Web 2.0

Labels
AJAX(112) App Studio(9) Apple(1) Application Builder(245) Application Factory(207) ASP.NET(95) ASP.NET 3.5(45) ASP.NET Code Generator(72) ASP.NET Membership(28) Azure(18) Barcode(2) Barcodes(3) BLOB(18) Business Rules(1) Business Rules/Logic(140) BYOD(13) Caching(2) Calendar(5) Charts(29) Cloud(14) Cloud On Time(2) Cloud On Time for Windows 7(2) Code Generator(54) Collaboration(11) command line(1) Conflict Detection(1) Content Management System(12) COT Tools for Excel(26) CRUD(1) Custom Actions(1) Data Aquarium Framework(122) Data Sheet(9) Data Sources(22) Database Lookups(50) Deployment(22) Designer(178) Device(1) DotNetNuke(12) EASE(20) Email(6) Features(101) Firebird(1) Form Builder(14) Globalization and Localization(6) How To(1) Hypermedia(2) Inline Editing(1) Installation(5) JavaScript(20) Kiosk(1) Low Code(3) Mac(1) Many-To-Many(4) Maps(6) Master/Detail(36) Microservices(4) Mobile(63) Mode Builder(3) Model Builder(3) MySQL(10) Native Apps(5) News(18) OAuth(9) OAuth Scopes(1) OAuth2(13) Offline(20) Offline Apps(4) Offline Sync(5) Oracle(11) PKCE(2) Postgre SQL(1) PostgreSQL(2) PWA(2) QR codes(2) Rapid Application Development(5) Reading Pane(2) Release Notes(184) Reports(48) REST(29) RESTful(29) RESTful Workshop(15) RFID tags(1) SaaS(7) Security(81) SharePoint(12) SPA(6) SQL Anywhere(3) SQL Server(26) SSO(1) Stored Procedure(4) Teamwork(15) Tips and Tricks(87) Tools for Excel(3) Touch UI(93) Transactions(5) Tutorials(183) Universal Windows Platform(3) User Interface(338) Video Tutorial(37) Web 2.0(100) Web App Generator(101) Web Application Generator(607) Web Form Builder(40) Web.Config(9) Workflow(28)
Archive
Blog
Web 2.0
Thursday, November 27, 2008PrintSubscribe
Instant Details for Lookup Fields

Data Aquarium Framework provides powerful data lookup capabilities. We have extended them one step further by offering instant details for lookup fields.

Navigate to http://dev.codeontime.com/demo/nwblob, select Products in the drop down in the left top corner and select any product. Notice that an arrow is displayed next to Product Name field. The view component has detected that Product Name is defined as a lookup field and displayed an instant details link.

image

Click on the arrow and a Details page for Manjimup Dried Apples product will be presented.

image

Notice that instant details arrows are also displayed next to Supplier Company Name field and Category Name field. Follow category name link and the next level of details is presented.

image

You can rename the category, change description or upload a new image. As soon as you save the changes or click on Close button you will returned back to the product instant details. Click Close button on products instant details and you are back on the page with the order details.

In just a few clicks you can jump straight to the details of the lookup data and make necessary adjustments or research. The same details preview is available when you jump to item details displayed in RSS data feeds of your ASP.NET web application.

Monday, September 29, 2008PrintSubscribe
DataViewExtender Events: selected and executed

Data Aquarium Framework includes a collection of JavaScript components that are rendering user interface in a web browser and are interacting with the server components of the framework. You can participate in the client-side life cycle by creating JavaScript event handlers that are responding to selected and executed events raised by Web.DataView component instances injected into the page by DataViewExtender server components.

Event selected is fired when a row is selected in the user interface. You can use get_selectedKey() method of Web.DataView component to find a primary key of a selected record.

Event executed is fired when a command has been executed. Event handler is provided with the result of execution on the server including auto-incremental primary key field values and error messages if any.

Let's explore these events by creating master-detail AJAX grid views that link Products to Suppliers in Northwind database.

Generate an Aquarium Express project with Code OnTime Generator from Northwind database and open this project in Visual Studio 2008 or Visual Web Developer 2008 Express Edition.

Add page Events.aspx to the root of the web site as shown in the sample below.

<%@ Page Language="C#" MasterPageFile="~/MasterPage.master" AutoEventWireup="true"
    CodeFile="Events.aspx.cs" Inherits="Events" Title="Events Demo" %>

<asp:Content ID="Content1" ContentPlaceHolderID="head" runat="Server">

    <script type="text/javascript">
function pageLoad() {
    var dataView = Web.DataView.find('SuppliersExtender');
    if (dataView) {
        dataView.add_selected(onSupplierSelected);
        dataView.add_executed(onSupplierExecuted);
    }
}

var justInserted = false;

function onSupplierSelected(sender) {
    if (justInserted) 
        justInserted = false;
    else
        updateProductsVisibility(sender.get_lastCommandName() != 'New');
}
function onSupplierExecuted(sender, args) {
    switch (sender._lastArgs.CommandName) {
        case 'Insert':
            updateProductsVisibility(true);
            justInserted = true;
            break;
        case 'Delete':
            updateProductsVisibility(false);
            break;
    }
}
function updateProductsVisibility(visible) {
    Sys.UI.DomElement.setVisible($get('ProductsPanel'), visible);
}
    </script>

</asp:Content>
<asp:Content ID="Content2" ContentPlaceHolderID="Header1Placeholder" runat="Server">
    Client-Side Events
</asp:Content>
<asp:Content ID="Content3" ContentPlaceHolderID="Header2Placeholder" runat="Server">
    Northwind
</asp:Content>
<asp:Content ID="Content4" ContentPlaceHolderID="BodyPlaceholder" runat="Server">
    <div id="Suppliers" runat="server" />
    <aquarium:DataViewExtender ID="SuppliersExtender" runat="server" 
        Controller="Suppliers" TargetControlID="Suppliers" PageSize="5"/>
    <br />
    <div id="ProductsPanel" style="display:none">
        <div id="Products" runat="server" />
        <aquarium:DataViewExtender ID="ProductsExtender" runat="server" 
            Controller="Products" TargetControlID="Products" PageSize="5"
            FilterFields="SupplierID" FilterSource="SuppliersExtender" />
    </div>
</asp:Content>

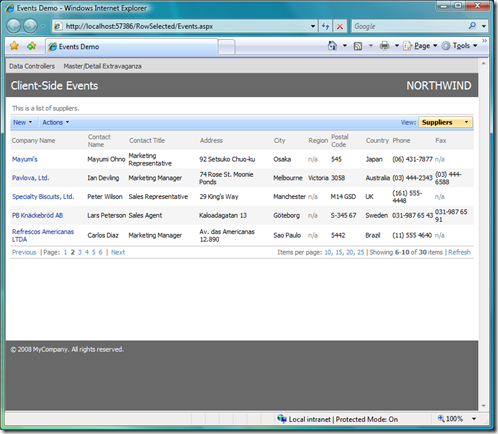
Open this page in a browser. You will see that products are not displayed under the suppliers grid.

image

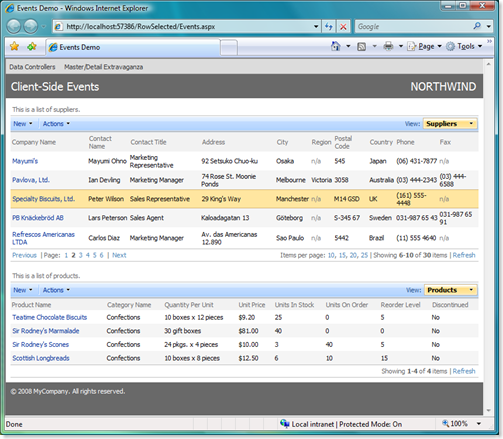
Click on any supplier row and the page will display a list of relevant products.  If you start adding a new supplier then the list of products will disappear. The list of products will show up again when you actually insert a supplier record. The list of products goes away when you delete a supplier.

image

How does this work?

Let's do a quick code walkthrough.

Element ProductsPanel is wrapped around the placeholder for Products. It doesn't matter if the DataViewExtender component is within the boundaries of the panel. Just make sure that the placeholder is hidden.

<div id="ProductsPanel" style="display:none">
    <div id="Products" runat="server" />
    <aquarium:DataViewExtender ID="ProductsExtender" runat="server" 
        Controller="Products" TargetControlID="Products" PageSize="5"
        FilterFields="SupplierID" FilterSource="SuppliersExtender" />
</div>

ASP.NET AJAX Extensions library automatically invokes JavaScript function pageLoad() when the runtime client components are instantiated and initialized. It works very much like Page_Load function in your server code, which is called when ASP.NET is ready to pass your a control over a page with all server components ready for use. Method Web.DataView.find will find an instance of JavaScript Web.DataView component that was injected into the page by SuppliersExtender server component. This is a convenient spot to assign event handlers of selected and executed events.

function pageLoad() {
    var dataView = Web.DataView.find('SuppliersExtender');
    if (dataView) {
        dataView.add_selected(onSupplierSelected);
        dataView.add_executed(onSupplierExecuted);
    }
}

Function onSupplierSelected will be called whenever a supplier record is selected by a user. This method is invoking updateProductsVisibility function and passes true as a parameter if the last executed action command is not New. We are also making sure that visibility of the products grid is not altered if we just have executed an insertion of a new supplier.

var justInserted = false;

function onSupplierSelected(sender) {
    if (justInserted) 
        justInserted = false;
    else
        updateProductsVisibility(sender.get_lastCommandName() != 'New');
}

Actions that cause an insertion or a deletion of a supplier will result in product details being displayed or hidden accordingly.

function onSupplierExecuted(sender, args) {
    switch (sender._lastArgs.CommandName) {
        case 'Insert':
            updateProductsVisibility(true);
            justInserted = true;
            break;
        case 'Delete':
            updateProductsVisibility(false);
            break;
    }
}

The actual update of products grid visibility is very simple. We are using standard JavaScript components of ASP.NET AJAX Extensions library to hide DOM element with ProductsPanel identifier.

function updateProductsVisibility(visible) {
    Sys.UI.DomElement.setVisible($get('ProductsPanel'), visible);
}

You can enhance this code to suit your own needs by interacting with div elements on your page, which will typically result in hiding and showing of arbitrary page fragments to create less cluttered and more intuitive user interface presentation in your AJAX ASP.NET applications created with Code OnTime Generator.

Sunday, September 21, 2008PrintSubscribe
Header and Footer Text in Form Views

Custom headers and footers can boost ease of use of your applications created with Data Aquarium Framework.  Take a look at the following screen shot.

image

Data field Unit Price features custom header and footer. Here is how we have defined this view in ~/Controllers/Products.xml of our sample application.

<view id="editForm1" type="Form" commandId="command1" label="Review Products">
  <headerText>Please review products information below. 
    Click Edit to change this record, click Delete to delete the record, 
    or click Cancel/Close to return back.</headerText>
  <categories>
    <category headerText="Products">
      <description>These are the fields of the products record 
        that can be edited.</description>
      <dataFields>
        <dataField fieldName="ProductName" columns="40" />
        <dataField fieldName="SupplierID" aliasFieldName="SupplierCompanyName" />
        <dataField fieldName="CategoryID" aliasFieldName="CategoryCategoryName" />
        <dataField fieldName="QuantityPerUnit" columns="20" />
        <dataField fieldName="UnitPrice" dataFormatString="c" columns="15">
          <headerText>Price of Unit:</headerText>
          <footerText>
            <![CDATA[ 
            <div style="color:navy">
            Enter price of unit in USD. Make sure to consult catalog of products 
            sold by our competitors at
            <a href="http://www.amazon.com" target="_blank">amazon.com</a>
            </div>]]>
          </footerText>
        </dataField>
        <dataField fieldName="UnitsInStock" columns="15" />
        <dataField fieldName="UnitsOnOrder" columns="15" />
        <dataField fieldName="ReorderLevel" columns="15" />
        <dataField fieldName="Discontinued" />
      </dataFields>
    </category>
  </categories>
</view>

HeaderText is displayed above the field value while the FooterText is displayed just under the field value. By default the field header is inherited from the label attribute of the base field.

You can break down the fields in the standard views in a few categories to further improve the form presentation.

Header and footer text will also automatically display in a custom form. Define the following markup in your web form that displays products.

<aquarium:DataViewExtender ID="ProductsExtender" runat="server" 
    Controller="Products" TargetControlID="ProductList" />
<div id="Products_editForm1" style="display: none">
    {ProductName}<br />
    {SupplierID}<br />
    {CategoryID}<br />
    {UnitPrice}
</div>

This simple markup will alter the form view presentation shown in the screen shot above to look like the one below.

image

Custom form templates allow ad hoc form view presentation when standard layout does not provide enough flexibility.