Watch Video Tutorials

Learn to build apps that work online and offline.

Learn to get started with Code On Time app generator by following along with the training videos below.

Buiding Order Entry Form with support for Barcodes, QR codes, and RFID tags

Learn to create the Order Entry Form that works offline and online. The form will handle barcodes, QR codes, and RFID tags. The tutorial explains how to calculate the default values, extended price, and order total.

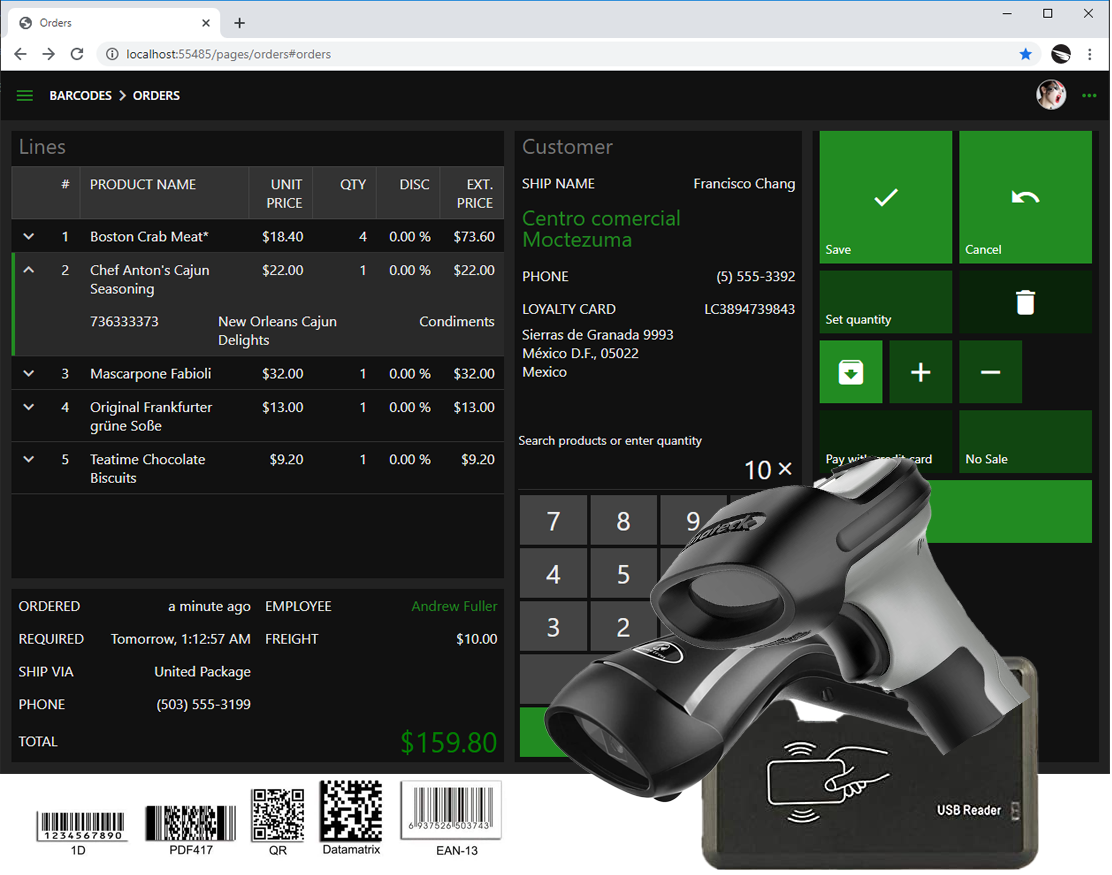
We start with the live demo of the app that will be created in this tutorial. Next we proceed to create the Order Entry Form shown in the demo and make it work in online and offline modes. The next iteration of the app is using UI Automation to implement the barcode processing for Product inventory, QR-code processing for Customer Loyalty Cards, RFID tags to handle Employee Access Cards. We bind it all together for Hands-Free Order Entry. The final part of the tutorial concentrates on creating the Kiosk-style presentation for the Order Entry Form.

Part 1 - Demo (30 minutes)

03:20 - Introduction
07:18 - Barcodes and Product Inventory
09:28 - QR codes and Customer Loyalty Cards
11:05 - RFID Access Cards and Employees
13:02 - Entering order line items with the barcode scanner
15:40 - Linking loyalty cards with the QR code scanner
16:51 - Linking employee to the order with the RFID reader
20:36 - Entering the lines items in “inventory” mode
24:38 - Kiosk presentation of Order Entry Form

Part 2 - Building Order Entry Form (1 hour 42 minutes)

0:32:49 - Introduction
0:33:16 - Database Diagram of Order Entry Form
0:35:58 - Configuring Sample Database
0:40:20 - Creating data models for Orders, Customers, Employees, and Shippers
0:48:52 - Creating data models for Order Details, Products, Categories, and Suppliers
0:54:36 - Modifying Menu
0:55:35 - Linking Order and Order Details
1:06:20 - Calculating default values with SQL business rules
1:09:08 - Calculating default values with JavaScript business rules
1:15:25 - Copying the Unit Price
1:18:24 - Calculating Extended Price with JavaScript
1:32:23 - Copying the shipping information from the Customer to the Order
1:37:14 - Calculating the Order Total
2:00:32 - Taking Orders in offline mode
2:12:25 - Syncing offline orders with the “online” database

Part 3 - Barcode Input and UI Automation (3 hours)

2:15:03 - Enabling the barcode input
2:26:45 - Simulating scanning of a barcode
2:33:20 - Low-level barcode processing
2:40:56 - Introducing UI Automation
2:42:33 - Integrating barcodes in the Product Inventory
3:20:09 - Integrating barcodes and QR-codes to handle Customer  Loyalty Cards
3:35:46 - Integrating RFID Access Cards to identify the Employees
3:46:55 - Using Data Queries during UI Automation
3:54:45 - Implementing Hands-Free Order Entry
5:08:22 - Taking orders in offline mode with barcodes, QR codes, and RFID tags

Part 4 - Kiosk UI (2 hours)

5:14:33 - Creating a Kiosk-style Order Entry presentation
6:43:35 - Making Order Entry Kiosk responsive
7:14:26 - Taking orders in the offline Kiosk

The source code produced in the tutorial is available at https://codeontime.com/blog/2020/05/hello-barcodes-sample-code.

Building a ToDo App

Learn rapid application of universal business apps. We will show you how to build a ToDo app that works on desktop computers, phones, and tablets. In the process you will learn how to customize forms and pages, create business rules and calculated fields, restrict access based on user identity, integrate maps and charts, add many-to-many fields, modal forms, add lookups, and brand your app.


Episode 1: Creating An App

In this episode, we will learn what it takes to build a ToDo app.

We will create a database and add a "Tasks" table. We will then create the app and explore the features. Finally, we will add an icon to the Tasks forms using the Project Designer.

Watch

Episode 2: Business Rules

In this episode, we will add some business rules to our ToDo app.

We will configure default values for the "Date" and "Created" fields. Then, we'll hide the "Created" field from the create form, and prevent the user from modifying the field for existing records. Finally, we will add a custom action that will mark tasks as completed. The "Completed" field will be hidden from the create form, and prevent editing in the edit form. Finally, we will create two views, "Active Tasks" and "All Tasks".

Watch

Episode 3: Adding a Lookup

In this episode, we will add a "Categories" lookup to our ToDo app, allowing us to categorize our tasks.

We will add the "Categories" table and add a foreign key to "Tasks" table, and update the Tasks model with the new foreign key. Then, we will explore the features of lookups in apps created with Code On Time.

Watch

Episode 4: Adding Maps

In this episode, we will add geographical info to tasks in our ToDo app.

We will create a "Locations" table in the database, and create the model. A location lookup will be added to tasks. We will then add some locations, and assign these locations to tasks using the map.

Watch

Episode 5: Adding Master-Detail Relationships

In this episode, we will learn how to associate any number of attachments to a task in our ToDo app.

We will create the "Attachments" table, create a model, and add a data view field on the Tasks form. We will then upload several files to a task.

Watch

Episode 6: Restricting User Access To Data

In this episode, we will assign owners to tasks, as well as keep track of the task creator in our ToDo app.

The fields "Creator" and "Owner" will be added to the Tasks table. The corresponding model will be updated to include those fields. Users and Roles will be added to the app using ASP.NET Membership. The two fields will be marked as "User Name" lookups. Business rules will be added to set the current user as the creator and owner by default. Filters will be added to ensure that users can only see tasks created by or owned by them.

Watch

Episode 7: Calculated Fields

In this episode, we will add expenses to tasks and perform some calculations in our ToDo app.

First, we will add the Expenses table and link it to tasks. We will add "Total Price" calculated field. Expenses data view field will be added on the Tasks form. We will add business rules to calculate the Total Price field, and display some aggregates on the Tasks form.

Watch

Episode 8: Many-To-Many Fields

This episode will teach you to configure a checkbox list and basket of options for our ToDo App. It will be based on an external junction (many-to-many) table.

First, we will add "Tags" and "TaskTags" tables and models. Then, we will add a "Tags" field into the tasks form. This field will first be configured as a checkbox list. We will add several records in-line. Then, we will convert the field to a basket style drop down list. Finally, we will remove the now redundant Categories table.

Watch

Episode 9: Status Bar

This episode explains how to set up a Status Bar to communicate the state of data to the application users.

First, we will add a static lookup field "Status" to the "Tasks" table. Then, we will change the business rules to automatically modify the "Status" value. Finally, we will enter a status bar definition for each value of the Status field to visually communicate the state of tasks to the users.

Watch

Episode 10: Forms

Learn rapid development of responsive forms that work on any device with any screen size. Master the form design with field flow, tabs, multi-column categories, and custom layouts. Start by changing a flow of fields after a brief introduction of responsive forms. Group in categories, configure categories to display as tabs. Configure a modal popup. Try your hand with custom form layouts.

Watch

Episode 11: Navigation

Organize navigation between the single page apps of your universal business application with Quick Launch icons and menu. Drag and drop pages in the navigation hierarchy, set a few icons to populate the Quick Launch bar, and move the menu from the toolbar to the sidebar.

Watch

Episode 12: Setting Up a Cloud

Our app is ready for production. Learn how to set up Microsoft Azure Cloud for publishing from the app generator. This episode explains how to sign up for an account and provides step-by-step instruction for Azure Active Directory configuration.

Watch

Episode 13: Cloud Database

An application deployed to Microsoft Azure is typically configured as Web App. The deployment infrastructure of Web App includes an Internet-facing App Service and Database Server. In this episode we will set up a database server and transfer development database schema to the cloud database.

Watch

Episode 14: Cloud Deployment

Learn to deploy your app as an "app service" to service both web and mobile users. App Service is an Internet facing server that reads and writes data by making SQL queries to the database engine in the cloud. We will set up our app service in the "Standard" tier with SSL, multiple deployment slots, and on-demand performance with auto scaling.

Watch

Episode 15: From Staging To Production

Deploy changed app to Staging slot for a live preview. Instantly swap Staging and Production versions of application directly from the app generator.

Watch

Episode 17: Externalizing BLOBs

Learn to store binary data outside of the database. Large photos and documents can run up the database size quickly. Such objects known as BLOBs (Large Binary Objects) are frequently stored in the external file system or attached storage. We will show you how to set up external storage of attachments in the file system and Microsoft Azure.

Watch