Aquarium Express and Data Aquarium Framework offer excellent support for master-detail pages. See a live demo of three level master-detail page.
Master-detail support has been further extended with the latest release. Now you can link master and detail DataViewExtender components by any matching field.
Previously a detail DataViewExtender was expected to specify filter fields that are matched to the primary key fields of the master. The updated version will also try to set a link to primary key fields by name. If a primary key field has not been matched to a field specified in FilterFields property of the detail DataViewExtender then the entire set of fields is being searched. This allows to create additional master-detail AJAX views that can serve as informational panels to any selected records as long as the field names of master-detail link are matched.
Another enhancement in master-detail support simplifies cross-container links that can see "through" the templates. Previous releases of the framework were relying on $find method to locate a client master component specified by property FilterSource. It works great if all of your components are placed in the same naming container. This isn't so when a DataViewExtender is placed in a template. The new enhancement allows master-detail links between components that are not in the same naming container.
Consider the following example, which is designed to work with Aquarium Express or Data Aquarium Framework project created from Northwind database.
In a new web form based on MasterPage.master enter the following markup.
<%@ Page Language="C#" MasterPageFile="~/MasterPage.master" AutoEventWireup="true"
    CodeFile="InfoPanel.aspx.cs" Inherits="InfoPanel" Title="Untitled Page" %>

<asp:Content ID="Content1" ContentPlaceHolderID="head" runat="Server">
</asp:Content>
<asp:Content ID="Content2" ContentPlaceHolderID="Header1Placeholder" runat="Server">
    Info Panel Demo
</asp:Content>
<asp:Content ID="Content3" ContentPlaceHolderID="Header2Placeholder" runat="Server">
    Northwind
</asp:Content>
<asp:Content ID="Content4" ContentPlaceHolderID="BodyPlaceholder" runat="Server">
    <act:TabContainer ID="OrderManager" runat="server">
        <act:TabPanel ID="CustomersTab" runat="server" HeaderText="Customers">
            <ContentTemplate>
                <div id="CustomerList" runat="server" />
                <aquarium:DataViewExtender ID="CustomersExtender" runat="server"
                    Controller="Customers" TargetControlID="CustomerList" />
            </ContentTemplate>
        </act:TabPanel>
        <act:TabPanel ID="OrdersTab" runat="server" HeaderText="Orders">
            <ContentTemplate>
                <div id="OrderList" runat="server" />
                <aquarium:DataViewExtender ID="OrdersExtender" runat="server"
                    Controller="Orders" FilterFields="CustomerID"
                    FilterSource="CustomersExtender" TargetControlID="OrderList" />
            </ContentTemplate>
        </act:TabPanel>
        <act:TabPanel ID="DetailsTab" runat="server" HeaderText="Details">
            <ContentTemplate>
                <div id="DetailsList" runat="server" />
                <aquarium:DataViewExtender ID="DetailsExtender" runat="server"
                    Controller="OrderDetails" FilterFields="OrderID"
                    FilterSource="OrdersExtender" TargetControlID="DetailsList" />
            </ContentTemplate>
        </act:TabPanel>
    </act:TabContainer>
</asp:Content>
This markup defines a TabContainer from Ajax Control Toolkit with three level arrangement of Customers, Orders, and Order Details, linked in a master-detail relationship. DataViewExtender components and corresponding placeholder div elements are placed on an individual tab of the container
Run this page to see the "cross container" master-detail links in action. This was not possible with the previous releases of the framework.

This form will benefit if we display a customer information summary somewhere on the page. The natural location is the top of the screen but that may differ from one application to another.
Open ~/Controllers/Customers.xml data controller descriptor and create an exact copy of editForm1. Name this copy infoForm1. We need this extra view since we don't want editForm1 of Customers controller on Customers tab to be affected when we finish customization.
Insert the following div element above the TabContainer.
<div id="CustomerInfo" runat="server" />
Append this DataViewExtender right after the TabContainer.
    <aquarium:DataViewExtender ID="CustomerInfoExtender" runat="server"
        Controller="Customers" View="infoForm1" FilterFields="CustomerID"
        FilterSource="CustomersExtender" TargetControlID="CustomerInfo" />
The location of CustomerInfo div is irrelevant but the detail extender component must be defined below the master component specified by FilterSource property when a component container tree is created by ASP.NET page parser. Run this page and make sure that whenever you select a customer record on Customer tab the corresponding CustomerInfo div at the top is refreshed with the matching record.
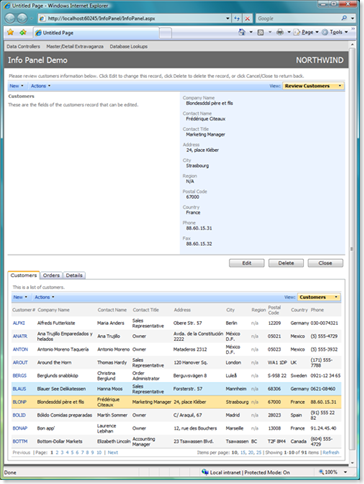
As you can see the top of the page is completely occupied by editable customer view, which is not what we want. Let's change this view to display just a few of the fields and hide the view description, action bar and action buttons.
We accomplish this by adding class attribute to CustomerInfo div. We also define a custom form template Customers_infoForm1. Then we insert a few CSS definitions in Content1 placeholder, which will end up embedded in the head element of the HTML form. All this techniques will alter the appearance of the page and are described in details in a post dedicated to custom form templates.
Here is a complete text of the web form.
<%@ Page Language="C#" MasterPageFile="~/MasterPage.master" AutoEventWireup="true"
    CodeFile="InfoPanel.aspx.cs" Inherits="InfoPanel" Title="Untitled Page" %>

<asp:Content ID="Content1" ContentPlaceHolderID="head" runat="Server">
    <style type="text/css">
        .CustomerInfo
        {
            padding: 0px;
            margin-bottom: 8px;
            background-color: White;
        }
        .CustomerInfo table.DataView tr.CategoryRow td.Fields
        {
            border: solid 1px silver;
            background-color: #E4F3E4;
        }
        .CustomerInfo .HeaderTextRow, .CustomerInfo .ActionRow,
        .CustomerInfo .ActionButtonsRow
        {
            display: none;
        }
    </style>
</asp:Content>
<asp:Content ID="Content2" ContentPlaceHolderID="Header1Placeholder" runat="Server">
    Info Panel Demo
</asp:Content>
<asp:Content ID="Content3" ContentPlaceHolderID="Header2Placeholder" runat="Server">
    Northwind
</asp:Content>
<asp:Content ID="Content4" ContentPlaceHolderID="BodyPlaceholder" runat="Server">
    <div id="CustomerInfo" runat="server" class="CustomerInfo" />
    <act:TabContainer ID="OrderManager" runat="server">
        <act:TabPanel ID="CustomersTab" runat="server" HeaderText="Customers">
            <ContentTemplate>
                <div id="CustomerList" runat="server" />
                <aquarium:DataViewExtender ID="CustomersExtender" runat="server"
                    Controller="Customers" TargetControlID="CustomerList" />
            </ContentTemplate>
        </act:TabPanel>
        <act:TabPanel ID="OrdersTab" runat="server" HeaderText="Orders">
            <ContentTemplate>
                <div id="OrderList" runat="server" />
                <aquarium:DataViewExtender ID="OrdersExtender" runat="server"
                    Controller="Orders" FilterFields="CustomerID"
                    FilterSource="CustomersExtender" TargetControlID="OrderList" />
            </ContentTemplate>
        </act:TabPanel>
        <act:TabPanel ID="DetailsTab" runat="server" HeaderText="Details">
            <ContentTemplate>
                <div id="DetailsList" runat="server" />
                <aquarium:DataViewExtender ID="DetailsExtender" runat="server"
                    Controller="OrderDetails" FilterFields="OrderID"
                    FilterSource="OrdersExtender" TargetControlID="DetailsList" />
            </ContentTemplate>
        </act:TabPanel>
    </act:TabContainer>
    <aquarium:DataViewExtender ID="CustomerInfoExtender" runat="server"
        Controller="Customers" View="infoForm1" FilterFields="CustomerID"
        FilterSource="CustomersExtender" TargetControlID="CustomerInfo" />
    <div id="Customers_infoForm1" style="display: none">
        <table style="width: 100%">
            <tr>
                <td>
                    {CustomerID}
                </td>
                <td style="font-weight: bold;">
                    {CompanyName}
                </td>
                <td>
                    {ContactName}
                </td>
                <td>
                    {ContactTitle}
                </td>
                <td>
                    {Phone}
                </td>
            </tr>
        </table>
    </div>
</asp:Content>
Here is an example of this form running in a web browser when user has selected a customer record and switched to Orders tab.
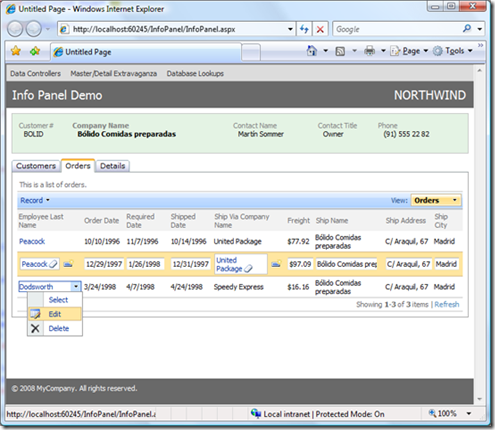
The green information panel at the top is automatically refreshed if you select a customer. The detail extender component is linked to a primary key field of a master record.
You can also link the same CustomerInfoExtender to a matching field of OrdersExtender component. The data controller of this component has CustomerID field, which is a foreign key that points to Customers table. The new feature of Data Aquarium Framework will kick in to make such link work. Just change CustomerInfoExtender.FilterSource to OrdersExtender. The behavior of the screen will change. You have to select an order to get the green panel at the of the screen to refresh itself.
In a more realistic example you would like to have Employee information panel connected to OrdersExtender to provide details about employee who has placed the order. We leave this task up to you.