Blog: Posts from September, 2008

Labels
AJAX(112) App Studio(7) Apple(1) Application Builder(245) Application Factory(207) ASP.NET(95) ASP.NET 3.5(45) ASP.NET Code Generator(72) ASP.NET Membership(28) Azure(18) Barcode(2) Barcodes(3) BLOB(18) Business Rules(1) Business Rules/Logic(140) BYOD(13) Caching(2) Calendar(5) Charts(29) Cloud(14) Cloud On Time(2) Cloud On Time for Windows 7(2) Code Generator(54) Collaboration(11) command line(1) Conflict Detection(1) Content Management System(12) COT Tools for Excel(26) CRUD(1) Custom Actions(1) Data Aquarium Framework(122) Data Sheet(9) Data Sources(22) Database Lookups(50) Deployment(22) Designer(177) Device(1) DotNetNuke(12) EASE(20) Email(6) Features(101) Firebird(1) Form Builder(14) Globalization and Localization(6) How To(1) Hypermedia(2) Inline Editing(1) Installation(5) JavaScript(20) Kiosk(1) Low Code(3) Mac(1) Many-To-Many(4) Maps(6) Master/Detail(36) Microservices(4) Mobile(63) Mode Builder(3) Model Builder(3) MySQL(10) Native Apps(5) News(18) OAuth(8) OAuth Scopes(1) OAuth2(11) Offline(20) Offline Apps(4) Offline Sync(5) Oracle(10) PKCE(2) PostgreSQL(2) PWA(2) QR codes(2) Rapid Application Development(5) Reading Pane(2) Release Notes(180) Reports(48) REST(29) RESTful(29) RESTful Workshop(15) RFID tags(1) SaaS(7) Security(80) SharePoint(12) SPA(6) SQL Anywhere(3) SQL Server(26) SSO(1) Stored Procedure(4) Teamwork(15) Tips and Tricks(87) Tools for Excel(2) Touch UI(93) Transactions(5) Tutorials(183) Universal Windows Platform(3) User Interface(338) Video Tutorial(37) Web 2.0(100) Web App Generator(101) Web Application Generator(607) Web Form Builder(40) Web.Config(9) Workflow(28)
Archive
Blog
Posts from September, 2008
Sunday, September 21, 2008PrintSubscribe
Building a Better UI With Data Aquarium Framework

Data Aquarium Framework has introduced a new feature that allows developers and designers to affect presentation of data fields in grid and form views.

Generated applications are using a default theme for a consistent and efficient presentation. There will situations when you need to customize some screens without affecting the entire application. Consider the following illustration.

image

By default all columns values in the grid view are aligned horizontally to the left. You might want to have Unit Price column values aligned to the right and Discontinued flag to be centered.

Add a CSS stylesheet with default name to ~/App_Themes/MyCompany folder and enter the following text in its body.

table.DataView tr.Row td.UnitPrice,
table.DataView tr.AlternatingRow td.UnitPrice
{
    text-align: right;
    padding-right: 4px;
    background-color:Yellow;
    color:red;
}

table.DataView tr.HeaderRow th.UnitPrice a
{
    color:Blue;
}

table.DataView tr.Row td.Discontinued, table.DataView tr.AlternatingRow td.Discontinued
{
    text-align: center;
    background-color: #CCFFCC;
}

The first CSS rule definition will ensure that Unit Price column values are displayed on a yellow background, aligned to the right with a four pixel padding, and red font color.

The second rule will make a link in the header of the column Unit Price to be of blue color.

The third rule centers text and changes the background color of the Discontinued column.

image

How does it work?

Presentation of the grid is rendered in a client browser by Web.DataView component that can be found in  ~/Scripts/DataView.js. The presentation rendering code adds a field name to the list of classes on corresponding table cells of the view. Your custom CSS stylesheet can provide rules to take advantage of these classes.

It is important to name the stylesheet in such a way that is will be the last stylesheet of your application theme.

Here is a snippet of HTML generated for the sample page if you view the page source.

<head>
    .............
    <link href="App_Themes/MyCompany/Aquarium.css" type="text/css" 
        rel="stylesheet" />
    <link href="App_Themes/MyCompany/StyleSheet.css" type="text/css" 
        rel="stylesheet" />
    .............
</head>

Our stylesheet with default name Stylesheet.css follows the standard style sheet that comes with Data Aquarium Framework. These ensures that our CSS rules are going to override or extend those defined in the standard stylesheet.

Similar features are available in form views. If you need help in figuring out correct rules then please post a comment on this blog or drop us a line at http://www.codeontime.com/contactus.aspx.

Saturday, September 20, 2008PrintSubscribe
Displaying Detail Information in an Arbitrary Part of The Page Based on a Field in a Selected Master Record

Aquarium Express and Data Aquarium Framework offer excellent support for master-detail pages. See a live demo of three level master-detail page.

Master-detail support has been further extended with the latest release. Now you can link master and detail DataViewExtender components by any matching field.

Previously a detail DataViewExtender was expected to specify filter fields that are matched to the primary key fields of the master. The updated version will also try to set a link to primary key fields by name. If a primary key field has not been matched to a field specified in FilterFields property of the detail DataViewExtender then the entire set of fields is being searched. This allows to create additional master-detail AJAX views that can serve as informational panels to any selected records as long as the field names of master-detail link are matched.

Another enhancement in master-detail support simplifies cross-container links that can see "through" the templates. Previous releases of the framework were relying on $find method to locate a client master component specified by property FilterSource. It works great if all of your components are placed in the same naming container. This isn't so when a DataViewExtender is placed in a template. The new enhancement allows master-detail links between components that are not in the same naming container.

Consider the following example, which is designed to work with Aquarium Express or Data Aquarium Framework project created from Northwind database.

In a new web form based on MasterPage.master enter the following markup.

<%@ Page Language="C#" MasterPageFile="~/MasterPage.master" AutoEventWireup="true"
    CodeFile="InfoPanel.aspx.cs" Inherits="InfoPanel" Title="Untitled Page" %>

<asp:Content ID="Content1" ContentPlaceHolderID="head" runat="Server">
</asp:Content>
<asp:Content ID="Content2" ContentPlaceHolderID="Header1Placeholder" runat="Server">
    Info Panel Demo
</asp:Content>
<asp:Content ID="Content3" ContentPlaceHolderID="Header2Placeholder" runat="Server">
    Northwind
</asp:Content>
<asp:Content ID="Content4" ContentPlaceHolderID="BodyPlaceholder" runat="Server">
    <act:TabContainer ID="OrderManager" runat="server">
        <act:TabPanel ID="CustomersTab" runat="server" HeaderText="Customers">
            <ContentTemplate>
                <div id="CustomerList" runat="server" />
                <aquarium:DataViewExtender ID="CustomersExtender" runat="server" 
                    Controller="Customers" TargetControlID="CustomerList" />
            </ContentTemplate>
        </act:TabPanel>
        <act:TabPanel ID="OrdersTab" runat="server" HeaderText="Orders">
            <ContentTemplate>
                <div id="OrderList" runat="server" />
                <aquarium:DataViewExtender ID="OrdersExtender" runat="server" 
                    Controller="Orders" FilterFields="CustomerID" 
                    FilterSource="CustomersExtender" TargetControlID="OrderList" />
            </ContentTemplate>
        </act:TabPanel>
        <act:TabPanel ID="DetailsTab" runat="server" HeaderText="Details">
            <ContentTemplate>
                <div id="DetailsList" runat="server" />
                <aquarium:DataViewExtender ID="DetailsExtender" runat="server" 
                    Controller="OrderDetails" FilterFields="OrderID" 
                    FilterSource="OrdersExtender" TargetControlID="DetailsList" />
            </ContentTemplate>
        </act:TabPanel>
    </act:TabContainer>
</asp:Content>

This markup defines a TabContainer from Ajax Control Toolkit with three level arrangement of Customers, Orders, and Order Details, linked in a master-detail relationship. DataViewExtender components and corresponding placeholder div elements are placed on an individual tab of the container

Run this page to see the "cross container" master-detail links in action. This was not possible with the previous releases of the framework.

image 

This form will benefit if we display a customer information summary somewhere on the page. The natural location is the top of the screen but that may differ from one application to another.

Open ~/Controllers/Customers.xml data controller descriptor and create an exact copy of editForm1. Name this copy infoForm1. We need this extra view since we don't want editForm1 of Customers controller on Customers tab to be affected when we finish customization.

Insert the following div element above the TabContainer.

    <div id="CustomerInfo" runat="server" />

Append this DataViewExtender right after the TabContainer.

    <aquarium:DataViewExtender ID="CustomerInfoExtender" runat="server" 
        Controller="Customers" View="infoForm1" FilterFields="CustomerID" 
        FilterSource="CustomersExtender" TargetControlID="CustomerInfo" />

The location of CustomerInfo div is irrelevant but the detail extender component must be defined below the master component specified by FilterSource property when a component container tree is created by ASP.NET page parser. Run this page and make sure that whenever you select a customer record on Customer tab the corresponding CustomerInfo div at the top is refreshed with the matching record.

image

As you can see the top of the page is completely occupied by editable customer view, which is not what we want. Let's change this view to display just a few of the fields and hide the view description, action bar and action buttons.

We accomplish this by adding class attribute to CustomerInfo div. We also define a custom form template Customers_infoForm1. Then we insert a few CSS definitions in Content1 placeholder, which will end up embedded in the head element of the HTML form. All this techniques will alter the appearance of the page and are described in details in a post dedicated to custom form templates.

Here is a complete text of the web form.

<%@ Page Language="C#" MasterPageFile="~/MasterPage.master" AutoEventWireup="true"
    CodeFile="InfoPanel.aspx.cs" Inherits="InfoPanel" Title="Untitled Page" %>

<asp:Content ID="Content1" ContentPlaceHolderID="head" runat="Server">
    <style type="text/css">
        .CustomerInfo
        {
            padding: 0px;
            margin-bottom: 8px;
            background-color: White;
        }
        .CustomerInfo table.DataView tr.CategoryRow td.Fields
        {
            border: solid 1px silver;
            background-color: #E4F3E4;
        }
        .CustomerInfo .HeaderTextRow, .CustomerInfo .ActionRow, 
        .CustomerInfo .ActionButtonsRow
        {
            display: none;
        }
    </style>
</asp:Content>
<asp:Content ID="Content2" ContentPlaceHolderID="Header1Placeholder" runat="Server">
    Info Panel Demo
</asp:Content>
<asp:Content ID="Content3" ContentPlaceHolderID="Header2Placeholder" runat="Server">
    Northwind
</asp:Content>
<asp:Content ID="Content4" ContentPlaceHolderID="BodyPlaceholder" runat="Server">
    <div id="CustomerInfo" runat="server" class="CustomerInfo" />
    <act:TabContainer ID="OrderManager" runat="server">
        <act:TabPanel ID="CustomersTab" runat="server" HeaderText="Customers">
            <ContentTemplate>
                <div id="CustomerList" runat="server" />
                <aquarium:DataViewExtender ID="CustomersExtender" runat="server" 
                    Controller="Customers" TargetControlID="CustomerList" />
            </ContentTemplate>
        </act:TabPanel>
        <act:TabPanel ID="OrdersTab" runat="server" HeaderText="Orders">
            <ContentTemplate>
                <div id="OrderList" runat="server" />
                <aquarium:DataViewExtender ID="OrdersExtender" runat="server" 
                    Controller="Orders" FilterFields="CustomerID" 
                    FilterSource="CustomersExtender" TargetControlID="OrderList" />
            </ContentTemplate>
        </act:TabPanel>
        <act:TabPanel ID="DetailsTab" runat="server" HeaderText="Details">
            <ContentTemplate>
                <div id="DetailsList" runat="server" />
                <aquarium:DataViewExtender ID="DetailsExtender" runat="server" 
                    Controller="OrderDetails" FilterFields="OrderID" 
                    FilterSource="OrdersExtender" TargetControlID="DetailsList" />
            </ContentTemplate>
        </act:TabPanel>
    </act:TabContainer>
    <aquarium:DataViewExtender ID="CustomerInfoExtender" runat="server" 
        Controller="Customers" View="infoForm1" FilterFields="CustomerID" 
        FilterSource="CustomersExtender" TargetControlID="CustomerInfo" />
    <div id="Customers_infoForm1" style="display: none">
        <table style="width: 100%">
            <tr>
                <td>
                    {CustomerID}
                </td>
                <td style="font-weight: bold;">
                    {CompanyName}
                </td>
                <td>
                    {ContactName}
                </td>
                <td>
                    {ContactTitle}
                </td>
                <td>
                    {Phone}
                </td>
            </tr>
        </table>
    </div>
</asp:Content>

Here is an example of this form running in a web browser when user has selected a customer record and switched to Orders tab.

image

The green information panel at the top is automatically refreshed if you select a customer. The detail extender component is linked to a primary key field of a master record.

You can also link the same CustomerInfoExtender to a matching field of OrdersExtender component. The data controller of this component has CustomerID field, which is  a foreign key that points to Customers table. The new feature of Data Aquarium Framework will kick in to make such link work. Just change CustomerInfoExtender.FilterSource to OrdersExtender. The behavior of the screen will change. You have to select an order to get the green panel at the of the screen to refresh itself.

In a more realistic example you would like to have Employee information panel connected to OrdersExtender to provide details about employee who has placed the order. We leave this task up to you.

Thursday, September 18, 2008PrintSubscribe
Using Code OnTime Generator: Getting Started

Code OnTime Generator is a general purpose code generator for Microsoft.NET.

Most code generators on the market are based on a proprietary template technology modeled after ASP.NET. A typical code generator template is a code file written in a target programming language with embedded markup tags that contain code generator internal programming language statements and expressions. These statements are manipulating input parameters and data files to produce the dynamic portion of the template text when code generator processes the template.

This model is well understood and quite popular.

There are few weaknesses of this approach to code generation:

  1. You are forced to use procedural approach to generate your programs. Every single aspect of the output program text must be explicitly defined in your template, which creates enormous complexity.
  2. One template file supports only one programming language. If you do want to produce your code in more than one programming language then you have to create two separate templates, which usually turn out to be a maintenance nightmare.
  3. It is very difficult to produce a well formatted output. If you ever tried to view HTML code generated by ASP.NET web forms then you would probably agree that it does not look pretty. Luckily we have amazing web browsers to sift through the mess and produce a pretty picture for us. You have to make sense of the mess and be a "browser" when you deal with program text produced by code generator. The code may work great but is usually a pain to read and work with.
  4. Proprietary data models used by code generator projects are difficult to alter. You will do well if you access the model via standard objects built into code generator but any customization must be done by design tools that come with code generator.
  5. Design environment of a typical code generator is inflexible and may or may not reflect your expectations. You are at the mercy of the vendor when the time comes to ask for improvements.

Code OnTime Generator eliminates these limitations.

Industry standard data presentation language XML is the data model language of code generation projects. Industry standard XPath and XSLT languages are natural companions to this data model language. Both, XPath and XSLT bring flexibility, power, and a bit of a magic in code generation process. Java Script and DHTML (also referred to as AJAX) are quite popular in a development community and are proving every day that there are very few things that you cannot do when you are building modern user interfaces with their help. Both technologies are in the foundation of the code generator design environment.

Here is how these technologies stack up against limitations that are found in a typical code generator.

Declarative Programming Model

XSLT is the best template technology out there designed specifically to take advantage of the flexibility built into XML. If you describe your project code generation requirements as an XML file then there is not a single piece of such specification, which is not a few key stsokes away from the template developer writing XPath expressions. XPath is to XML what SQL is to databases. Learn to say what you want and XPath engine will get it for you.

Compare that with the laborious procedural statements and expressions in a typical code generator that you have to meticulously craft to get the data that you want. Imagine that you are writing an application that works with the database. What if instead of saying select CustomerName from Customers where CustomerID = 'ABC' you are forced to write code that opens a database file, opens the primary key index, creates a cursor, moves the cursor until your reach the desired record, declares a buffer to read the data out, and only then you can start using the result. Sounds like a nightmare. Typical code generator templates are going through similar pains when code based on any complex data model is to be generated.

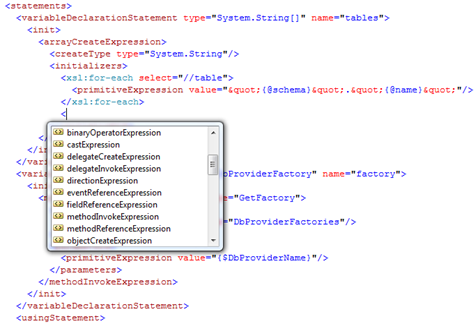
Instead of writing code in a specific target language you declare the XML constructs that your program must be built from. Consider the following declaration.

<variableDeclarationStatement type="DbProviderFactory" name="factory">
  <init>
    <methodInvokeExpression methodName="GetFactory">
      <target>
        <typeReferenceExpression type="DbProviderFactories"/>
      </target>
      <parameters>
        <primitiveExpression value="{$DbProviderName}"/>
      </parameters>
    </methodInvokeExpression>
  </init>
</variableDeclarationStatement>

It sure reads like a book.

I am declaring a variable of type DbProviderFactory named factory and initializing it by invoking method GetFactory while targeting type DbProviderFactories and passing on parameter in a form of a primitive expression that drives its values from XSLT variable DbProviderName.

The result in a C# program will look like the one below if DbProviderName variable is equal to System.Data.SqlClient.

DbProviderFactory factory = DbProviderFactories.GetFactory("System.Data.SqlClient");

Best of all you can rely on the power of Visual Studio to guide you in your quest of writing a code generation template. Complete intellisense support makes the process very simple.

image

Code OnTime Generator features an automatic processor of output program code declarations that are translated with the help of System.CodeDom code generation library built into Microsoft.NET.

Support for Multiple Languages

Dependency on System.CodeDom provides a benefit of being able to generate the output code in any programming language supported by Microsoft.NET. We go a step further in overcoming some of the limitations of the System.CodeDom code generator and are providing additional constructs and full support for many language features for two programming languages: Visual C# and Visual Basic.NET.

High Quality Formatting

The produced code comes out with almost perfect formatting. You will likely say that it does look as if a human being has been crafting the lines of the output program text. Automatic formatting saves huge amount of time and gives you  a peace of mind to known that the final code will come out alright.

Open User-Defined Data Model

There is a sample project Hello World that was designed to showcase the capabilities of the code generator. Here is project data model that can be found in HelloWorld.Project.xml file.

<?xml version="1.0" encoding="utf-8" ?>
<project xmlns="urn:schemas-codeontime-com:hello-world-project">
  <providerName>System.Data.SqlClient</providerName>
  <connectionString></connectionString>
</project>

The project will generate a program that opens a connection to any supported database, read its content, and print out a number of records in the database tables. All we need is the name of ADO.NET provider and a connection string. Absolutely arbitrary element names are included in our XML project database.  There are no mandates or requirements that are imposed on your data by any features of the code generator. You decide what sort of data will be in the foundation of your code generation project.

Unlimited Flexibility Of Design Environment

Each project has file CodeOnTime.Project.xml that defines the steps that code generator must perform to produce the output. Here is a snippet from Hello World project.

<load path="$ProjectPath">
  <if test="not(file/@name='HelloWorld.Project.xml')">
    <copy input="$LibraryPath\HelloWorld.Project.xml"
output="HelloWorld.Project.xml"/> </if> </load> <!-- opens the main project page --> <navigate url="HelloWorld.Start.htm"/>

In this snippet the code generator will load the list of files in the output project folder.

If there is no HelloWorld.Project.xml there then the file is copied from the library folder to the project folder.

Next the project build script directs code generator to load HelloWorld.Start.htm file located in the project library folder.

Our code generator relies on Java Script and DHTML. Build-in web browser loads project pages and completely relies on this pages to display an appropriate user interface, update the data model, and signal when navigate step is over. All pages are relying on the standard Microsoft.Ajax.js library, which brings significant improvements in making it simpler to build UI with Java Script.

All code generation templates and included "as is" and can be used as a foundation for your own projects.

Code Generation Primer

Project Hello World is provided to give you a head-start with your own code generation ideas. Here is how you start development.

Run Visual Studio 2008  or Visual Web Developer 2008 Express Edition and select File|Open Web Site command in the menu. Browse to [My Documents]\Code OnTime\Library folder and open it as if it were a web site.

Visual Studio will suggest to convert this "site" to the web site that can run with Microsoft.NET 3.5. Press OK button. The Solution Explorer will display a similar set of files:

image 

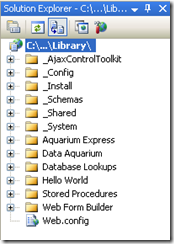
Files that start with underscore symbol are collections of system files that provide XSD schemas, shared HTML snippets and system Java Script files. One of the folders holds the entire AjaxControlToolkit in it, which is being reused in a few projects.

File Web.config has been created by Visual Studio and can be ignored.

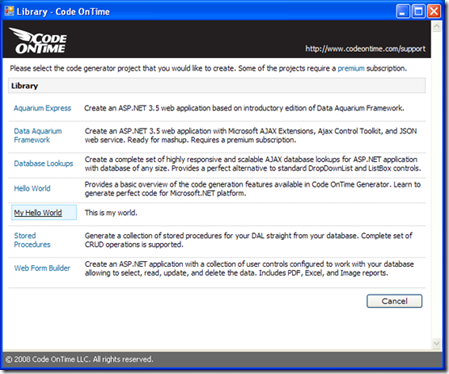
Copy any project that you would like to use as your own template and paste it into the root of the library. Open CodeOnTime.Project.xml file and make changes at the top of the project to reflect the project name, and description. Also come up with a product ID of your own.

<information>
  <product>CNT200809-MHW</product>
  <title>My Hello World</title>
  <description>This is my world.</description>
  <vendor>Contoso</vendor>
  <website>http://www.contoso.com</website>
</information>

Run Code OnTime Generator and start creating a new project.

image

You project will show up right there. Any future code generation library updates will not affect your project.

You can start making immediate improvements with full intellisense support of Visual Studio. Intellisense and hints are available in XSLT stylesheets, in Java Script libraries, in codedom files, and in project build file.

If you are working on your own project and have a question that requires an answer then please don't hesitate to drop us a message at http://codeontime.com/contactus.aspx. We are here to help