Web 2.0

Labels
AJAX(112) App Studio(7) Apple(1) Application Builder(245) Application Factory(207) ASP.NET(95) ASP.NET 3.5(45) ASP.NET Code Generator(72) ASP.NET Membership(28) Azure(18) Barcode(2) Barcodes(3) BLOB(18) Business Rules(1) Business Rules/Logic(140) BYOD(13) Caching(2) Calendar(5) Charts(29) Cloud(14) Cloud On Time(2) Cloud On Time for Windows 7(2) Code Generator(54) Collaboration(11) command line(1) Conflict Detection(1) Content Management System(12) COT Tools for Excel(26) CRUD(1) Custom Actions(1) Data Aquarium Framework(122) Data Sheet(9) Data Sources(22) Database Lookups(50) Deployment(22) Designer(177) Device(1) DotNetNuke(12) EASE(20) Email(6) Features(101) Firebird(1) Form Builder(14) Globalization and Localization(6) How To(1) Hypermedia(2) Inline Editing(1) Installation(5) JavaScript(20) Kiosk(1) Low Code(3) Mac(1) Many-To-Many(4) Maps(6) Master/Detail(36) Microservices(4) Mobile(63) Mode Builder(3) Model Builder(3) MySQL(10) Native Apps(5) News(18) OAuth(9) OAuth Scopes(1) OAuth2(13) Offline(20) Offline Apps(4) Offline Sync(5) Oracle(11) PKCE(2) Postgre SQL(1) PostgreSQL(2) PWA(2) QR codes(2) Rapid Application Development(5) Reading Pane(2) Release Notes(183) Reports(48) REST(29) RESTful(29) RESTful Workshop(15) RFID tags(1) SaaS(7) Security(81) SharePoint(12) SPA(6) SQL Anywhere(3) SQL Server(26) SSO(1) Stored Procedure(4) Teamwork(15) Tips and Tricks(87) Tools for Excel(2) Touch UI(93) Transactions(5) Tutorials(183) Universal Windows Platform(3) User Interface(338) Video Tutorial(37) Web 2.0(100) Web App Generator(101) Web Application Generator(607) Web Form Builder(40) Web.Config(9) Workflow(28)
Archive
Blog
Web 2.0
Saturday, August 23, 2008PrintSubscribe
Custom Templates for AJAX forms in Data Aquarium Framework Application

There are situations when form views rendered automatically by Data Aquarium Framework are not meeting your requirements. A simple and powerful technique allows you to specify custom form templates.

Custom Form Templates

Generate a Data Aquarium project from Northwind database and create a new web form Products.aspx in the root of the web site. Change the form markup as shown below.

<%@ Page Language="C#" MasterPageFile="~/MasterPage.master" AutoEventWireup="true"
    CodeFile="Products.aspx.cs" Inherits="Forms_Products" Title="Products" %>

<asp:Content ID="Content1" ContentPlaceHolderID="head" runat="Server">
</asp:Content>
<asp:Content ID="Content2" ContentPlaceHolderID="Header1Placeholder" runat="Server">
    Custom Form Templates
</asp:Content>
<asp:Content ID="Content3" ContentPlaceHolderID="Header2Placeholder" runat="Server">
    Northwind
</asp:Content>
<asp:Content ID="Content4" ContentPlaceHolderID="BodyPlaceholder" runat="Server">
    <div id="Products" runat="server">
    </div>
    <aquarium:DataViewExtender ID="ProductsExtender" runat="server" TargetControlID="Products"
        Controller="Products" />
</asp:Content>

View the new form in a browser and select any product in grid view.

image

A standard presentation with one category that contains all data fields is rendered.

We will break down the form data fields into two columns to make the form shorter. Enter the following markup right after the aquarium:DataViewExtender control:

    <div id="Products_editForm1" style="display: none">
        <table style="width: 700px">
            <tr>
                <td width="50%" valign="top">
                    <div>
                        {ProductName}
                    </div>
                    <div>
                        {SupplierID}
                    </div>
                    <div>
                        {CategoryID}
                    </div>
                    <div>
                        {Discontinued}
                    </div>
                </td>
                <td width="50%" valign="top">
                    <div>
                        {QuantityPerUnit}
                    </div>
                    <div>
                        {UnitPrice}
                    </div>
                    <div>
                        {UnitsInStock}
                    </div>
                    <div>
                        {UnitsOnOrder}
                    </div>
                    <div>
                        {ReorderLevel}
                    </div>
                </td>
            </tr>
        </table>
    </div>

The important things here are id and style attributes of the main div element. The first attribute identifies a data controller descriptor and the view in the controller that must be replaced with the template when this page is rendered. In this case we will replace the editForm1 view whenever it is being rendered for Products controller.

The style property with value display:none will hide the template from users.

The field names in the curly brackets are matched with the names of the data fields in the view editForm1 that you can find in ~/Controllers/Products.aspx data controller descriptor file.

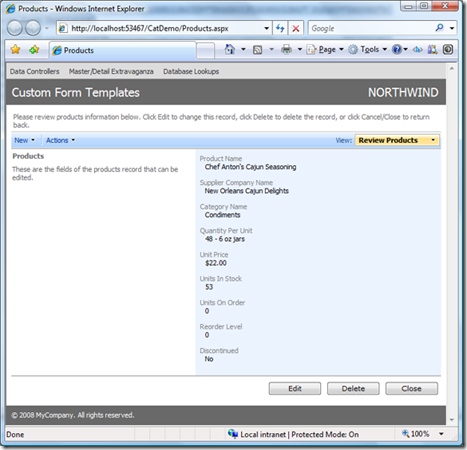
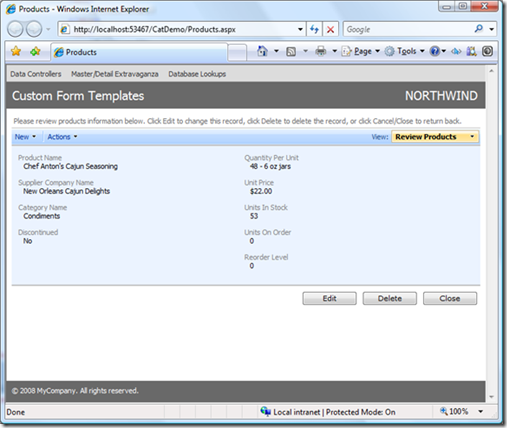
Refresh the page in a browser and select the same product again. A two-column presentation of form fields is rendered this time.

image

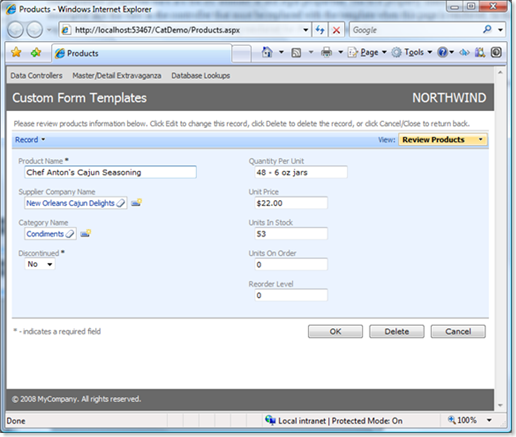
All great AJAX features of Data Aquarium Framework applications are available if you start editing data in the form. Click on the Edit button and the following will be rendered.

image

Templates are working in any data controller views rendered for displayed on the page. For example, click on New Supplier icon next to the Supplier Company Name field. Notice that a standard New Supplier form is displayed.

image

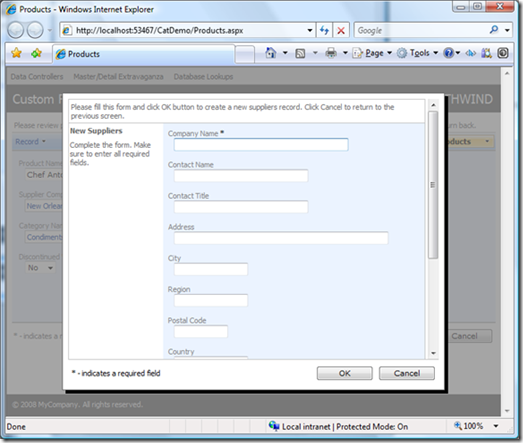
You can reduce this form to just one field if you insert the following markup right after Products_editForm1 template.

    <div id="Suppliers_createForm1" style="display: none">
        {CompanyName}
    </div>

Refresh the page, select product, click on Edit button and click on New Supplier icon. A single-field form will show up.

image

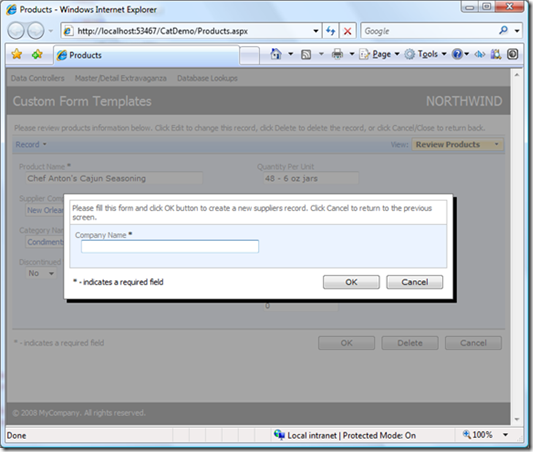
Supplier form createForm1 will render as shown on the picture only on the Products.aspx page.

If you want to customize the presentation of certain forms and have them displayed the same way on all pages of your application then you may find it useful to place relevant templates in web user controls and insert the user controls accordingly into the pages that require customization.

Here is an example of web user control ProductTemplates.ascx that defines a template for editForm1 form view of Products data controller.

<%@ Control Language="C#" ClassName="ProductTemplates" %>
<div id="Products_editForm1" style="display: none">
    <table style="width: 700px">
        <tr>
            <td width="50%" valign="top">
                <div>
                    {ProductName}
                </div>
                <div>
                    {SupplierID}
                </div>
                <div>
                    {CategoryID}
                </div>
                <div>
                    {Discontinued}
                </div>
            </td>
            <td width="50%" valign="top">
                <div>
                    {QuantityPerUnit}
                </div>
                <div>
                    {UnitPrice}
                </div>
                <div>
                    {UnitsInStock}
                </div>
                <div>
                    {UnitsOnOrder}
                </div>
                <div>
                    {ReorderLevel}
                </div>
            </td>
        </tr>
    </table>
</div>

Change the markup of Products.aspx page as follows.

<%@ Page Language="C#" MasterPageFile="~/MasterPage.master" AutoEventWireup="true"
    CodeFile="Products.aspx.cs" Inherits="Forms_Products" Title="Products" %>

<%@ Register Src="ProductTemplates.ascx" TagName="ProductTemplates" TagPrefix="uc1" %>
<asp:Content ID="Content1" ContentPlaceHolderID="head" runat="Server">
</asp:Content>
<asp:Content ID="Content2" ContentPlaceHolderID="Header1Placeholder" runat="Server">
    Custom Form Templates
</asp:Content>
<asp:Content ID="Content3" ContentPlaceHolderID="Header2Placeholder" runat="Server">
    Northwind
</asp:Content>
<asp:Content ID="Content4" ContentPlaceHolderID="BodyPlaceholder" runat="Server">
    <div id="Products" runat="server">
    </div>
    <aquarium:DataViewExtender id="ProductsExtender" runat="server" TargetControlId="Products"
        controller="Products" />
    <uc1:ProductTemplates ID="ProductTemplates1" runat="server" />
</asp:Content>

Tag uc1:ProductTemplates will alter presentation of form view editForm1 at runtime.

What's Next

If you do need to further customize the presentation of the fields in your HTML templates then consider using CSS stylesheets.

The standard layout displays a label above the field and the field has a slight padding on the left. Let's eliminate the label and remove the padding.

image

Create CustomFormTemplates.css stylesheet in the ~/App_Themes/MyCompany folder and change it as shown in the next snippet. Notice that if you have changed the default namespace of your project then MyCompany folder shall be replaced with the name of your theme.

div.HiddenLabel .Header
{
    display:none;
}

div.HiddenLabel .Item
{
    font-weight:bold;
    margin-left:-8px;
}

Class HiddenLabel is our custom class. Classes Header and Item are defined in the Aquarium.css that you can find in the same theme folder. We will use HiddenLabel class to alter the presentation of the template in a browser. Change the placeholder for ProductName in the template of the view editForm1 as follows.

<div class="HiddenLabel">
    {ProductName}
</div>

The simple addition of class in the div element will produce the following result when viewed in a web browser.

image

Still Not Enough

Data Aquarium Framework provides powerful template support to allow flexible customization of form presentation without losing any of the AJAX features.

There will certainly be some situations when form templates are not providing the flexibility that you need.

For example, you have to use a 3-rd party custom control or require some non-generic behavior of the form fields.

One option that is available to you is to code the custom logic in Java Script. Regardless of your level of experience that might not be the easiest approach.

A better option, which works great for both experienced and novice developers, it to rely on the standard ASP.NET controls and asp:UpdatePanel to provide a smooth AJAX style page refreshing in your web forms. Data Aquarium Framework will offer plenty of productivity features in this scenario as well.

The foundation of the development with standard controls and Data Aquarium Framework is ControllerDataSource component. This control provides a data source that can participate in any standard ASP.NET data binding to yield enormous gains in development process.

There is no data access code to write since the entire data engine of Data Aquarium Framework is at your service. This control provides all the benefits that you will find in applications based on ObjectDataSource, including made to measure paging, sorting, and filtering of data sets of unlimited size. Yet you don't have to write your own business objects, since ControllerDataSource is passing all the hard work to the framework.

At the same time you benefit from the centralized business logic that can be created with custom action handlers.

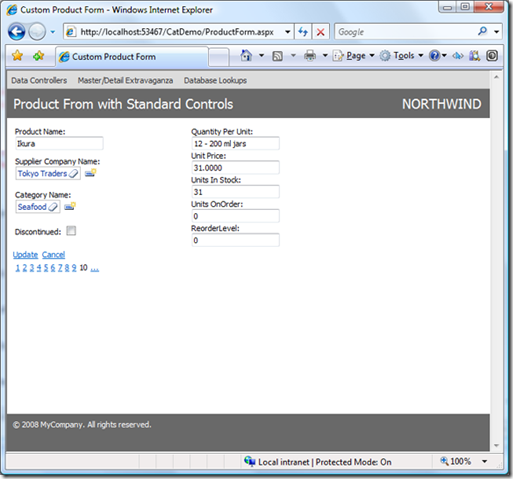
Create a new page ProductForm.aspx in the root of your web site and add ControllerDataSource and FormView controls as shown in the sample code.

<%@ Page Language="C#" MasterPageFile="~/MasterPage.master" AutoEventWireup="true"
    CodeFile="ProductForm.aspx.cs" Inherits="ProductForm" Title="Custom Product Form" %>

<asp:Content ID="Content1" ContentPlaceHolderID="head" runat="Server">
</asp:Content>
<asp:Content ID="Content2" ContentPlaceHolderID="Header1Placeholder" runat="Server">
    Product From with Standard Controls
</asp:Content>
<asp:Content ID="Content3" ContentPlaceHolderID="Header2Placeholder" runat="Server">
    Northwind
</asp:Content>
<asp:Content ID="Content4" ContentPlaceHolderID="BodyPlaceholder" runat="Server">
    <aquarium:ControllerDataSource ID="cds1" runat="server" DataController="Products" />
    <asp:FormView ID="FormView1" runat="server" AllowPaging="True" DataSourceID="cds1"
        DataKeyNames="ProductID">
        <EditItemTemplate>
            <table style="width: 500px">
                <tr>
                    <td valign="top">
                        <div style="padding-bottom: 8px;">
                            Product Name:<br />
                            <asp:TextBox ID="ProductNameTextBox" runat="server" Text='<%# Bind("ProductName") %>' /></div>
                        <div>
                            Supplier Company Name:<br />
                            <aquarium:DataViewLookup ID="SupplierLookup" runat="server" DataController="Suppliers"
                                DataValueField="SupplierID" DataTextField="CompanyName" SelectedValue='<%# Bind("SupplierID") %>' />
                        </div>
                        <div>
                            Category Name:<br />
                            <aquarium:DataViewLookup ID="CategoriesLookup" runat="server" DataController="Categories"
                                DataValueField="CategoryID" DataTextField="CategoryName" SelectedValue='<%# Bind("CategoryID") %>' />
                        </div>
                        <div>
                            Discontinued:
                            <asp:CheckBox ID="DiscontinuedCheckBox" runat="server" Checked='<%# Bind("Discontinued") %>' /></div>
                    </td>
                    <td valign="top">
                        <div>
                            Quantity Per Unit:<br />
                            <asp:TextBox ID="QuantityPerUnitTextBox" runat="server" Text='<%# Bind("QuantityPerUnit") %>' /></div>
                        <div>
                            Unit Price:<br />
                            <asp:TextBox ID="UnitPriceTextBox" runat="server" Text='<%# Bind("UnitPrice") %>' /></div>
                        <div>
                            Units In Stock:<br />
                            <asp:TextBox ID="UnitsInStockTextBox" runat="server" Text='<%# Bind("UnitsInStock") %>' /></div>
                        <div>
                            Units On Order:<br />
                            <asp:TextBox ID="UnitsOnOrderTextBox" runat="server" Text='<%# Bind("UnitsOnOrder") %>' /></div>
                        <div>
                            ReorderLevel:<br />
                            <asp:TextBox ID="ReorderLevelTextBox" runat="server" Text='<%# Bind("ReorderLevel") %>' /></div>
                    </td>
                </tr>
            </table>
            <asp:LinkButton ID="UpdateButton" runat="server" CausesValidation="True" CommandName="Update"
                Text="Update" />
            &nbsp;<asp:LinkButton ID="UpdateCancelButton" runat="server" CausesValidation="False"
                CommandName="Cancel" Text="Cancel" />
        </EditItemTemplate>
        <InsertItemTemplate>
            <table style="width: 500px">
                <tr>
                    <td valign="top">
                        <div>
                            Product Name:<br />
                            <asp:TextBox ID="ProductNameTextBox" runat="server" Text='<%# Bind("ProductName") %>' /></div>
                        <div>
                            Supplier Company Name:<br />
                            <aquarium:DataViewLookup ID="SupplierLookup" runat="server" DataController="Suppliers"
                                DataValueField="SupplierID" DataTextField="CompanyName" SelectedValue='<%# Bind("SupplierID") %>' />
                        </div>
                        <div>
                            Category Name:<br />
                            <aquarium:DataViewLookup ID="CategoriesLookup" runat="server" DataController="Categories"
                                DataValueField="CategoryID" DataTextField="CategoryName" SelectedValue='<%# Bind("CategoryID") %>' />
                        </div>
                    </td>
                    <td valign="top">
                        <div>
                            Quantity Per Unit:<br />
                            <asp:TextBox ID="QuantityPerUnitTextBox" runat="server" Text='<%# Bind("QuantityPerUnit") %>' /></div>
                        <div>
                            Unit Price:<br />
                            <asp:TextBox ID="UnitPriceTextBox" runat="server" Text='<%# Bind("UnitPrice") %>' /></div>
                        <div>
                            Units InStock:<br />
                            <asp:TextBox ID="UnitsInStockTextBox" runat="server" Text='<%# Bind("UnitsInStock") %>' /></div>
                        <div>
                            Units On Order:<br />
                            <asp:TextBox ID="UnitsOnOrderTextBox" runat="server" Text='<%# Bind("UnitsOnOrder") %>' /></div>
                        <div>
                            Reorder Level:<br />
                            <asp:TextBox ID="ReorderLevelTextBox" runat="server" Text='<%# Bind("ReorderLevel") %>' /></div>
                    </td>
                </tr>
            </table>
            <asp:LinkButton ID="InsertButton" runat="server" CausesValidation="True" CommandName="Insert"
                Text="Insert" />
            &nbsp;<asp:LinkButton ID="InsertCancelButton" runat="server" CausesValidation="False"
                CommandName="Cancel" Text="Cancel" />
        </InsertItemTemplate>
        <ItemTemplate>
            <table style="width: 500px">
                <tr>
                    <td valign="top">
                        <div style="padding-bottom: 8px;">
                            Product Name:<br />
                            <asp:Label ID="ProductNameLabel" runat="server" Text='<%# Bind("ProductName") %>'
                                Font-Bold="true" /></div>
                        <div style="padding-bottom: 8px;">
                            Supplier Company Name:<br />
                            <asp:Label ID="SupplierCompanyNameLabel" runat="server" Text='<%# Bind("SupplierCompanyName") %>'
                                Font-Bold="true" /></div>
                        <div style="padding-bottom: 8px;">
                            Category Name:<br />
                            <asp:Label ID="CategoryCategoryNameLabel" runat="server" Text='<%# Bind("CategoryCategoryName") %>'
                                Font-Bold="true" /></div>
                        <div style="padding-bottom: 8px;">
                            Discontinued:
                            <asp:CheckBox ID="DiscontinuedCheckBox" runat="server" Checked='<%# Bind("Discontinued") %>'
                                Font-Bold="true" Enabled="false" /></div>
                    </td>
                    <td valign="top">
                        <div style="padding-bottom: 8px;">
                            Quantity Per Unit:<br />
                            <asp:Label ID="QuantityPerUnitLabel" runat="server" Text='<%# Bind("QuantityPerUnit") %>'
                                Font-Bold="true" /></div>
                        <div style="padding-bottom: 8px;">
                            Unit Price:<br />
                            <asp:Label ID="UnitPriceLabel" runat="server" Text='<%# Bind("UnitPrice") %>' Font-Bold="true" /></div>
                        <div style="padding-bottom: 8px;">
                            Units In Stock:<br />
                            <asp:Label ID="UnitsInStockLabel" runat="server" Text='<%# Bind("UnitsInStock") %>'
                                Font-Bold="true" /></div>
                        <div style="padding-bottom: 8px;">
                            Units On Order:<br />
                            <asp:Label ID="UnitsOnOrderLabel" runat="server" Text='<%# Bind("UnitsOnOrder") %>'
                                Font-Bold="true" /></div>
                        <div style="padding-bottom: 8px;">
                            Reorder Level:<br />
                            <asp:Label ID="ReorderLevelLabel" runat="server" Text='<%# Bind("ReorderLevel") %>'
                                Font-Bold="true" />
                        </div>
                    </td>
                </tr>
            </table>
            <asp:LinkButton ID="EditButton" runat="server" CausesValidation="False" CommandName="Edit"
                Text="Edit" />
            &nbsp;<asp:LinkButton ID="DeleteButton" runat="server" CausesValidation="False" CommandName="Delete"
                Text="Delete" />
            &nbsp;<asp:LinkButton ID="NewButton" runat="server" CausesValidation="False" CommandName="New"
                Text="New" />
        </ItemTemplate>
    </asp:FormView>
</asp:Content>

Despite the heavy customization that you can do with FormView control there is very little that needs to be done to enable the data access features. There is just one line that includes ControllerDataSource control in the page and makes the form capable of paging, inserting, updating, and deleting the data in the products table.

    <aquarium:ControllerDataSource ID="cds1" runat="server" DataController="Products" />

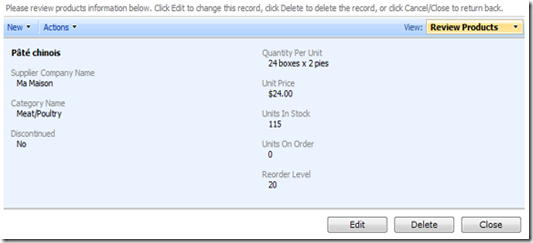
Also there are few instances of DataViewLookup control that bring in AJAX enabled data lookup capability in the standard FormView control.

Open the page in a browser and edit any product. The following user interface will be presented.

image

Sunday, August 17, 2008PrintSubscribe
Features of Master/Detail Presentation

Excellent master/detail support in Data Aquarium Framework comes with some great premium features, which typically require a lot of custom coding of high complexity.

Simple Markup

The standout feature is the simplicity of page definitions.

Consider a web form that displays customers and their orders. A considerable amount of markup is required to define a page like that if you are using standard ASP.NET components, such as GridView, DetailsView, and ObjectDataSource.

Here is a page fragment in a Data Aquarium Framework application that displays customers and orders:

    <!-- presentation of customers -->
    <div id="Customers" runat="server">
    </div>
    <aquarium:DataViewExtender ID="CustomersExtender" runat="server" TargetControlID="Customers"
        Controller="Customers" PageSize="3" />
    <!-- presentation of orders -->
    <div id="Orders" runat="server">
    </div>
    <aquarium:DataViewExtender ID="OrdersExtender" runat="server" TargetControlID="Orders"
        Controller="Orders" PageSize="3" FilterSource="CustomersExtender" FilterFields="CustomerID" />

A couple of div elements and a couple of DataViewExtender components is all what is needed to render user interface like the one you can see live here.

This is an example of the discussed master/detail screen. It shows Customers, Orders, and Order Details.

AJAX and server components of Data Aquarium Framework implement a centralized declarative user interface programming model. Your typical ASP.NET application is likely based on a page-centric model. Standard ASP.NET application pages host components such as GridView and DetailsView with their columns and fields predefined. The framework is relying on reusable data controller descriptors to get the metadata required to rendered user interface presentation. Follow the link to see a sample data controller.

The centralized definition of user interface elements allows unmatched flexibility in user interface development. The same views defined once in a data controller can be referred in dozens of pages. These views are displayed automatically in dynamic lookups without any coding.

You can connect data controller views in all sorts of ways without writing any code. Simply set the FilterSource and FilterFields properties of detail DataViewExtender components to create complex master/detail relationships on a web form. Use the technique shown in the sample markup above.

Properties FilterSource and FilterFields are used to construct efficient dynamic SQL statements that are executed by your database server. Data Aquarium Framework packages the results of the queries into arrays of values and delivers them to the client components running on a page. AJAX components of the framework will render an HTML markup and replace fragments of the page to provide smooth user experience.

Load-on-Demand

Try the sample tabbed presentation of tables in the Data Aquarium Framework application created from the Northwind database.

image

When you open the sample page for first time Categories and Products are dynamically loaded from the server and displayed. The act of opening a page is causing the server to render the tabbed user interface with Ajax Control Toolkit components TabContainer and TabPanel that you are seeing on the screen shot. The Web.DataView AJAX components of Data Aquarium Framework are embedded in the tabs. These components are making two additional requests to get just enough data to present customers and orders on the form.

There are many more tabs with Web.DataView component instances matched to the rest of the Northwind database tables and connected in master/detail fashion. If all of them were executing data retrieval requests at the same time then that would have created dozens of additional server interactions. Many of this requests could be totally without purpose since an application user is likely not to look at all of them.

Click on the Customers tab and notice that the customer data has been requested on-demand and displayed shortly after you have click on the tab.

image

Data Aquarium Framework components automatically determine the exact amount of data that is needed to present in the user interface views that are actually visible to a user. Physical data retrieval happens when you select a tab and bring invisible views in focus.

Automatic Hiding of Filter Fields

If you change the markup of DataViewExtender components by removing FilterSource and FilterFields properties then the runtime screen will look similar to the one below if you select the first customer and sort orders by customer company name.

image

Notice that the orders section is displaying a customer company name for each order. This is great if both views are completely independent but is not desirable if you have a master / detail presentation. All displayed orders are related to the same selected customer in that case. A repeated customer name on each order line takes up the valuable real estate of the page and should be eliminated.

Restore the FilterSource and FilterFields properties on OrdersExtender and notice that orders view automatically hides the customer company name without any extra coding.

image

If you were to link orders to employees then the employee last name column would disappear.

Primary Key Inheritance

Navigate to the sample application and try to add a new product in any category. First select a category. Sort products by name and then click on New menu option on the action bar of the products view. Click on New Products menu item. Enter A new product and press OK button.

image

The following view will be presented next.

image

The new product is automatically linked to selected master category without any coding. The primary key field values of selected master record are automatically copied to the detail record foreign key fields when the detail record is inserted into database.

This feature is automatically enabled when you set a master/detail connection via FilterSource and FilterFields properties of DataViewExtender. You can create custom action handlers to provide additional data processing before and after the SQL command.

Support For Standard Data Components

There will be times when you need to write some highly custom master/detail web forms and would rather rely on standard ASP.NET components to do so. Data Aquarium Framework provides ControllerDataSource data source component that works great with standard components or any other commercial library that you own.

Generate an application based on Data Aquarium project , open the generated code in Visual Studio 2008 or Visual Web Developer Express 2008 and and create a new page StandardMD.aspx based on the MasterPage.master in the web site root. Enter the following markup:

<%@ Page Language="C#" MasterPageFile="~/MasterPage.master" AutoEventWireup="true"
    CodeFile="StandardMD.aspx.cs" Inherits="StandardMD" Title="Untitled Page" %>

<asp:Content ID="Content1" ContentPlaceHolderID="head" runat="Server">
</asp:Content>
<asp:Content ID="Content2" ContentPlaceHolderID="Header1Placeholder" runat="Server">
    Standard Master/Detail
</asp:Content>
<asp:Content ID="Content3" ContentPlaceHolderID="Header2Placeholder" runat="Server">
    Northwind
</asp:Content>
<asp:Content ID="Content4" ContentPlaceHolderID="BodyPlaceholder" runat="Server">
    <aquarium:ControllerDataSource ID="CustomersCDS" runat="server" DataController="Customers">
    </aquarium:ControllerDataSource>
    <asp:GridView ID="Customers" runat="server" DataSourceID="CustomersCDS" AllowPaging="true"
        AllowSorting="true" AutoGenerateDeleteButton="true" AutoGenerateEditButton="true"
        AutoGenerateSelectButton="true" DataKeyNames="CustomerID">
    </asp:GridView>
    <aquarium:ControllerDataSource ID="OrdersCDS" runat="server" DataController="Orders">
        <FilterParameters>
            <asp:ControlParameter Name="CustomerID" ControlID="Customers" PropertyName="SelectedValue" />
        </FilterParameters>
    </aquarium:ControllerDataSource>
    <asp:GridView ID="Orders" runat="server" DataSourceID="OrdersCDS" AllowPaging="true"
        AllowSorting="true" AutoGenerateDeleteButton="true" AutoGenerateEditButton="true"
        AutoGenerateSelectButton="true" DataKeyNames="OrderID">
    </asp:GridView>
</asp:Content>

The only unusual code here is the presence of ControllerDataSource instances. The standard GridView components on the page are bound to the data sources via DataSourceID property. Data source OrdersCDS is set to behave as a detail of the Customers grid view and will filter data whenever a customer is selected on the page. If you run the page and select a customer then the following user interface will be presented.

image

Nothing really fancy. But if you do look closer then you will notice that you can page and sort your records. You can edit, and delete anything on the page. The orders grid is automatically refreshed when a customer is selected.

In fact, you can have thousands of records in both grids and they will work extremely fast thanks to the on-demand data retrieval built into Data Aquarium Framework. Only the data that needs to be presented on the page is actually retrieved from the database. The exact same code is being executed on the sever in response to requests by client-side AJAX components when they need to displays data. That sort of functionality is hard to accomplish unless you resort to use ObjectDataSource components and write custom business objects to support them.

With a little bit of editing you can have this page look like the one below.

image

To speed up customization select the data source instances of this sample page and execute Refresh Schema command in the smart tag options of each data source. This will automatically create fields for your grid views.

Remember that ControllerDataSource is working with any standard or custom components that are compatible with ASP.NET data binding architecture.

Conclusion

Data Aquarium Framework provides significant productivity features to developers building master / detail web forms. Modern AJAX-based user interface components of the framework will automatically handle many complicated issues that are commonly encountered by application developers. Standard ASP.NET web forms are supported as well via ControllerDataSource component.

Saturday, August 16, 2008PrintSubscribe
Master/Detail in One Page

Most applications require a master/detail presentation of data on a form. This presentation styles has been perfected in desktop applicati0ns, but is still a difficult task in a web application. Data Aquarium Framework makes presenting master/detail data easy.

Let's set a master detail presentation in application that was generated from Northwind database. The sample application created by Code OnTime Generator already includes a master/detail demo page that presents and links all your tables simultaneously. Here is a screen shot:

MasterDetail

We will create a brand new page and link together Customers, Orders, and Order Details.

Start by generating a new Data Aquarium Framework project. Open the generated project in Visual Studio 2008 or Visual Web Developer Express 2008 and add a new web form OrderManager.aspx to the root of the site. Make sure to select a master page when you are adding this new form to the project.

Edit the page to make it look like this:

<%@ Page Language="C#" MasterPageFile="~/MasterPage.master" AutoEventWireup="true"
    CodeFile="OrderManager.aspx.cs" Inherits="OrderManager" Title="Untitled Page" %>

<asp:Content ID="Content1" ContentPlaceHolderID="head" runat="Server">
</asp:Content>
<asp:Content ID="Content2" ContentPlaceHolderID="Header1Placeholder" runat="Server">
    Order Manager
</asp:Content>
<asp:Content ID="Content3" ContentPlaceHolderID="Header2Placeholder" runat="Server">
    Northwind
</asp:Content>
<asp:Content ID="Content4" ContentPlaceHolderID="BodyPlaceholder" runat="Server">
    <!-- presentation of customers -->
    <div id="Customers" runat="server" style="margin-bottom: 4px;">
    </div>
    <aquarium:DataViewExtender ID="CustomersExtender" runat="server" TargetControlID="Customers"
        Controller="Customers" PageSize="3" />
    <!-- presentation of orders -->
    <div id="Orders" runat="server" style="margin-bottom: 4px;">
    </div>
    <aquarium:DataViewExtender ID="OrdersExtender" runat="server" TargetControlID="Orders"
        Controller="Orders" PageSize="3" FilterSource="CustomersExtender" FilterFields="CustomerID" />
    <!-- presentation of order details -->
    <div id="OrderDetails" runat="server">
    </div>
    <aquarium:DataViewExtender ID="OrderDetailsExtender" runat="server" TargetControlID="OrderDetails"
        Controller="OrderDetails" PageSize="5" FilterSource="OrdersExtender" FilterFields="OrderID" />
</asp:Content>

Master/detail link is established between DataViewExtender components. Two properties are involved.

FilterSource property refers to the master view extender. For example, OrdersExtender is linked to CustomersExtender.

Property FilterFields identifies the fields in the data controller that will be filtered with values from the primary keys selected in the view of the master extender when rendered in a browser. The client java script component Web.DataView will try to match the fields of the detail view with selected key fields in the master by matching their names. Field CustomerID of the Orders view will easily match to the name of the primary key field in the Customers view. If the field names are different then the ordinal position of the fields in the filter is being used for matching.

You can set up unlimited number of the master detail links within the same page. No post backs are executed. The page section refreshing is smooth and the application behaves a lot like a desktop program. All views provide sorting and adaptive filtering. Filtering automatically recognizes master details links and reduces the number of available filter-by-example options.

Select FileView in Browser option in the menu of your development tool. The page will load the data and if you start interacting with the page the it may look like that.

OrderManager

The live version of this page is hosted here.

Select a company name and orders section will display relevant orders. Select an order and details of the order will show up. Select and edit an order and your screen may look like the one below. Notice that you can even add new lookup values for Employees, Shippers, and Products in place if the lookup values are not available without making a single page refresh or ever leaving the page.

OrderManagerEdit

Considering that minuscule amount of markup code that you actually have to write there is no other tool on the market that can do the same. Subscribe to the premium projects and generate your own application. Many more exciting features and code generator projects are coming up and will be released to premium project subscribers. Post your questions or request new feature on our forum.