Blog: Posts from September, 2008

Labels
AJAX(112) App Studio(7) Apple(1) Application Builder(245) Application Factory(207) ASP.NET(95) ASP.NET 3.5(45) ASP.NET Code Generator(72) ASP.NET Membership(28) Azure(18) Barcode(2) Barcodes(3) BLOB(18) Business Rules(1) Business Rules/Logic(140) BYOD(13) Caching(2) Calendar(5) Charts(29) Cloud(14) Cloud On Time(2) Cloud On Time for Windows 7(2) Code Generator(54) Collaboration(11) command line(1) Conflict Detection(1) Content Management System(12) COT Tools for Excel(26) CRUD(1) Custom Actions(1) Data Aquarium Framework(122) Data Sheet(9) Data Sources(22) Database Lookups(50) Deployment(22) Designer(177) Device(1) DotNetNuke(12) EASE(20) Email(6) Features(101) Firebird(1) Form Builder(14) Globalization and Localization(6) How To(1) Hypermedia(2) Inline Editing(1) Installation(5) JavaScript(20) Kiosk(1) Low Code(3) Mac(1) Many-To-Many(4) Maps(6) Master/Detail(36) Microservices(4) Mobile(63) Mode Builder(3) Model Builder(3) MySQL(10) Native Apps(5) News(18) OAuth(9) OAuth Scopes(1) OAuth2(13) Offline(20) Offline Apps(4) Offline Sync(5) Oracle(11) PKCE(2) Postgre SQL(1) PostgreSQL(2) PWA(2) QR codes(2) Rapid Application Development(5) Reading Pane(2) Release Notes(183) Reports(48) REST(29) RESTful(29) RESTful Workshop(15) RFID tags(1) SaaS(7) Security(81) SharePoint(12) SPA(6) SQL Anywhere(3) SQL Server(26) SSO(1) Stored Procedure(4) Teamwork(15) Tips and Tricks(87) Tools for Excel(2) Touch UI(93) Transactions(5) Tutorials(183) Universal Windows Platform(3) User Interface(338) Video Tutorial(37) Web 2.0(100) Web App Generator(101) Web Application Generator(607) Web Form Builder(40) Web.Config(9) Workflow(28)
Archive
Blog
Posts from September, 2008
Saturday, September 20, 2008PrintSubscribe
Displaying Detail Information in an Arbitrary Part of The Page Based on a Field in a Selected Master Record

Aquarium Express and Data Aquarium Framework offer excellent support for master-detail pages. See a live demo of three level master-detail page.

Master-detail support has been further extended with the latest release. Now you can link master and detail DataViewExtender components by any matching field.

Previously a detail DataViewExtender was expected to specify filter fields that are matched to the primary key fields of the master. The updated version will also try to set a link to primary key fields by name. If a primary key field has not been matched to a field specified in FilterFields property of the detail DataViewExtender then the entire set of fields is being searched. This allows to create additional master-detail AJAX views that can serve as informational panels to any selected records as long as the field names of master-detail link are matched.

Another enhancement in master-detail support simplifies cross-container links that can see "through" the templates. Previous releases of the framework were relying on $find method to locate a client master component specified by property FilterSource. It works great if all of your components are placed in the same naming container. This isn't so when a DataViewExtender is placed in a template. The new enhancement allows master-detail links between components that are not in the same naming container.

Consider the following example, which is designed to work with Aquarium Express or Data Aquarium Framework project created from Northwind database.

In a new web form based on MasterPage.master enter the following markup.

<%@ Page Language="C#" MasterPageFile="~/MasterPage.master" AutoEventWireup="true"
    CodeFile="InfoPanel.aspx.cs" Inherits="InfoPanel" Title="Untitled Page" %>

<asp:Content ID="Content1" ContentPlaceHolderID="head" runat="Server">
</asp:Content>
<asp:Content ID="Content2" ContentPlaceHolderID="Header1Placeholder" runat="Server">
    Info Panel Demo
</asp:Content>
<asp:Content ID="Content3" ContentPlaceHolderID="Header2Placeholder" runat="Server">
    Northwind
</asp:Content>
<asp:Content ID="Content4" ContentPlaceHolderID="BodyPlaceholder" runat="Server">
    <act:TabContainer ID="OrderManager" runat="server">
        <act:TabPanel ID="CustomersTab" runat="server" HeaderText="Customers">
            <ContentTemplate>
                <div id="CustomerList" runat="server" />
                <aquarium:DataViewExtender ID="CustomersExtender" runat="server" 
                    Controller="Customers" TargetControlID="CustomerList" />
            </ContentTemplate>
        </act:TabPanel>
        <act:TabPanel ID="OrdersTab" runat="server" HeaderText="Orders">
            <ContentTemplate>
                <div id="OrderList" runat="server" />
                <aquarium:DataViewExtender ID="OrdersExtender" runat="server" 
                    Controller="Orders" FilterFields="CustomerID" 
                    FilterSource="CustomersExtender" TargetControlID="OrderList" />
            </ContentTemplate>
        </act:TabPanel>
        <act:TabPanel ID="DetailsTab" runat="server" HeaderText="Details">
            <ContentTemplate>
                <div id="DetailsList" runat="server" />
                <aquarium:DataViewExtender ID="DetailsExtender" runat="server" 
                    Controller="OrderDetails" FilterFields="OrderID" 
                    FilterSource="OrdersExtender" TargetControlID="DetailsList" />
            </ContentTemplate>
        </act:TabPanel>
    </act:TabContainer>
</asp:Content>

This markup defines a TabContainer from Ajax Control Toolkit with three level arrangement of Customers, Orders, and Order Details, linked in a master-detail relationship. DataViewExtender components and corresponding placeholder div elements are placed on an individual tab of the container

Run this page to see the "cross container" master-detail links in action. This was not possible with the previous releases of the framework.

image 

This form will benefit if we display a customer information summary somewhere on the page. The natural location is the top of the screen but that may differ from one application to another.

Open ~/Controllers/Customers.xml data controller descriptor and create an exact copy of editForm1. Name this copy infoForm1. We need this extra view since we don't want editForm1 of Customers controller on Customers tab to be affected when we finish customization.

Insert the following div element above the TabContainer.

    <div id="CustomerInfo" runat="server" />

Append this DataViewExtender right after the TabContainer.

    <aquarium:DataViewExtender ID="CustomerInfoExtender" runat="server" 
        Controller="Customers" View="infoForm1" FilterFields="CustomerID" 
        FilterSource="CustomersExtender" TargetControlID="CustomerInfo" />

The location of CustomerInfo div is irrelevant but the detail extender component must be defined below the master component specified by FilterSource property when a component container tree is created by ASP.NET page parser. Run this page and make sure that whenever you select a customer record on Customer tab the corresponding CustomerInfo div at the top is refreshed with the matching record.

image

As you can see the top of the page is completely occupied by editable customer view, which is not what we want. Let's change this view to display just a few of the fields and hide the view description, action bar and action buttons.

We accomplish this by adding class attribute to CustomerInfo div. We also define a custom form template Customers_infoForm1. Then we insert a few CSS definitions in Content1 placeholder, which will end up embedded in the head element of the HTML form. All this techniques will alter the appearance of the page and are described in details in a post dedicated to custom form templates.

Here is a complete text of the web form.

<%@ Page Language="C#" MasterPageFile="~/MasterPage.master" AutoEventWireup="true"
    CodeFile="InfoPanel.aspx.cs" Inherits="InfoPanel" Title="Untitled Page" %>

<asp:Content ID="Content1" ContentPlaceHolderID="head" runat="Server">
    <style type="text/css">
        .CustomerInfo
        {
            padding: 0px;
            margin-bottom: 8px;
            background-color: White;
        }
        .CustomerInfo table.DataView tr.CategoryRow td.Fields
        {
            border: solid 1px silver;
            background-color: #E4F3E4;
        }
        .CustomerInfo .HeaderTextRow, .CustomerInfo .ActionRow, 
        .CustomerInfo .ActionButtonsRow
        {
            display: none;
        }
    </style>
</asp:Content>
<asp:Content ID="Content2" ContentPlaceHolderID="Header1Placeholder" runat="Server">
    Info Panel Demo
</asp:Content>
<asp:Content ID="Content3" ContentPlaceHolderID="Header2Placeholder" runat="Server">
    Northwind
</asp:Content>
<asp:Content ID="Content4" ContentPlaceHolderID="BodyPlaceholder" runat="Server">
    <div id="CustomerInfo" runat="server" class="CustomerInfo" />
    <act:TabContainer ID="OrderManager" runat="server">
        <act:TabPanel ID="CustomersTab" runat="server" HeaderText="Customers">
            <ContentTemplate>
                <div id="CustomerList" runat="server" />
                <aquarium:DataViewExtender ID="CustomersExtender" runat="server" 
                    Controller="Customers" TargetControlID="CustomerList" />
            </ContentTemplate>
        </act:TabPanel>
        <act:TabPanel ID="OrdersTab" runat="server" HeaderText="Orders">
            <ContentTemplate>
                <div id="OrderList" runat="server" />
                <aquarium:DataViewExtender ID="OrdersExtender" runat="server" 
                    Controller="Orders" FilterFields="CustomerID" 
                    FilterSource="CustomersExtender" TargetControlID="OrderList" />
            </ContentTemplate>
        </act:TabPanel>
        <act:TabPanel ID="DetailsTab" runat="server" HeaderText="Details">
            <ContentTemplate>
                <div id="DetailsList" runat="server" />
                <aquarium:DataViewExtender ID="DetailsExtender" runat="server" 
                    Controller="OrderDetails" FilterFields="OrderID" 
                    FilterSource="OrdersExtender" TargetControlID="DetailsList" />
            </ContentTemplate>
        </act:TabPanel>
    </act:TabContainer>
    <aquarium:DataViewExtender ID="CustomerInfoExtender" runat="server" 
        Controller="Customers" View="infoForm1" FilterFields="CustomerID" 
        FilterSource="CustomersExtender" TargetControlID="CustomerInfo" />
    <div id="Customers_infoForm1" style="display: none">
        <table style="width: 100%">
            <tr>
                <td>
                    {CustomerID}
                </td>
                <td style="font-weight: bold;">
                    {CompanyName}
                </td>
                <td>
                    {ContactName}
                </td>
                <td>
                    {ContactTitle}
                </td>
                <td>
                    {Phone}
                </td>
            </tr>
        </table>
    </div>
</asp:Content>

Here is an example of this form running in a web browser when user has selected a customer record and switched to Orders tab.

image

The green information panel at the top is automatically refreshed if you select a customer. The detail extender component is linked to a primary key field of a master record.

You can also link the same CustomerInfoExtender to a matching field of OrdersExtender component. The data controller of this component has CustomerID field, which is  a foreign key that points to Customers table. The new feature of Data Aquarium Framework will kick in to make such link work. Just change CustomerInfoExtender.FilterSource to OrdersExtender. The behavior of the screen will change. You have to select an order to get the green panel at the of the screen to refresh itself.

In a more realistic example you would like to have Employee information panel connected to OrdersExtender to provide details about employee who has placed the order. We leave this task up to you.

Thursday, September 18, 2008PrintSubscribe
Using Code OnTime Generator: Getting Started

Code OnTime Generator is a general purpose code generator for Microsoft.NET.

Most code generators on the market are based on a proprietary template technology modeled after ASP.NET. A typical code generator template is a code file written in a target programming language with embedded markup tags that contain code generator internal programming language statements and expressions. These statements are manipulating input parameters and data files to produce the dynamic portion of the template text when code generator processes the template.

This model is well understood and quite popular.

There are few weaknesses of this approach to code generation:

  1. You are forced to use procedural approach to generate your programs. Every single aspect of the output program text must be explicitly defined in your template, which creates enormous complexity.
  2. One template file supports only one programming language. If you do want to produce your code in more than one programming language then you have to create two separate templates, which usually turn out to be a maintenance nightmare.
  3. It is very difficult to produce a well formatted output. If you ever tried to view HTML code generated by ASP.NET web forms then you would probably agree that it does not look pretty. Luckily we have amazing web browsers to sift through the mess and produce a pretty picture for us. You have to make sense of the mess and be a "browser" when you deal with program text produced by code generator. The code may work great but is usually a pain to read and work with.
  4. Proprietary data models used by code generator projects are difficult to alter. You will do well if you access the model via standard objects built into code generator but any customization must be done by design tools that come with code generator.
  5. Design environment of a typical code generator is inflexible and may or may not reflect your expectations. You are at the mercy of the vendor when the time comes to ask for improvements.

Code OnTime Generator eliminates these limitations.

Industry standard data presentation language XML is the data model language of code generation projects. Industry standard XPath and XSLT languages are natural companions to this data model language. Both, XPath and XSLT bring flexibility, power, and a bit of a magic in code generation process. Java Script and DHTML (also referred to as AJAX) are quite popular in a development community and are proving every day that there are very few things that you cannot do when you are building modern user interfaces with their help. Both technologies are in the foundation of the code generator design environment.

Here is how these technologies stack up against limitations that are found in a typical code generator.

Declarative Programming Model

XSLT is the best template technology out there designed specifically to take advantage of the flexibility built into XML. If you describe your project code generation requirements as an XML file then there is not a single piece of such specification, which is not a few key stsokes away from the template developer writing XPath expressions. XPath is to XML what SQL is to databases. Learn to say what you want and XPath engine will get it for you.

Compare that with the laborious procedural statements and expressions in a typical code generator that you have to meticulously craft to get the data that you want. Imagine that you are writing an application that works with the database. What if instead of saying select CustomerName from Customers where CustomerID = 'ABC' you are forced to write code that opens a database file, opens the primary key index, creates a cursor, moves the cursor until your reach the desired record, declares a buffer to read the data out, and only then you can start using the result. Sounds like a nightmare. Typical code generator templates are going through similar pains when code based on any complex data model is to be generated.

Instead of writing code in a specific target language you declare the XML constructs that your program must be built from. Consider the following declaration.

<variableDeclarationStatement type="DbProviderFactory" name="factory">
  <init>
    <methodInvokeExpression methodName="GetFactory">
      <target>
        <typeReferenceExpression type="DbProviderFactories"/>
      </target>
      <parameters>
        <primitiveExpression value="{$DbProviderName}"/>
      </parameters>
    </methodInvokeExpression>
  </init>
</variableDeclarationStatement>

It sure reads like a book.

I am declaring a variable of type DbProviderFactory named factory and initializing it by invoking method GetFactory while targeting type DbProviderFactories and passing on parameter in a form of a primitive expression that drives its values from XSLT variable DbProviderName.

The result in a C# program will look like the one below if DbProviderName variable is equal to System.Data.SqlClient.

DbProviderFactory factory = DbProviderFactories.GetFactory("System.Data.SqlClient");

Best of all you can rely on the power of Visual Studio to guide you in your quest of writing a code generation template. Complete intellisense support makes the process very simple.

image

Code OnTime Generator features an automatic processor of output program code declarations that are translated with the help of System.CodeDom code generation library built into Microsoft.NET.

Support for Multiple Languages

Dependency on System.CodeDom provides a benefit of being able to generate the output code in any programming language supported by Microsoft.NET. We go a step further in overcoming some of the limitations of the System.CodeDom code generator and are providing additional constructs and full support for many language features for two programming languages: Visual C# and Visual Basic.NET.

High Quality Formatting

The produced code comes out with almost perfect formatting. You will likely say that it does look as if a human being has been crafting the lines of the output program text. Automatic formatting saves huge amount of time and gives you  a peace of mind to known that the final code will come out alright.

Open User-Defined Data Model

There is a sample project Hello World that was designed to showcase the capabilities of the code generator. Here is project data model that can be found in HelloWorld.Project.xml file.

<?xml version="1.0" encoding="utf-8" ?>
<project xmlns="urn:schemas-codeontime-com:hello-world-project">
  <providerName>System.Data.SqlClient</providerName>
  <connectionString></connectionString>
</project>

The project will generate a program that opens a connection to any supported database, read its content, and print out a number of records in the database tables. All we need is the name of ADO.NET provider and a connection string. Absolutely arbitrary element names are included in our XML project database.  There are no mandates or requirements that are imposed on your data by any features of the code generator. You decide what sort of data will be in the foundation of your code generation project.

Unlimited Flexibility Of Design Environment

Each project has file CodeOnTime.Project.xml that defines the steps that code generator must perform to produce the output. Here is a snippet from Hello World project.

<load path="$ProjectPath">
  <if test="not(file/@name='HelloWorld.Project.xml')">
    <copy input="$LibraryPath\HelloWorld.Project.xml"
output="HelloWorld.Project.xml"/> </if> </load> <!-- opens the main project page --> <navigate url="HelloWorld.Start.htm"/>

In this snippet the code generator will load the list of files in the output project folder.

If there is no HelloWorld.Project.xml there then the file is copied from the library folder to the project folder.

Next the project build script directs code generator to load HelloWorld.Start.htm file located in the project library folder.

Our code generator relies on Java Script and DHTML. Build-in web browser loads project pages and completely relies on this pages to display an appropriate user interface, update the data model, and signal when navigate step is over. All pages are relying on the standard Microsoft.Ajax.js library, which brings significant improvements in making it simpler to build UI with Java Script.

All code generation templates and included "as is" and can be used as a foundation for your own projects.

Code Generation Primer

Project Hello World is provided to give you a head-start with your own code generation ideas. Here is how you start development.

Run Visual Studio 2008  or Visual Web Developer 2008 Express Edition and select File|Open Web Site command in the menu. Browse to [My Documents]\Code OnTime\Library folder and open it as if it were a web site.

Visual Studio will suggest to convert this "site" to the web site that can run with Microsoft.NET 3.5. Press OK button. The Solution Explorer will display a similar set of files:

image 

Files that start with underscore symbol are collections of system files that provide XSD schemas, shared HTML snippets and system Java Script files. One of the folders holds the entire AjaxControlToolkit in it, which is being reused in a few projects.

File Web.config has been created by Visual Studio and can be ignored.

Copy any project that you would like to use as your own template and paste it into the root of the library. Open CodeOnTime.Project.xml file and make changes at the top of the project to reflect the project name, and description. Also come up with a product ID of your own.

<information>
  <product>CNT200809-MHW</product>
  <title>My Hello World</title>
  <description>This is my world.</description>
  <vendor>Contoso</vendor>
  <website>http://www.contoso.com</website>
</information>

Run Code OnTime Generator and start creating a new project.

image

You project will show up right there. Any future code generation library updates will not affect your project.

You can start making immediate improvements with full intellisense support of Visual Studio. Intellisense and hints are available in XSLT stylesheets, in Java Script libraries, in codedom files, and in project build file.

If you are working on your own project and have a question that requires an answer then please don't hesitate to drop us a message at http://codeontime.com/contactus.aspx. We are here to help

Wednesday, September 17, 2008PrintSubscribe
Working With Binary Large Objects (BLOB)

Modern web applications are frequently dealing with large data files of various formats commonly referred as Binary Large Objects. In this article we will demonstrate how to implement BLOB support in Data Aquarium Framework and Aquarium Express applications.

Generate an Aquarium Express project from Northwind database and open the generated web site in Visual Studio 2008 or Visual Web Developer 2008 Express Edition. Open the default page in a web browser and selected Categories data controller in the drop down at the top of the page. 

image

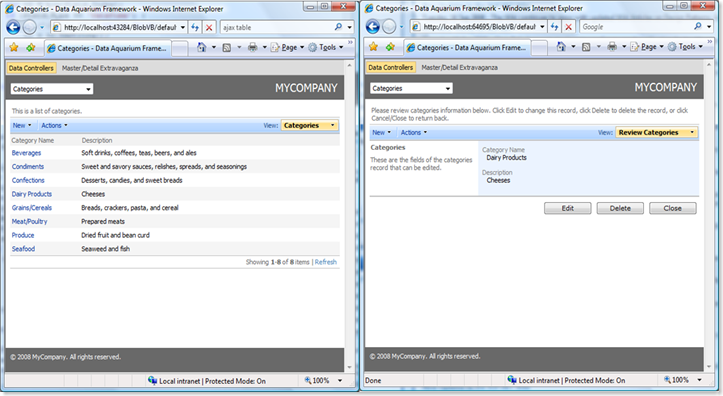
The standard grid and form views are only displaying product category name and description data fields. Future versions of Data Aquarium Framework will provide automatic support for BLOB fields. We will enhance the presentation that can be generated today to include a category picture and support uploading of new pictures as well.

Image Handler

We will start by adding a generic handler Blob.ashx to the root of our web site. The purpose of this handler is to deliver a category picture to a web browser in response to a request that specifies a category ID.

Here is how the handler works.

First it verifies that there is a parameter CategoryID in the requested URL that represents a number. If so then a picture is retrieved by SQL query executed with the help of MyCompany.Data.SqlText utility class generated automatically for every project. An attempt is made to determine the binary format of the picture. We are trying to load the picture by calling the method FromStream of System.Drawing.Image class. If attempt has failed then we will try to read the picture again with offset of 78. This is only necessary if you are working with Northwind database, which supports one of the older proprietary formats that were introduced by Microsoft a long time ago.

Now it is time to return the picture to a requesting browser. We identify the content type of the picture by looking up a dictionary of image content types created by static (shared) constructor of the generic handler. Then we write the picture into the output stream.

The last and important step is to tell the requesting browser not to cache the output produced by handler.

Image handler Blog.ashx written in C#:

<%@ WebHandler Language="C#" Class="Blob" %>

using System;
using System.Drawing;
using System.Drawing.Imaging;
using System.Collections.Generic;
using System.IO;
using System.Web;
using MyCompany.Data;

public class Blob : IHttpHandler
{
    public void ProcessRequest(HttpContext context)
    {
        int categoryId;
        if (Int32.TryParse(context.Request.Params["CategoryID"], out categoryId))
            using (SqlText getPicture = new SqlText(
                "select Picture from Categories where CategoryId = @CategoryId"))
            {
                getPicture.AddParameter("@CategoryId", categoryId);
                if (getPicture.Read() && !DBNull.Value.Equals(getPicture["Picture"]))
                {
                    byte[] picture = (byte[])getPicture["Picture"];
                    int offset = 0;
                    Image img = null;
                    try
                    {
                        img = Image.FromStream(new MemoryStream(picture));
                    }
                    catch (Exception)
                    {
                        offset = 78; // correction for Northwind image format
                        img = Image.FromStream(
                            new MemoryStream(picture, offset, picture.Length - offset));
                    }
                    context.Response.ContentType = ImageFormats[img.RawFormat.Guid];
                    context.Response.OutputStream.Write(picture, offset,
                        picture.Length - offset);
                }
            }
        context.Response.Cache.SetCacheability(HttpCacheability.NoCache);
    }

    public bool IsReusable { get { return false; } }

    public static SortedDictionary<Guid, string> ImageFormats;

    static Blob()
    {
        ImageFormats = new SortedDictionary<Guid, string>();
        ImageFormats.Add(ImageFormat.Bmp.Guid, "image/bmp");
        ImageFormats.Add(ImageFormat.Emf.Guid, "image/emf");
        ImageFormats.Add(ImageFormat.Exif.Guid, "image/exif");
        ImageFormats.Add(ImageFormat.Gif.Guid, "image/gif");
        ImageFormats.Add(ImageFormat.Jpeg.Guid, "image/jpeg");
        ImageFormats.Add(ImageFormat.Png.Guid, "image/png");
        ImageFormats.Add(ImageFormat.Tiff.Guid, "image/tiff");
        ImageFormats.Add(ImageFormat.Wmf.Guid, "image/wmf");
    }
}

Image handler Blob.ashx written in VB.NET:

<%@ WebHandler Language="VB" Class="Blob" %>

Imports System
Imports System.Web
Imports System.Drawing
Imports System.Drawing.Imaging
Imports System.Collections.Generic
Imports System.IO
Imports MyCompany.Data

Public Class Blob : Implements IHttpHandler
    
    Public Sub ProcessRequest(ByVal context As HttpContext) _
        Implements IHttpHandler.ProcessRequest
        Dim categoryId As Integer
        If (Integer.TryParse(context.Request.Params("CategoryID"), categoryId)) Then
            Using getPicture As SqlText = New SqlText( _
                "select Picture from Categories where CategoryId = @CategoryId")
                getPicture.AddParameter("@CategoryID", categoryId)
                If (getPicture.Read() AndAlso Not DBNull.Value.Equals(getPicture("Picture"))) Then
                    Dim picture As Byte() = CType(getPicture("Picture"), Byte())
                    Dim offset As Integer
                    Dim img As Image = Nothing
                    Try
                        img = Image.FromStream(New MemoryStream(picture))
                    Catch ex As Exception
                        offset = 78
                        img = Image.FromStream( _
                            New MemoryStream(picture, offset, picture.Length - offset))
                    End Try
                    context.Response.ContentType = ImageFormats(img.RawFormat.Guid)
                    context.Response.OutputStream.Write(picture, offset, picture.Length - offset)
                End If
            End Using
        End If
        context.Response.Cache.SetCacheability(HttpCacheability.NoCache)
    End Sub
 
    Public ReadOnly Property IsReusable() As Boolean _
        Implements IHttpHandler.IsReusable
        Get
            Return False
        End Get
    End Property
    
    Public Shared ImageFormats As SortedDictionary(Of Guid, Object)
    
    Shared Sub New()
        ImageFormats = New SortedDictionary(Of Guid, Object)
        ImageFormats.Add(ImageFormat.Bmp.Guid, "image/bmp")
        ImageFormats.Add(ImageFormat.Emf.Guid, "image/emf")
        ImageFormats.Add(ImageFormat.Exif.Guid, "image/exif")
        ImageFormats.Add(ImageFormat.Gif.Guid, "image/gif")
        ImageFormats.Add(ImageFormat.Jpeg.Guid, "image/jpeg")
        ImageFormats.Add(ImageFormat.Png.Guid, "image/png")
        ImageFormats.Add(ImageFormat.Tiff.Guid, "image/tiff")
        ImageFormats.Add(ImageFormat.Wmf.Guid, "image/wmf")
    End Sub

End Class

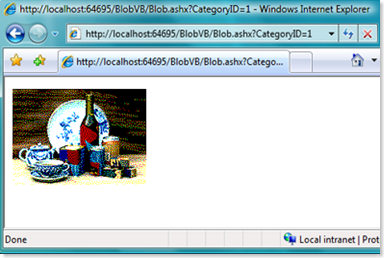
If you navigate to this handler in a web browser then a blank page will be displayed. Specify CategoryID parameter in a browser URL and a corresponding image will show up.

image

Displaying Picture From Database in Form View

Create page Categories.aspx in the root of your web site and enter the page markup as follows.

<%@ Page Language="VB" MasterPageFile="~/MasterPage.master" AutoEventWireup="false"
    CodeFile="Categories.aspx.vb" Inherits="Categories" Title="Categories" %>

<asp:Content ID="Content1" ContentPlaceHolderID="head" runat="Server">
</asp:Content>
<asp:Content ID="Content2" ContentPlaceHolderID="Header1Placeholder" runat="Server">
    Categories
</asp:Content>
<asp:Content ID="Content3" ContentPlaceHolderID="Header2Placeholder" runat="Server">
    Northwind
</asp:Content>
<asp:Content ID="Content4" ContentPlaceHolderID="BodyPlaceholder" runat="Server">
    <div id="CategoryList" runat="server" />
    <aquarium:DataViewExtender ID="CategoriesExtender" runat="server" 
        Controller="Categories" TargetControlID="CategoryList" />
    <div id="Categories_editForm1" style="display: none">
        {CategoryName}
        <br />
        {Description}
        <br />
        <a href="Blob.ashx?CategoryID={CategoryID:d}" target="_blank">
            <img src="Blob.ashx?CategoryID={CategoryID:d}" alt="Category" 
                style="height: 120px; border: 0px" /></a>
    </div>
</asp:Content>

This page is based on standard master page MasterPage.master included in the generated project. Our page declares CategoryList element as a placeholder for categories and CategoriesExtender, which is responsible for making sure that the view will be rendered there.

Then there is also template Categories_editForm1 for editForm1 view that must be applied when the view is to be rendered on this page by data controller Categories. The template is not displayed in the page. Read about custom form templates to better understand form and grid template capabilities of the framework.

Template instructs client-side  java script component Web.DataView to substitute CategoryName and Description with corresponding markup that would otherwise be rendered if there was no template.

There are also two references to CategoryID that are included into URLs pointing to Blob.ashx generic handler. Both references are formatted as CategoryID:d. The letter following the colon is a format string that will force Web.DataView to take the corresponding field value and format the value with java script String.format method call, which looks like String.format('{0:d}',v) where v is a value. This inserts only the string presentation of category ID instead of the complicated markup that would have been rendered otherwise. That makes it possible to use ID in the URL that is passed to the action handler.

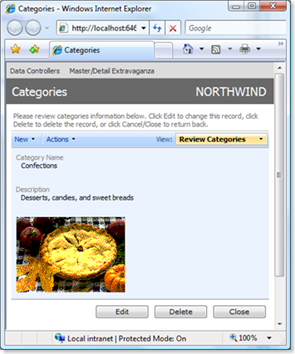
Open Categories.aspx in a web browser and select any category. A view similar to the one in the screen shot will be presented. Click on the category picture and a full size image will open in a new web browser window.

image

If your application is not dealing with images then you can get rid of the img element in the template and have it replaced with text click to download or some other phrase.

Uploading Picture to Database

Let's implement support for picture uploading, which will not be any different if you are dealing with other file formats.

Add web form Uploader.aspx to the root of our web site and make the following changes.

<%@ Page Language="VB" AutoEventWireup="false" CodeFile="Uploader.aspx.vb" 
    Inherits="Uploader" %>
<!DOCTYPE html PUBLIC "-//W3C//DTD XHTML 1.0 Transitional//EN" 
    "http://www.w3.org/TR/xhtml1/DTD/xhtml1-transitional.dtd">
<html xmlns="http://www.w3.org/1999/xhtml">
<head id="Head1" runat="server">
    <title>Uploader</title>
    <style type="text/css">
        body, input
        {
            font-family: Tahoma;
            font-size: 8.5pt;
            margin: 2px;
        }
    </style>
    <script type="text/javascript">
    function uploadSuccess(){
        parent.window.Web.DataView.showMessage(
          '<b>Congratulations!</b> Category picture has been uploaded successfully.')
        parent.window.Web.DataView.find('CategoriesExtender').goToPage(-1);
    }
    </script>
</head>
<body>
    <form id="form1" runat="server">
    <div>
        <div id="StartUpload" runat="server">
            Click
            <asp:LinkButton ID="ShowUploadControls" runat="server" Text="here" 
                OnClick="ShowUploadControls_Click" />
            to upload a category image.
        </div>
        <div id="UploadControls" runat="server" visible="false">
            <asp:Button ID="Submit" runat="server" Text="Submit" 
                OnClick="Submit_Click" />
            <asp:FileUpload ID="FileUpload1" runat="server" Width="300px" />
        </div>
    </div>
    </form>
</body>
</html>

The body of the form has two div elements. The first contains a link that is supposed to display upload controls to user when clicked. The upload controls are hidden by default. These controls are FileUpload1 control and Submit button. There is also a java script function uploadSuccess that we will discuss a little bit later.

Here is how a C# code-behind of the page looks:

using System;
using System.Web;
using MyCompany.Data;

public partial class Uploader : System.Web.UI.Page
{
    protected void ShowUploadControls_Click(object sender, EventArgs e)
    {
        UploadControls.Visible = true;
        StartUpload.Visible = false;
    }
    protected void Submit_Click(object sender, EventArgs e)
    {
        if (FileUpload1.HasFile)
            using (SqlText updatePicture = new SqlText(
                "update Categories set Picture=@Picture where CategoryID = @CategoryID"))
            {
                updatePicture.AddParameter("@Picture", FileUpload1.FileBytes);
                updatePicture.AddParameter("@CategoryID", Request.Params["CategoryID"]);
                updatePicture.ExecuteNonQuery();
            }
        UploadControls.Visible = false;
        StartUpload.Visible = true;
        ClientScript.RegisterClientScriptBlock(typeof(Uploader), ClientID, 
            "uploadSuccess();", true);
    }
}

VB.NET version of the same code-behind class is presented here:

Imports System
Imports System.Web
Imports MyCompany.Data

Partial Class Uploader
    Inherits System.Web.UI.Page

    Protected Sub ShowUploadControls_Click(ByVal sender As Object, _
       ByVal e As System.EventArgs) Handles ShowUploadControls.Click
        UploadControls.Visible = True
        StartUpload.Visible = False
    End Sub

    Protected Sub Submit_Click(ByVal sender As Object, _
      ByVal e As System.EventArgs) Handles Submit.Click
        If (FileUpload1.HasFile) Then
            Using updatePicture As SqlText = New SqlText( _
              "update Categories set Picture=@Picture " + _
              "where CategoryID = @CategoryID")
                updatePicture.AddParameter("@Picture", FileUpload1.FileBytes)
                updatePicture.AddParameter("@CategoryID", Request.Params("CategoryID"))
                updatePicture.ExecuteNonQuery()
            End Using
            UploadControls.Visible = False
            StartUpload.Visible = True
            ClientScript.RegisterClientScriptBlock( _
              Me.GetType(), ClientID, "uploadSuccess();", True)
        End If
    End Sub
End Class

Event handler ShowUploadControls_Click simply displays Submit button and FileUpload1 file upload control.

Event handler Submit_Click writes the submitted file to the database with the help of utility class MyCompany.Data.SqlText that we have used previously. You can use your own favorite data access controls including standard ADO.NET classes. Then the visibility of web controls is reversed. The last step is to render a call to java script function uploadSuccess defined in the markup of Uploader.aspx web form. This method will execute as soon as the page is loaded in a browser window.

Let's take a closer look at this function.

<script type="text/javascript">
function uploadSuccess(){
    parent.window.Web.DataView.showMessage(
      '<b>Congratulations!</b> Category picture has been uploaded successfully.')
    parent.window.Web.DataView.find('CategoriesExtender').goToPage(-1);
}
</script>

This function reaches out to a parent of a browser window and uses Web.DataView.showMessage method. Then it finds CategoriesExtender java script component and asks it to refresh itself.

If you do open this page in a web browser then there is no parent window and the script will report an error when you upload a file. We intend to use this script in an iframe element that we will incorporate into the Categories_editForm1 template to provide smooth user experience.

Let's return back to Categories.aspx for a minute and change the template for editForm1 as follows.

<div id="Categories_editForm1" style="display: none">
    {CategoryName}
    <br />
    {Description}
    <br />
    <a href="Blob.ashx?CategoryID={CategoryID:d}" target="_blank">
        <img src="Blob.ashx?CategoryID={CategoryID:d}" alt="Category" 
            style="height: 120px; border: 0px" /></a>
    <iframe src="Uploader.aspx?CategoryID={CategoryID:d}" 
        style="width: 400px; height: 30px; margin-top: 4px" 
        frameborder="0" scrolling="no"></iframe>
</div>

We have inserted iframe element at the end of the template. The source of the iframe is referring to Uploader.aspx and specifies a category ID in the URL of the src attribute.

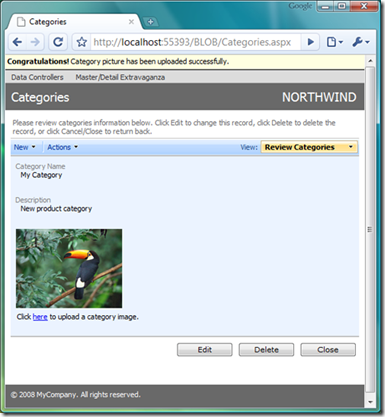
Open Categories.aspx in a web browser and start creating new category.

image

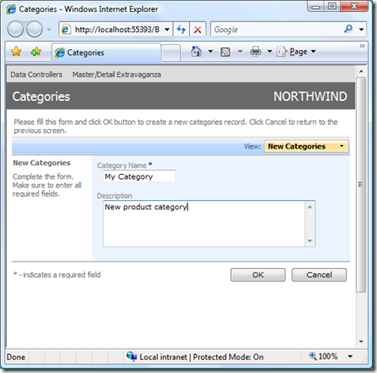
View createForm1 is presented. Enter category name and description and click OK button. Select the new category in the grid view. There is no picture defined for My Category yet, which will result in a missing image icon displayed under category description.

image

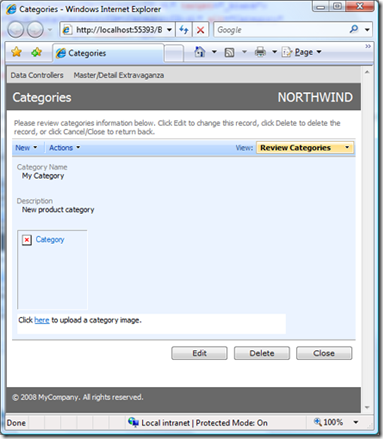
Click on the link displayed in the iframe under the image. Submit button and FileUpload1 are visible now. Select a picture for the category. 

image

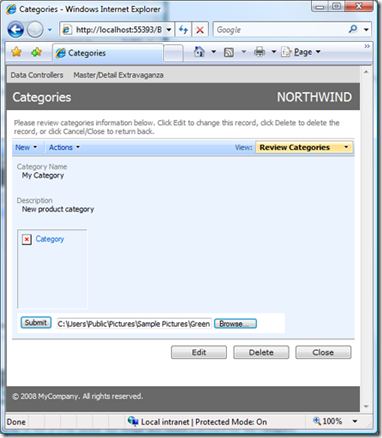
Click on Submit button and the uploaded picture will be displayed under category description data field.

image

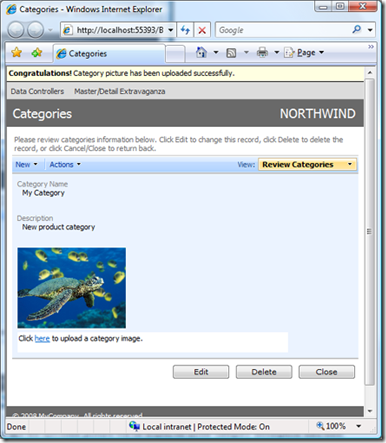
The picture has been stored to the database by Uploader.aspx and retrieved by Blob.ashx generic handler when CategoriesExtender instance of java script Web.DataView class has refreshed presentation in response to uploadSuccess java script function call.

Also, notice a yellow bar at the top of the page. This message has been also displayed by uploadSuccess, which has taken advantage of Web.DataView.showMessage method that creates a static message bar that stays at the top of the page even if you scroll the page in a browser.

image

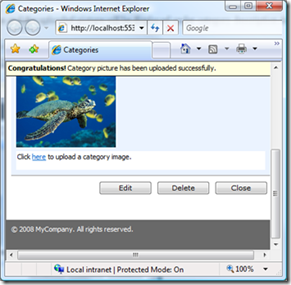
Any subsequent action in user interface will hide the message bar automatically. The same facility is used by Web.DataView component to report data update errors or any other important messages that occur in a lifecycle of the views.

Does This Work With All Browsers?

This technique does work with all modern browsers. Here is the same page displayed in Google Chrome.

image