Master/Detail

Labels
AJAX(112) App Studio(9) Apple(1) Application Builder(245) Application Factory(207) ASP.NET(95) ASP.NET 3.5(45) ASP.NET Code Generator(72) ASP.NET Membership(28) Azure(18) Barcode(2) Barcodes(3) BLOB(18) Business Rules(1) Business Rules/Logic(140) BYOD(13) Caching(2) Calendar(5) Charts(29) Cloud(14) Cloud On Time(2) Cloud On Time for Windows 7(2) Code Generator(54) Collaboration(11) command line(1) Conflict Detection(1) Content Management System(12) COT Tools for Excel(26) CRUD(1) Custom Actions(1) Data Aquarium Framework(122) Data Sheet(9) Data Sources(22) Database Lookups(50) Deployment(22) Designer(178) Device(1) DotNetNuke(12) EASE(20) Email(6) Features(101) Firebird(1) Form Builder(14) Globalization and Localization(6) How To(1) Hypermedia(2) Inline Editing(1) Installation(5) JavaScript(20) Kiosk(1) Low Code(3) Mac(1) Many-To-Many(4) Maps(6) Master/Detail(36) Microservices(4) Mobile(63) Mode Builder(3) Model Builder(3) MySQL(10) Native Apps(5) News(18) OAuth(9) OAuth Scopes(1) OAuth2(13) Offline(20) Offline Apps(4) Offline Sync(5) Oracle(11) PKCE(2) Postgre SQL(1) PostgreSQL(2) PWA(2) QR codes(2) Rapid Application Development(5) Reading Pane(2) Release Notes(184) Reports(48) REST(29) RESTful(29) RESTful Workshop(15) RFID tags(1) SaaS(7) Security(81) SharePoint(12) SPA(6) SQL Anywhere(3) SQL Server(26) SSO(1) Stored Procedure(4) Teamwork(15) Tips and Tricks(87) Tools for Excel(3) Touch UI(93) Transactions(5) Tutorials(183) Universal Windows Platform(3) User Interface(338) Video Tutorial(37) Web 2.0(100) Web App Generator(101) Web Application Generator(607) Web Form Builder(40) Web.Config(9) Workflow(28)
Archive
Blog
Master/Detail
Saturday, April 4, 2009PrintSubscribe
ExternalFilter And Modal Views

New ExternalFilter property is available to business rules developers and allows implementing code that is aware of the external master-detail relationships without mixing business logic and user interface code and markup.

image

Sample Project

You can see this sample live at http://dev.codeontime.com/demo/externalfilter. The source code is available at http://dev.codeontime.com/demo/externalfilter/Source.zip.

Generate a Data Aquarium application from Northwind database with business objects enabled and add ~/EmployeeTerritories.aspx page to the root of the web site created by Code OnTime Generator.

Open ~/Controllers/EmployeeTerritories.xml and create its copy named ~/Controllers/MyEmployeeTerritories.xml. Change view grid1 to reveal the territory code and add territory description as a separate field.

<view id="grid1" type="Grid" commandId="command1" label="Employee Territories">
    <headerText>This is a list of employee territories. </headerText>
    <dataFields>
        <dataField fieldName="EmployeeID"/>
        <dataField fieldName="TerritoryID" />
        <dataField fieldName="TerritoryTerritoryDescription"/>
        <dataField fieldName="TerritoryRegionRegionDescription"/>
    </dataFields>
</view>

Modify EmployeeTerritories.aspx as shown in this snippet.

<%@ Page Title="" Language="C#" MasterPageFile="~/MasterPage.master" 
    AutoEventWireup="true" CodeFile="EmployeeTerritories.aspx.cs" 
    Inherits="EmployeeTerritories" %>

<asp:Content ID="Content1" ContentPlaceHolderID="head" runat="Server">
</asp:Content>
<asp:Content ID="Content2" ContentPlaceHolderID="Header1Placeholder" runat="Server">
    Employee Territories
</asp:Content>
<asp:Content ID="Content3" ContentPlaceHolderID="Header2Placeholder" runat="Server">
    Northwind
</asp:Content>
<asp:Content ID="Content4" ContentPlaceHolderID="BodyPlaceholder" runat="Server">
    <div id="EmployeesDiv" runat="server">
    </div>
    <aquarium:DataViewExtender ID="EmployeesExtender" runat="server" 
        Controller="Employees"
        PageSize="5" TargetControlID="EmployeesDiv" />
    <div id="EmployeeTerritoriesDiv" runat="server" />
    <aquarium:DataViewExtender ID="EmployeeTerritoriesExtender" runat="server" 
        Controller="MyEmployeeTerritories" 
        TargetControlID="EmployeeTerritoriesDiv" FilterFields="EmployeeID" 
        FilterSource="EmployeesExtender"
        PageSize="20" />
</asp:Content>

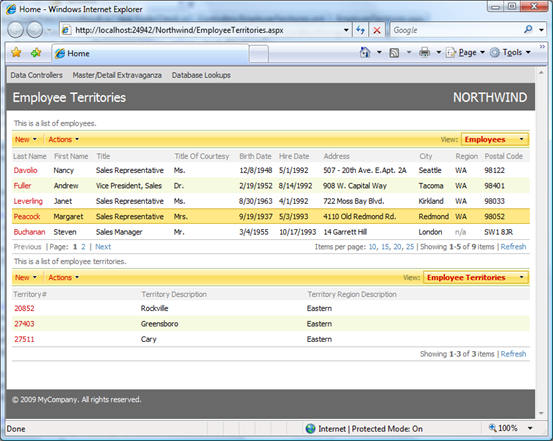
Open the page in the browser. The following user interface will be presented.

image

Task

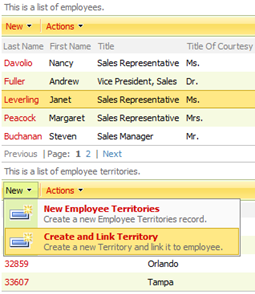
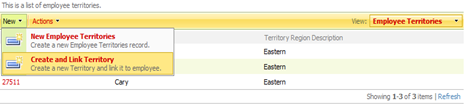
Users can quickly associate selected employee and territories by clicking New | New Employee Territories option on the action bar of Employee Territories view.

We will add a new option to New menu to allow simultaneous creation of a new territory and association of this territory with the selected employee. We will be using modal dialog and ExternalFilter property for this task.

Implementation

Add the new action to MyEmployeeTerritories.xml.

<actionGroup scope="ActionBar" headerText="New">
    <action commandName="New" commandArgument="createForm1" 
        headerText="New Employee Territories" 
        description="Create a new Employee Territories record." />
    <action commandName="Custom" commandArgument="CreateAndLinkTerritory" 
        headerText="Create and Link Territory" 
        description="Create a new Territory and link it to employee." 
        cssClass="NewLargeIcon"/>
</actionGroup>

image 

Modify command1 and add new command2 as follows.

        <command id="command1" type="Text">
            <text>
                <![CDATA[
select
    "EmployeeTerritories"."EmployeeID" "EmployeeID"
    ,"Employee"."LastName" "EmployeeLastName"
    ,"EmployeeTerritories"."TerritoryID" "TerritoryID"
    ,"Territory"."TerritoryDescription" "TerritoryTerritoryDescription"
    ,"TerritoryRegion"."RegionDescription" "TerritoryRegionRegionDescription"
    ,null "TerritoryCode"
    ,null "TerritoryDescription"
    ,null "RegionID"
from "dbo"."EmployeeTerritories" "EmployeeTerritories"
    left join "dbo"."Employees" "Employee" on "EmployeeTerritories"."EmployeeID" = "Employee"."EmployeeID"
    left join "dbo"."Territories" "Territory" on "EmployeeTerritories"."TerritoryID" = "Territory"."TerritoryID"
    left join "dbo"."Region" "TerritoryRegion" on "Territory"."RegionID" = "TerritoryRegion"."RegionID"
]]>
            </text>
        </command>
        <command id="command2" type="Text">
            <text>
                <![CDATA[
select
    null "EmployeeID"
    ,null "EmployeeLastName"
    ,null "TerritoryID"
    ,null "TerritoryTerritoryDescription"
    ,null "TerritoryRegionRegionDescription"
    ,null "TerritoryCode"
    ,null "TerritoryDescription"
    ,null "RegionID"
    
]]>
            </text>
        </command>
    </commands>
    <fields>

Notice that command1 was enhanced with three additional fields TerritoryCode, TerritoryDescription, and RegionID that are being selected as empty values. Command command2 mirrors all fields of command1 with one exception - all fields are returned as NULL values. The second command returns a single row of empty values.

Let's add definitions of the new fields to the fields element of the data controller.

<!-- new fields to support "createTerritory" view -->
<field name="TerritoryCode" type="String" allowNulls="false" label="Code"/>
<field name="TerritoryDescription" type="String" allowNulls="false" label="Description"/>
<field name="RegionID" type="Int32" allowNulls="false" label="Region">
    <items style="ListBox" dataController="Region" />
</field>

Finally, we will add createTerritory view. This view will be displayed in response to a selection of Create and Link Territory action bar menu option and is relying on command2 for its data.

<view id="createTerritory" type="Form" commandId="command2" 
    label="Create New Territory">
    <headerText>Please fill this form and click OK button to create 
        a new territory and link it to the employee. Click Cancel 
        to return to the previous screen.</headerText>
    <categories>
        <category headerText="Employee Information">
            <description>New territory will be linked to this employee.</description>
            <dataFields>
                <dataField fieldName="EmployeeLastName"/>
            </dataFields>
        </category>
        <category headerText="Territory">
            <description><![CDATA[
                Please enter the territory code, territory description, and 
                select a territory region. <br/><br/>You can use zip code 
                of the territory as code and city or county name as 
                territory description.]]></description>
            <dataFields>
                <dataField fieldName="TerritoryCode" columns="5"/>
                <dataField fieldName="TerritoryDescription" />
                <dataField fieldName="RegionID" />
            </dataFields>
        </category>
    </categories>
</view>

Now we are ready to write some code. Data Aquarium Framework promotes business logic reusability. Custom code is implemented in independent classes that are hooked to data controllers via @handler attribute.

Create a new class Class1 and link the class to data controller.

<dataController name="EmployeeTerritories" 
    conflictDetection="overwriteChanges" 
    label="Employee Territories" 
    xmlns="urn:schemas-codeontime-com:data-aquarium" 
    handler="Class1">
    ......

Enter the following code in the class definition.

C#

using System;
using System.Collections.Generic;
using System.Linq;
using System.Web;
using MyCompany.Data;
using MyCompany.Data.Objects;

public class Class1 : BusinessRules
{
    public Class1()
    {
    }

    [ControllerAction("MyEmployeeTerritories", 
        "Custom", "CreateAndLinkTerritory")]
    protected void NewTerritory()
    {
        if (Arguments.ExternalFilter.Length > 0 
            && Arguments.ExternalFilter[0].Value != null)
        {
            Employees emp = Employees.SelectSingle(
                Convert.ToInt32(Arguments.ExternalFilter[0].Value));
            Context.Session["Employee"] = emp;
            Context.Session["ControllerID"] = Arguments.ContextKey;
            Result.ShowModal("MyEmployeeTerritories", "createTerritory", 
                "New", "createTerritory");
        }

        else
            Result.ShowAlert("Please select an employee.");
    }

    [RowBuilder("MyEmployeeTerritories", 
        "createTerritory", RowKind.New)]
    protected void CreateTerritoryNewRow()
    {
        Employees emp = (Employees)Context.Session["Employee"];
        UpdateFieldValue("EmployeeLastName", emp.LastName);
    }

}

VB

Imports Microsoft.VisualBasic
Imports MyCompany.Data
Imports MyCompany.Data.Objects

Public Class Class1
    Inherits BusinessRules

    <ControllerAction("MyEmployeeTerritories", _
        "Custom", "CreateAndLinkTerritory")> _
    Protected Sub NewTerritory()
        If (Arguments.ExternalFilter.Length > 0 _
                AndAlso Not Arguments.ExternalFilter(0).Value Is Nothing) Then
            Dim emp As Employees = Employees.SelectSingle( _
                Convert.ToInt32(Arguments.ExternalFilter(0).Value))
            Context.Session("Employee") = emp
            Context.Session("ControllerID") = Arguments.ContextKey
            Result.ShowModal("MyEmployeeTerritories", "createTerritory", _
                             "New", "createTerritory")
        Else
            Result.ShowAlert("Please select an employee.")
        End If
    End Sub

    <RowBuilder("MyEmployeeTerritories", _
                "createTerritory", RowKind.New)> _
    Protected Sub CreateTerritoryNewRow()
        Dim emp As Employees = CType(Context.Session("Employee"), Employees)
        UpdateFieldValue("EmployeeLastName", emp.LastName)
    End Sub

End Class

Class Class1 is inherited from BusinessRules base. Business rules are recognized by the framework. Business rules class members are treated as serving a specific purpose when adorned with certain attributes.

Attribute ControllerAction on method NewTerritory will instruct the framework to invoke this method whenever a custom command with argument CreateAndLinkTerritory is invoked in a client-side JavaScript component Web.DataView.

Business rules property Arguments gives access to all information about the incoming command request. Its own new property ExternalFilter allows inspecting values of a master-detail link when a Web.DataView component is linked as a child in such a relationship. At the top of the article we have configured EmloyeeTerritoriesExtender component to be filtered by EmployeeID field. The extender injects a JavaScript snippet into the page to create an instance of Web.DataView with the appropriate filter.

Method NewTerritory verifies if an employee is selected and then stores the selected employee information in the web request session and displays a view createTerritory in a modal mode. The startup command for the view is New with an argument that points to the view itself. This will cause the view to be displayed in the "new record" mode.

image

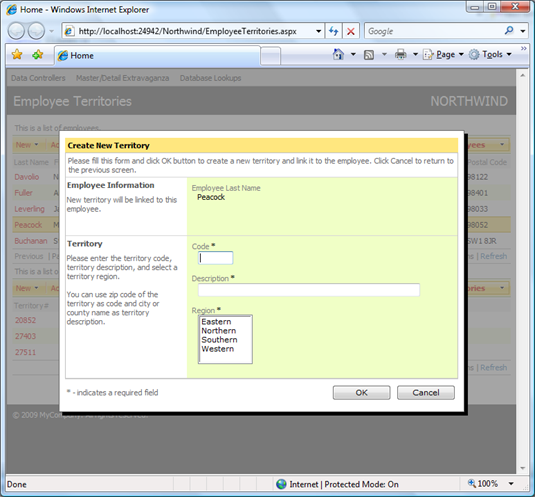
In the screen shot you can see this in action.

Note that employee name corresponds to the name of the employee selected in the list of employees. The name is provided by method CreateTerritoryNewRow adorned with an attribute RowBuilder. This method retrieves selected employee from the session and updates the row returned with employee's last name just before the row is returned to the client.

If you set a break point in method CreateTerritoryNewRow then the debugger will stop there twice. It happens for the first time when view is initialized for modal presentation. Then the startup command is executed to switch the view in the "new record" mode, which causes the second invocation. The framework does not distinguish views to be serving any specific purpose and assumes the "new record" mode only when the New command has been executed.

The following code will create a new territory and link it to the selected employee by create a new record in EmployeeTerritories table. This code will execute when user clicks the OK button.

C#

[ControllerAction("MyEmployeeTerritories", "createTerritory", 
    "Insert", ActionPhase.Before)]
protected void NewTerritorySave(string territoryCode, 
    string territoryDescription, int regionId)
{
    PreventDefault();
    Employees emp = (Employees)Context.Session["Employee"];
    Territories t = new Territories();
    t.TerritoryID = territoryCode;
    t.TerritoryDescription = territoryDescription;
    t.RegionID = regionId;
    if (t.Insert() == 1)
    {
        EmployeeTerritories et = new EmployeeTerritories();
        et.TerritoryID = t.TerritoryID;
        et.EmployeeID = emp.EmployeeID;
        et.Insert();
    }
    Result.HideModal();
    Result.ExecuteOnClient(
        String.Format("$find('{0}').goToPage(-1)", 
        Context.Session["ControllerID"]));
}

VB

<ControllerAction("MyEmployeeTerritories", "createTerritory", _
                      "Insert", ActionPhase.Before)> _
    Protected Sub NewTerritorySave(ByVal territoryCode As String, _
        ByVal territoryDescription As String, ByVal regionId As Integer)
        PreventDefault()
        Dim emp As Employees = CType(Context.Session("Employee"), Employees)
        Dim t As Territories = New Territories()
        t.TerritoryID = territoryCode
        t.TerritoryDescription = territoryDescription
        t.RegionID = regionId
        If t.Insert() = 1 Then
            Dim et As EmployeeTerritories = New EmployeeTerritories()
            et.TerritoryID = t.TerritoryID
            et.EmployeeID = emp.EmployeeID
            et.Insert()
        End If
        Result.HideModal()
        Result.ExecuteOnClient( _
            String.Format("$find('{0}').goToPage(-1)", _
            Context.Session("ControllerID")))

    End Sub

Command command2 is not based on any real database table. We are intercepting a request from createTerritory view to insert a new record via NewTerritorySave method. Any data fields available in the view can be listed as parameters of the method.

First, we prevent any default logic from executing when our method exits by calling PreventDefault.

Then we use the automatically generated business objects Employees, Territories, and EmployeeTerritories to update the database. Business objects are not equipped with database connections or commands, which allows storing them safely in ASP.NET session. Data manipulation commands are executed by business objects via Data Aquarium Framework. Business objects rely on the same data controller architecture to promote business logic reuse.

Last, we have to hide the modal view displayed at the moment in the user's browser. The request is executed in the context of the client side view createTerritory. Many methods available via business rules Result property are producing small snippets of JavaScript that are being accumulated while the request is processed on the server. Nothing happens until the method exists and the batch is returned to the browser.

Most likely you would want the employee territories refreshed and display a new territory that employee is responsible for. The last line of the method sends a JavaScript command to the browser to refresh the view that has requested displayed of createTerritory view in the first place. Client ID of the view was available in NewTerritory method via Arguments.ContextKey property.

Conclusion

Simple and power business rules model of Data Aquarium Framework allows archiving functionality of a significant complexity with a very modest amount of code. Database interactions are greatly simplified by business objects automatically generated by Code OnTime Generator.

Business rules and objects are available to subscribers to premium projects only.

Monday, September 29, 2008PrintSubscribe
DataViewExtender Events: selected and executed

Data Aquarium Framework includes a collection of JavaScript components that are rendering user interface in a web browser and are interacting with the server components of the framework. You can participate in the client-side life cycle by creating JavaScript event handlers that are responding to selected and executed events raised by Web.DataView component instances injected into the page by DataViewExtender server components.

Event selected is fired when a row is selected in the user interface. You can use get_selectedKey() method of Web.DataView component to find a primary key of a selected record.

Event executed is fired when a command has been executed. Event handler is provided with the result of execution on the server including auto-incremental primary key field values and error messages if any.

Let's explore these events by creating master-detail AJAX grid views that link Products to Suppliers in Northwind database.

Generate an Aquarium Express project with Code OnTime Generator from Northwind database and open this project in Visual Studio 2008 or Visual Web Developer 2008 Express Edition.

Add page Events.aspx to the root of the web site as shown in the sample below.

<%@ Page Language="C#" MasterPageFile="~/MasterPage.master" AutoEventWireup="true"
    CodeFile="Events.aspx.cs" Inherits="Events" Title="Events Demo" %>

<asp:Content ID="Content1" ContentPlaceHolderID="head" runat="Server">

    <script type="text/javascript">
function pageLoad() {
    var dataView = Web.DataView.find('SuppliersExtender');
    if (dataView) {
        dataView.add_selected(onSupplierSelected);
        dataView.add_executed(onSupplierExecuted);
    }
}

var justInserted = false;

function onSupplierSelected(sender) {
    if (justInserted) 
        justInserted = false;
    else
        updateProductsVisibility(sender.get_lastCommandName() != 'New');
}
function onSupplierExecuted(sender, args) {
    switch (sender._lastArgs.CommandName) {
        case 'Insert':
            updateProductsVisibility(true);
            justInserted = true;
            break;
        case 'Delete':
            updateProductsVisibility(false);
            break;
    }
}
function updateProductsVisibility(visible) {
    Sys.UI.DomElement.setVisible($get('ProductsPanel'), visible);
}
    </script>

</asp:Content>
<asp:Content ID="Content2" ContentPlaceHolderID="Header1Placeholder" runat="Server">
    Client-Side Events
</asp:Content>
<asp:Content ID="Content3" ContentPlaceHolderID="Header2Placeholder" runat="Server">
    Northwind
</asp:Content>
<asp:Content ID="Content4" ContentPlaceHolderID="BodyPlaceholder" runat="Server">
    <div id="Suppliers" runat="server" />
    <aquarium:DataViewExtender ID="SuppliersExtender" runat="server" 
        Controller="Suppliers" TargetControlID="Suppliers" PageSize="5"/>
    <br />
    <div id="ProductsPanel" style="display:none">
        <div id="Products" runat="server" />
        <aquarium:DataViewExtender ID="ProductsExtender" runat="server" 
            Controller="Products" TargetControlID="Products" PageSize="5"
            FilterFields="SupplierID" FilterSource="SuppliersExtender" />
    </div>
</asp:Content>

Open this page in a browser. You will see that products are not displayed under the suppliers grid.

image

Click on any supplier row and the page will display a list of relevant products.  If you start adding a new supplier then the list of products will disappear. The list of products will show up again when you actually insert a supplier record. The list of products goes away when you delete a supplier.

image

How does this work?

Let's do a quick code walkthrough.

Element ProductsPanel is wrapped around the placeholder for Products. It doesn't matter if the DataViewExtender component is within the boundaries of the panel. Just make sure that the placeholder is hidden.

<div id="ProductsPanel" style="display:none">
    <div id="Products" runat="server" />
    <aquarium:DataViewExtender ID="ProductsExtender" runat="server" 
        Controller="Products" TargetControlID="Products" PageSize="5"
        FilterFields="SupplierID" FilterSource="SuppliersExtender" />
</div>

ASP.NET AJAX Extensions library automatically invokes JavaScript function pageLoad() when the runtime client components are instantiated and initialized. It works very much like Page_Load function in your server code, which is called when ASP.NET is ready to pass your a control over a page with all server components ready for use. Method Web.DataView.find will find an instance of JavaScript Web.DataView component that was injected into the page by SuppliersExtender server component. This is a convenient spot to assign event handlers of selected and executed events.

function pageLoad() {
    var dataView = Web.DataView.find('SuppliersExtender');
    if (dataView) {
        dataView.add_selected(onSupplierSelected);
        dataView.add_executed(onSupplierExecuted);
    }
}

Function onSupplierSelected will be called whenever a supplier record is selected by a user. This method is invoking updateProductsVisibility function and passes true as a parameter if the last executed action command is not New. We are also making sure that visibility of the products grid is not altered if we just have executed an insertion of a new supplier.

var justInserted = false;

function onSupplierSelected(sender) {
    if (justInserted) 
        justInserted = false;
    else
        updateProductsVisibility(sender.get_lastCommandName() != 'New');
}

Actions that cause an insertion or a deletion of a supplier will result in product details being displayed or hidden accordingly.

function onSupplierExecuted(sender, args) {
    switch (sender._lastArgs.CommandName) {
        case 'Insert':
            updateProductsVisibility(true);
            justInserted = true;
            break;
        case 'Delete':
            updateProductsVisibility(false);
            break;
    }
}

The actual update of products grid visibility is very simple. We are using standard JavaScript components of ASP.NET AJAX Extensions library to hide DOM element with ProductsPanel identifier.

function updateProductsVisibility(visible) {
    Sys.UI.DomElement.setVisible($get('ProductsPanel'), visible);
}

You can enhance this code to suit your own needs by interacting with div elements on your page, which will typically result in hiding and showing of arbitrary page fragments to create less cluttered and more intuitive user interface presentation in your AJAX ASP.NET applications created with Code OnTime Generator.

Saturday, September 20, 2008PrintSubscribe
Displaying Detail Information in an Arbitrary Part of The Page Based on a Field in a Selected Master Record

Aquarium Express and Data Aquarium Framework offer excellent support for master-detail pages. See a live demo of three level master-detail page.

Master-detail support has been further extended with the latest release. Now you can link master and detail DataViewExtender components by any matching field.

Previously a detail DataViewExtender was expected to specify filter fields that are matched to the primary key fields of the master. The updated version will also try to set a link to primary key fields by name. If a primary key field has not been matched to a field specified in FilterFields property of the detail DataViewExtender then the entire set of fields is being searched. This allows to create additional master-detail AJAX views that can serve as informational panels to any selected records as long as the field names of master-detail link are matched.

Another enhancement in master-detail support simplifies cross-container links that can see "through" the templates. Previous releases of the framework were relying on $find method to locate a client master component specified by property FilterSource. It works great if all of your components are placed in the same naming container. This isn't so when a DataViewExtender is placed in a template. The new enhancement allows master-detail links between components that are not in the same naming container.

Consider the following example, which is designed to work with Aquarium Express or Data Aquarium Framework project created from Northwind database.

In a new web form based on MasterPage.master enter the following markup.

<%@ Page Language="C#" MasterPageFile="~/MasterPage.master" AutoEventWireup="true"
    CodeFile="InfoPanel.aspx.cs" Inherits="InfoPanel" Title="Untitled Page" %>

<asp:Content ID="Content1" ContentPlaceHolderID="head" runat="Server">
</asp:Content>
<asp:Content ID="Content2" ContentPlaceHolderID="Header1Placeholder" runat="Server">
    Info Panel Demo
</asp:Content>
<asp:Content ID="Content3" ContentPlaceHolderID="Header2Placeholder" runat="Server">
    Northwind
</asp:Content>
<asp:Content ID="Content4" ContentPlaceHolderID="BodyPlaceholder" runat="Server">
    <act:TabContainer ID="OrderManager" runat="server">
        <act:TabPanel ID="CustomersTab" runat="server" HeaderText="Customers">
            <ContentTemplate>
                <div id="CustomerList" runat="server" />
                <aquarium:DataViewExtender ID="CustomersExtender" runat="server" 
                    Controller="Customers" TargetControlID="CustomerList" />
            </ContentTemplate>
        </act:TabPanel>
        <act:TabPanel ID="OrdersTab" runat="server" HeaderText="Orders">
            <ContentTemplate>
                <div id="OrderList" runat="server" />
                <aquarium:DataViewExtender ID="OrdersExtender" runat="server" 
                    Controller="Orders" FilterFields="CustomerID" 
                    FilterSource="CustomersExtender" TargetControlID="OrderList" />
            </ContentTemplate>
        </act:TabPanel>
        <act:TabPanel ID="DetailsTab" runat="server" HeaderText="Details">
            <ContentTemplate>
                <div id="DetailsList" runat="server" />
                <aquarium:DataViewExtender ID="DetailsExtender" runat="server" 
                    Controller="OrderDetails" FilterFields="OrderID" 
                    FilterSource="OrdersExtender" TargetControlID="DetailsList" />
            </ContentTemplate>
        </act:TabPanel>
    </act:TabContainer>
</asp:Content>

This markup defines a TabContainer from Ajax Control Toolkit with three level arrangement of Customers, Orders, and Order Details, linked in a master-detail relationship. DataViewExtender components and corresponding placeholder div elements are placed on an individual tab of the container

Run this page to see the "cross container" master-detail links in action. This was not possible with the previous releases of the framework.

image 

This form will benefit if we display a customer information summary somewhere on the page. The natural location is the top of the screen but that may differ from one application to another.

Open ~/Controllers/Customers.xml data controller descriptor and create an exact copy of editForm1. Name this copy infoForm1. We need this extra view since we don't want editForm1 of Customers controller on Customers tab to be affected when we finish customization.

Insert the following div element above the TabContainer.

    <div id="CustomerInfo" runat="server" />

Append this DataViewExtender right after the TabContainer.

    <aquarium:DataViewExtender ID="CustomerInfoExtender" runat="server" 
        Controller="Customers" View="infoForm1" FilterFields="CustomerID" 
        FilterSource="CustomersExtender" TargetControlID="CustomerInfo" />

The location of CustomerInfo div is irrelevant but the detail extender component must be defined below the master component specified by FilterSource property when a component container tree is created by ASP.NET page parser. Run this page and make sure that whenever you select a customer record on Customer tab the corresponding CustomerInfo div at the top is refreshed with the matching record.

image

As you can see the top of the page is completely occupied by editable customer view, which is not what we want. Let's change this view to display just a few of the fields and hide the view description, action bar and action buttons.

We accomplish this by adding class attribute to CustomerInfo div. We also define a custom form template Customers_infoForm1. Then we insert a few CSS definitions in Content1 placeholder, which will end up embedded in the head element of the HTML form. All this techniques will alter the appearance of the page and are described in details in a post dedicated to custom form templates.

Here is a complete text of the web form.

<%@ Page Language="C#" MasterPageFile="~/MasterPage.master" AutoEventWireup="true"
    CodeFile="InfoPanel.aspx.cs" Inherits="InfoPanel" Title="Untitled Page" %>

<asp:Content ID="Content1" ContentPlaceHolderID="head" runat="Server">
    <style type="text/css">
        .CustomerInfo
        {
            padding: 0px;
            margin-bottom: 8px;
            background-color: White;
        }
        .CustomerInfo table.DataView tr.CategoryRow td.Fields
        {
            border: solid 1px silver;
            background-color: #E4F3E4;
        }
        .CustomerInfo .HeaderTextRow, .CustomerInfo .ActionRow, 
        .CustomerInfo .ActionButtonsRow
        {
            display: none;
        }
    </style>
</asp:Content>
<asp:Content ID="Content2" ContentPlaceHolderID="Header1Placeholder" runat="Server">
    Info Panel Demo
</asp:Content>
<asp:Content ID="Content3" ContentPlaceHolderID="Header2Placeholder" runat="Server">
    Northwind
</asp:Content>
<asp:Content ID="Content4" ContentPlaceHolderID="BodyPlaceholder" runat="Server">
    <div id="CustomerInfo" runat="server" class="CustomerInfo" />
    <act:TabContainer ID="OrderManager" runat="server">
        <act:TabPanel ID="CustomersTab" runat="server" HeaderText="Customers">
            <ContentTemplate>
                <div id="CustomerList" runat="server" />
                <aquarium:DataViewExtender ID="CustomersExtender" runat="server" 
                    Controller="Customers" TargetControlID="CustomerList" />
            </ContentTemplate>
        </act:TabPanel>
        <act:TabPanel ID="OrdersTab" runat="server" HeaderText="Orders">
            <ContentTemplate>
                <div id="OrderList" runat="server" />
                <aquarium:DataViewExtender ID="OrdersExtender" runat="server" 
                    Controller="Orders" FilterFields="CustomerID" 
                    FilterSource="CustomersExtender" TargetControlID="OrderList" />
            </ContentTemplate>
        </act:TabPanel>
        <act:TabPanel ID="DetailsTab" runat="server" HeaderText="Details">
            <ContentTemplate>
                <div id="DetailsList" runat="server" />
                <aquarium:DataViewExtender ID="DetailsExtender" runat="server" 
                    Controller="OrderDetails" FilterFields="OrderID" 
                    FilterSource="OrdersExtender" TargetControlID="DetailsList" />
            </ContentTemplate>
        </act:TabPanel>
    </act:TabContainer>
    <aquarium:DataViewExtender ID="CustomerInfoExtender" runat="server" 
        Controller="Customers" View="infoForm1" FilterFields="CustomerID" 
        FilterSource="CustomersExtender" TargetControlID="CustomerInfo" />
    <div id="Customers_infoForm1" style="display: none">
        <table style="width: 100%">
            <tr>
                <td>
                    {CustomerID}
                </td>
                <td style="font-weight: bold;">
                    {CompanyName}
                </td>
                <td>
                    {ContactName}
                </td>
                <td>
                    {ContactTitle}
                </td>
                <td>
                    {Phone}
                </td>
            </tr>
        </table>
    </div>
</asp:Content>

Here is an example of this form running in a web browser when user has selected a customer record and switched to Orders tab.

image

The green information panel at the top is automatically refreshed if you select a customer. The detail extender component is linked to a primary key field of a master record.

You can also link the same CustomerInfoExtender to a matching field of OrdersExtender component. The data controller of this component has CustomerID field, which is  a foreign key that points to Customers table. The new feature of Data Aquarium Framework will kick in to make such link work. Just change CustomerInfoExtender.FilterSource to OrdersExtender. The behavior of the screen will change. You have to select an order to get the green panel at the of the screen to refresh itself.

In a more realistic example you would like to have Employee information panel connected to OrdersExtender to provide details about employee who has placed the order. We leave this task up to you.