Apps built with Code On Time offer inherent user and role management capabilities. For public-facing apps, the initial challenge to broader user adoption lies in convincing users to create accounts. Internet users are generally reluctant to provide their credentials on multiple websites. Enterprise apps, regardless of their complexity, must integrate seamlessly with existing security systems. IT departments are unlikely to approve apps that do not provide single sign-on for their users. Your app can address both challenges effectively due to the embedded support for OAuth 2.0 Authorization.
What Is OAuth 2.0 Authorization?
OAuth 2.0 authorization is an industry-standard protocol for authorizing third-party applications to access user data. It allows users to grant access to their data without sharing their passwords with the third-party application.
OAuth 2.0 authorization works by having the user log in to their account with the identity provider (such as Google or Facebook) and then granting permission to the third-party application to access their data. Once the user has granted permission, the third-party application can access the user's data without the user having to log in again.
OAuth 2.0 authorization is a secure and convenient way for users to authorize third-party applications to access their data. It is also a flexible protocol that can be used with a variety of identity providers and third-party applications.
Preparing App for OAuth 2.0
Your custom app requires a way to track its users. Various database tables may reference the user records to indicate who created or modified data. To tailor the user experience for different audiences, you can assign app-specific roles to the users. To achieve this, you need to install the membership support in the app database. Additionally, your app needs a location to store its runtime configuration data, which can be achieved by integrating the Content Management System.
Make sure to add both the membership system and the CMS to your application database when configuring the connection string.
You need to publish your application to a public address and enable SSL support.
The configuration of a Code On Time app for OAuth 2.0 authorization is the same uniform process for any provider. For example, let's see how to configure Google as an identity provider.
Google as Identity Provider
Let’s allow users with a valid Google account to sign in to your app.
Sign in to the production version of your app with the admin account and navigate to the Site Content. Click the floating “plus” button and proceed to register the Identity Provider by selecting the corresponding option in the list.
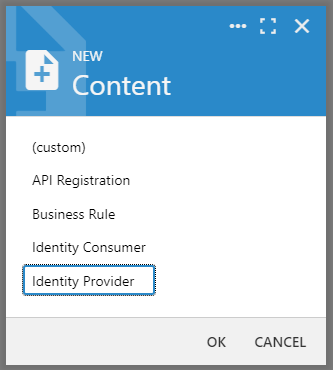
Select the Identity Provider in the list to create a new identity provider option for your app users. The configuration record will be stored in the Site Content table that serves as the content management system for the app.
Press the OK button to continue. When the OAuth Identity Provider configuration form opens, choose OAuth 2.0. If you have experience setting up an API development tool for OAuth 2.0, you will likely find many familiar parameters in the form.
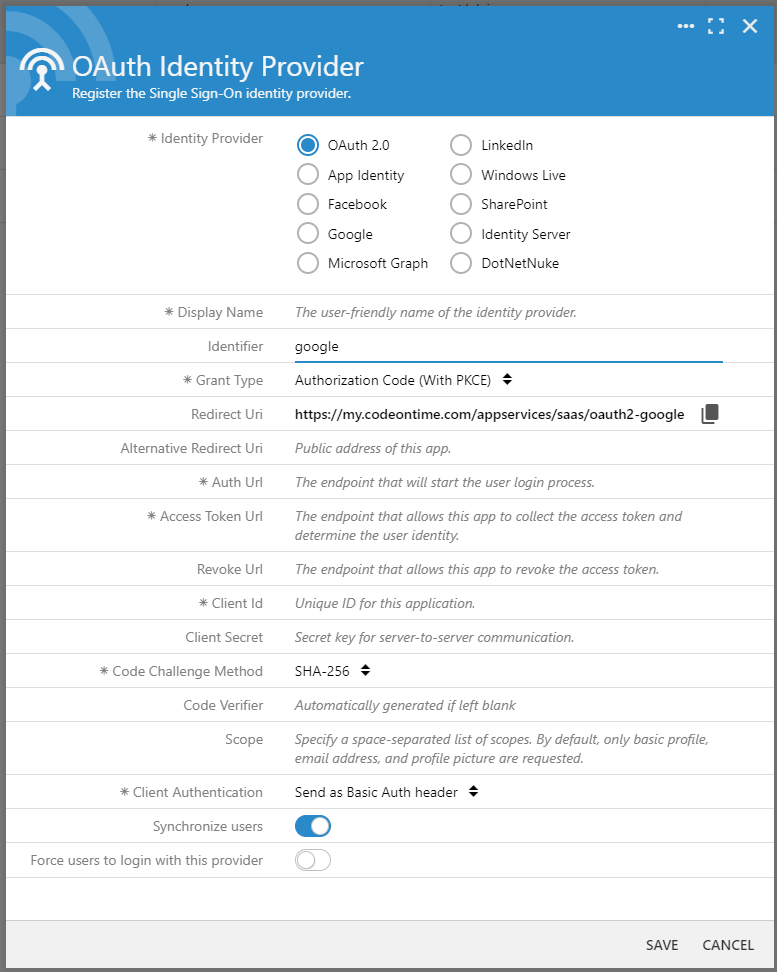
This form allows registering any OAuth 2.0 identity provider to create an alternative sign-in option for the app users. Multiple generic records can be created. Other identity provider choices are the shortcuts to register the known identity providers and require fewer parameters.
Enter google in the Identifier field and press Enter. Click the Copy icon next to the Redirect Uri input field. The authorization server of the identity provider will send the authorization code to this URL. Keep the form open for now.
Client ID and Secret
It is time to create an OAuth client ID. For that, open another tab in the browser and visit the Google API Console to obtain OAuth 2.0 credentials such as a client ID and client secret that are known to both Google and your application.
The Google API Console is a platform for developers to build and manage API projects. It lets them create credentials, utilize APIs, and monitor usage. The console supports various API types, including public, private, and internal APIs. Additionally, it offers features like credential management, usage tracking, and API documentation.
Sign in to the console and access the Credentials in API & Services section. Click the Create Credentials button and choose the OAuth client ID option in the dropdown menu.
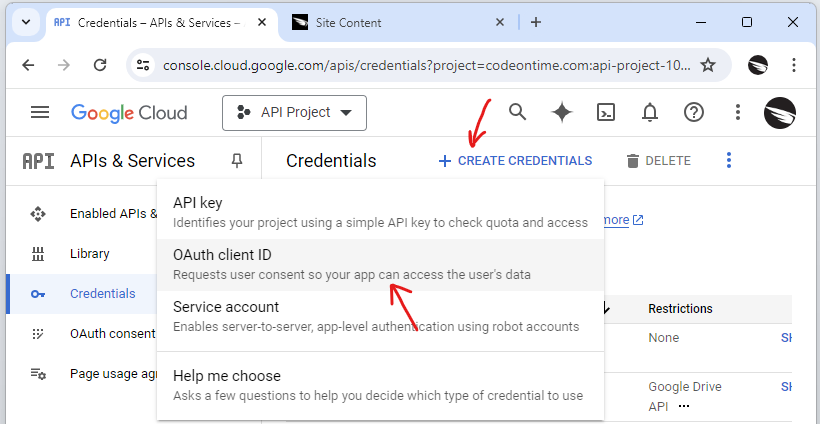
Create the credentials of the OAuth client ID type in the Credentials section of the Google API Console.
Set the Application Type to Web Application and enter the name for your app. Add a URI in the Authorized redirect URIs section and paste the value of the Redirect Uri of your app that is already in the clipboard.
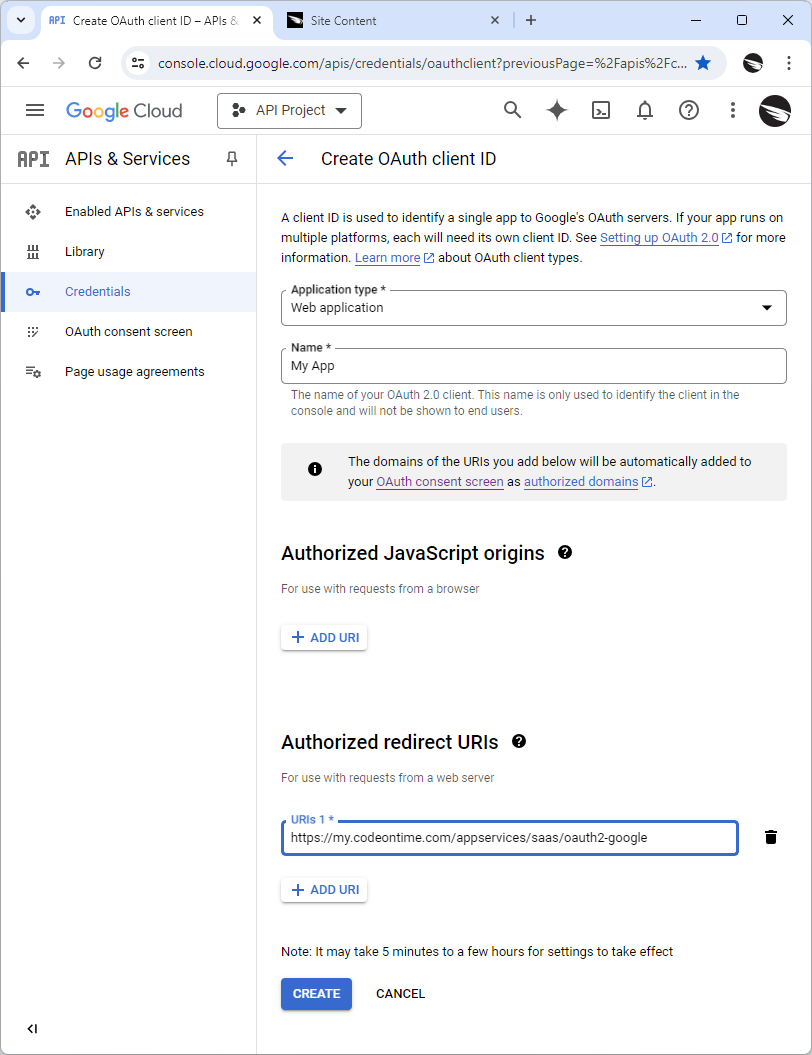
OAuth client ID must be configured in the Credentials of the API & Services section of the Google API Console before you can configure your Code On Time application for OAuth 2.0 authorization.
Press the Create button and you will see the properties of the registered OAuth client application. You will need the Client ID and Client secret values to complete the configuration of the identity provider for your own app.
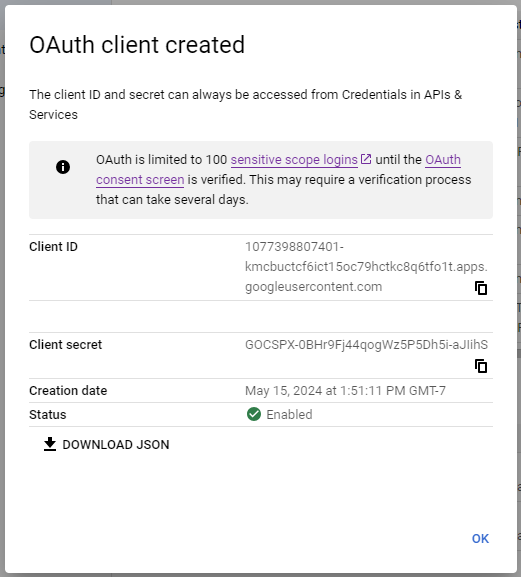
The Client ID and the Client secret are needed to configure the OAuth 2.0 Authorization in a Code On Time app.
Do not close the form with the OAuth client parameters. The Client secret will not be available after the form is closed.
You will be able to view and change the app name and the authorized redirect URIs if necessary.
OAuth Identity Provider
Copy the Client ID to the clipboard and switch to the browser tab with the OAuth Identity Provider form. Paste the value from the clipboard into the corresponding field. Repeat the process for the Client Secret.
Complete the field in the OAuth Identity Provider form as follows:
|
Field
|
Value
|
|
Display Name
|
Google (OAuth 2.0 With PKCE)
|
|
Grant Type
|
Authorization Code (With PKCE)
|
|
Auth Uri
|
https://accounts.google.com/o/oauth2/v2/auth
|
|
Access Token Uri
|
https://www.googleapis.com/oauth2/v4/token
|
|
Revoke Uri
|
https://www.googleapis.com/oauth2/v4/revoke
|
|
Client Id
|
The Client ID of your app in the Google API Console.
|
|
Client Secret
|
The Client secret of your app in the Google API Console.
|
|
Code Challenge Method
|
SHA-256
|
|
Code Verifier
|
Leave the field value blank.
|
|
Scope
|
Leave the field value blank
|
|
Client Authentication
|
Send as Basic Auth header
|
|
Synchronize users
|
Enabled
|
|
Force users to login with this provider
|
Disabled
|
Save the form. If you reopen the identity provider record, then the OAuth Identity Provider form may look like the following.
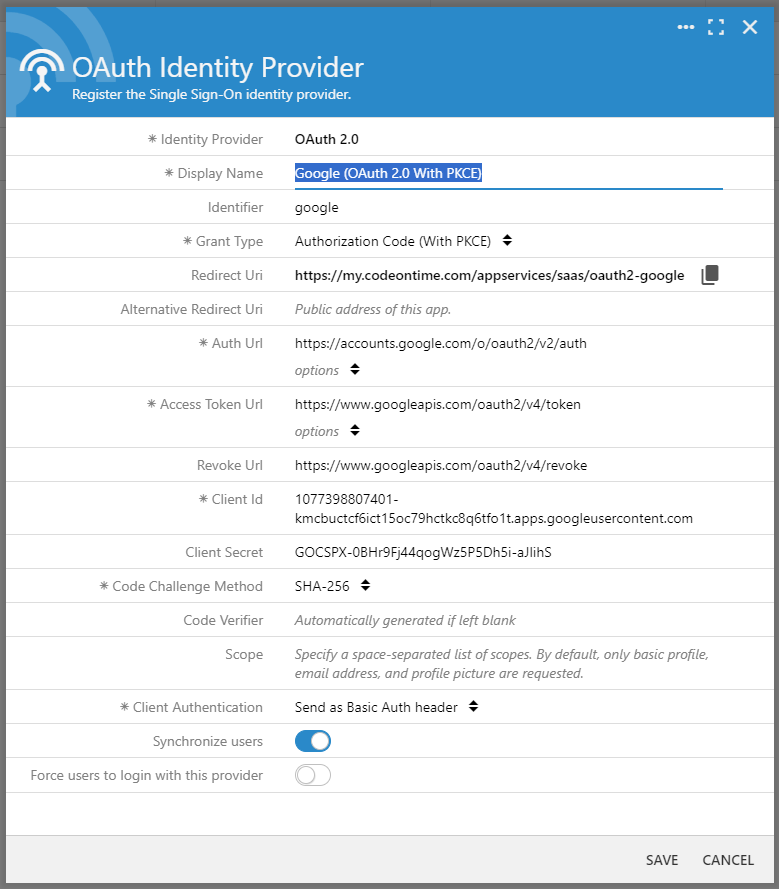
Your own registration of Google as identity provider will be identical with the exception of the values in the Redirect Uri, Client ID, and Client Secret fields.
Your own registration of Google as OAuth 2.0 identity provider will be virtually identical. The mandatory Display Name can be any user-friendly text. The Identifier is optional. Leave it blank if Google will be your only identity provider or enter an arbitrary unique alpha-numeric sequence if your app will use multiple OAuth 2.0 identity providers to authorize users.
The values of the Redirect Uri, Client Id, and Client Secret are unique to your own application. The former is a read-only value calculated by the app at runtime. The Redirect Uri will reflect the deployment address of your application.
We recommend setting the Grant Type to Authorization Code (With PKCE) to ensure the most secure method of user authentication. Set the Code Challenge Method to SHA-256 and leave the Code Verifier blank.
Authorization Code with PKCE Flow
The Authorization Code with PKCE (Proof Key for Code Exchange) flow is an OAuth 2.0 authorization flow that is designed to mitigate the risk of authorization code interception attacks. It works by using a randomly generated code verifier and challenge before exchanging the authorization code for an access token. This makes it more difficult for an attacker to intercept the authorization code and use it to obtain an access token.
Here is a brief overview of how the Authorization Code with PKCE flow works:
- The client application generates a random code verifier and calculates a code challenge from it using a cryptographic hash function.
- The client application redirects the user to the authorization server with the code challenge and other parameters.
- The user authenticates with the authorization server and grants permission to the client application to access their data.
- The authorization server generates an authorization code and redirects the user back to the client application.
- The client application exchanges the authorization code and code verifier with the authorization server for an access token.
The Authorization Code with PKCE flow is a secure and reliable way to authorize third-party applications to access user data. It is particularly useful for applications that are deployed in untrusted environments or that handle sensitive data.
Google URIs
The Auth URI points to the Google Account authorization service. Your app will redirect to the specified URL enhanced with required parameters.This will begin the authorization flow for the Google accounts. For example, the client_id parameter will identify your app, while the automatically generated code_challenge will allow the app to collect the user identity information in a secure fashion.
The Access Token URI serves as a gateway to the Google Identity API, which handles the process of obtaining and refreshing access tokens. Upon successful user authentication and authorization, the app is issued an authorization code by the authorization service. This authorization code is then utilized as a parameter within the Redirect URI previously configured in the app's Google Credentials.
The Revoke URI allows your app to notify Google that the access token is not needed anymore. This will happen when the user explicitly logs out.
Scope
By default, your app will always include the openid, email, and profile scopes in the scope parameter of the authorization URL. This instructs the authorization server to return the id_token containing the information about the user when the user grants the app access to their identity information during the sign in process.
OpenID is a decentralized authentication protocol that allows users to log in to websites and other online services using a single digital identity. Instead of creating and managing multiple usernames and passwords for different websites, users can use their OpenID to sign in to any website that supports the protocol. OpenID is designed to be secure and easy to use, and it can help to protect users from phishing attacks and other security risks.
User Authorization Flow
The standard login screen of your app will change automatically. The radio button list of identity providers is presented to the users trying to sign in. The last option in the list represents the security system of the application itself.
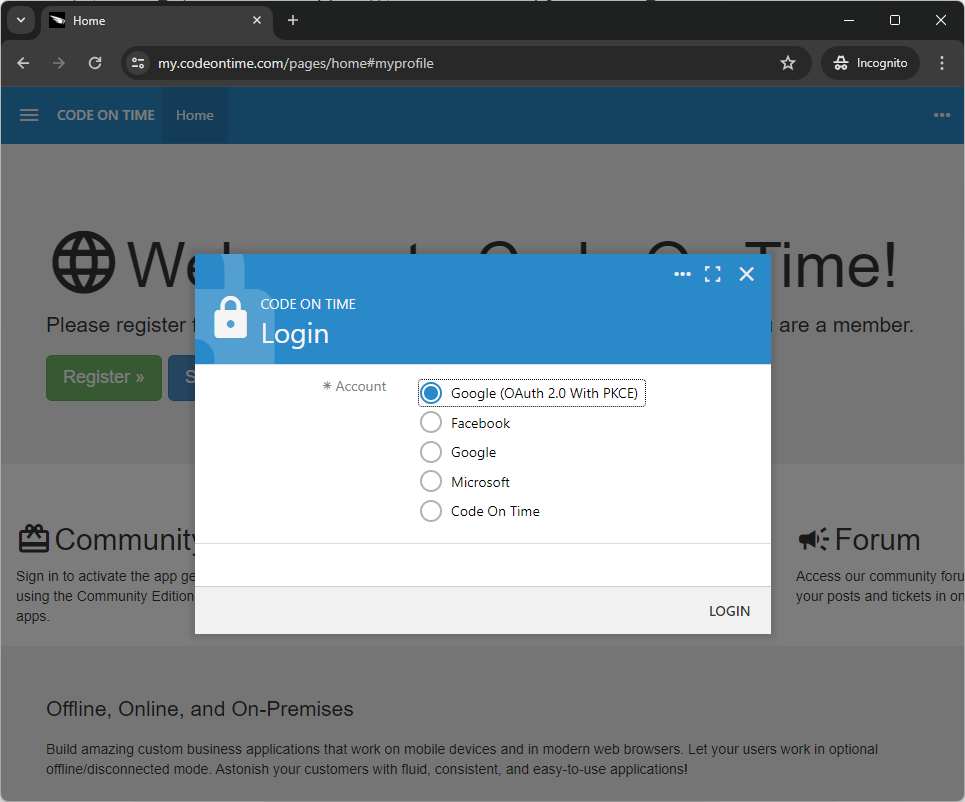
The screenshot shows the login screen of the https://my.codeontime.com portal.
If there is an identity provider configured with the option to Force users to login with this provider, then the user is automatically redirected to the provider’s authorization server. Otherwise users choose their preferred method of authentication and press the Login button.
When users select Google as their authentication method, the authorization process begins. This process is controlled entirely by the identity provider vendor. If users have previously logged into other services using the same identity provider, they can skip entering their credentials and simply consent to the app accessing their identity information.
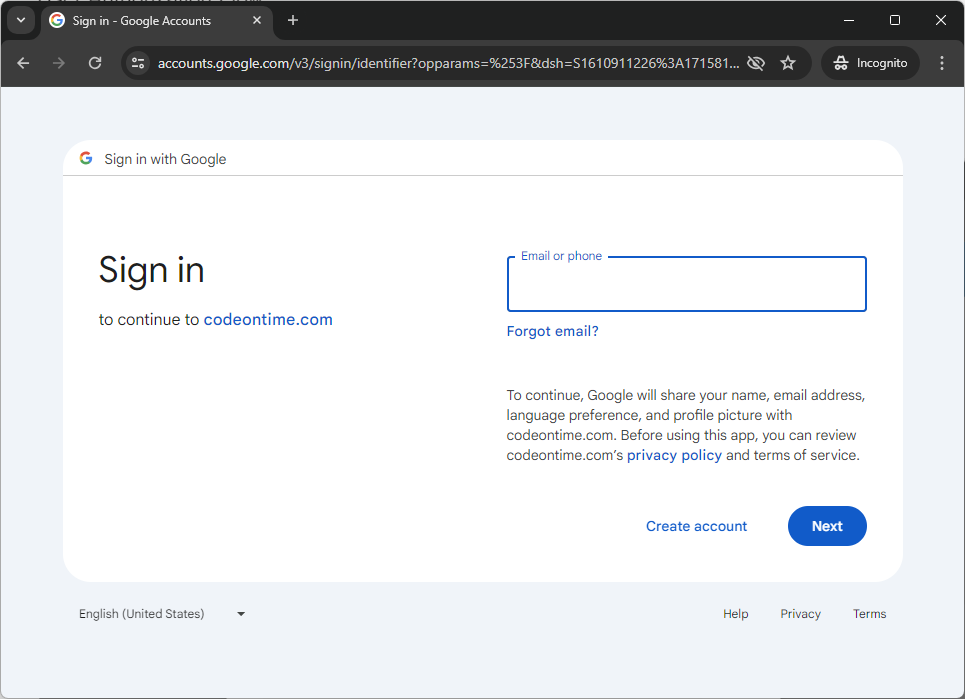
Here is how the Google Account authorization begins if you sign in to your app when the browser is running in the incognito/private mode.
Finally, the user is redirected back to the app at the URI specified in the Redirect Url field in the identity provider configuration. Your application uses the authorization code specified in the code parameter to fetch the user identity information from Google by contacting the API specified in the Auth Token Url field of the identity provider.
The user information is received in the JSON format and includes the access_token, id_token, and optional refresh_token keys. The app will persist this information as sys/users/[USER_NAME].json “file” in the Site Content table used by the app as a general purpose CMS.
User Sign In
The id_token value specified in the user data allows your application to identify the user. Here is the sample content of the token obtained from Google.
JSON
1234567891011121314151617{
  "iss": "https://accounts.google.com",
  "azp": "4985749854-933kdd1o5ev29kapvid5hmn99nddddfoe1.apps.googleusercontent.com",
  "aud": "4985749854-933kdd1o5ev29kapvid5hmn99nddddfoe1.apps.googleusercontent.com",
  "sub": "106861556205838118498",
  "hd": "idp-domain-name.com",
  "preferred_username": "john.doe",
  "email": "john.doe@idp-domain-name.com",
  "email_verified": true,
  "at_hash": "4we-xSQFZJuXPxMupn0aYA",
  "name": "John Doe",
  "picture": "https://lh3.googleusercontent.com/a/ACg8ocIZcEYwKeUyxyNhdiexWrcjPHB-1oqUhUokL7mW2waO8meBeAxU=s96-c",
  "given_name": "John",
  "family_name": "Doe",
  "iat": 1715812203,
  "exp": 1715815803
}
Your app will use the preferred_username key to locate the user in the membership records. If a user with such a name exists, then the app will sign the user in. If the key is not present, then the app will attempt to locate the user with the name or email that matches the email key.
In the absence of an identity provider configured to synchronize users, the app will deny access if it cannot find the user in its membership records.
If the identity provider is configured to Synchronize users and the user is not found, then the new user account is created. The username of the new member is derived either from the preferred_username or from the email key. The password of the new member is a random sequence. The built-in membership system stores the hash value of the password, which makes the real password a complete mystery.
The picture key is the URL that allows your application to fetch the user picture and save it to the CMS.
Developers have access to the claims in the id_token through the BusinessRules.UserClaims property when writing “code” business rules.
Refresh Token
When a user successfully signs in to an app using Google as their identity provider, the app will obtain an access token that will remain valid for a short period. If the user closes the browser shortly after a successful sign-in and then accesses the app in a separate browser window within five minutes, they will automatically be logged in and won't need to sign in again. The login prompt will reappear after a longer period.
The identity provider may ask for "offline" access to the user's identity. This allows the app to refresh the access token without the user's involvement. If the user or the administrator of the authorization server revokes access to the user's identity, your app will automatically log the user out. If the authorization is still valid, user claims are automatically updated, the user will not be asked to sign in again until they log out explicitly.
The standard way to ask for a refresh token is to specify the offline_access scope. Google's authorization server requires the access_type parameter set to the offline value in the authorization URL to allow offline access to the user identity. Add this parameter in the Advanced Options of the Auth Url field in the identity provider configuration. If you have already tried signing in with this provider, then also include the prompt parameter with the consent value to ensure that the user’s authorization will be reissued.
text
12access_type=offline
prompt=consent
Note that there are advanced options associated with the Access Token Url. Developers can specify the parameters required by their authorization server for the initial token request and for the optional refresh request. The parameters may be specified in the request headers or in the body. The screenshot below shows the advanced parameters for Google account authorization. The parameters are presented as name/value pairs listed on separate lines. The app will encode the parameter values as needed at runtime.

The Advanced Options dropdown allows specifying the parameters for the Auth Url and for the Access Token Url fields in the OAuth Identity Provider configuration form when the Identity Provider is set to OAuth 2.0. List parameters as name/value pairs, one per line. Values will be encoded by the application automatically.
Okay, here is a chapter designed to guide users through configuring OAuth 2.0 settings for Microsoft Entra ID within the Code On Time App Builder environment.
Microsoft Entra ID as Identity Provider
This chapter will guide you through the process of registering an application with Microsoft Entra ID (formerly Azure Active Directory) and configuring your Code On Time application to use Entra ID for OAuth 2.0 authentication. This allows your users to sign in using their Microsoft work or school accounts, or even personal Microsoft accounts, leveraging the robust security and single sign-on capabilities of the Microsoft identity platform.
Prerequisites
Before you begin, ensure you have the following:
- An active Microsoft Azure subscription: You need an Azure account with an active subscription. If you don't have one, you can create a free account.
- Access to Microsoft Entra ID: Within your Azure subscription, you need access to a Microsoft Entra ID tenant.
- Permissions to manage applications: You must have permissions to register and manage applications within your Microsoft Entra ID tenant. Roles like "Application Administrator" or "Global Administrator" typically have these permissions.
- A Code On Time application: Your application should be ready for authentication configuration.
- Your Application's Base URL: Know the base URL where your Code On Time application will be hosted (e.g., https://myapp.com, https://localhost:44301). This is crucial for configuring the Redirect URI.
Step 1: Registering Your Application in Microsoft Entra ID
To use Entra ID for authentication, you first need to register your Code On Time application within your Entra ID tenant.
- Navigate to the Azure Portal: Open your web browser and go to https://portal.azure.com. Sign in with your Azure credentials.
- Access Microsoft Entra ID:
-
- In the Azure portal search bar, type "Microsoft Entra ID" and select it from the results.
- Alternatively, click on the portal menu (three horizontal lines in the top left) and select "Microsoft Entra ID."
- Go to App Registrations:
-
- In the Microsoft Entra ID navigation pane, under "Manage," click on "App registrations."
- Create a New Registration:
-
- Click on the "+ New registration" button at the top of the App registrations page.
- Configure the Application Registration:
-
- Name: Enter a descriptive name for your application. This name will be visible to users on consent screens. For example, "My Code On Time App - Production" or "Sales App (Code On Time)".
- Supported account types: This setting determines who can use this application. Choose the option that best suits your needs:
-
- Accounts in this organizational directory only ([Your Tenant Name] only - Single tenant): Only users within your organization's Entra ID tenant can sign in. This is common for internal business applications.
- Accounts in any organizational directory (Any Microsoft Entra ID tenant - Multitenant): Users from any Microsoft Entra ID tenant (i.e., other organizations) can sign in.
- Accounts in any organizational directory (Any Microsoft Entra ID tenant - Multitenant) and personal Microsoft accounts (e.g. Skype, Xbox): Allows users from any Entra ID tenant and users1 with personal Microsoft accounts (like @outlook.com, @hotmail.com) to sign in.
- Personal Microsoft accounts only: Only personal Microsoft accounts can sign in. For most Code On Time business applications, the first or second option is typical. If you need broader access, choose the third.
- Redirect URI (Crucial):
-
- Select "Web" from the platform dropdown.
- In the URI field, you need to enter the specific callback URL for your Code On Time application. This URI is where Microsoft Entra ID will send the authentication tokens after a user successfully signs in.
- The standard format for the Redirect URI in a Code On Time application integrated with Entra ID is:
[YourAppBaseURL]/appservices/saas/EntraID/oauth2/callback Example: If your application is hosted at https://www.mycotapp.com, the Redirect URI would be: https://www.mycotapp.com/appservices/saas/EntraID/oauth2/callback Or for local development: https://localhost:44301/appservices/saas/EntraID/oauth2/callback (Ensure the port number matches your local development setup).
- Important:
-
- Replace [YourAppBaseURL] with the actual base URL of your application.
- The URI must use HTTPS for production applications. For local development, http://localhost with a port is often acceptable by Entra ID if configured, but https is strongly recommended.
- This Redirect URI must exactly match the one you will configure later in your Code On Time application settings. Mismatches are a common source of errors.
- Click the "Register" button at the bottom of the page.
Step 2: Gather Essential Information from Azure Portal
Once your application is registered, you'll be taken to its "Overview" page. You need to note down several pieces of information that will be used in your Code On Time application's configuration.
- Application (client) ID:
-
- On the "Overview" page of your app registration, find the "Application (client) ID."
- Copy this value. This ID uniquely identifies your application to Microsoft Entra ID.
- Directory (tenant) ID:
-
- Also on the "Overview" page, find the "Directory (tenant) ID."
- Copy this value. This ID identifies your Microsoft Entra ID tenant.
- (Illustrative placeholder)
- Create a Client Secret:
A client secret is a confidential string that your application uses to prove its identity when requesting a token.
-
- In the left navigation pane for your app registration, under "Manage," click on "Certificates & secrets."
- Click on the "Client secrets" tab.
- Click "+ New client secret."
- Description: Enter a meaningful description (e.g., "CodeOnTimeAppSecret-Prod").
- Expires: Choose an expiration duration for the secret (e.g., 6 months, 12 months, 24 months, or custom). Be mindful of the expiry date and set a reminder to renew it before it expires to prevent authentication failures.
- Click "Add."
- CRITICAL: The client secret value will be displayed immediately after creation. Copy this value and store it securely in a password manager or other secure location. You will not be able to see this value again after you leave this page.
- (Illustrative placeholder)
Step 3: Configure API Permissions (Optional but Recommended)
API permissions define what your application is allowed to do on behalf of the signed-in user. For basic sign-in and retrieving user profile information, you'll typically need openid, profile, and email.
- In the left navigation pane for your app registration, under "Manage," click on "API permissions."
- By default,
User.Read under "Microsoft Graph" might already be listed.
- Click on "+ Add a permission."
- Select "Microsoft Graph" from the list of commonly used Microsoft APIs.
- Choose "Delegated permissions." These permissions require the signed-in user to consent to them.
- In the "Select permissions" search box, type and select the following permissions:
-
- Click "Add permissions" at the bottom.
- Grant Admin Consent (If Necessary):
-
- Depending on your tenant's policies or the permissions requested, you might need an administrator to grant consent for the entire organization. For the common
openid, profile, email, and User.Read permissions, individual user consent is often sufficient unless your organization has disabled user consent.
- If admin consent is required and you have the necessary privileges, you can click the "Grant admin consent for [Your Tenant Name]" button.
Step 4: Configure Your Code On Time Application
Now, take the information you gathered from the Azure portal and configure the OAuth 2.0 settings within your Code On Time app.
Complete the field in the OAuth Identity Provider form as follows:
|
Field
|
Value for Microsoft Entra ID
|
|
Display Name
|
Microsoft Entra ID or Sign in with Microsoft
|
|
Grant Type
|
Authorization Code (With PKCE)
|
|
Auth Uri
|
https://login.microsoftonline.com/[Tenant_ID_or_common_or_organizations]/oauth2/v2.0/authorize Replace [Tenant_ID_or_common_or_organizations] as per your Entra ID app setup - see notes below
|
|
Access Token Uri
|
https://login.microsoftonline.com/[Tenant_ID_or_common_or_organizations]/oauth2/v2.0/token
|
|
Revoke Uri
|
https://login.microsoftonline.com/[Tenant_ID_or_common_or_organizations]/oauth2/v2.0/logout
|
|
Client Id
|
[Your_Application_Client_ID] (This is the "Application (client) ID" from your app registration's "Overview" page in the Azure portal.)
|
|
Client Secret
|
[Your_Client_Secret_Value] (This is the Value of the client secret you generated and securely stored from the "Certificates & secrets" section of your app registration in the Azure portal.)
|
|
Code Challenge Method
|
SHA-256
|
|
Code Verifier
|
Leave the field value blank.
|
|
Scope
|
openid profile email User.Read
|
|
Client Authentication
|
Send as Basic Auth header
|
|
Synchronize users
|
Enabled
|
|
Force users to login with this provider
|
Disabled
|
You will need to provide the following:
- Provider Name: EntraID (or a custom name, but stick to this for consistency with the Redirect URI path).
- Client ID: Paste the Application (client) ID you copied from the Azure portal.
- Client Secret: Paste the client secret value you copied and stored securely.
- Authority URI (or Issuer URI): This URI tells your application where to send authentication requests. It's constructed using your Directory (tenant) ID. The recommended v2.0 endpoint format is:
-
https://login.microsoftonline.com/[Directory_Tenant_ID]/v2.0- Replace
[Directory_Tenant_ID] with the Directory (tenant) ID you copied.
- Alternative Authority URIs (depending on "Supported account types" chosen during app registration):
-
- For multi-tenant applications (any organization):
https://login.microsoftonline.com/organizations/v2.0
- For multi-tenant applications and personal Microsoft accounts:
https://login.microsoftonline.com/common/v2.0
- Redirect URI: Enter the exact same Redirect URI you configured in the Azure portal for your app registration.
-
- Example:
https://www.mycotapp.com/appservices/saas/EntraID/oauth2/callback
- Scopes: Define the permissions your application is requesting. Enter them as a space-separated list:
-
openid profile email User.Read (User.Read might be implicit with profile, but good to include if you need basic user details).
- Response Type: Typically
code for the Authorization Code Flow, which is recommended for web applications.
- Username Claim: (If applicable in Code On Time settings) Often
email or preferred_username depending on what you want to use as the primary identifier from the token claims.
- Enabled: Ensure the provider is marked as enabled.
Save these settings in your Code On Time project and redeploy your application.
Key URIs for Microsoft Entra ID (v2.0 Endpoints)
For reference, here are the general endpoint structures. Your Code On Time application framework will typically construct these based on the Authority URI you provide.
- Authorization Endpoint:
https://login.microsoftonline.com/[Tenant_ID_or_common_or_organizations]/oauth2/v2.0/authorize
- Token Endpoint:
https://login.microsoftonline.com/[Tenant_ID_or_common_or_organizations]/oauth2/v2.0/token
- Microsoft Graph API Base URI:
https://graph.microsoft.com/v1.0/ (Used if you make direct calls to Microsoft Graph after authentication).
- Logout URI / End Session Endpoint:
https://login.microsoftonline.com/[Tenant_ID_or_common_or_organizations]/oauth2/v2.0/logout To ensure a full single sign-out, your application should redirect the user to this endpoint. You can also provide a post_logout_redirect_uri query parameter to redirect the user back to your application after logout. This post_logout_redirect_uri must also be registered in your Entra ID app registration under "Authentication" -> "Front-channel logout URL". Example: https://login.microsoftonline.com/common/oauth2/v2.0/logout?post_logout_redirect_uri=https://www.mycotapp.com/loggedout
Troubleshooting Common Issues
- Redirect URI Mismatch (Error
http vs https, trailing slashes, and port numbers.
- Invalid Client Secret: If you see errors like
AADSTS7000215: Invalid client secret provided, ensure the client secret in your Code On Time settings is the correct value (not the secret ID) and that it hasn't expired. If in doubt, create a new secret in Azure, update it in Code On Time, and try again.
- Permissions Not Granted / Consent Issues: If users can't sign in or your app can't access required information, double-check the "API permissions" in Azure. Ensure consent has been granted (either by the user or an admin, as needed).
- Incorrect Supported Account Type: If a user from outside your organization tries to log in to an app configured for "Accounts in this organizational directory only," they will be denied. Ensure your "Supported account types" setting in Azure aligns with your intended audience.
- Case Sensitivity: While many parts of the configuration are not case-sensitive, it's good practice to maintain consistency, especially with URIs.
- Check Azure Sign-in Logs: In the Azure portal, navigate to your Microsoft Entra ID, then under "Monitoring," select "Sign-in logs." Filter by your application (using the Application (client) ID) to see detailed error information from Entra ID's perspective, which can be very helpful for diagnostics.
- Browser Cache/Cookies: Sometimes, old cookies or cached redirect information can cause issues during testing. Try in a private/incognito browser window or clear your browser cache.
Security Best Practices
- Protect Your Client Secret: Treat the client secret like a password. Store it securely and never embed it directly in client-side code. Code On Time manages this server-side.
- Use HTTPS: Always use HTTPS for your application's base URL and Redirect URIs in production environments.
- Principle of Least Privilege: Only request the API permissions that your application absolutely needs.
- Regularly Renew Client Secrets: Set reminders and renew your client secrets well before their expiration date to avoid service disruptions.
- Monitor Sign-in Activity: Regularly review the sign-in logs for your application in the Azure portal to detect any suspicious activity.
- Understand Consent: Be aware of the permissions you are requesting and how user/admin consent works in your organization.
By following these steps, you should be able to successfully configure your Code On Time application to use Microsoft Entra ID for robust and secure OAuth 2.0 authentication.
Code On Time App as Identity Provider
In this section, we'll guide you through configuring a Code On Time application to act as an identity provider. Your application's OAuth 2.0 Identity Provider can be used with any OAuth 2.0-compliant server, such as another application built using Code On Time with its RESTful API enabled.
Apps created with Code On Time have a built-in RESTful API engine that implements a hypermedia-driven REST Level 3 API for the application data. It also implements several OAuth 2.0 Authorization flows.
Local Redirect Uri, Client Id, and Client Secret
Navigate to the Northwind application at https://demo.codeontime.com. This app was built with Code On Time and configured to expose its RESTful API to the world. Sign in with the admin credentials and navigate to the Site Content page, the content management system of the app. Click the “search” icon and find the entries containing the sys/oauth2/apps path. Select the identity consumer entry named Standalone SPA4 with RESTful Hypermedia and OAuth 2.0. This identity consumer registration record is for the app designed in the Lesson 5 of the RESTful API Workshop. We will reuse the same record to designate the Northwind application as the identity provider for our own custom app .
The Redirect Uri of the identity consumer is for the custom single-page application developed in the workshop lesson. The Local Redirect Uri of the identity consumer is a valid identity provider URI of an app created with Code On Time and running on the 60595 port at the localhost address
The identity consumer supports the Native and Server-to-Server authorization flows. The former is based on the dynamic secret and the latter relies on the static secret.

The screenshot shows configuration parameters of the Standalone SPA4 with RESTful Hypermedia and OAuth 2.0 client application. The Redirect Uri points to the primary location of the client application. The Local Redirect Uri is the second URI recognized by the Northwind application as the legitimate client. Typically this URI will point to an app running on the development workstation.
To ensure compatibility with the Northwind's "Standalone SPA4 with RESTful Hypermedia and OAuth 2.0" registration record, create a sample application using Code On Time and make certain that the Web Server configuration specifies the 60595 port.
Another option is to modify the project settings of your existing app to use the same port.
For the sample application, we will configure the OAuth 2.0 Identity Provider utilizing the Client Id and Client Secret from the Northwind's registration record.
OAuth 2.0 Endpoints
The Northwind Demo offers OAuth 2.0 RESTful API hypermedia-enhanced endpoint accessible at https://demo.codeontime.com/oauth2/v2. Hypermedia controls (authorize, token, and revoke) enable configuration of corresponding identity provider URIs. To construct the Auth Uri, Access Token Uri, and Revoke Uri of the identity provider, add the suffixes auth, token, and revoke to the endpoint respectively.
JSON
1234567891011121314151617181920212223242526272829303132333435363738394041424344454647484950515253545556575859606162636465666768{
  "_links": {
    "self": {
      "href": "/oauth2/v2"
    },
    "apps": {
      "href": "/oauth2/v2/apps"
    },
    "authorize": {
      "href": "/oauth2/v2/auth"
    },
    "token": {
      "href": "/oauth2/v2/token",
      "method": "POST"
    },
    "tokeninfo": {
      "href": "/oauth2/v2/tokeninfo"
    },
    "userinfo": {
      "href": "/oauth2/v2/userinfo",
      "method": "POST"
    },
    "revoke": {
      "href": "/oauth2/v2/revoke",
      "method": "POST"
    },
    "authorize-client-native": {
      "href": "/oauth2/v2/auth/pkce",
      "method": "POST"
    },
    "authorize-client-spa": {
      "href": "/oauth2/v2/auth/spa",
      "method": "POST"
    },
    "authorize-server": {
      "href": "/oauth2/v2/auth/server",
      "method": "POST"
    },
    "authorize-device": {
      "href": "/oauth2/v2/auth/device",
      "method": "POST"
    },
    "schema": {
      "href": "/oauth2/v2?_schema=true"
    }
  },
  "issuer": "Northwind",
  "scopes": {
    "openid": {
      "hint": "View the unique user id, client app id, API endpoint, token issue and expiration date."
    },
    "profile": {
      "hint": "View the user's last and first name, birthdate, gender, picture, and preferred language."
    },
    "address": {
      "hint": "View the user's preferred postal address."
    },
    "email": {
      "hint": "View the user's email address."
    },
    "phone": {
      "hint": "View the user's phone number."
    },
    "offline_access": {
      "hint": "Access your data anytime."
    }
  }
}
OAuth Identity Provider
Run the sample app from Code On Time, sign in with the admin account and navigate to the Site Content. Add the new Identity Provider configured as follows:
|
Field
|
Value
|
|
Identity Provider
|
OAuth 2.0
|
|
Display Name
|
Northwind Demo
|
|
Identifier
|
northwind
|
|
Grant Type
|
Authorization Code (With PKCE)
|
|
Redirect Uri
|
http://localhost:60595/appservices/saas/oauth2-northwind
|
|
Auth Uri
|
https://demo.codeontime.com/oauth2/v2/auth
|
|
Access Token Uri
|
https://demo.codeontime.com/oauth2/v2/token
|
|
Revoke Uri
|
https://demo.codeontime.com/oauth2/v2/revoke
|
|
Client Id
|
Copy and paste the Client Id of the identity consumer record.
|
|
Client Secret
|
Copy and paste the Client Secret of the identity consumer record.
|
|
Code Challenge Method
|
SHA-256
|
|
Code Verifier
|
Leave the field blank.
|
|
Scope
|
ofline_access
|
|
Client Authentication
|
Send as Basic Auth header
|
|
Synchronize users
|
Enabled
|
|
Force users to login with this provider
|
Disabled
|
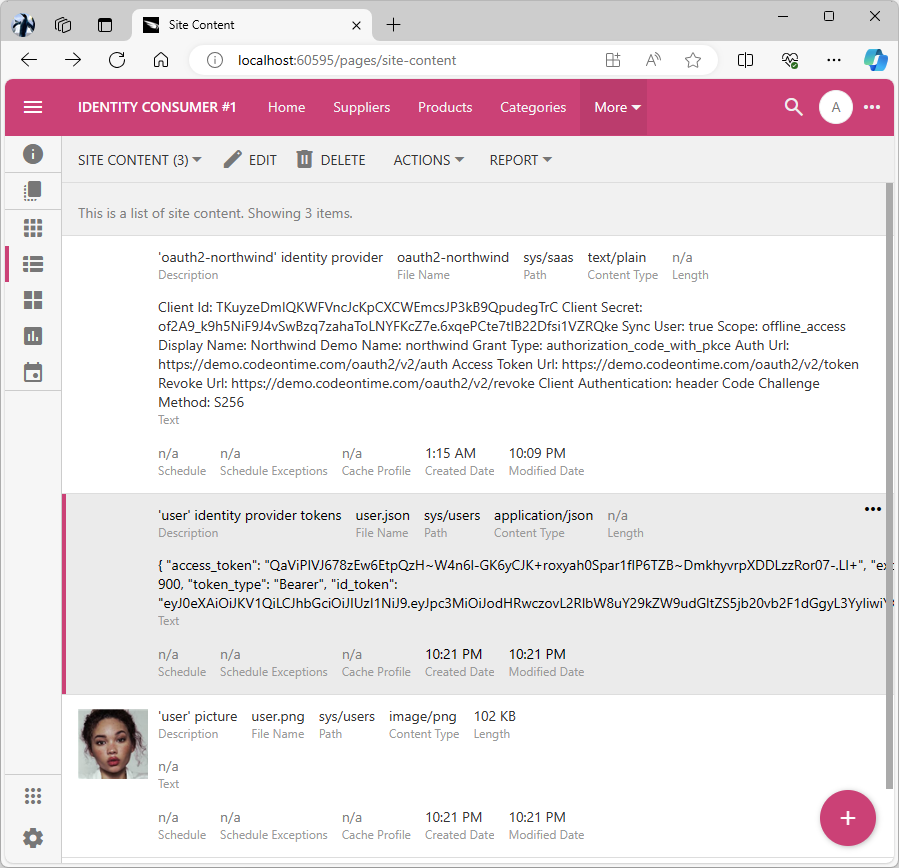
Save the identity provider configuration. Here is how it may look in your app.
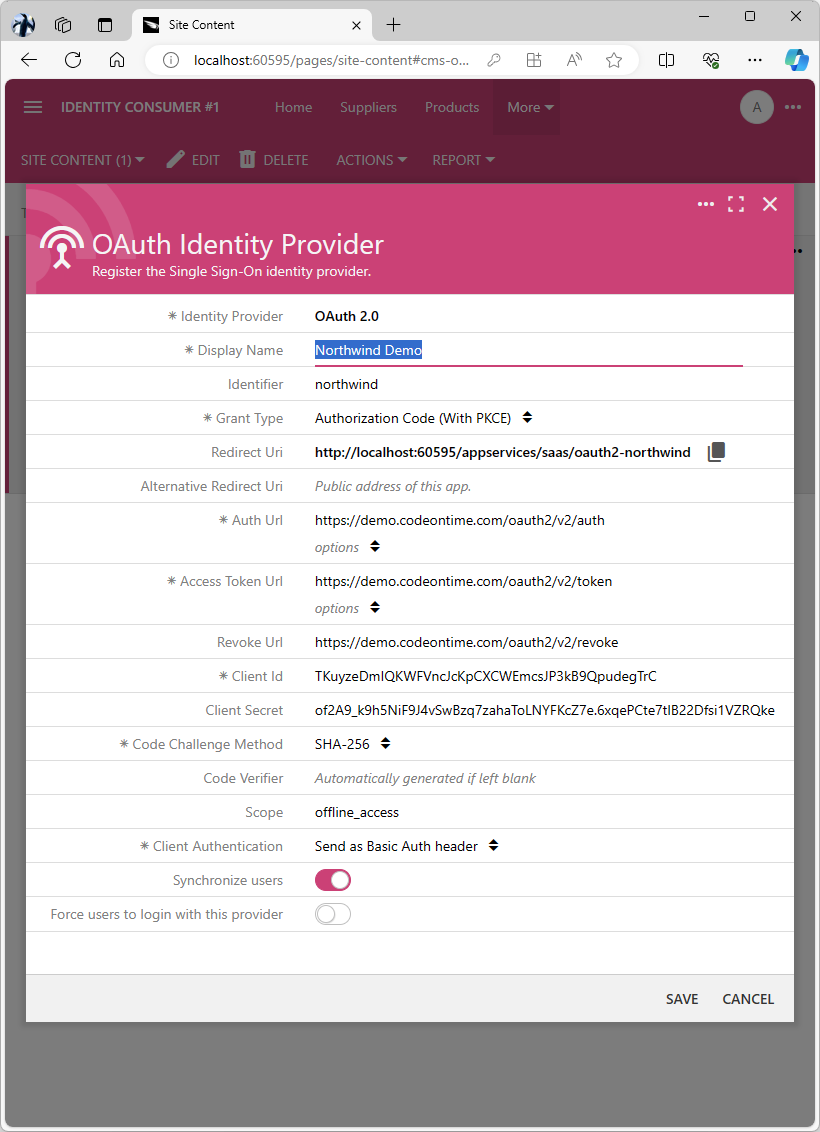
The OAuth 2.0 Identity Provider configuration screen of an app running on the 60595 port at the localhost address. This configuration allows using the Northwind demo application as the identity provider.
Sign out of the sample application and choose the Login option.
User Authorization Flow
The standard login screen of your app will change. The radio button list with two options is presented to the user. The first option allows signing in with the Northwind Demo account. The second option in the list represents the security system of the application itself and allows users to sign in with the “local” account.
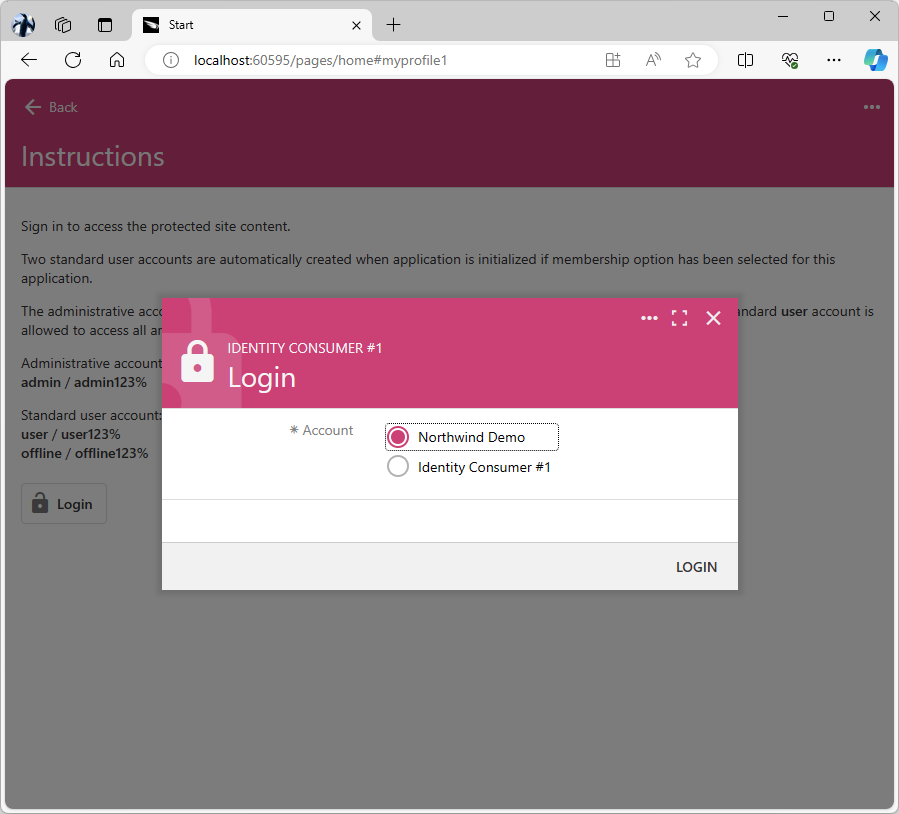
The login screen of a Code On Time app that has one external identity provider configured with the Northwind Demo display name. The second option allows users to sign in with the local user account.
Choose the Northwind Demo in the Account and click the Login button. You will be redirected to the Northwind app. Proceed to sign in with the user account.
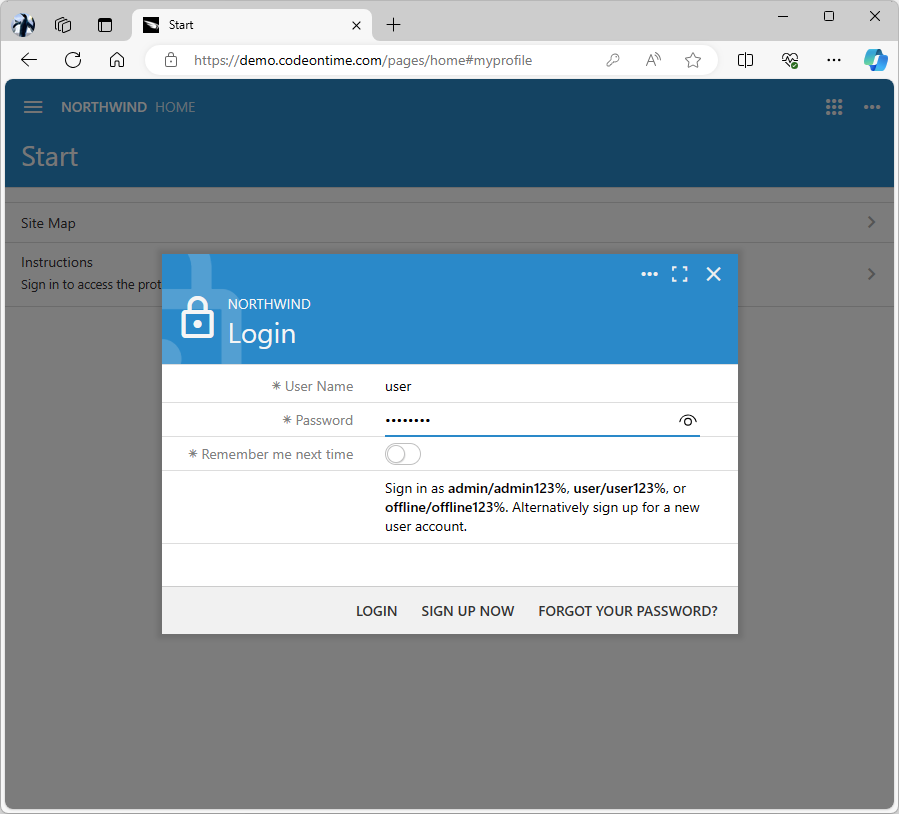
The login of the Northwind application displays a hint showing the standard admin, user, and offline credentials.
When the user enters their credentials correctly, the Northwind application displays an Account Access prompt. This prompt outlines the extent of information requested by the client app, Standalone SPA4 with RESTful Hypermedia and OAuth 2.0. Note that the name may differ from your sample app because we're reusing another application's identity consumer registration record. However, if the identity provider administrator has designated the identity consumer as Trusted, the prompt won't be shown.
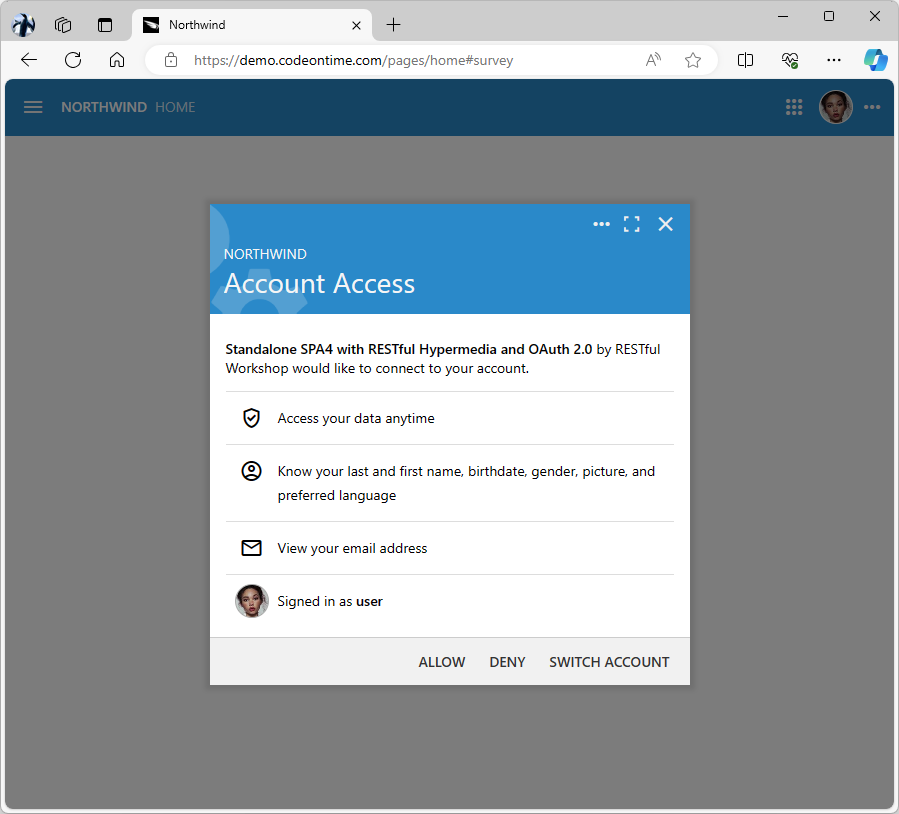
The Account Access prompt is displayed when the app is not flagged as “trusted” by the administrator in the identity consumer configuration. The prompt outlines the scope of information required by the client application. The user may allow or deny access. There is an option to switch the account.
If the account access is granted, then the user is redirected to the Redirect Uri specified in the authorization request, which will sign them into the sample application.
The homepage of the sample application is loaded when the user is signed in with the identity provider.
User Tokens
When a user signs in, their tokens are stored persistently. For instance, if a user named 'user' logs into the Northwind application using their credentials, a record called 'sys/users/user.json' will be created in the 'Site Content' section of the sample application. To view the contents of the CMS, log in to the sample application using the local 'admin' account. One of the records will contain the identity provider tokens. Additionally, there will be a record of the identity provider's registration and the user's profile picture retrieved from the identity provider.
TBD
The contents of the user’s identity provider tokens are shown next.
JSON
12345678910{
  "access_token": "QaViPIVJ678zEw6EtpQzH~W4n6l-GK6yCJK+roxyah0Spar1fIP6TZB~DmkhyvrpXDDLzzRor07-.Ll+",
  "expires_in": 900,
  "token_type": "Bearer",
  "id_token": "eyJ0eXAiOiJKV1QiLCJhbGciOiJIUzI1NiJ9.eyJpc3MiOiJodHRwczovL2RlbW8uY29kZW9udGltZS5jb20vb2F1dGgyL3YyIiwiYXpwIjoiVEt1eXplRG1JUUtXRlZuY0pjS3BDWENXRW1jc0pQM2tCOVFwdWRlZ1RyQyIsImF1ZCI6Imh0dHA6Ly9sb2NhbGhvc3Q6NjA1OTUvYXBwc2VydmljZXMvc2Fhcy9vYXV0aDItbm9ydGh3aW5kIiwic3ViIjoiNzc5ZTg5MGYtOWZiYi00OThmLWFjYzQtMGNmOGU2NWIxNzllIiwiaWF0IjoxNzE2MDcwODg3LCJleHAiOjE3MTYwNzE3ODcsImVtYWlsIjoidXNlckBNeUNvbXBhbnkuY29tIiwiZW1haWxfdmVyaWZpZWQiOnRydWUsIm5hbWUiOm51bGwsImdpdmVuX25hbWUiOm51bGwsImZhbWlseV9uYW1lIjpudWxsLCJtaWRkbGVfbmFtZSI6bnVsbCwibmlja25hbWUiOm51bGwsInByZWZlcnJlZF91c2VybmFtZSI6InVzZXIiLCJwcm9maWxlIjpudWxsLCJwaWN0dXJlIjoiaHR0cHM6Ly9kZW1vLmNvZGVvbnRpbWUuY29tL29hdXRoMi92Mi91c2VyaW5mby9waWN0dXJlcy9vcmlnaW5hbC9QcndkRlIxMjd5OTJURWFlUkN2RGhMY1dUY0RjMzN3V184aVBfbEIxY3JBLmpwZWciLCJnZW5kZXIiOm51bGwsImJpcnRoZGF0ZSI6bnVsbCwiem9uZWluZm8iOiJBbWVyaWNhL0xvc19BbmdlbGVzIiwibG9jYWxlIjoiZW4tVVMiLCJ1cGRhdGVkX2F0IjpudWxsLCJzY29wZSI6Im9mZmxpbmVfYWNjZXNzIG9wZW5pZCBwcm9maWxlIGVtYWlsIn0.Xcnw4SzQNnShlvToAVkfupOflAWjXf8gC1rB3SZKNq8",
  "refresh_token": "MnyiJIKD7zUQr~ppGqKpAC2RVfdUfkrV5RS-yOgtfJUHAlBlYIXZH1xgJnAB.7.C",
  "scope": "offline_access openid profile email",
  "picture_updated": "2024-05-18T22:21:27.9640578Z",
  "expires_datetime": "2024-05-18T22:36:28.2632727Z"
}
Application uses the access_token to validate the user account and the refresh_token to refresh the access_token when it expires. The identity provider tokens are deleted when the user signs out.
User Sign In
Through the id_token content, the sample application can sign in the user. The preferred_username and email keys help identify and locate the user in the database. If no matching membership record exists, a new user account is created if the identity provider configuration specifies the Sync users option.
JSON
123456789101112131415161718192021222324{
  "iss": "https://demo.codeontime.com/oauth2/v2",
  "azp": "TKuyzeDmIQKWFVncJcKpCXCWEmcsJP3kB9QpudegTrC",
  "aud": "http://localhost:60595/appservices/saas/oauth2-northwind",
  "sub": "779e890f-9fbb-498f-acc4-0cf8e65b179e",
  "iat": 1716070887,
  "exp": 1716071787,
  "email": "user@MyCompany.com",
  "email_verified": true,
  "name": null,
  "given_name": null,
  "family_name": null,
  "middle_name": null,
  "nickname": null,
  "preferred_username": "user",
  "profile": null,
  "picture": "https://demo.codeontime.com/oauth2/v2/userinfo/pictures/original/PrwdFR127y92TEaeRCvDhLcWTcDc33wW_8iP_lB1crA.jpeg",
  "gender": null,
  "birthdate": null,
  "zoneinfo": "America/Los_Angeles",
  "locale": "en-US",
  "updated_at": null,
  "scope": "offline_access openid profile email"
}
Federated Identity Management
Code On Time allows creating the built-them-and-forget applications that help running various business processes. Integration of a large number of apps into enterprise with single sign-on is simple but may present a maintenance challenge. Managing users in the 3rd-party identity provider’s database is difficult, since the rich user metadata specific to your organization may not be easily described in a general purpose authorization server configuration.
Consider creating a custom app with Code On Time and designating it as an identity provider for your internal application. You can add custom associations of users with the organizational units and customer accounts. It is easy to enhance the id_token with this data. Custom apps can use this data for self-configuration purposes while your system administrators retain full control over the business configuration in a single repository.
You can implement a custom and flexible Federated Identity Management for your organization’s applications whether or not they are created with Code On Time. If you want to do it right, then do it yourself!
Better yet, register any number of external OAuth 2.0 compatible authorization servers in your custom identity provider (IdP) application. A single identity provider record will enable the Enterprise SSO for the entire application collection.