The fourth Single Page Application in the RESTful Workshop series is displaying a list of products from the backend application created with Code On Time. The screenshot shows the user authenticated with OAuth 2.0 Authorization Code flow with PKCE. The user picture and email were extracted from JWT obtained with the help of OpenID Connect.
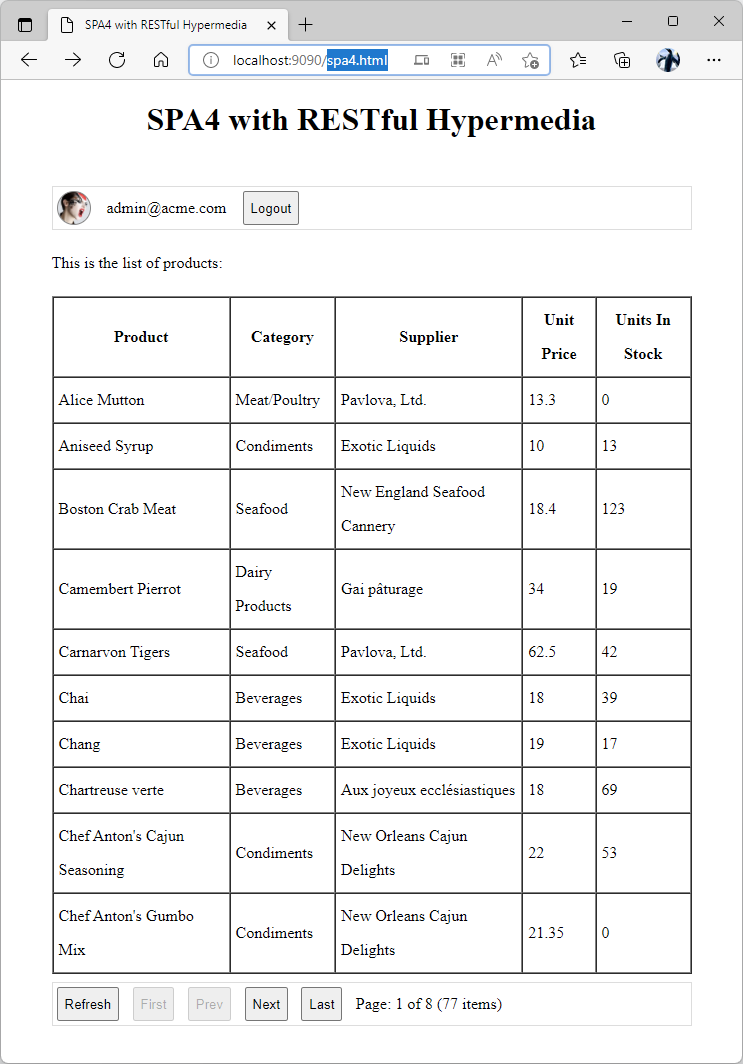 Standalone SPA4 with RESTful Hypermedia and OAuth 2.0
This app looks a lot like Embedded SPA3 (Custom UI) with RESTful Hypermedia. Here is what’s different:
- The app spa4.hml is not embedded in the host application.
- The app and its backend are not a part of the same domain.
- This is the standalone app. It can be hosted on any web server and operating system.
- Users are authenticated by the backend application via OAuth 2.0 Authorization.
- The app displays the user name and picture with the Logout button above the list of products.
User Interface and Hosting
Use your favorite text editor to create the spa4.html file in the directory of your choice. Do not place the file in the backend application folders.
HTML
123456789101112131415161718192021222324252627282930313233343536373839404142434445464748495051525354555657585960<!DOCTYPE html>
<html lang="en">
<head>
    <meta charset="utf-8">
    <meta name="viewport" content="width=device-width, initial-scale=1">
    <title>SPA4 with RESTful Hypermedia</title>
    <script src="spa4.js"></script>
    <script src="https://demo.codeontime.com/v2/js/restful-2.0.1.js"></script>
    <style>
        #avatar {
            display: inline-block;
            width: 32px;
            height: 32px;
            background-size: 100% auto;
            border-radius: 17px;
            border: solid 1px #888;
            background-position: center center;
        }

        #anonymous, #authenticated {
            max-width: 640px;
            min-width: 480px;
            margin: 3em auto 2em auto;
            line-height: 34px;
        }

        .toolbar {
            height: 34px;
            display: flex;
            border: solid 1px #ddd;
            padding: .25em;
            margin: .5em 0;
        }

        button[data-hypermedia] {
            margin-right: 1em;
        }
    </style>
</head>
<body>
    <h1 style="text-align:center">SPA4 with RESTful Hypermedia</h1>
    <!-- anonymous user -->
    <div id="anonymous" style="display:none">
        <div class="toolbar">
            <button id="loginButton">Login</button>
            <span style="padding:0 1em">OAuth2 Authorization Flow with PKCE</span>
        </div>
    </div>
    <!-- authenticated user -->
    <div id="authenticated" style="display:none">
        <div class="toolbar">
            <span id="avatar"></span>
            <span id="email" style="padding:0 1em"></span>
            <button id="logoutButton">Logout</button>
        </div>
        <p>This is the list of products:</p>
        <div id="product-list"></div>
    </div>
</body>
</html>
The page defines #anonymous and #authenticated containers. Both are styled to be hidden.
The first container defines the toolbar with the #loginButton. The second container defines the toolbar with the #avatar, #email, and #logoutButton elements. There is also the #product-list element that will be populated dynamically with the product data and paging buttons.
There are two external script references in the head of the app.
HTML
12<script src="spa4.js"></script>
<script src="https://demo.codeontime.com/v2/js/restful-2.0.1.js"></script>
The first script spa4.js will contain the application code. The code was embedded directly within the HTML markup in the tutorials SPA1, SPA2, and SPA3. In this instance we are splitting HTML and JavaScript.
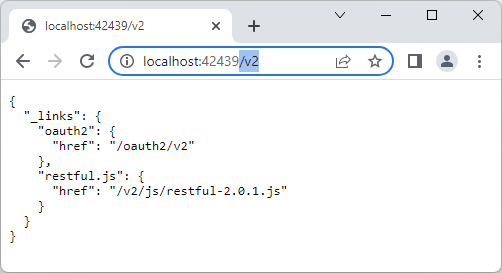
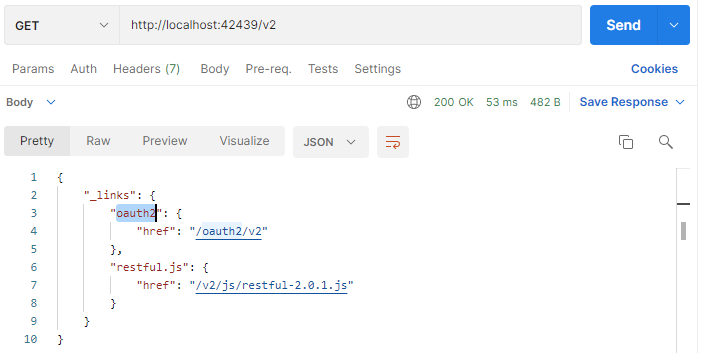
The URI of the second script will depend on your backend application and the version of Code On Time you are using. Launch the backend from the app builder and enter the /v2 path right after the port in the browser address bar. You will see the following output.
 RESTful API endpoint output for anonymous user.
Copy the href property from the restful.js hypermedia link and use it as the source of your second script. Make sure to include the address and the port of the backend application in the final URL. This script will provide your app with the access to the $app.restful method, which allows using both the hypermedia and direct resource URIs when interacting with the backend.
Method $app.restful provides a thin wrapper on top of the Fetch API. It fetches the /v2 endpoint resources of the backend application with the user access token passed in the Authorization header.
Code On Time automatically installs the Microsoft IIS Express development web server. Let’s use it as the host of SPA4. Run the following command in the Command Prompt on your device with the /path parameter set to the location of the spa4.html file:
"C:\Program Files\IIS Express\iisexpress.exe" /path:c:\restful /port:9090 /clr:v4.0
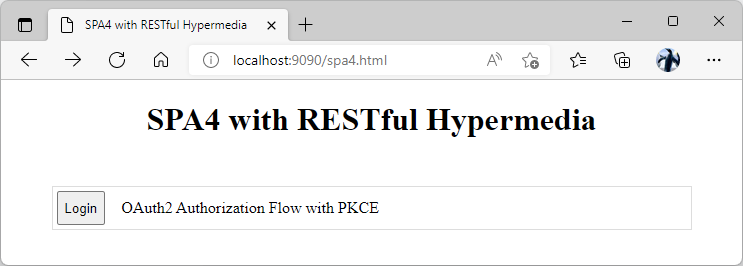
Keep the Command Prompt running and open a new browser window. Enter http://localhost:9090/spa4.html in the address bar and you will see the following output. It will indicate that your app is running correctly.
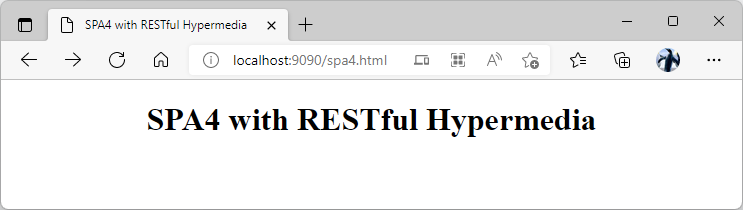 This output confirms that the app is successfully hosted by Microsoft IIS Express on the specified port at localhost address.
This app can be hosted on any domain and deployed to any web server and operating system.
Client Application Registration
The app running on http://localhost:9090/spa4.html will need to be known to the backend. Otherwise the following obstacles will be in the way:
- An application running on the port 9090 will not be able to retrieve data from the backend application running on a different port even though both have the localhost address. Modern browsers implement the strict CORs policies, which will prevent the cross-domain interactions.
- Users will need to authenticate themselves with the backend application, which requires a certain level of trust between the backend and the standalone client app. Unknown client applications will not be able to authenticate their users.
Client application registration enables HTTP communication between SPA4 and the backend. It also makes possible the OAuth 2.0 Authorization.
Next we will use Postman to register the client app SPA4 to make it known to the backend application, which also provides the built-in user interface options to register a client app.
App Management API
Here is how you can locate the built-in API that allows registration of OAuth 2.0 client apps in the backend application database.
- Run the Postman utility and create a new HTTP Request.
- Enter the local address of the backend application with the /v2 path in the request URL and press Send.
 RESTful API endpoint with "oauth2" hypermedia control.
- Click on the oauth2 hypermedia link in the response body. The new HTTP request tab will open.
- Activate the Authorization section of the request and set the Type field to API Key. Enter
94b79da7-e3a9-4152-9213-886f4c810bec as the key Value. This is the same key that is associated with the admin user account in the server.rest.authorization.keys array in ~/app/touch-settings.json configuration file (see Authentication topic in the RESTful Backend Application tutorial).
- Press Send and the response body will include the hypermedia link apps along with the few others. The apps link is available to the users with Administrators or OAuth2 Admin roles.
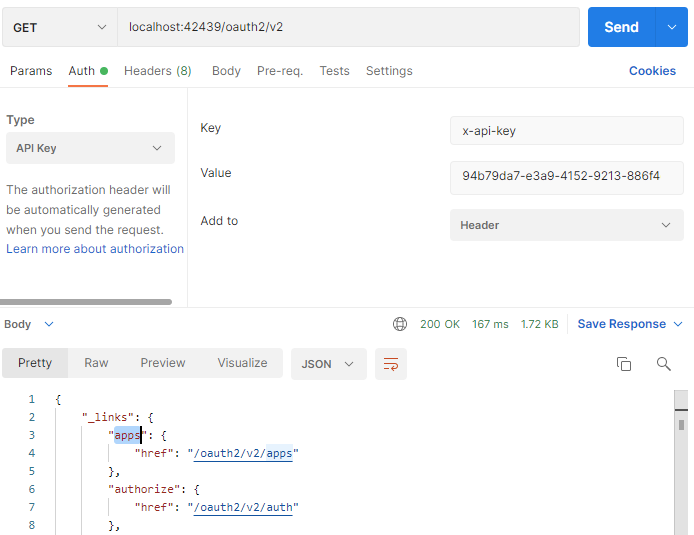 OAuth 2.0 API endpoint includes the "apps" hypermedia control for the users with the Administrators and OAuth Admin roles only.
- Follow the apps link, configure Authorization of the new request with the same API key, and press Send. An empty collection of apps will be displayed.
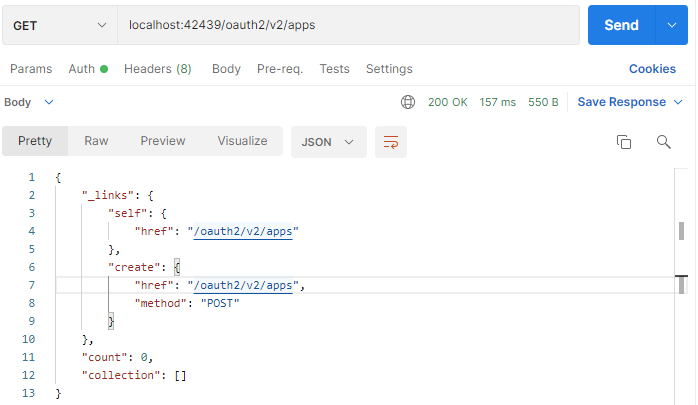 App Management API provides the hypermedia control "create", which allows registering client apps to make them "known" to the application. Known apps can can use the implemented APIs across domain boundaries and authenticate users with OAuth 2.0 Authorization Code flows.
- Follow the create hypermedia link. The new HTTP Request tab will open. Set the request method to POST and configure the authorization key in the Authorization section.
- Choose the Body tab in the request and change the body type from none to raw.
- Change the content type of the body from Text to JSON.
It is time to register the client application.
Registering SPA4 for OAuth 2.0 Authorization
Enter the following in the body of the request:
JSON
12345678910{
    "name": "Standalone SPA4 with RESTful Hypermedia and OAuth 2.0",
    "author": "RESTful Workshop",
    "redirect_uri": "http://localhost:9090/spa4.html#auth",
    "authorization": {
        "native": true,
        "spa": false,
        "server": false
    }
}
Press Send to register the client app SPA4 in the backend application database. The client application will become known to the backend. The required CORs configuration entries will be created.
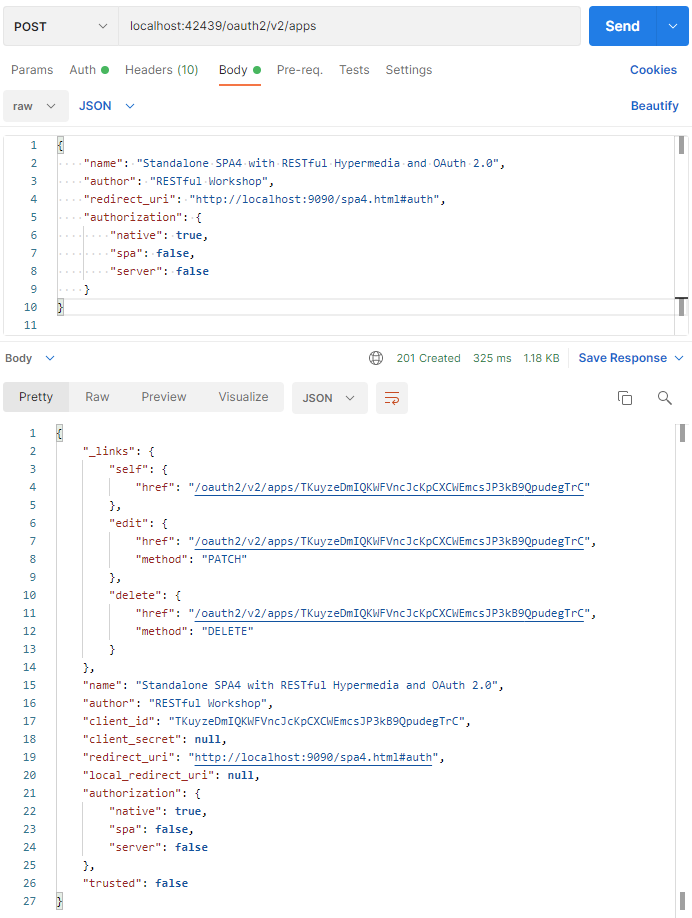 The client registration record of SPA4.
This sample response shows the new registration record of the client application.
JSON
123456789101112131415161718192021222324252627{
    "_links": {
        "self": {
            "href": "/oauth2/v2/apps/TKuyzeDmIQKWFVncJcKpCXCWEmcsJP3kB9QpudegTrC"
        },
        "edit": {
            "href": "/oauth2/v2/apps/TKuyzeDmIQKWFVncJcKpCXCWEmcsJP3kB9QpudegTrC",
            "method": "PATCH"
        },
        "delete": {
            "href": "/oauth2/v2/apps/TKuyzeDmIQKWFVncJcKpCXCWEmcsJP3kB9QpudegTrC",
            "method": "DELETE"
        }
    },
    "name": "Standalone SPA4 with RESTful Hypermedia and OAuth 2.0",
    "author": "RESTful Workshop",
    "client_id": "TKuyzeDmIQKWFVncJcKpCXCWEmcsJP3kB9QpudegTrC",
    "client_secret": null,
    "redirect_uri": "http://localhost:9090/spa4.html#auth",
    "local_redirect_uri": null,
    "authorization": {
        "native": true,
        "spa": false,
        "server": false
    },
    "trusted": false
}
The following properties of the registration record are of interest:
- Property client_id is the unique identifier for SPA4 client application.
- The redirect_uri property is the location that will receive the authorization code from the backend after successful confirmation of the user identity. The code can be exchanged for an access token by SPA4. Tokens will authenticate the app users.
- Property authorization.native is set to true. It indicates that the backend will authenticate the SPA4 users with the OAuth 2.0 Authorization Code Flow with PKCE protocol. This authorization flow is suitable both for single page applications and native mobile applications.
Don’t be intimidated by the abbreviations in the name of the authorization flow. The backend application and restful.js will take care of the details as long as you can provide the client_id and redirect_uri values.
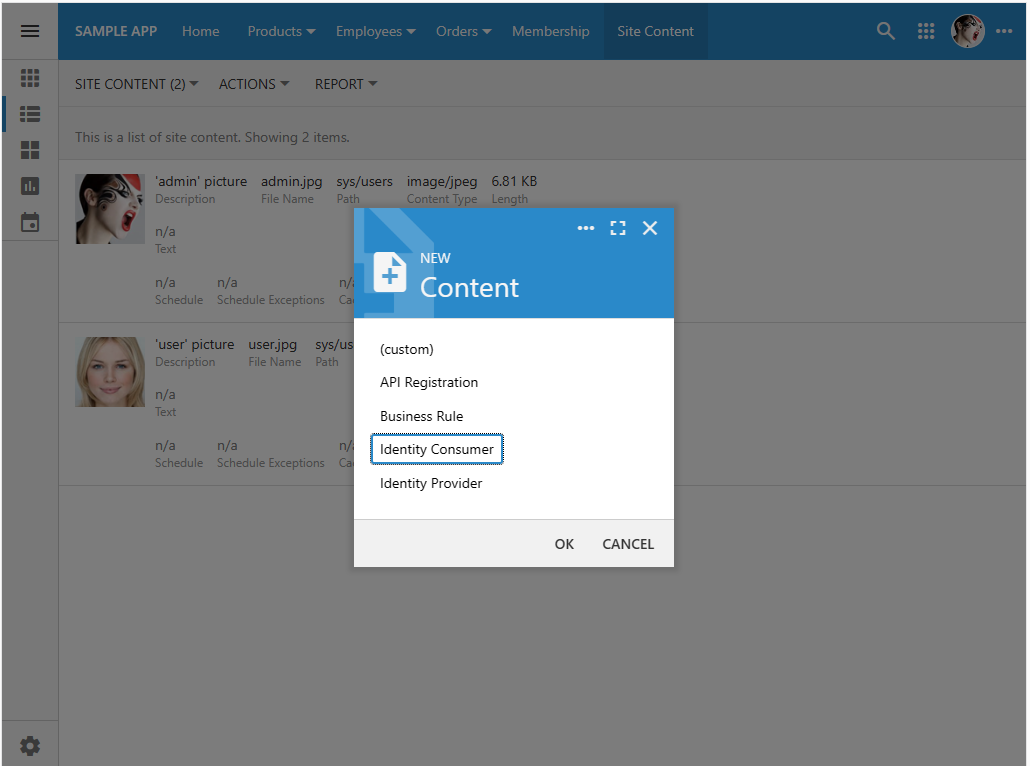
Identity Consumer
Application administrators have a user interface option to register a client app. Sign into the backend application with the admin user account, navigate to the Site Content, and press the Plus icon. The app will display the New Content prompt. Choose the Identity Consumer option and press the OK button.
 The Site Content database is the dynamic registry of an app created with Code On Time. It is based on a single table. Various aspects of the OAuth lifecycle are recorded there.The Identity Consumer option allows registering the client apps that will rely on your applications to confirm the user identity.
The Client App Registration form will appear. Enter the Name, Author, Redirect Uri, and choose the Native option in the Authorization section. The form uses the App Management API to manipulate the client app registration records.
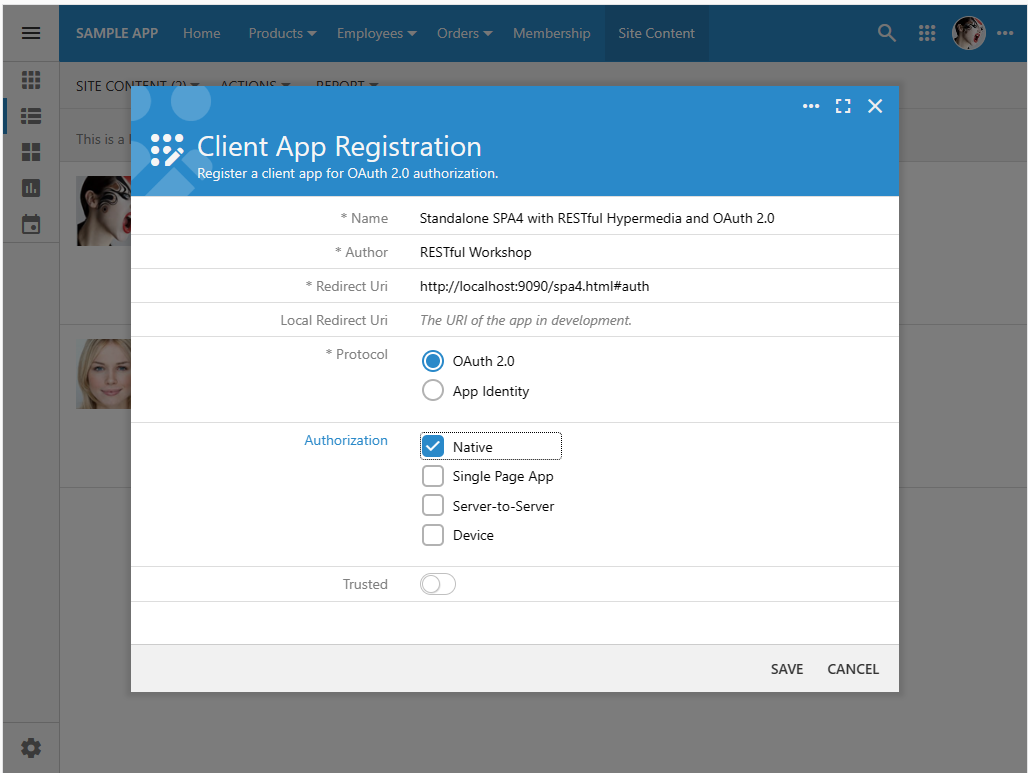 The Client App Registration form offers the interactive means of the OAuth Consumer Registration. Administrators can choose the type of authorization and whether the client app is trusted. Users of the trusted applications will not see a prompt to allow or deny access to the data scopes requested by the app from the identity provider.
Complete the form and press the Save button. The corresponding records will be created in the Site Content database. Press the Copy button next to the Client Id value to have it copied to the clipboard.
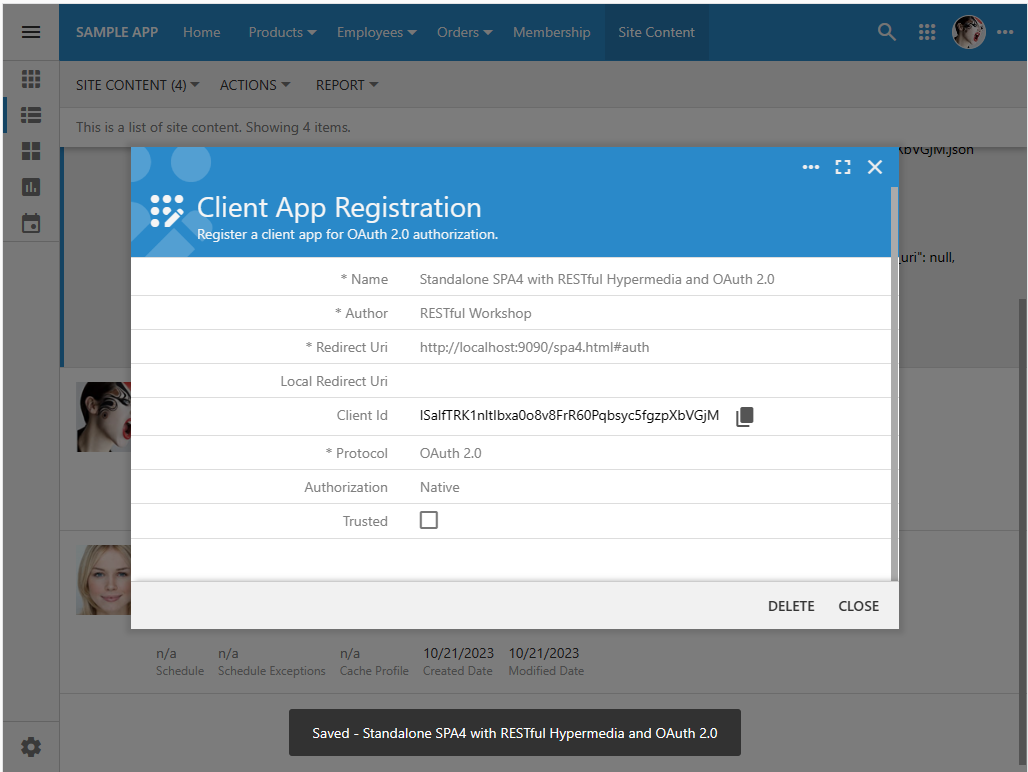 The Client App Registration form becomes read-only when saved. Administrators can copy the Client Id and pass it to the client app developer. The client apps will pass their Id to the identity provider application. Only the registered client apps will be able to ask the identity provider to sign in their users.
The identity consumer registration can be used to create the Single Sign-On mechanism for a collection of apps created with Code On Time or other tools.
App Initialization
Enter the following in spa4.js and save the file:
JavaScript
12345678910111213(function () {
    var clientId = "TKuyzeDmIQKWFVncJcKpCXCWEmcsJP3kB9QpudegTrC", // specific to the Client App Registration
        token = session('token'),
        apiHypermedia = session('apiHypermedia'),
        products;

    window.addEventListener('load', e => {
        document.querySelector('#loginButton').addEventListener('click', login);
        document.querySelector('#logoutButton').addEventListener('click', logout);
        document.addEventListener('click', handleHypermedia);
        start();
    });
})();
The global variable clientId is initialized with the client_id identifier from the client app registration record.
Global variables token and apiHypermedia are initialized with the values fetched from the current browser session. The utility function session is discussed later in this tutorial
Variables apiHypermedia and products are storing the hypermedia-enabled API and product data. They allow the app to retrieve and display the list of products as explained in the Embedded SPA1 with RESTful Hypermedia tutorial.
SPA4 is implemented with plain JavaScript without dependencies on any particular library. The objective of this tutorial is to explain how to authenticate users and work with data via the RESTful API Engine built into backend applications created with Code On Time.
Feel free to adapt the code for React, Angular, or any other libraries.
Application SPA4 comes alive in the load event handler triggered on the window object. It immediately attaches the login and logout handlers to the respective buttons and calls the start function.
Start
Add the start function to spa4.js file.
JavaScript
12345678910111213141516171819202122232425262728293031function start() {
    $app.restful({
        "config": {
            "clientId": clientId,
            "token": function (value) {
                if (value)
                    token = session('token', value);
                return token;
            }
        }
    });
    if (location.hash.match(/#auth\b/))
        exchangeAuthorizationCodeForAccessToken();
    else {
        // initialize the GUI
        document.querySelector(token ? '#authenticated' : "#anonymous").style.display = '';
        if (token) {
            // parse the 'id_token' (JWT) and show the user 'picture' and 'email' claims
            if (token.id_token) {
                var idToken = JSON.parse(atob(token.id_token.split(/\./)[1]));
                document.querySelector('#avatar').style.backgroundImage = 'url(' + idToken.picture + ')';
                document.querySelector('#email').textContent = idToken.email;
            }
            // show the data if the API allows it
            if (apiHypermedia && apiHypermedia.products)
                refreshProductList(apiHypermedia.products._links.first);
            else
                document.querySelector('#product-list').textContent = 'Unauthorized to see the products';
        }
    }
}
Application starts with the configuration of the $app.restful API with the following parameters specified in the config argument:
- The clientId parameter is borrowed directly from the global variable of the same name.
- The token parameter is the function. If the function is called with the argument, then its value is stored in the session and assigned to the token variable. The function always returns the token value.
Both configuration parameters will be used by the $app.restful method to seamlessly refresh the access token whenever it expires. By default the token will expire every 15 minutes. The method will automatically detect the expiration and get a new access token from the backend. The new token is communicated to the app with the token function specified in the config parameter.
Next, the application determines if it is being loaded by a user or the backend application after confirmation of the user's identity. The former happens when a user enters http://localhost:9090/spa4.html in the browser address bar. The latter is triggered by the presence of the #auth hash in the URL, which will begin the exchange of the authorization code for an access token.
The execution flow and user experience will depend on the presence of the value in the token variable in the absence of the #auth hash. If there is a value in the token, then the avatar, email, Logout button, and the list of products will become visible. If the value of the token is not defined, then the user will see the Login button only.
 The user interface of anonymous user in the standalone SPA4 with RESTful Hypermedia and OAuth 2.0
The “code for token” exchange and processing of the JWT (id_token) will be discussed later.
Login
Add the login function to the code in spa4.js. The function will execute when the Login button is pressed. It will figure the absolute URL of the single page application by trimming the hash and parameters from the page location.
JavaScript
1234567891011121314151617181920function login() {
    var appUrl = location.href.match(/^(.+?)((\?|#).+)?$/);
    // get the url and data for "Authorization Code With PKCE" flow
    $app.restful({
        "hypermedia": 'oauth2 >> authorize-client-native >>',
        "body": {
            "client_id": clientId,
            "redirect_uri": appUrl[1] + "#auth",
            "scope": "offline_access openid profile email"
        }
    }).then(result => {
        // Save the entire result as the 'loginRequest' in the session storage
        // to exchange the authorization code for an access token
        session('loginRequest', result);
        // 1) Redirect to the "authorize" link
        // 2) User will login in the primary app in the familiar environment
        // 3) The backend app will return to the SPA with the authorization code in the URL
        location.href = result._links.authorize.href;
    }).catch(restfulException);
}
The login function will call the $app.restful method with the hypermedia and body parameters.
The hypermedia parameter will instruct the method to perform multiple HTTP requests to the RESTful API Engine of the backend. The address of the backend server will match the source of the restful.js script in the page header and does not need to be specified.
The $app.restful method will fetch the /v2 endpoint in the absence of the url parameter. If there is the hypermedia parameter, then the method will keep resolving the named hypermedia controls and transitioning to the next resource whenever the optional transition operator “>>” is following the control name.
If there is an object parameter with the name that matches the hypermedia control, then its properties are used to fulfill the HTTP request. If there is the body parameter, then it will be used to execute the last HTTP request in the chain specified in hypermedia.
Hypermedia Navigation
First the $app.restful method will fetch data from the /v2 endpoint, which will look like this:
JSON
12345678910{
    "_links": {
        "oauth2": {
            "href": "/oauth2/v2"
        },
        "restful.js": {
            "href": "/v2/js/restful-2.0.1.js"
        }
    }
}
Next the method will transition to the oauth2 hypermedia link that will return the data shown below. The data represents the OAuth 2.0 API and standard scopes implemented in the applications created with Code On Time.
JSON
123456789101112131415161718192021222324252627282930313233343536373839404142434445464748495051525354555657{
    "_links": {
        "authorize": {
            "href": "/oauth2/v2/auth"
        },
        "token": {
            "href": "/oauth2/v2/token",
            "method": "POST"
        },
        "tokeninfo": {
            "href": "/oauth2/v2/tokeninfo"
        },
        "userinfo": {
            "href": "/oauth2/v2/userinfo",
            "method": "POST"
        },
        "revoke": {
            "href": "/oauth2/v2/revoke",
            "method": "POST"
        },
        "authorize-client-native": {
            "href": "/oauth2/v2/auth/pkce",
            "method": "POST"
        },
        "authorize-client-spa": {
            "href": "/oauth2/v2/auth/spa",
            "method": "POST"
        },
        "authorize-server": {
            "href": "/oauth2/v2/auth/server",
            "method": "POST"
        },
        "schema": {
            "href": "/oauth2/v2?_schema=true"
        }
    },
    "scopes": {
        "openid": {
            "hint": "View the unique user id, client app id, API endpoint, token issue and expiration date."
        },
        "profile": {
            "hint": "View the user's last and first name, birthdate, gender, picture, and preferred language."
        },
        "address": {
            "hint": "View the user's preferred postal address."
        },
        "email": {
            "hint": "View the user's email address."
        },
        "phone": {
            "hint": "View the user's phone number."
        },
        "offline_access": {
            "hint": "Access your data anytime."
        }
    }
}
Finally the $app.restful method will fetch the authorize-client-native hypermedia control by executing the POST request to the corresponding URL. The body parameter of the method will become the body of the request. This is how the body of the HTTP request will look.
JSON
12345{
    "client_id": "TKuyzeDmIQKWFVncJcKpCXCWEmcsJP3kB9QpudegTrC",
    "redirect_uri": "http://localhost:9090/spa4.html#auth",
    "scope": "offline_access openid profile email"
}
Authorization Url
The response received from the backend will be captured in the session as loginRequest by the login function.
JSON
123456789101112131415161718192021{
    "_links": {
        "authorize": {
            "href": "https://demo.codeontime.com/oauth2/v2/auth?response_type=code&client_id=TKuyzeDmIQKWFVncJcKpCXCWEmcsJP3kB9QpudegTrC&redirect_uri=http%3a%2f%2flocalhost%3a9090%2fspa4.html%23auth&scope=offline_access+openid+profile+email&state=VusPwp23sGFYfxKm&code_challenge=DzQyZyz8kaU1VjRUpoeOIM465OxvCbmOV8csABfT878&code_challenge_method=S256"
        }
    },
    "state": "VusPwp23sGFYfxKm",
    "token": {
        "_links": {
            "self": {
                "href": "https://demo.codeontime.com/oauth2/v2/token",
                "method": "POST"
            }
        },
        "grant_type": "authorization_code",
        "code": null,
        "redirect_uri": "http://localhost:9090/spa4.html#auth",
        "client_id": "TKuyzeDmIQKWFVncJcKpCXCWEmcsJP3kB9QpudegTrC",
        "code_verifier": "aeW~AS5lac9505pe-YsVpKXDIEbBuR5Zre-gdZpNlMwTTflbKA~H7CrM5xeCbqOJ"
    }
}
The data is preserved in the session storage of the browser to make possible the “code for token” exchange.
Function login will immediately redirect the browser to the URL specified in the _links.authorize.href key.
This is the Authorization Url with the parameters wrapped to separate lines:
https://demo.codeontime.com/oauth2/v2/auth?
response_type=code&
client_id=TKuyzeDmIQKWFVncJcKpCXCWEmcsJP3kB9QpudegTrC&
redirect_uri=http%3a%2f%2flocalhost%3a9090%2fspa4.html%23auth&
scope=offline_access+openid+profile+email&
state=VusPwp23sGFYfxKm&
code_challenge=DzQyZyz8kaU1VjRUpoeOIM465OxvCbmOV8csABfT878&
code_challenge_method=S256
The URL points to the backend application. Its parameters instruct the backend to confirm the user identity and to return an authorization code back to SPA4 with the assumption that it will be exchanged for an access token according to OAuth2 Authorization Code Flow with PKCE.
The values of the output keys state and token.code_verifier are randomly generated sequences that are not preserved by the backend application. They are intended for the client application only. The parameter code_challenge in the URL is the hash of the token.code_verifier value. The value of the state key is also included in the URL. Each request to the authorize-client-native hypermedia will yield the different values in these keys.
Developers may choose to produce the Authorization Url entirely on the client with their own code if desired.
Account Access Approval and Scopes
The redirect URL will cause the application user interface of the backend to “get into a state” as soon as the user signs in. The authenticated user will see the following prompt no matter what page they are visiting.
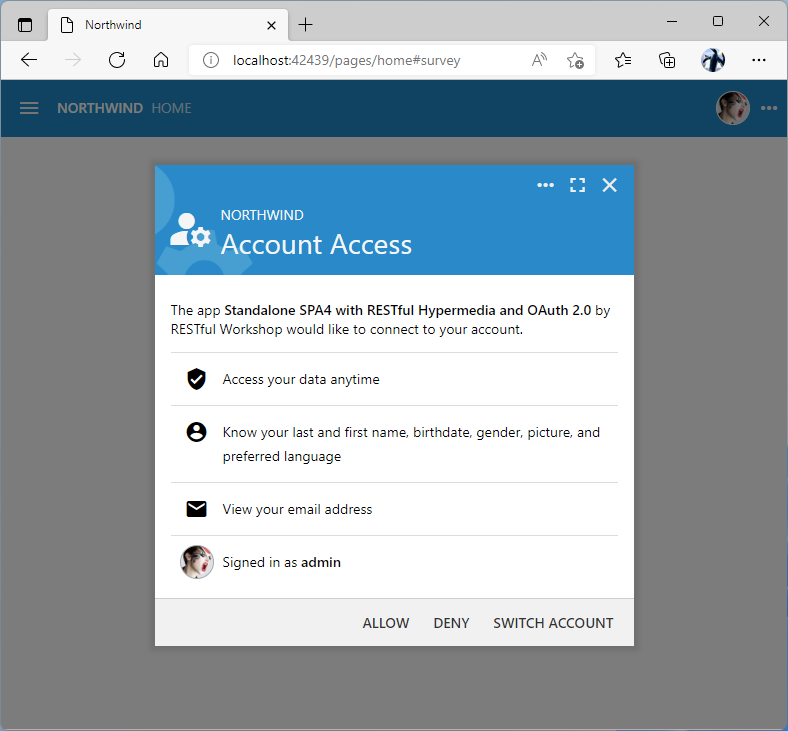 The Account Access consent form is presented to the user during the OAuth 2.0 Authorization Code flow with PKCE in the application created with Code On Time.
The user is presented with the scopes requested in the Authorization Url composed by the client when the Login button was clicked. Users can either Allow or Deny the request for account access from the 3rd party application.
The Account Access consent form is presented to the user during the OAuth 2.0 Authorization Code flow with PKCE in the application created with Code On Time.
The user is presented with the scopes requested in the Authorization Url composed by the client when the Login button was clicked. Users can either Allow or Deny the request for account access from the 3rd party application.
The list of scopes explicitly tells the user what exactly the 3rd party app will be able to do and learn. These scopes are defined in the Authorization URL created by SPA4 in the login function:
- Scope offline_access allows the app to refresh the access token without asking the user to sign in. The client will be able to access data anytime without an explicit confirmation. Access tokens are refreshed every fifteen minutes and the trusted apps shall be allowed to maintain access as long as needed.
- Scope openid will instruct the backend to include the id_token along with the access_token when the account access is granted or refreshed. This scope is defined in the OpenID Connect protocol, which allows client applications to discover the user information in a uniform way. The three-part JWT (JSON Web Token) is returned as the id_token during the “code for token” exchange.
- Scope profile is the part of OpenID Connect. It allows the app to discover the basic information about the user such as the last name or picture.
- Scope email is also part of the OpenID Connect specification. It lets the user disclose their email address to the client application.
Learn about custom scopes and the reasons to use them in the JWT, OAuth 2.0 Scopes, Roles, and Access Control List tutorial.
If the client app is the primary user interface for the backend application created with Code On Time, then presenting the users with the list of scopes may be redundant. Use the App Management API described in the Client Registration Section of the tutorial to edit the client app registration record. Set the trusted property to true in the body of the PATCH request.
Users of the trusted client applications are not presented with the list of scopes and an option to allow or deny the request. Successful identity confirmation will allow the account access automatically.
Users may choose to switch their identity if they have more than one account in the backend application. The account selector is presented when the Switch Account button is clicked in the Account Access form. This also happens if the user is already signed into the backend application at the time when the redirect from the client app to the Authorization Url occurs.
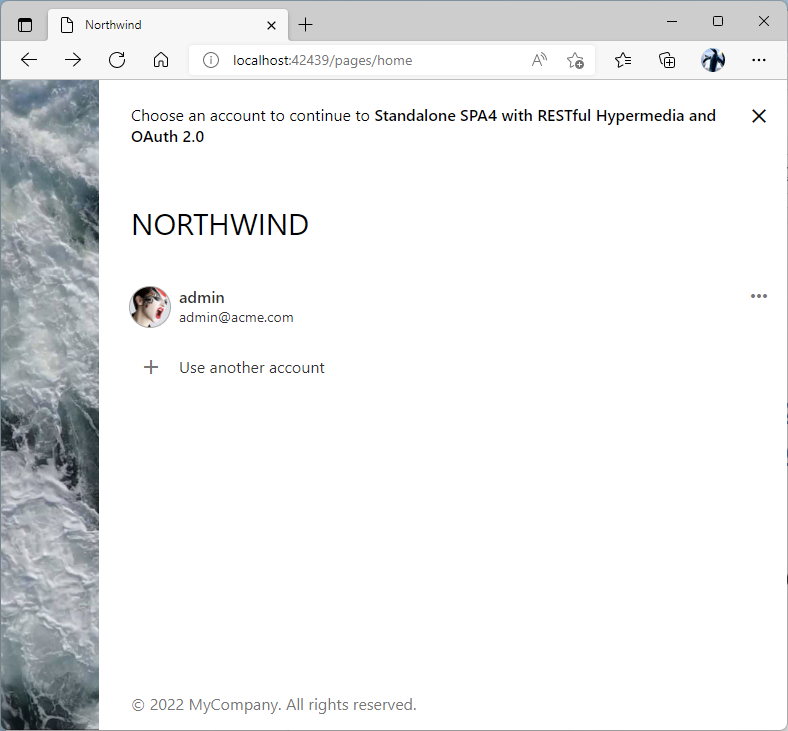 Account selector allow users to switch their identity when a client app is requesting account access.
The user account in the screenshots has an avatar. Here is how a picture can be associated with a user account:
- Sign into the backend application with the admin account.
- Select Site Content on in the menu bar.
- Start creating the new site content record.
- Choose (custom) for the type of the content.
- Tap the Data input to choose a picture or drag a file onto it.
- Enter sys/users in the Path field.
- Replace the file name with the user name and keep the extension. For example, enter user.png in the File Name field for the user account picture in the PNG format.
- Press Save to create the picture. The avatar will become visible the next time the user signs in.
Exchanging Code for Token
PKCE stands for Proof Key of Code Exchange. This is the extension for the Authorization Code flow that allows the secure exchange of authorization code for an access token. The flow is suitable for applications that are not able to keep secrets. The single page applications have their entire code visible to the prying eyes. The same is true for the native applications installed on client devices.
The code_verifier is retained by the client app and is not known to the backend. Its hashed value is specified in the code_challenge parameter in the URL The backend will associate the parameter with the account access request from the client app. If the user has granted the access, then the authorization code will be specified in the redirect URL navigating the browser from the backend to the client application. The client must specify the original code_verifier in the request exchanging the authorization code for an access token.
The client app SPA4 will load with the following URL when the user approves the account access request (both the state and code parameters will be different for each login attempt):
http://localhost:9090/spa4.html#auth?state=VusPwp23sGFYfxKm&code=kflsjdlkfsjdlk38984374.
Function start detects the #auth hash in the URL and invokes the exchangeAuthorizationCodeForAccessToken function.
Here it is:
JavaScript
12345678910111213141516171819202122232425262728293031323334function exchangeAuthorizationCodeForAccessToken() {
    var args = urlArgs();
    if (args.error)
        reloadApp(args.error);
    else {
        // get the access token
        var loginRequest = session('loginRequest');
        if (loginRequest) {
            session('loginRequest', null);
            if (args.state != loginRequest.state)
                reloadApp("Forged 'state' is detected.");
            else {
                loginRequest.token.code = args.code;
                $app.restful({
                    "url": loginRequest.token._links["self"],
                    "body": loginRequest.token
                })
                    .then(result => {
                        token = session('token', result);
                        $app.restful() // request the API of authenticated user
                            .then(result => {
                                session('apiHypermedia', result);
                                reloadApp();
                            })
                            .catch(restfulException);

                    })
                    .catch(restfulException);
            }
        }
        else
            reloadApp("The invalid 'loginRequest' is detected.");
    }
}
If there is the error parameter in the URL, then the app will reload. Otherwise the loginRequest is extracted from the session.
If the loginRequest.state value does not match the state parameter value in the URL, then the app will reload with the “Forged ‘state’ is detected” message. Otherwise the loginRequest is removed from the session.
Next the code parameter is copied from the URl to the loginRequest.token.code key. The modified token property of the loginRequest is shown below:
JSON
12345678910111213141516{
    "state": "VusPwp23sGFYfxKm",
    "token": {
        "_links": {
            "self": {
                "href": "https://demo.codeontime.com/oauth2/v2/token",
                "method": "POST"
            }
        },
        "grant_type": "authorization_code",
        "code": "kflsjdlkfsjdlk38984374",
        "redirect_uri": "http://localhost:9090/spa4.html#auth",
        "client_id": "TKuyzeDmIQKWFVncJcKpCXCWEmcsJP3kB9QpudegTrC",
        "code_verifier": "aeW~AS5lac9505pe-YsVpKXDIEbBuR5Zre-gdZpNlMwTTflbKA~H7CrM5xeCbqOJ"
    }
}
Application will invoke the $app.restful method with the self hypermedia from the loginRequest specified in the url parameter and loginRequest.token specified in the body parameter.
Last, it will save the access token in the session, fetch and preserve the API definition, and reload the app.
Token Variable
Reloading of the SPA4 client app by the exchangeAuthorizationCodeForAccessToken function will initialize both the token and apiHypermedia variables with data. Here is the snippet from the top of the spa4.js file:
JavaScript
1234var clientId = "TKuyzeDmIQKWFVncJcKpCXCWEmcsJP3kB9QpudegTrC", // specific to the Client App Registration
    token = session('token'),
    apiHypermedia = session('apiHypermedia'),
    products;
The token variable will contain the object similar to the one below:
JSON
12345678{
    "access_token": "2uRD3pVjOcQiWb7UUR9U9ZDkYikRuamp1S-LjhaT_kU96hjI.LQHvU7k9oGGU_5ERCEYrOFEml_J+zNi",
    "expires_in": 900,
    "token_type": "Bearer",
    "id_token": "eyJ0eXAiOiJKV1QiLCJhbGciOiJIUzI1NiJ9.eyJpc3MiOiJodHRwOi8vbG9jYWxob3N0OjQyNDM5L29hdXRoMi92MiIsImF6cCI6IlRLdXl6ZURtSVFLV0ZWbmNKY0twQ1hDV0VtY3NKUDNrQjlRcHVkZWdUckMiLCJhdWQiOiJodHRwOi8vbG9jYWxob3N0OjQyNDM5L3YyIiwic3ViIjoiYmYxMTk5ZDItN2ZkZC00YmJkLTgyMDgtZThhZGIzZTVkZGI1IiwiaWF0IjoxNjQ4MzIwMzQzLCJleHAiOjE2NDgzMjEyNDMsImVtYWlsIjoiYWRtaW5AYWNtZS5jb20iLCJlbWFpbF92ZXJpZmllZCI6dHJ1ZSwibmFtZSI6bnVsbCwiZ2l2ZW5fbmFtZSI6bnVsbCwiZmFtaWx5X25hbWUiOm51bGwsIm1pZGRsZV9uYW1lIjpudWxsLCJuaWNrbmFtZSI6bnVsbCwicHJlZmVycmVkX3VzZXJuYW1lIjpudWxsLCJwcm9maWxlIjpudWxsLCJwaWN0dXJlIjoiaHR0cDovL2xvY2FsaG9zdDo0MjQzOS9vYXV0aDIvdjIvdXNlcmluZm8vcGljdHVyZXMvb3JpZ2luYWwvTm5rdi04LXNXQUhuaHFwZlBJVHJ5LXhPRWZtdEliVnlEM1FoYnI4b3MtYy5qcGVnIiwiZ2VuZGVyIjpudWxsLCJiaXJ0aGRhdGUiOm51bGwsInpvbmVpbmZvIjoiQW1lcmljYS9Mb3NfQW5nZWxlcyIsImxvY2FsZSI6ImVuLVVTIiwidXBkYXRlZF9hdCI6bnVsbCwic2NvcGUiOiJvZmZsaW5lX2FjY2VzcyBvcGVuaWQgcHJvZmlsZSBlbWFpbCJ9.MEYgJqEFRA1hcaETSL8HY9cHiZksM6kbM_za9gp1mP8",
    "refresh_token": "TxyVpC+0bk79kXI2EldQ+qiQ-GMyUuX9jh3MhWu3M6NoM2yl9I5kzOKNRktiOMKq",
    "scope": "offline_access openid profile email"
}
This object makes it possible for the app to specify the user identity when making requests to the RESTful API Engine of the backend.
The token variable structure can be reduced just to the value of the access_token property if the user identity information or refreshing of the access token are not required.
SPA4 will function correctly with the minimalistic version of the token data.
Let’s explore the individual properties of the object in the token variable.
access_token
The access_token property contains the access token that can be specified in the Authorization header of the HTTP request to the RESTful API.
expires_in
The expires_in property specifies how soon the access token will expire. The value is expressed in seconds. By default, the backend application will configure the tokens to expire in 15 minutes. Set the server.rest.authorization.oauth2.accessTokenDuration option in the ~/app/touch-settings.json configuration file to the number of minutes the access token will remain valid.
token_type
The value of the token_type must precede the access token value specified in the Authorization header of an HTTP request. Make sure to put a “space” character between them.
id_token
The id_token property will be present only if the openid scope was specified in the Authorization Url. The value of the property is the JSON Web Token also known as the JWT.
JWT is composed of three parts separated by “.” character. Each part is the base-64-url-encoded text.
Try decoding the JWT in one of many tools available online. The first part is the header and the third part is the signature of JSON Web Token. The payload (the second part) will show the following JSON data:
JSON
123456789101112131415161718192021222324{
  "iss": "https://demo.codeontime.com/oauth2/v2",
  "azp": "TKuyzeDmIQKWFVncJcKpCXCWEmcsJP3kB9QpudegTrC",
  "aud": "https://demo.codeontime.com/v2",
  "sub": "bf1199d2-7fdd-4bbd-8208-e8adb3e5ddb5",
  "iat": 1648320343,
  "exp": 1648321243,
  "email": "admin@acme.com",
  "email_verified": true,
  "name": null,
  "given_name": null,
  "family_name": null,
  "middle_name": null,
  "nickname": null,
  "preferred_username": null,
  "profile": null,
  "picture": "https://demo.codeontime.com/oauth2/v2/userinfo/pictures/original/Nnkv-8-sWAHnhqpfPITry-xOEfmtIbVyD3Qhbr8os-c.jpeg",
  "gender": null,
  "birthdate": null,
  "zoneinfo": "America/Los_Angeles",
  "locale": "en-US",
  "updated_at": null,
  "scope": "offline_access openid profile email"
}
The decoding tools will tell you that the signature is invalid and requires a passphrase (the 256-bit secret) to verify. The secret is known only to the backend application. You can ask the backend to verify the id_token with the tokeninfo hypermedia control.
 The hypermedia control "tokeninfo" in OAuth 2.0 API validates and decodes the contents of a JWT that was issued by the backend application.
Some OAuth 2.0 Authorization flows pass a JWT as an access token. It is specified as a parameter in the URL and for that reason cannot be trusted without verification. Applications created with Code On Time do not accept JWT as an access token. Only the Authorization Code flows are supported, which are considered to be inherently secure by the industry.
The information in the id_token can be trusted since it is returned either when the authorization code is exchanged for an access token or when the latter is refreshed.
It takes literally one line of code to decode the contents of the id_token property with JavaScript. Here is the snippet of code from the start function that does it:
JavaScript
123456// parse the 'id_token' (JWT) and show the user 'picture' and 'email' claims
if (token.id_token) {
    var idToken = JSON.parse(atob(token.id_token.split(/\./)[1]));
    document.querySelector('#avatar').style.backgroundImage = 'url(' + idToken.picture + ')';
    document.querySelector('#email').textContent = idToken.email;
}
The snippet also assigns the picture and email claims from the JWT in id_token to the respective user interface elements.
Claims picture and email are included in the JSON Web Token only if the profile and email scopes are specified in the Authorization Url.
refresh_token
The value of the refresh_token property is used by the $app.restful method automatically when the access token is reported as expired by the backend application.
Developers can renew the access token at any time with the token hypermedia control in the OAuth 2.0 API of the backend.
scope
The scope property contains the space-separated list of scopes known to the backend application and requested by the client in the Authorization Url.
Fetching and Displaying Data
Function start displays the avatar and email address of the authenticated user and proceeds to render the list of products by invoking the refreshProductList function. The detailed discussion of how the products are rendered is in the Embedded SPA1 with RESTful Hypermedia tutorial.
The code is slightly modified in SPA4 since some of the Touch UI utility functions will need to be replaced with their equivalents.
JavaScript
12345678910111213141516171819202122232425262728293031323334353637383940414243444546474849/* product list rendering and paging */

function refreshProductList(hypermedia) {
    $app.restful({
        "url": hypermedia
    })
        .then(result => {
            products = result;
            renderProductData();
        })
        .catch(restfulException);
}

function renderProductData() {
    var sb = [
        '<table border="1" cellpadding="5" cellspacing="0">',
        '<tr><th>Product</th><th>Category</th><th>Supplier</th><th>Unit Price</th><th>Units In Stock</th></tr>'];
    for (var i = 0; i < products.collection.length; i++) {
        var p = products.collection[i];
        sb.push('<tr>');
        sb.push('<td>', htmlEncode(p.productName), '</td>');
        sb.push('<td>', htmlEncode(p.categoryName), '</td>');
        sb.push('<td>', htmlEncode(p.supplierCompanyName), '</td>');
        sb.push('<td>', htmlEncode(p.unitPrice), '</td>');
        sb.push('<td>', htmlEncode(p.unitsInStock), '</td>');
        sb.push('</tr>')
    }
    sb.push('</table>');
    sb.push('<div class="toolbar">')
    var hypermedia = products._links;
    sb.push('<button data-hypermedia="self"', hypermedia.self ? '' : ' disabled="disabled"', '>Refresh</button>');
    sb.push('<button data-hypermedia="first"', hypermedia.first ? '' : ' disabled="disabled"', '>First</button>');
    sb.push('<button data-hypermedia="prev"', hypermedia.prev ? '' : ' disabled="disabled"', '>Prev</button>');
    sb.push('<button data-hypermedia="next"', hypermedia.next ? '' : ' disabled="disabled"', '>Next</button>');
    sb.push('<button data-hypermedia="last"', hypermedia.last ? '' : ' disabled="disabled"', '>Last</button>');
    var hypermediaArgs = urlArgs(products._links.self);
    sb.push('Page: ', parseInt(hypermediaArgs.page) + 1, ' of ', Math.ceil(products.count / hypermediaArgs.limit),
        ' (', + products.count + ' items)');
    sb.push('</div>');
    document.querySelector('#product-list').innerHTML = sb.join('');
}

function handleHypermedia(e) {
    var btn = e.target.closest('[data-hypermedia]')
    if (btn && products) {
        var hypermedia = btn.getAttribute('data-hypermedia');
        refreshProductList(products._links[hypermedia]);
    }
}
Utilities
The utility functions of the SPA4 implementation are presented below:
JavaScript
12345678910111213141516171819202122232425262728293031323334353637383940414243444546474849505152535455/* miscellaneous utilities */

function urlArgs(url) {
    if (!url)
        url = location;
    if (url.href)
        url = url.href;
    var args = {};
    var iterator = /(\w+)=(.+?)(&|#|$)/g;
    var m = iterator.exec(url);
    while (m) {
        args[m[1]] = m[2];
        m = iterator.exec(url);
    }
    return args;
}

function session(name, value) {
    if (arguments.length == 1) {
        value = sessionStorage.getItem(name);
        if (typeof value == 'string')
            value = JSON.parse(value);
    }
    else {
        if (value == null)
            sessionStorage.removeItem(name);
        else
            sessionStorage.setItem(name, JSON.stringify(value));
    }
    return value;
}

function restfulException(ex) {
    if (ex && ex.errors) {
        alert(ex.errors[0].reason + ': ' + ex.errors[0].message)
        if (ex.code == 401 || ex.code == 403) {
            session('token', null);
            reloadApp();
        }
    }
}

function reloadApp(message) {
    if (message)
        alert(message);
    location.replace(location.pathname);
}

function htmlEncode(text) {
    var encoder = window.encElem;
    if (!encoder)
        encoder = window.encElem = document.createElement('span');
    encoder.textContent = text;
    return encoder.innerHTML;
}
Function urlArgs will parse the parameters specified after the “?” in the url argument or in the URL of the browser address bar. The parameters are returned as properties of an object.
Another notable function is session. It creates a wrapper on top of the intrinsic sessionStorage object. If only the name argument is specified, then the function will read the corresponding variable from the storage and parse it as JSON into an object. If the value argument is specified, then its named serialized version will be persisted in the storage. If value is null, then the corresponding storage item is removed.
Demoting Touch UI
If you are creating a custom frontend on top of the RESTful API Engine and expect it to become the primary user interface, then you will have a dilemma. Users can sign into the backend application directly and bypass your creation.
On one hand you want the users to confirm their identity in the backend. On the other hand everything else must be done in the primary UI.
Developers solve the dilemma by limiting the backend UI to specific roles.
Change the ~/app/touch-settings.json configuration file of the backend to include the ui.roles key with the value set to Administrators.
Backend application will allow users with the Administrators role to sign in and access any of its pages. Other users will not be able to sign in even if they confirm their identity.
Backend application will let all users confirm their identity and let them approve the account access if they enter at the location specified in Authorization Url during the login process initiated in the client app.
That way developers can quickly produce sophisticated data management forms based on Touch UI for themselves and application administrators. RESTful resources based on the data controllers will be created in the process. Developers can take their time to carefully craft a unique user experience in the custom frontend while taking advantage of the RESTful API Engine.
Logout
Let’s wrap up this tutorial by discussing the logout functionality. Users sign out from the client app by clicking on the Logout button in the toolbar above the list of products.
JavaScript
123456789101112131415function logout() {
    $app.restful({
        "hypermedia": 'oauth2 >> revoke >>',
        "body": {
            "client_id": clientId,
            "token": token.refresh_token || token.access_token || token
        },
        "token": false // anonymous request
    }).then(result => {
        // remove the token from the session
        session('token', null);
        session('apiHypermedia', null);
        reloadApp();
    }).catch(restfulException);
}
A single call of the $app.restful method will remove the token and apiHypermedia data from the session storage and reload the app. The client application will enter its initial state.
The hypermedia argument will instruct the method to transition to the revoke hypermedia control. The body argument includes the client_id property derived from the clientId constant declared at the top of spa4.js file. The token property of the body argument will derive its value either from the refresh_token or access_token property available in the token global variable
The OAuth 2.0 API of the backend will delete the token data. This will render any existing copies of the access_token or refresh_token values unusable.
Final Source Code
This single page app is composed of two physical files. The markup of the spa4.html is shown at the top of the tutorial. The complete source of the spa4.js file is shown next.
Are numerous data samples and code snippets getting your head spinning? Take a deep breath and have a quick look at the compact and straightforward SPA4 implementation.
JavaScript
123456789101112131415161718192021222324252627282930313233343536373839404142434445464748495051525354555657585960616263646566676869707172737475767778798081828384858687888990919293949596979899100101102103104105106107108109110111112113114115116117118119120121122123124125126127128129130131132133134135136137138139140141142143144145146147148149150151152153154155156157158159160161162163164165166167168169170171172173174175176177178179180181182183184185186187188189190191192193194195196197198199200201202203204205206207208209210211212213214215216217218219220221222223224225(function () {
    var clientId = "TKuyzeDmIQKWFVncJcKpCXCWEmcsJP3kB9QpudegTrC", // specific to the Client App Registration
        token = session('token'),
        apiHypermedia = session('apiHypermedia'),
        products;

    window.addEventListener('load', e => {
        document.querySelector('#loginButton').addEventListener('click', login);
        document.querySelector('#logoutButton').addEventListener('click', logout);
        document.addEventListener('click', handleHypermedia);
        start();
    });

    function start() {
        $app.restful({
            "config": {
                "clientId": clientId,
                "token": function (value) {
                    if (value)
                        token = session('token', value);
                    return token;
                }
            }
        });
        if (location.hash.match(/#auth\b/))
            exchangeAuthorizationCodeForAccessToken();
        else {
            // initialize the GUI
            document.querySelector(token ? '#authenticated' : "#anonymous").style.display = '';
            if (token) {
                // parse the 'id_token' (JWT) and show the user 'picture' and 'email' claims
                if (token.id_token) {
                    var idToken = JSON.parse(atob(token.id_token.split(/\./)[1]));
                    document.querySelector('#avatar').style.backgroundImage = 'url(' + idToken.picture + ')';
                    document.querySelector('#email').textContent = idToken.email;
                }
                // show the data if the API allows it
                if (apiHypermedia && apiHypermedia.products)
                    refreshProductList(apiHypermedia.products._links.first);
                else
                    document.querySelector('#product-list').textContent = 'Unauthorized to see the products';
            }
        }
    }

    /* authentication with "OAuth2 Authorization Code with PKCE" flow */

    function login() {
        var appUrl = location.href.match(/^(.+?)((\?|#).+)?$/);
        // get the url and data for "Authorization Code With PKCE" flow
        $app.restful({
            "hypermedia": 'oauth2 >> authorize-client-native >>',
            "body": {
                "client_id": clientId,
                "redirect_uri": appUrl[1] + "#auth",
                "scope": "offline_access openid profile email"
            }
        }).then(result => {
            // Save the entire result as the 'loginRequest' in the session storage
            // to exchange the authorization  code for an access token
            session('loginRequest', result);
            // 1) Redirect to the "authorize" link
            // 2) User will login in the primary app in the familiar environment
            // 3) The backend app will return to the SPA with the authorization code in the URL
            location.href = result._links.authorize.href;
        }).catch(restfulException);
    }

    function exchangeAuthorizationCodeForAccessToken() {
        var args = urlArgs();
        if (args.error)
            reloadApp(args.error);
        else {
            // get the access token
            var loginRequest = session('loginRequest');
            if (loginRequest) {
                session('loginRequest', null);
                if (args.state != loginRequest.state)
                    reloadApp("Forged 'state' is detected.");
                else {
                    loginRequest.token.code = args.code;
                    $app.restful({
                        "url": loginRequest.token._links["self"],
                        "body": loginRequest.token
                    })
                        .then(result => {
                            token = session('token', result);
                            $app.restful() // request the API of authenticated user
                                .then(result => {
                                    session('apiHypermedia', result);
                                    reloadApp();
                                })
                                .catch(restfulException);

                        })
                        .catch(restfulException);
                }
            }
            else
                reloadApp("The invalid 'loginRequest' is detected.");
        }
    }

    function logout() {
        $app.restful({
            "hypermedia": 'oauth2 >> revoke >>',
            "body": {
                "client_id": clientId,
                "token": token.refresh_token || token.access_token || token
            },
            "token": false // anonymous request
        }).then(result => {
            // remove the token from the session
            session('token', null);
            session('apiHypermedia', null);
            reloadApp();
        }).catch(restfulException);
    }

    /* product list rendering and paging */

    function refreshProductList(hypermedia) {
        $app.restful({
            "url": hypermedia
        })
            .then(result => {
                products = result;
                renderProductData();
            })
            .catch(restfulException);
    }

    function renderProductData() {
        var sb = [
            '<table border="1" cellpadding="5" cellspacing="0">',
            '<tr><th>Product</th><th>Category</th><th>Supplier</th><th>Unit Price</th><th>Units In Stock</th></tr>'];
        for (var i = 0; i < products.collection.length; i++) {
            var p = products.collection[i];
            sb.push('<tr>');
            sb.push('<td>', htmlEncode(p.productName), '</td>');
            sb.push('<td>', htmlEncode(p.categoryName), '</td>');
            sb.push('<td>', htmlEncode(p.supplierCompanyName), '</td>');
            sb.push('<td>', htmlEncode(p.unitPrice), '</td>');
            sb.push('<td>', htmlEncode(p.unitsInStock), '</td>');
            sb.push('</tr>')
        }
        sb.push('</table>');
        sb.push('<div class="toolbar">')
        var hypermedia = products._links;
        sb.push('<button data-hypermedia="self"', hypermedia.self ? '' : ' disabled="disabled"', '>Refresh</button>');
        sb.push('<button data-hypermedia="first"', hypermedia.first ? '' : ' disabled="disabled"', '>First</button>');
        sb.push('<button data-hypermedia="prev"', hypermedia.prev ? '' : ' disabled="disabled"', '>Prev</button>');
        sb.push('<button data-hypermedia="next"', hypermedia.next ? '' : ' disabled="disabled"', '>Next</button>');
        sb.push('<button data-hypermedia="last"', hypermedia.last ? '' : ' disabled="disabled"', '>Last</button>');
        var hypermediaArgs = urlArgs(products._links.self);
        sb.push('Page: ', parseInt(hypermediaArgs.page) + 1, ' of ', Math.ceil(products.count / hypermediaArgs.limit),
            ' (', + products.count + ' items)');
        sb.push('</div>');
        document.querySelector('#product-list').innerHTML = sb.join('');
    }

    function handleHypermedia(e) {
        var btn = e.target.closest('[data-hypermedia]')
        if (btn && products) {
            var hypermedia = btn.getAttribute('data-hypermedia');
            refreshProductList(products._links[hypermedia]);
        }
    }

    /* miscellaneous utilities */

    function urlArgs(url) {
        if (!url)
            url = location;
        if (url.href)
            url = url.href;
        var args = {};
        var iterator = /(\w+)=(.+?)(&|#|$)/g;
        var m = iterator.exec(url);
        while (m) {
            args[m[1]] = m[2];
            m = iterator.exec(url);
        }
        return args;
    }

    function session(name, value) {
        if (arguments.length == 1) {
            value = sessionStorage.getItem(name);
            if (typeof value == 'string')
                value = JSON.parse(value);
        }
        else {
            if (value == null)
                sessionStorage.removeItem(name);
            else
                sessionStorage.setItem(name, JSON.stringify(value));
        }
        return value;
    }

    function restfulException(ex) {
        if (ex && ex.errors) {
            alert(ex.errors[0].reason + ': ' + ex.errors[0].message)
            if (ex.code == 401 || ex.code == 403) {
                session('token', null);
                reloadApp();
            }
        }
    }

    function reloadApp(message) {
        if (message)
            alert(message);
        location.replace(location.pathname);
    }

    function htmlEncode(text) {
        var encoder = window.encElem;
        if (!encoder)
            encoder = window.encElem = document.createElement('span');
        encoder.textContent = text;
        return encoder.innerHTML;
    }
})();
Built-in vs 3rd Party OAuth Provider
Modern web and native apps require a backend server application with the REST API. User authentication relies on access tokens obtained from an OAuth 2.0 cloud provider sitting on top of the backend. The runtime fees will quickly add up with the user base growth. The integration of the 3rd party infrastructure allows the quick start of the development, but makes it a monumental effort to migrate to another platform.
Applications created with Code On Time include the built-in RESTful API Engine with OAuth 2.0 Authorization. There are no runtime fees. Your apps are elevated to the REST Level 3 with the Hypermedia.
Try Code On Time and build amazing standalone and embedded applications now!
Next
Continue to the Standalone SPA5 with REST (Level 2) and OAuth 2.0 segment. You will modify the app that we just created to use direct resource URls with the explicitly specified HTTP methods.
This tutorial is part of the RESTful Workshop designed to empower individual developers and teams to create amazing enterprise-quality backends for mobile and web applications. Zero experience and no code is required to provide your data with the REST API conforming to the Level 3 of Richardson Maturity Model with the built-in OAuth 2.0 and Open ID Connect.