This workshop is designed to empower individual developers and teams to create amazing enterprise-quality backends for mobile and web applications. Zero experience and no code is required to provide your data with the REST API conforming to the Level 3 of Richardson Maturity Model with the built-in OAuth 2.0 and Open ID Connect.
- This workshop will help you understand what the RESTful API is, what are the benefits of the RESTful Hypermedia, and how to build the RESTful applications with Code On Time.
- You will use Code On Time application builder to rapidly produce an inventory management system with a sophisticated user interface that runs on mobile and desktop devices. No coding experience is required.
- You will enable the RESTful API Engine and build three single-page applications (SPA) embedded directly into the inventory manager. These apps will feature a custom user interface blending in the backend. The apps will invoke either the hypermedia or the direct resource URLs to interact with the API. JavaScript and HTML experience required.
- You will enable OAuth 2.0 Authentication in the backend and build two standalone SPAs that can be hosted anywhere. Both apps will rely on “Authorization code flow with PKCE” to authenticate the users. The apps will use the OpenID Connect (OIDC) to get the user email and picture from JWT. The apps will make use of the hypermedia or direct resource URLs to get data from the backend. JavaScript and HTML experience required.
Lesson 1: RESTful Application
The workshop begins with the implementation of an inventory management system and includes the step-by-step instructions. Your own application will look similar to the one shown in the picture below. It will have an advanced user interface that allows users to manage categories, suppliers, and products.
Start the workshop with the RESTful Application segment.
 Reading Pane split view in the application created with Code On Time.
You may be compelled to finish right there when you see the end result of your work. It will be that good! Please do not stop and keep going.
At the end of the segment the application configuration will be changed with a few keystrokes to enable the built-in RESTful API Engine. You will learn to use the API development tools to browse the hypermedia links of the RESTful API.
Hypermedia makes your API easy to learn and consume. Welcome to the RESTful World!
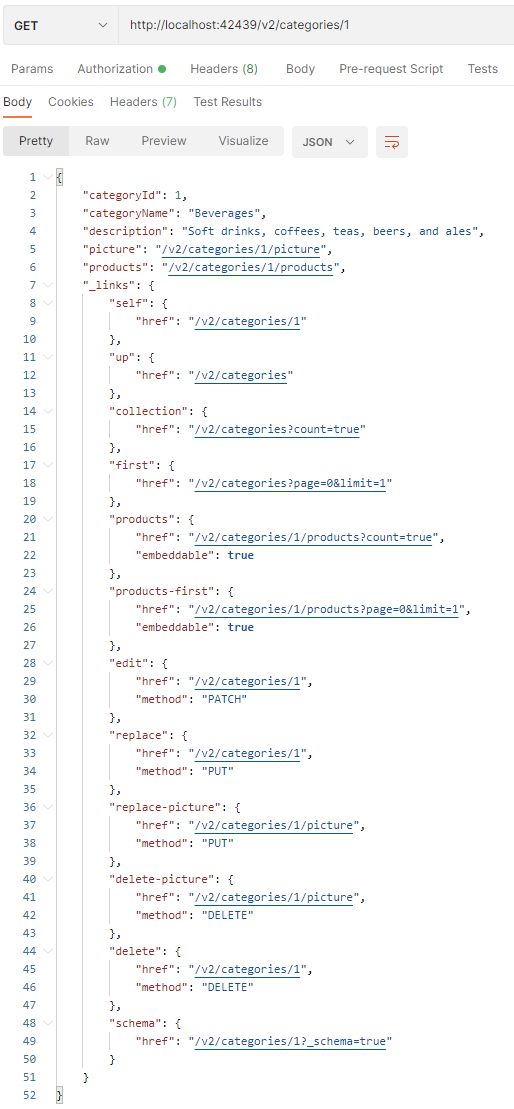 An example of the RESTful resource data with the embedded hypermedia.
RESTful Hypermedia of the backend application is easy to discover with the help of API development tools.
Keep reading to learn more about building the embedded and standalone client apps for the RESTful backend.
Lesson 2: Embedded SPA1 with RESTful Hypermedia
The first client of the RESTful API is the Single Page Application embedded directly in the backend and protected by its security system. Users must sign in to access the page. The page will blend into the inventory manager user interface and allow paging of the products by invoking the hypermedia controls of the API.
Start building your first Embedded SPA with RESTful Hypermedia.
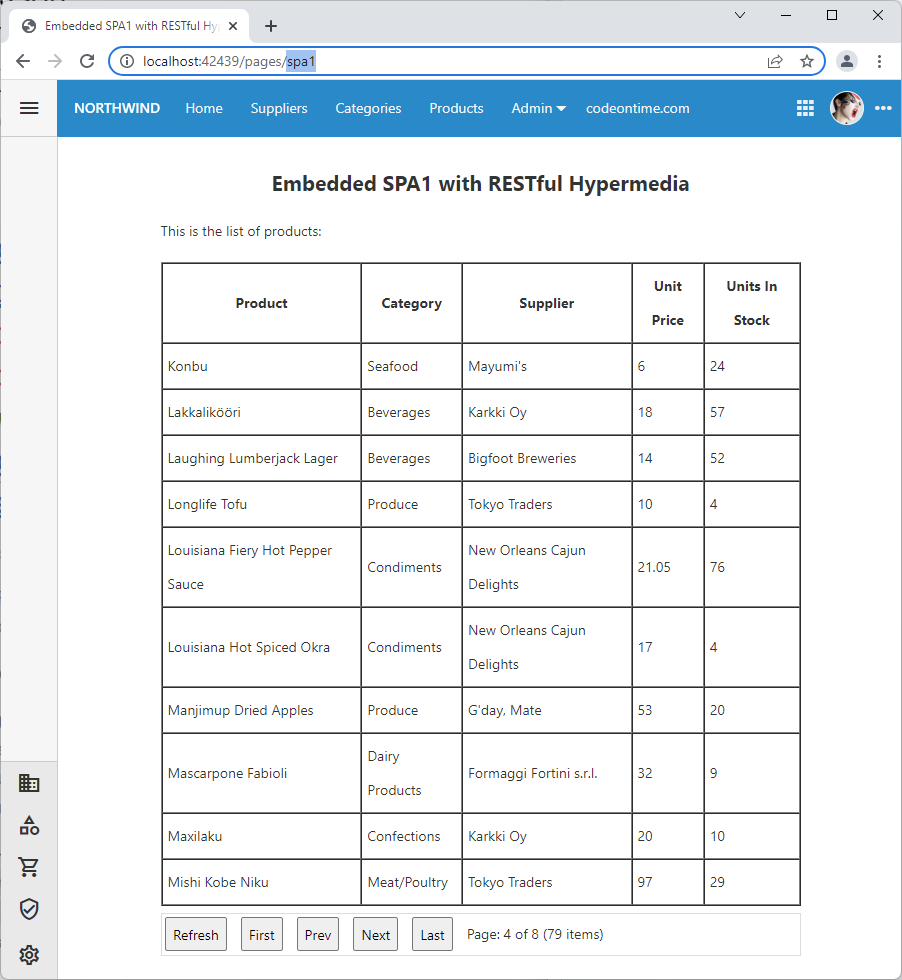 Embedded SPA1 with RESTful Hypermedia
Lesson 3: Embedded SPA2 with REST Level 2
This tutorial will explain how to alter the SPA1 to invoke the resource URLs of the RESTful API directly. This embedded app will look just like its cousin that makes use of the hypermedia.
Discover the benefits of hypermedia in the Embedded SPA2 with REST Level 2 segment by learning how to live without it!
The implementation of the product paging will become a little more complex and require a few extra lines of code since the paging logic will have to be duplicated in the client app itself.
In contrast, the hypermedia-enabled client is simpler since it relies on the hypermedia controls (API links) embedded directly in the data received from the server. The hypermedia makes it very simple for client app developers to alter the interface and respond to the user actions.
Lesson 4: Embedded SPA3 (Custom UI) with RESTful Hypermedia
Both SPA1 and SPA2 are simple pages hosted by the backend application (the inventory manager). The apps blend seamlessly in the user interface of the host and invoke its RESTful API Engine through hypermedia or resource URLs.
Learn how to create custom landing pages, dashboards, and single page apps embedded in the API host while following the instructions in the Embedded SPA3 (Custom UI) with RESTful Hypermedia segment.
Our next embedded Single Page Application features a completely custom user interface while being hosted by the backend. In fact, there will be no user interface of the host application whatsoever. The page will remain protected by the security system of the host.
You will learn how to disable the user interface of the host (shhh - very easy) while still taking advantage of the built-in RESTful API Engine with hypermedia.
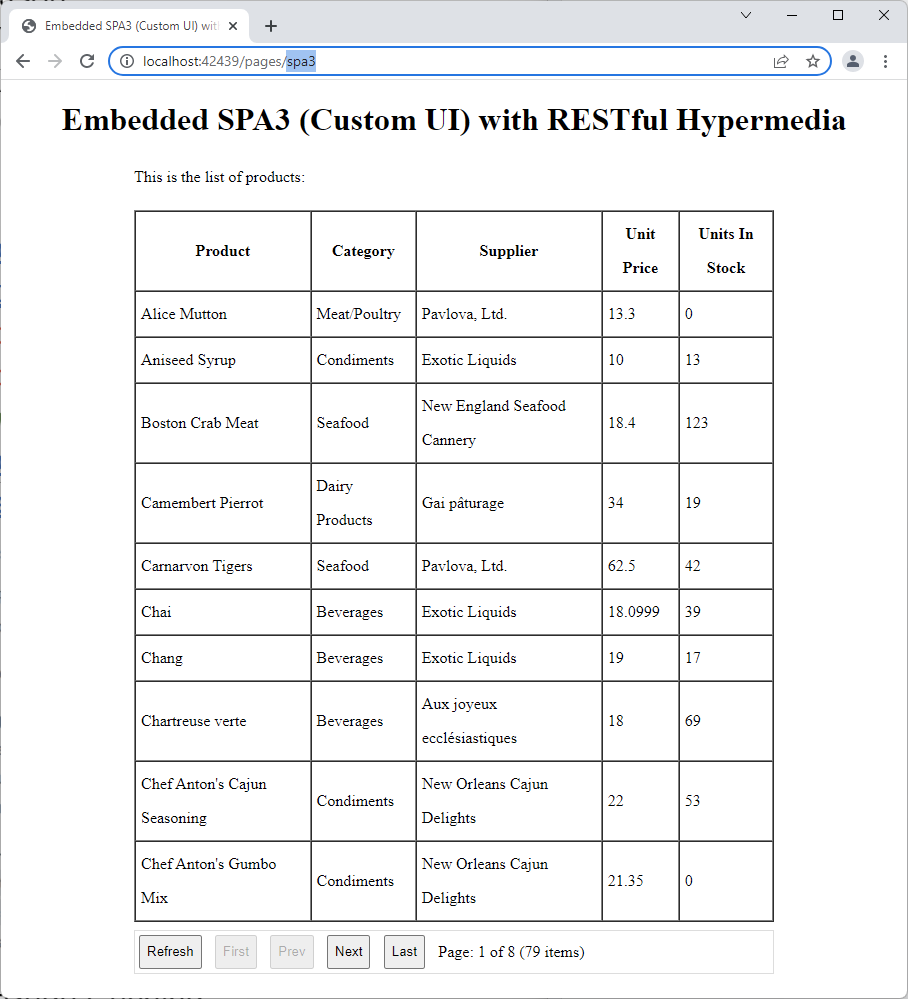 Embedded SPA3 (Custom UI) with RESTful Hypermedia
Lesson 5: Standalone SPA4 with RESTful Hypermedia and OAuth 2.0
The purpose of this tutorial is to create a standalone Single Page Application that uses the Authorization Code Flow with PKCE to authenticate the end users. This app will allow paging the inventory products by taking advantage of the RESTful Hypermedia similar to the embedded SPA1 and SPA3. This client app can be hosted on any web server of your choice.
Start the Standalone SPA4 with RESTful Hypermedia and OAuth 2.0 segment.
You will begin by changing the configuration of the RESTful Backend Application to limit the user interface availability to the Administrators only and to enable OAuth 2.0.
You will learn how to register a client app for OAuth 2.0 in the backend.
You will create the login and logout capabilities and learn how to obtain the email address and picture of the authenticated user from JSON Web Token (JWT).
This is how the app looks when users first load it up in the browser.
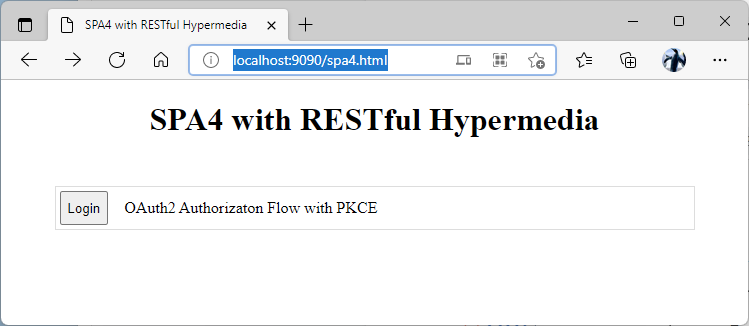 The user interface of anonymous user in the standalone SPA4 with RESTful Hypermedia and OAuth 2.0
Login button will redirect to the backend application and require users to sign in and authorize the account access.
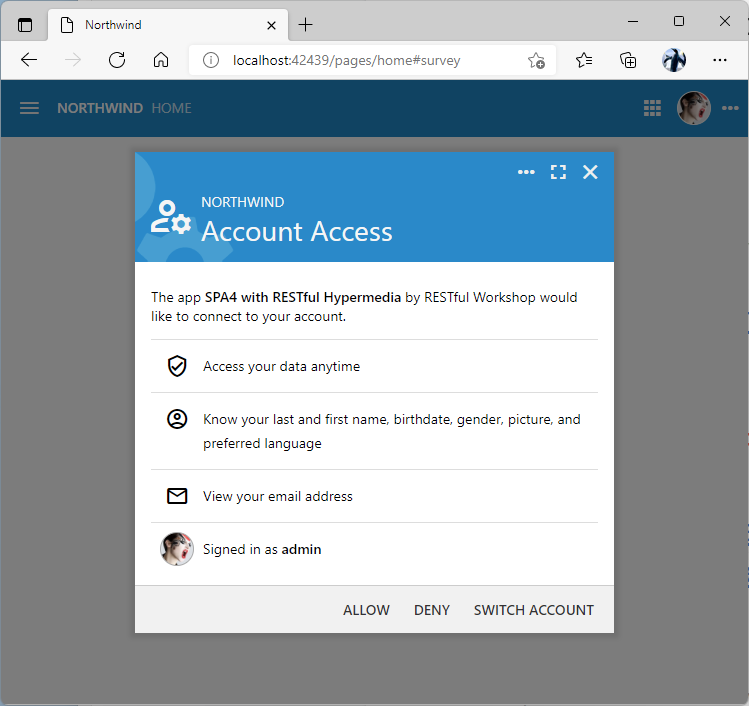 Account Access consent form presented to the user during the OAuth 2.0 Authorization Code flow with PKCE in the application created with Code On Time.
If the account access is allowed, then the backend will redirect back to the client app SPA4 with the authorization code in the URL. The client app will exchange the authorization code for an access token and use the token when making requests to the backend.
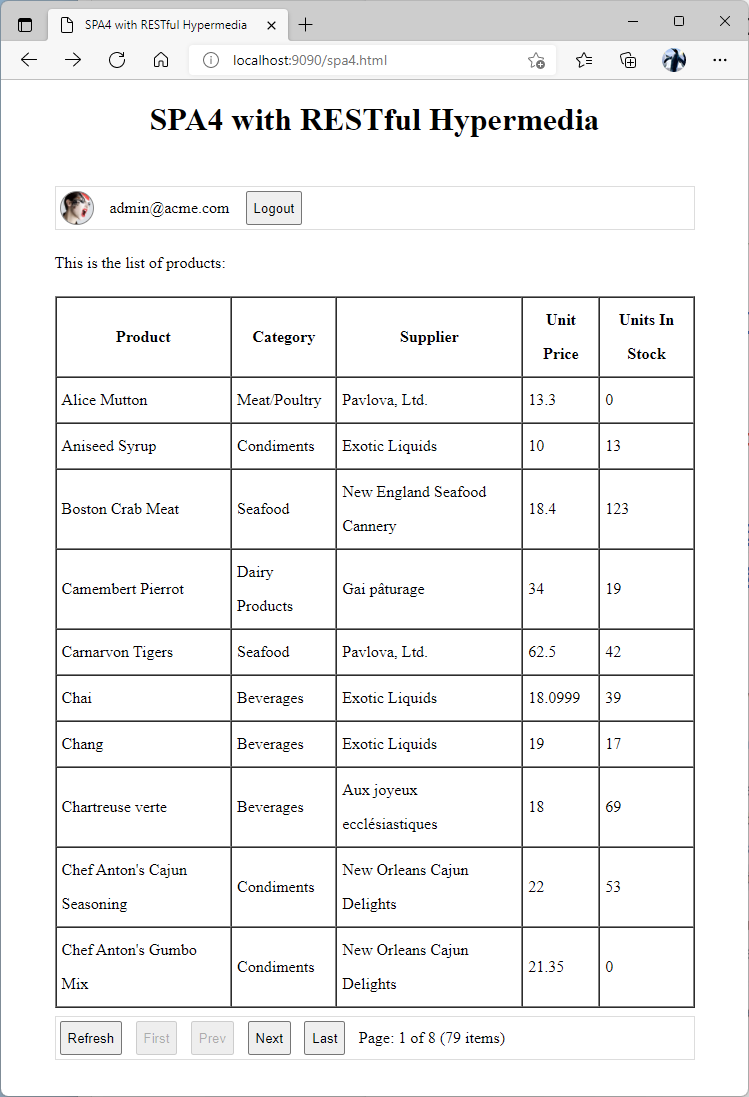 The user interface of authenticated user in the standalone SPA4 with RESTful Hypermedia and OAuth 2.0
The tutorial shows a typical hybrid app based on HTML and JavaScript. API calls are illustrated with the HTTP requests. Native app developers will get a clear understanding of how to implement the user authentication with OAuth 2.0 authorization flows built into the backend of applications created with Code on Time.
You will become ready to build client apps with your favorite user interface framework and access data with hypermedia or traditional REST.
Lesson 6: Standalone SPA5 with REST Level 2 and OAuth 2.0
OAuth 2.0 Authorization is a set of REST APIs embedded into the backend of applications created with Code On Time. These APIs are implemented on top of the same RESTful API Engine, which speaks to its strength and flexibility. There are no 3rd party dependencies or runtime fees!
Learn to sign the users in and out in the Standalone SPA5 with REST Level 2 and OAuth 2.0 without relying on the hypermedia.
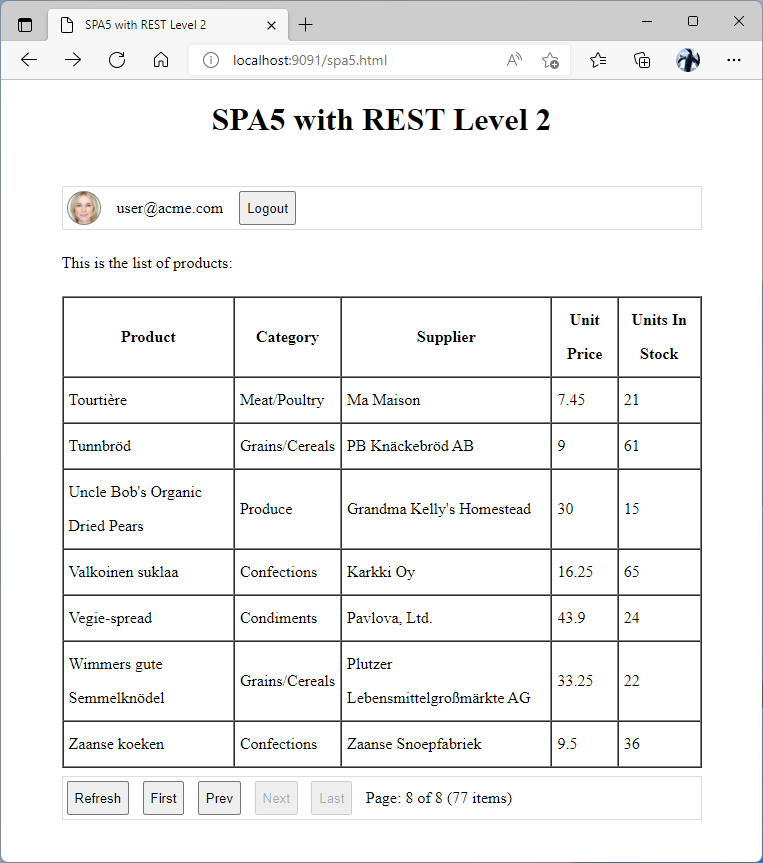 The user interface of authenticated user in the standalone SPA5 with REST Level 2 and OAuth 2.0
This client app is the look-alike of the SPA4. It works with the REST resources directly. The HTTP methods and URLs are embedded in the code. If you have fallen in love with the hypermedia, then you may find it as a disadvantage. If you are not convinced and prefer the traditional REST, then use this client app as the foundation for your next hybrid or native application.
Lesson 7: CRUD with Hypermedia
Typical CRUD operations are performed on REST resources with POST, GET, PATCH, PUT, and DELETE methods of HTTP protocol. The uniform hypermedia controls create, edit, replace, and delete are embedded in the resource data.
Learn to Create, Read, Update, and Delete data with confidence.
The reader will modify the SPA4 app to allow creating, editing, and deleting the products.
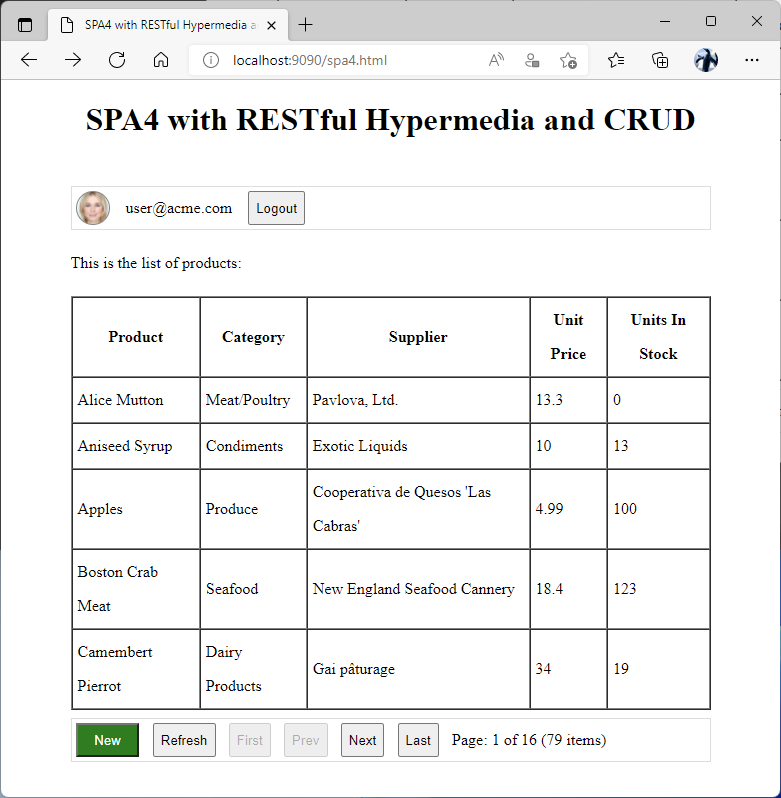 Single page app SPA4 with RESTful Hypermedia and CRUD has the "New" button in the toolbar. The "New Product" form is displayed when the button is pressed. A click on any row in the product grid will open the "Edit Product" form allowing users to change or delete the product.
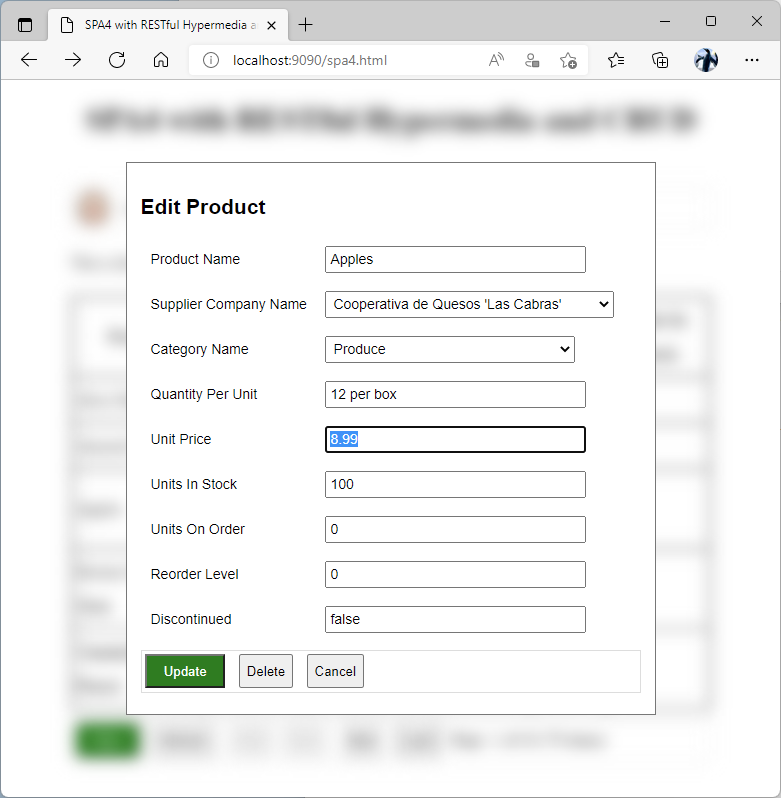 Users can make changes to the product or delete it from the list.
Lesson 8: Custom Actions with Hypermedia
The REST API Level 2 and above must support HTTP methods (verbs) in resource handling. For example, the request with the GET method is expected to return the resource data while the request with the PATCH method is expected to modify some of its fields. The number of HTTP verbs is limited and will not cover all possible scenarios of data manipulation.
Enhance the RESTful API of applications with custom actions to go beyond CRUD.
Custom action identifiers can be specified directly in the resource URLs requested with the POST method. The custom action hypermedia controls are embedded in the data by the RESTful API Engine.
Developers evolve the application API by making changes to the data controllers and their models. Both Touch UI and RESTful API are reflecting the configuration and capabilities of the application data controllers.
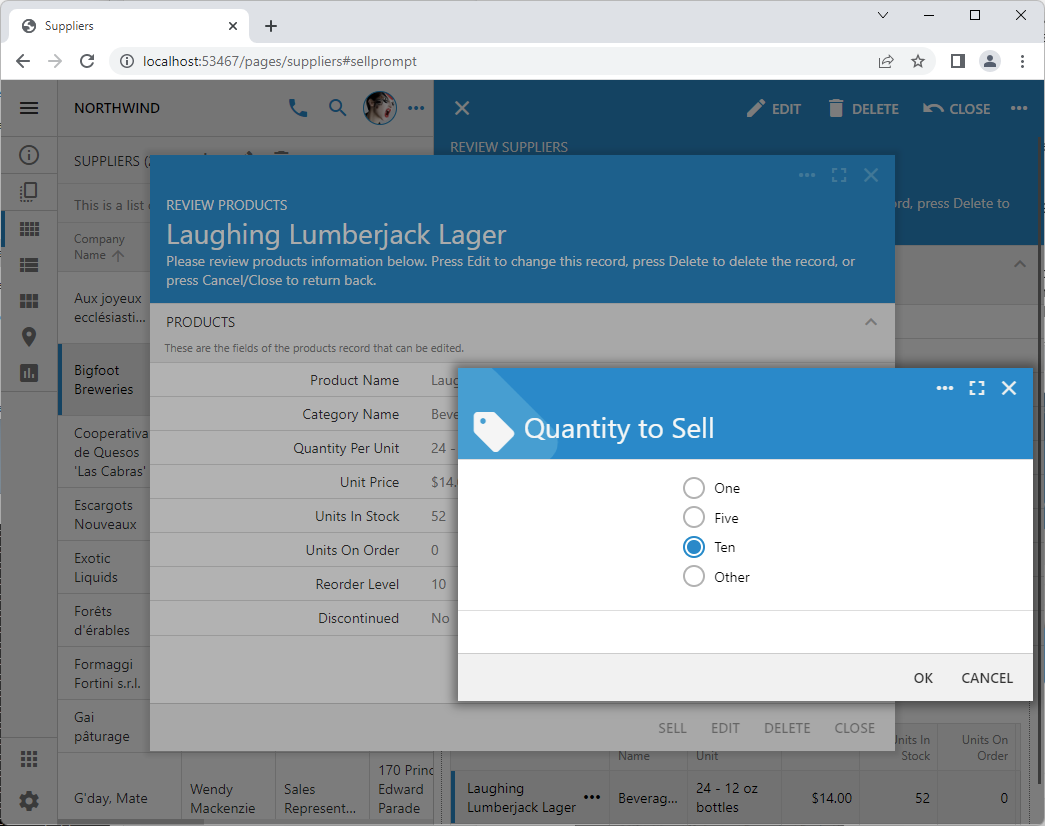 Confirmation controller "SellPrompt" presents the user with an option to sell 1, 5, or 10 units of a product with a single touch. Option "Other" allows entering the arbitrary quantity of units to sell. The prompt is displayed when users press the "Sell" button in the product form.
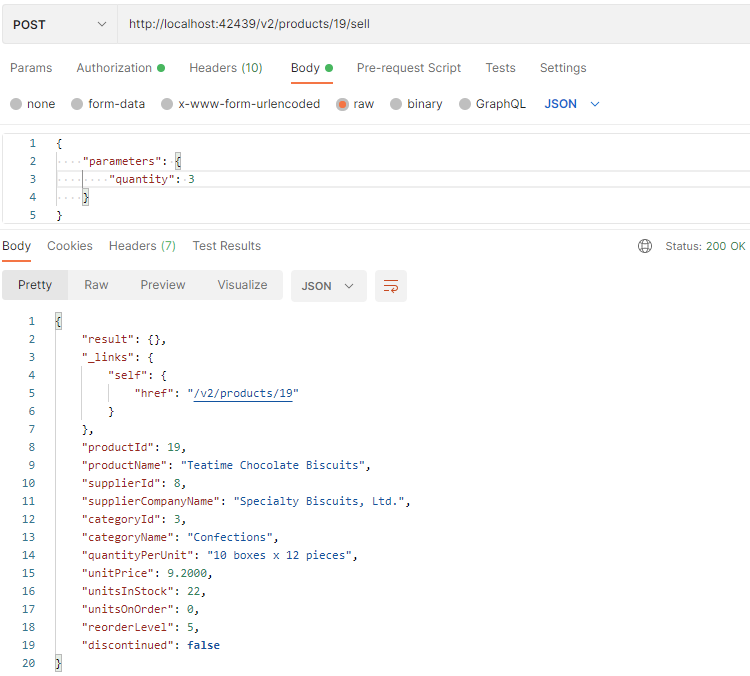 RESTful API Engine makes the custom action "sell" available to the client apps. The parameters of the action are specified in the "parameters" key of the payload. The new state of the resource is returned in the response.
Lesson 9: BLOBs
Values of Binary Large Objects (BLOBs) are represented as resource URLs in the data. User identity must be specified in the Authorization header to get or change a BLOB. Hypermedia links to replace or delete BLOB values are included. Developers submit binary data as fields in the body property of the $app.restful method argument or as the named values in the multipart/form-data of HTTP requests.
Work with the BLOB resources like a pro.
Lesson 10: Resource Navigation with Hypermedia
Hypermedia helps developers and client applications to discover the available actions and related data of a resource. The RESTful API Engine evaluates the user identity, assesses the HTTP method, and consults the Access Control List (ACL) to produce the resource data. The engine performs the same rigorous checks when embedding the relevant hypermedia links directly in the output.
Master the navigation and filtering of the hypermedia-enabled resources.
Resources may return singleton entities or collections of entities. The latter may be filtered with conditional expressions and query parameters with optional sorting.
Lesson 11: No More Under-Fetching or Over-Fetching
Modern client applications require complex data to be fetched from the server. The RESTful resources provide the singletons and collections of uniform entities. The resources are easy to fetch. The hypermedia embedded in the resource entities allows the subsequent fetching of the related data.
Get the data without Under-Fetching and Over-Fetching with hypermedia.
Client application developers will love the hypermedia but hate the work required to arrange the multiple fetch requests. Also the resources may be too rich for one's taste when only a couple of fields are needed but dozens of entity properties are always included in a response. Developers had to invent the query language GraphQL to fight both the under-fetching and over-fetching of data typical for the Web APIs!
RESTful API Engine supports the fields and _embed parameter to allow fetching a complex data of a specific shape in a single request while still taking advantage of HTTP caching, which is not possible with GraphQL.
Lesson 12: JWT, OAuth 2.0 Scopes, Roles, and ACL
JSON Web Tokens (JWT) provide the industry-standard for representing claims securely between two parties. The built-in scopes make it possible for the client apps to continuously refresh the access tokens and to request specific identity claims with the explicit user permission. Custom scopes provide granular access to the RESTful resources. Built-in Access Control List (ACL) associates specific HTTP verbs and custom actions with the scopes. ACL will instruct the RESTful engine to allow specific HTTP verbs and resource action only. The embedded hypermedia is also restricted according to the ACL rules.
Combine the scopes, roles, and ACL for granular resource access.
Lesson 13: Input and Output Content Types
Built-in RESTful API Engine handles multiple input and output content types. Developers use the Content-Type and Accept headers to request and receive data in JSON, Yaml, XML, and a few other formats.
Discover the data languages of the RESTful API Engine.
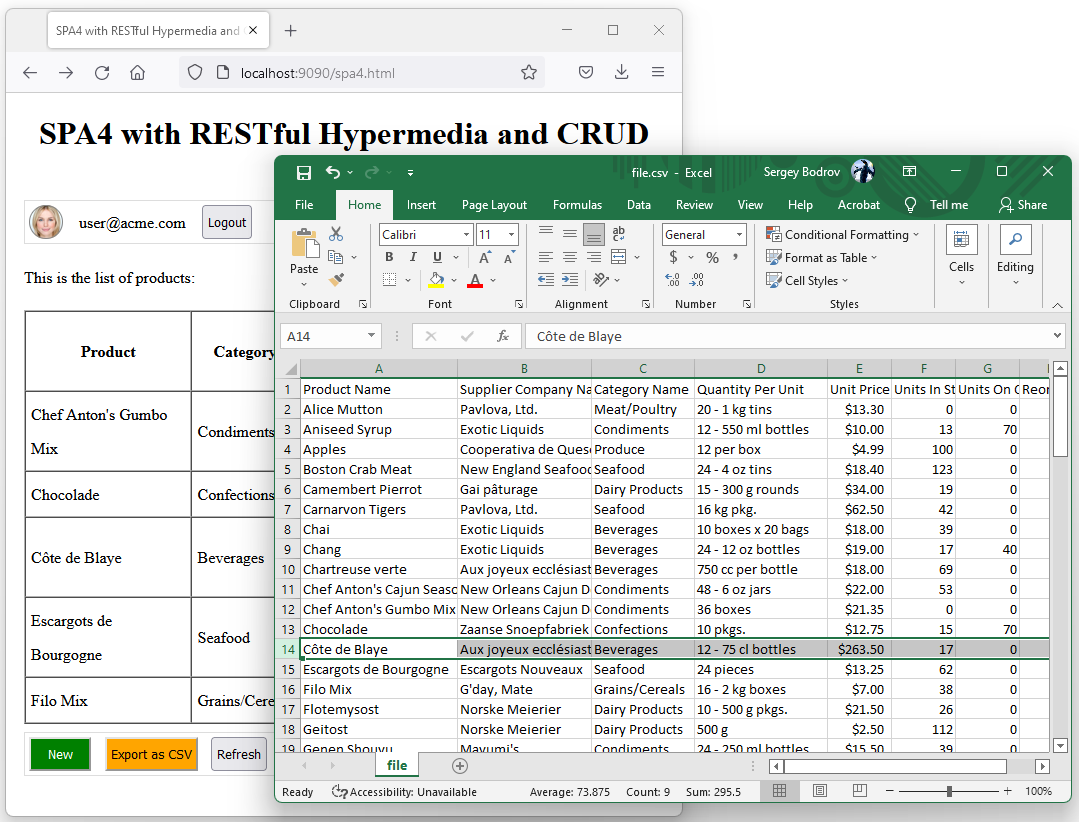 It is simple to incorporate a secure export to CSV (comma-separated values) in the RESTful apps. The standard header "Accept" directs the RESTful API Engine to produce data in the desired format.
Lesson 14: ETag and HTTP Caching
RESTful API Engine responses are provided with the ETag header. Browsers automatically submit ETag with the subsequent requests to fetch the same resource. The engine responds with the HTTP status 304 and empty body if the ETag of the resource has not changed. Apps can also submit ETag with CRUD requests for conflict detection.
Detect the data editing conflicts and build high performance applications by taking advantage of the HTTP protocol.
ETag allows preventing the physical transfer of the unchanged resources but still requires some processing on the server. The backend application framework and the RESTful engine can be instructed to cache the resource response in the server memory and in the persistent storage. The engine will include the HTTP client caching instructions in the responses, which will allow browsers to completely eliminate the need to contact the server for a period of time.
Lesson 15: Native App Authorization
Developers rely on a variety of platforms to deliver mobile apps. It is easy to set up the user authorization with an application created with Code On Time. The embedded RESTful API Engine implements OAuth 2.0 protocol with multiple authorization flows. Native applications can be programmed to have enterprise level security with little effort. The lesson explains how to configure Postman, the popular API development tool, to get the access tokens from the RESTful Backend Application. Any native client app will implement a similar pattern of authorization.
Learn to acquire access tokens in the native app via OAuth 2.0 Authorization Code flow with PKCE.
Lesson 16: Device Authorization Grant Flow
Multiple OAuth 2.0 authorization flows are built into the framework of applications created with Code On Time. The RESTful API can be consumed by the embedded software of the devices with the limited input capabilities. Self-service kiosks, personal medical equipment, household appliances, media players, wireless speakers, and smart watches are just a few examples of devices that can interact with the API. If you are an engineer in need of a software to manage the reams of data and personalization for a brand new gadget, then Code On Time is the tool that will provide an instant foundation at a fraction of the cost.
Integrate apps in the physical world of your users with the Device Authorization Grant flow.
RESTful Apps with Code On Time
Startups, IT departments, hobbyists, and students will find Code On Time to be a powerful and easy-to-use tool that allows instant production of high quality mobile and web applications with an amazing Touch UI interface.
Built-in RESTful API Engine makes it possible to extend the applications with the embedded pages that blend in or have a completely custom look. Applications can participate in complex orchestrations through cloud functions and scripts calling into the API resources thanks to the built-in support for API keys.
Built-in OAuth 2.0 Authentication turns an application created with Code On Time into the backend of your next big thing! Do not hire hordes of backend developers and pay no runtime fees.
Get Code On Time application builder now!