Postman in the popular API development tool. RESTful Workshop recommends this tool when exploring the RESTful API Engine. The engine is an integral part of applications created with Code On Time. It supports authentication with API Key and OAuth 2.0 Authorization Code flows. It relies on access tokens to identify users when client apps are making requests to the RESTful API.
Postman makes it easy to acquire an access token with OAuth 2.0 Authorization Code flow with PKCE. Native apps will follow a similar pattern when implementing the token acquisition from an app built with Code On Time.
Workshop segments SPA4 and SPA5 explain how to build a single page application capable of authenticating users with OAuth 2.0 Authorization Code flow with PKCE. This particular flow is suitable for native mobile applications and single page applications. Both are not able to “keep a secret”, since the source code, binaries, and external settings can be explored by 3rd parties.
Proof Key of Code Exchange (PKCE) provides the means of producing a dynamic secret instead of relying on a static secret. Dynamic secret ensures a secure exchange of an authorization code for an access token between the client application and the server.
Request Authorization
Authentication with most OAuth 2.0 flows starts when users are pressing the Login button in the client app.
- The browser window is redirected to an Authorization URL pointing to the backend web application. Native apps open a special Web View for the same purpose.
- Users are asked to sign into a familiar application they know and trust.
- Users confirm their identity with the optional 2-Factor Authentication or set up a new account.
- Authenticated users are asked to allow access to their account.
- If account access is granted to the client app, then the backend application will redirect to the location specified in the Authorization Url.
- Client application collects the authorization code specified in the redirect URL by the backend.
- Client exchanges the authorization code for an access token.
- The token is retained by the client application and specified in the Authorization header of requests to identify the user to the backend.
Postman will act as a native client acquiring an access token from the RESTful Application created with Code On Time.
Developers will need to know the details of the client application registration and OAuth 2.0 API endpoints.
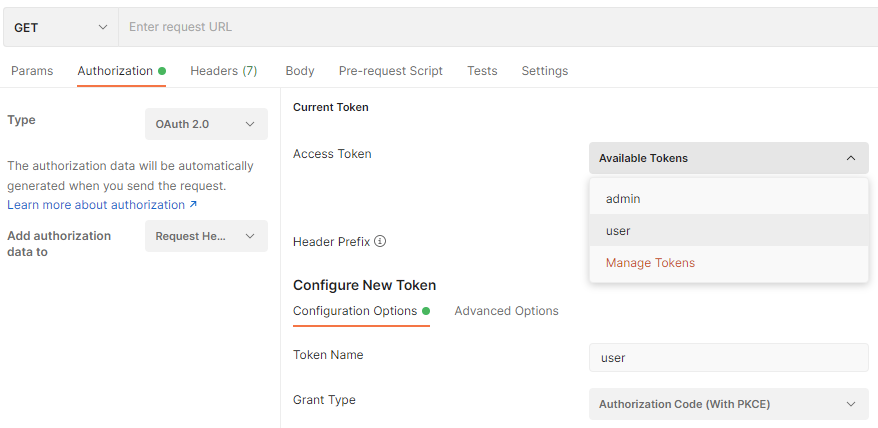
Start Postman and create a new HTTP request. Enter the localhost address of the backend application followed by the /v2 path in the request URL. Select the Authorization tab and choose OAuth 2.0 in the Type field. Additional settings will appear.
The Current Token section allows selection of the access token for the request authorization. The tokens are retained by Postman after each successful authorization request approved by the user.
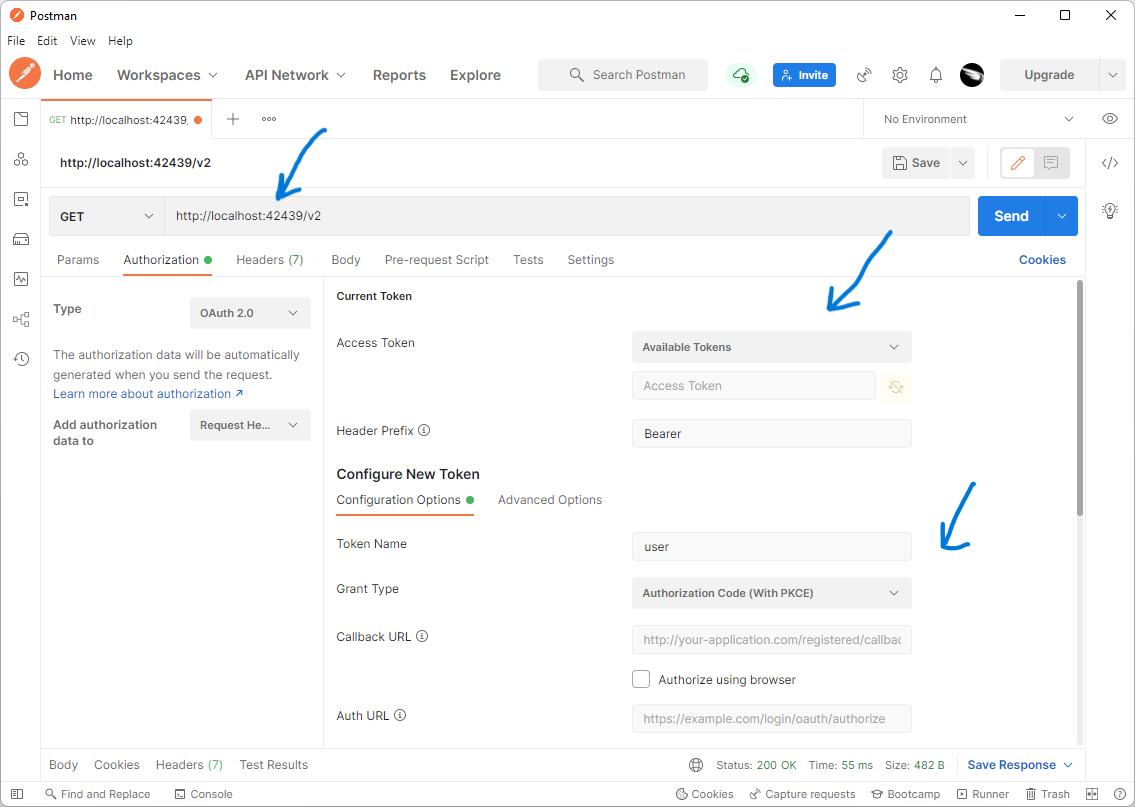
Authorization tab of the new HTTP Request in Postman configured for OAuth 2.0. Developers can select an Access Token for the request from the list of Available Tokens. They can also set up parameters to capture the new tokens.
The Configure New Token section allows capturing and naming the new tokens. Captured tokens will appear in the Available Tokens drop down of the Current Token section.
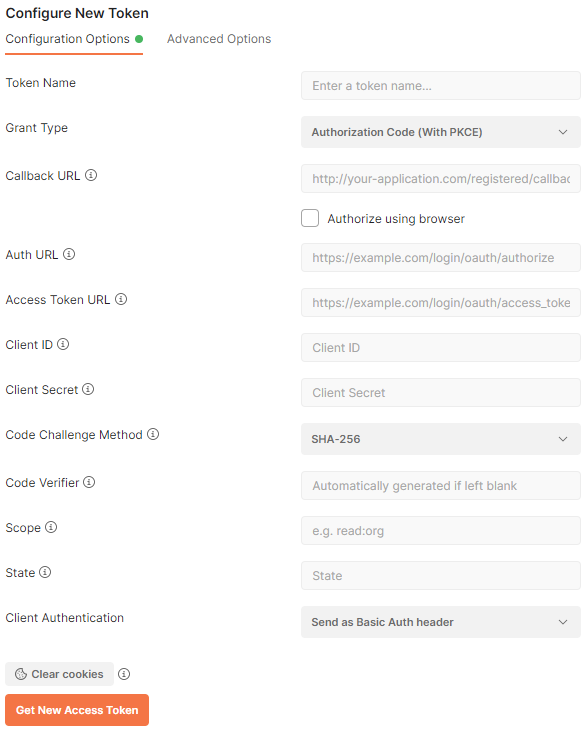
New Token Configuration
Here is the full view of the parameters required to configure the capturing of new tokens. This set of parameters allows collecting access tokens from any OAuth 2.0 Authorization server.
Applications created with Code On Time have the built-in OAuth 2.0 Authorization API and will work with any OAuth 2.0 client including Postman.
Postman provides the means of access token capturing from any OAuth 2.0 compliant identity server. RESTful API Engine of apps created with Code On Time has the built-in support for OAuth 2.0 authorization flows. Developers can configure Postman to capture the access tokens from a Code On Time application.
Configure the request to acquire a new token from the RESTful Application Backend on behalf of SPA4 with the property values shown below.
|
Property
|
Value
|
|
Token Name
|
Enter admin as the value. Typically this is the user account name.
|
|
Grant Type
|
Choose Authorization Code (With PKCE) in the dropdown.
|
|
Callback URL
|
Enter http://localhost:9090/spa4.html#auth) as the value. This is the redirect_uri from the client application registration.
|
|
Auth URL
|
Enter https://demo.codeontime.com/oauth2/v2/auth as the value. This is the href value from the authorize hypermedia control available in OAuth 2.0 API of the backend.
|
|
Access Token URL
|
Enter https://demo.codeontime.com/oauth2/v2/token as the value. This is the href value from the token hypermedia control of the OAuth 2.0 API.
|
|
Client ID
|
Enter TKuyzeDmIQKWFVncJcKpCXCWEmcsJP3kB9QpudegTrC as the value. This is the client_id from the client application registration.
|
|
Client Secret
|
Leave the field value blank.
|
|
Code Challenge Method
|
Set value to SHA-256.
|
|
Code Verifier
|
Leave the field value black. Postman will automatically generate the value.
|
|
Scope
|
Enter offline_access openid profile email as the field value. This space-separated list of scopes will yield the access_token, id_token, and refresh_token if the authorization request is approved by the user.
|
|
State
|
Enter any random sequence of characters. For example, enter 12345.The state is returned with the authorization code upon approval of account access by the user. Client application will compare the specified value with the one specified in the url to detect the forged request.
|
|
Client Authentication
|
Leave the default value.
|
Note that the port number in the localhost addresses above will be different for each implementation of the backend. Use the client application registration property values of your own backend application.
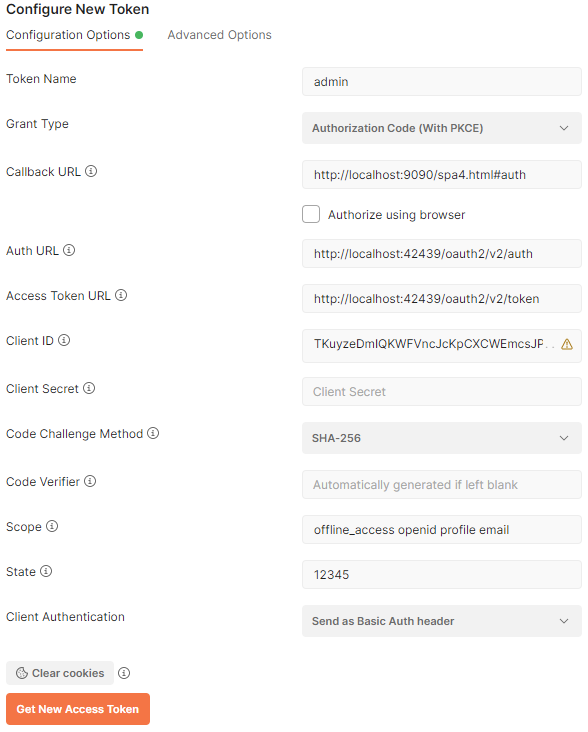
OAuth 2.0 endpoints of an application created with Code On Time can be accessed at ~/oauth2/v2 path. The rich hypermedia of the resource provides developers with the Callback URL, Auth URL, Access Token URL. Developers can set the Grant Type to use the Authorization Code (With PKCE). This flow allows the client app to generate the Client Secret and Code Verifier for one-time use.
Click the Get New Access Token button. Postman will open a hosted browser window.
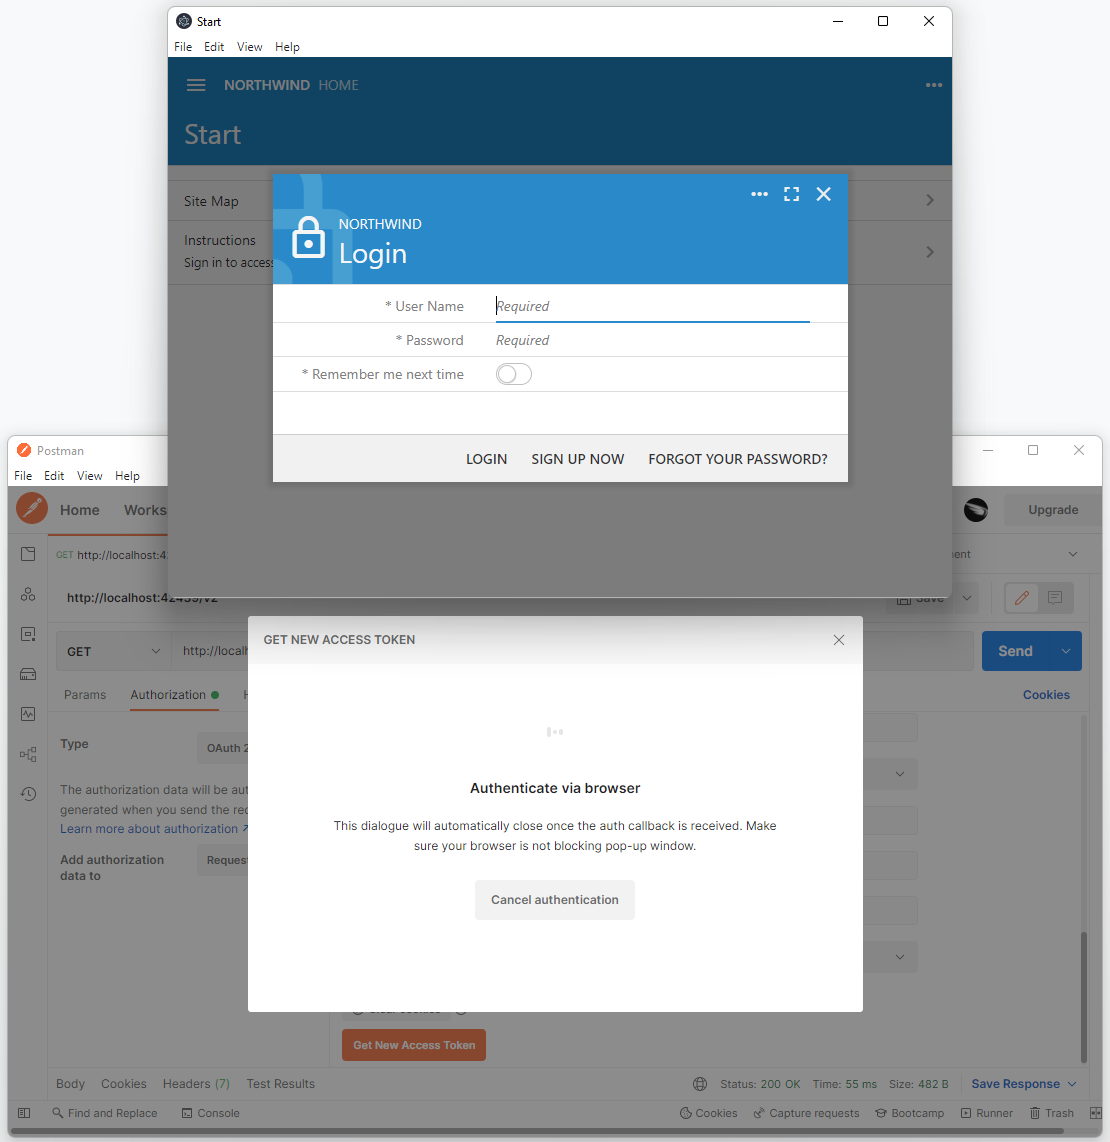
Postman will open a browser window at the Auth URL when developers press the Get New Access Token button. Then it will wait for a user to sign into the Code On Time application and approve or deny the request to access the account data.
Sign into the backend application with the username admin and password admin123% to be greeted with the Account Access confirmation.
Allow account access to the Standalone SPA4 with RESTful Hypermedia and OAuth 2.0 client application. Postman is impersonating the SPA4 here and therefore its name is displayed at the top of the account access prompt.
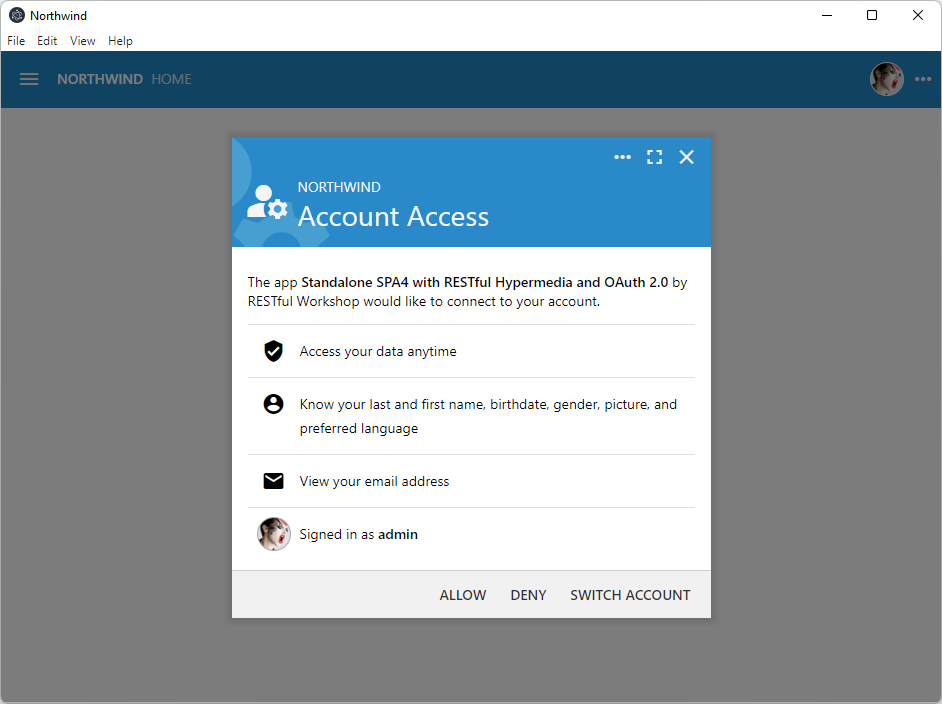
Your Code On Time application will display the Account Access prompt letting users know the name of the client application and the requested access scopes, such as the picture and email address. User approves the account access for the client application in the hosted webview controlled by Postman.
Backend application will redirect to the URL specified in the Callback URL parameter in the Configure New Token settings. URL will be altered to include the authorization code value. It will also have the copy of the state parameter from the Authorization Url.
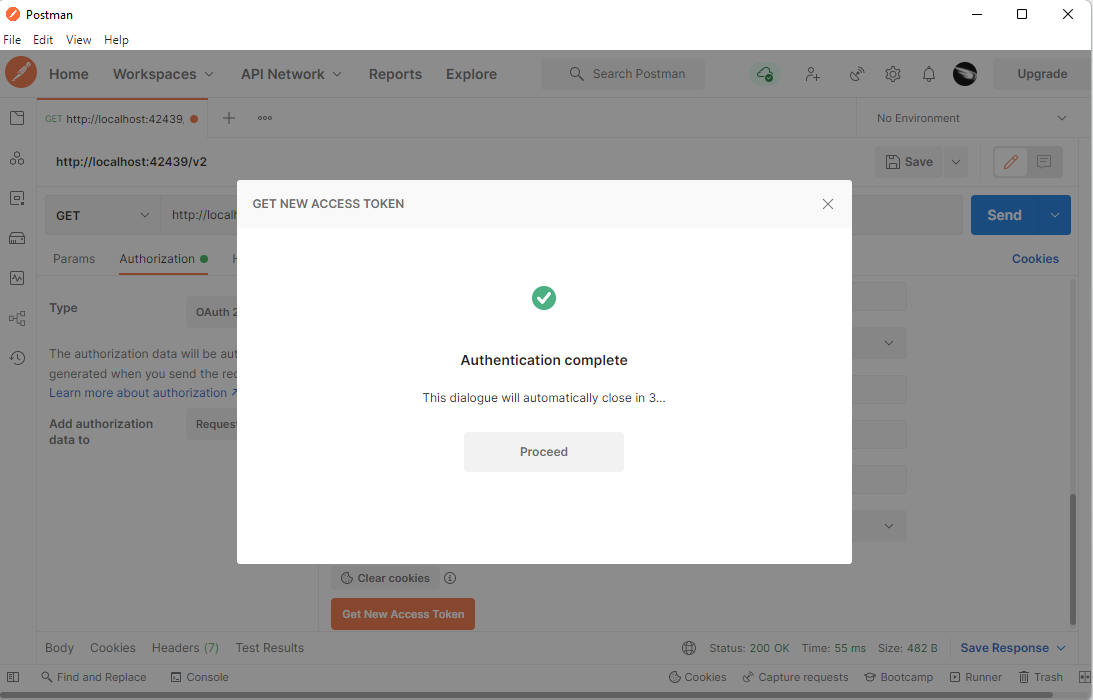
If the user grants the account access, then the Code On Time application will redirect to the Callback URL specified in the Configure New Token dialog. Postman is waiting for the redirect to take place. It will display the Authentication Complete confirmation message after exchanging the access_code in the URL for the access_token with the Code on Time applications via the Access Token URL.
Confirmation of the successful authentication will close automatically after a short delay since the Postman will have only two minutes to exchange the authorization code for an access token. The response from the exchange will be presented in the Manage Access Tokens window.
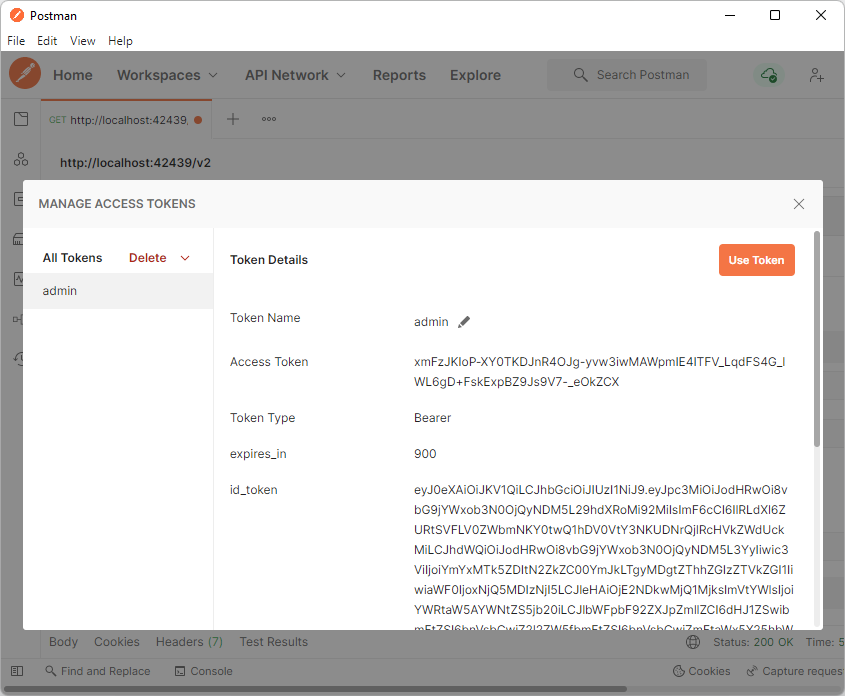
Developers can name the new Access Token and use it for development purposes in the Manage Access Tokens window. Typically the name of the token is the username.
Press the Use Token button to set the user identity of the HTTP request.
Developers can see the current Access Token and Header Prefix on the Authorization tab. The token expiration time is displayed below the token value. If the offline_access scope was specified, then the refresh_token is also available in the authorization response. The Refresh link and Auto-refresh Token options are available in the user interface. The expired token will be automatically refreshed by Postman as needed.
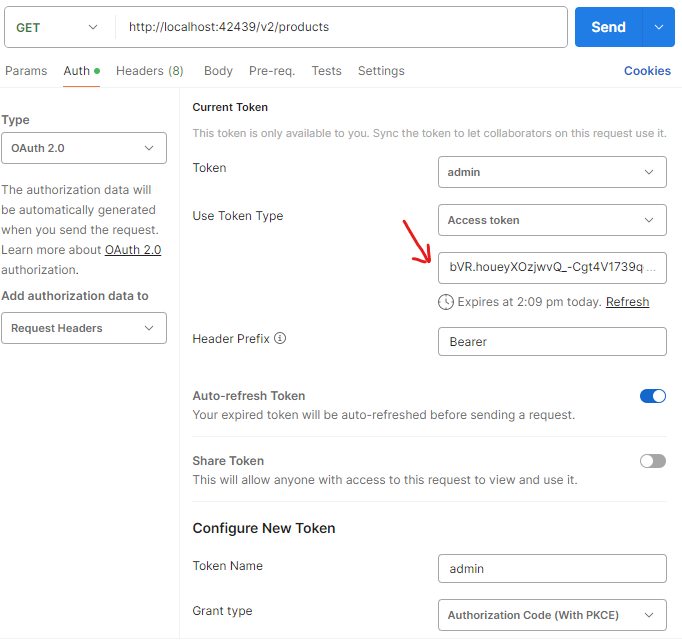
The captured access tokens are available in the HTTP request parameters. Press the Refresh link below the token value to fetch its new value from the application. Postman will automatically refresh the token if the offline_access scope was specified in the token configuration.
Developers can see the current Access Token and Header Prefix on the Authorization tab.
Developing With Tokens
Developers impersonate users in three easy steps when configuring an HTTP request:
- Select Authorization tab of the HTTP Request
- Set Type to OAuth 2.0.
- Choose Access Token from the list of available tokens.
The Access Tokens dropdown on the Authorization tab of HTTP Request in Postman contains the names of the captured tokens.
Tokens will expire periodically. Requests submitted to the backend application will return an error with HTTP code 401 when this happens. Developers can revisit the Authorization tab of the request and acquire a new token. Postman preserves the Configure New Token settings. A single click on the Get New Access Token button will open the backend application in the hosted browser. Developer signs in on behalf of a user and approves account access. The new access token is available!
Learn how to build a single page application with OAuth 2.0 Authorization and OpenID.
This tutorial is part of the RESTful Workshop designed to empower individual developers and teams to create amazing enterprise-quality backends for mobile and web applications. Zero experience and no code is required to provide your data with the REST API conforming to the Level 3 of Richardson Maturity Model with the built-in OAuth 2.0 and Open ID Connect.