This is the database schema of the inventory management application that will be created in this segment. It will serve as the backend for several single page apps.
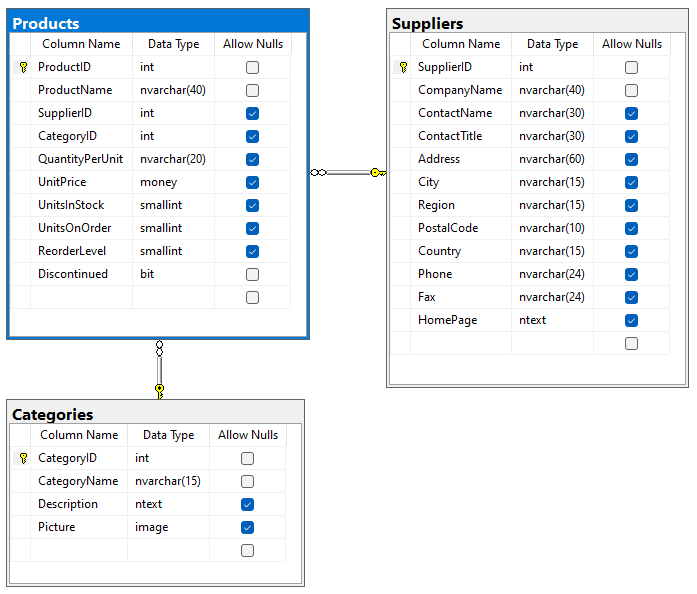 The diagram of the backend application database implementing a simple inventory management system.
We will use Code On Time app builder to rapidly produce a web application with a sophisticated frontend and RESTful API Engine built-in. Microsoft SQL Express is the recommended database engine for this workshop. The app builder also works with Oracle, MySQL, DB2, SQL Anywhere, Postresql, and Firebird.
Creating the Project
Download the app builder at https://codeontime.com/download and install it on your development machine. Start creating the new project, enter Northwind in the project name, leave the default settings, and proceed to configure the database connection. Click the “...” button next to the Connection String input.
Follow these steps to create the sample database and configure the connection:
- Enter .\sqlexpress in the Server field.
- Enter northwind-db1 in the Database field and press Create.
- Choose the Northwind option in the Sample Tables dropdown and press Install. Wait until a prompt is displayed confirming that the database was created.
- Click the Add button under Membership and wait for the confirmation message.
- Leave Site Content (recommended) option selected under Content Management System (CMS) and press Add. Wait for the confirmation message.
 Configuration of the database connection string in Code On Time app builder.
Click the OK button to complete the configuration of the database connection string.
Press the Next button to proceed to the data model.
Data Model & Business Logic
Database northwind-db1 has a full set of sample data for the workshop. It also includes the membership tables to keep track of users, roles, and user roles. It has its own content management system (CMS) represented by the SiteContent table.
Suppliers
Scroll the list of database entities to the bottom and click on Suppliers. The flat list of fields at the top represents the denormalized references to the columns of the entities included in the model. Exclude the Suppliers.HomePage column from the model. Enter 1 in the Sort Order of the Company Name field.
Toggle the Master-Detail button on the toolbar of the model builder. Click on the Products (SupplierID) suggestion in the panel on the right-hand side of the screen. Confirm that you want to create the Products model.
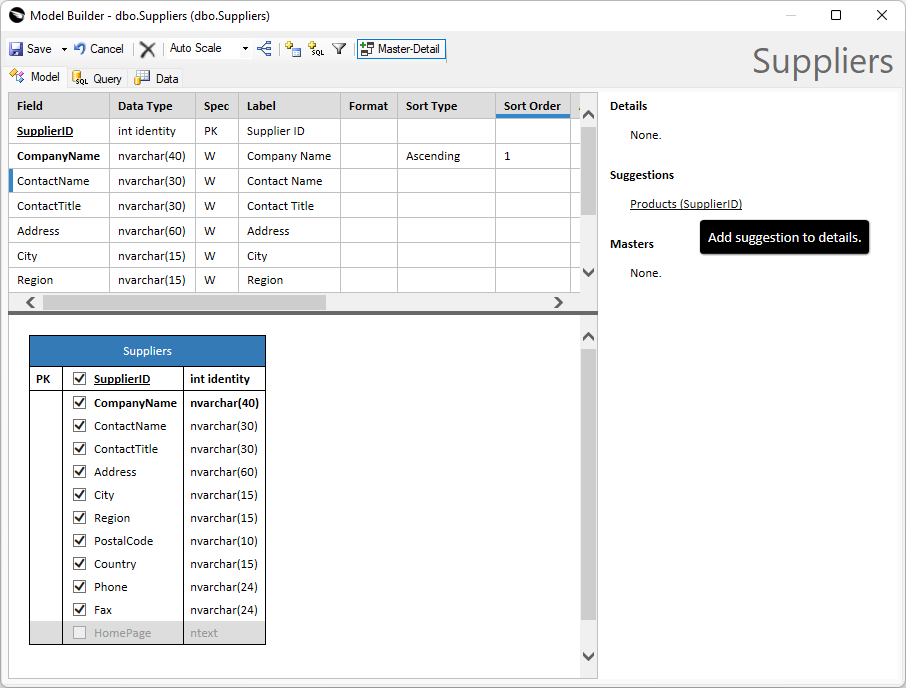 The model of the Suppliers entity in the Model Builder.
The Products data model will be displayed. The corresponding dataview field was created in the Suppliers model already.
Products
The new model is more complex. The model builder has added references to the Products, Categories and Suppliers entities. A few columns are automatically borrowed from the entities into the flat (denormalized) list of model fields. Rename the fields SupplierPhone and SupplierCountry to Phone and Country. Enter 1 in the Sort Order of the ProductName field.
Click the Save button on the toolbar to persist the changes.
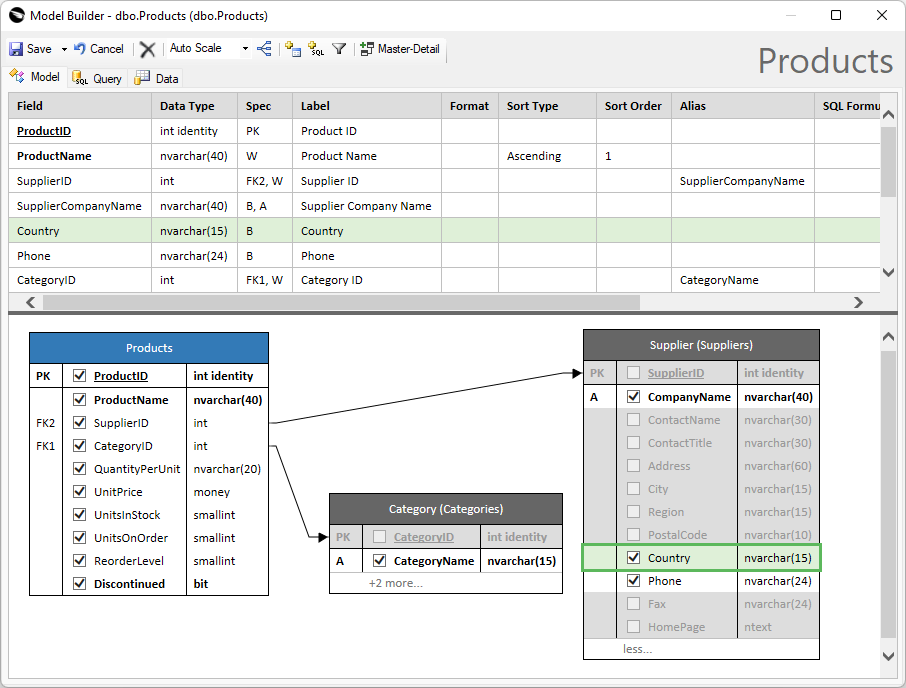 The model of the Products entity in the Model Builder.
You will see Products and Suppliers in the list of the configured data models.
Categories
Select Categories in the list of suggested database entities. Enter 1 in the Sort Order of the CategoryName field.
Toggle the Master-Detail button on the toolbar and click on the Products (CategoryID) suggestion in the panel on the right-hand side of the screen. This will create the Products detail in the model.
Click the Save button on the toolbar.
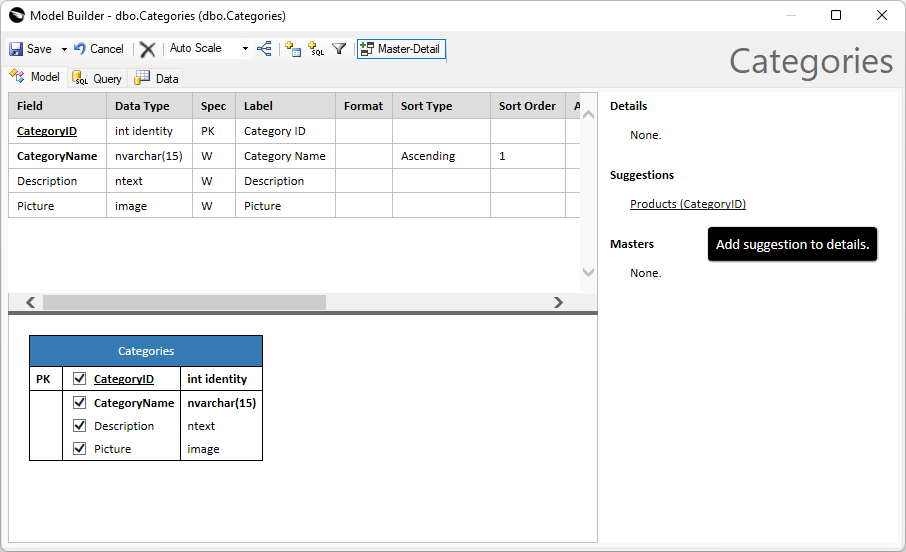 The model of the Categories entity in the Model Builder.
Categories, Products and Suppliers will be displayed in the list of the configured data models.
Trying It Out
Keep clicking the Next button in the project wizard until you reach the data controller summary. Do not make any changes in the project settings yet. The summary will display a list of all data controllers that will be created when the app is generated. You shall see Categories, MyProfile, Products, SiteContent, and Suppliers.
Press the Generate button and wait to see the result of your work. In less than a minute your default web browser will pop up and load the Northwind application. Let’s try it out!
Click on the Instruction on the home page and sign in as admin with admin123% password.
Choose the Suppliers option in the menu, tap the Suppliers (29) dropdown on the toolbar below the menu, and select the Reading Pane option. Choose a supplier to see the details in the split view. The list of the associated products will be displayed in the reading pane.
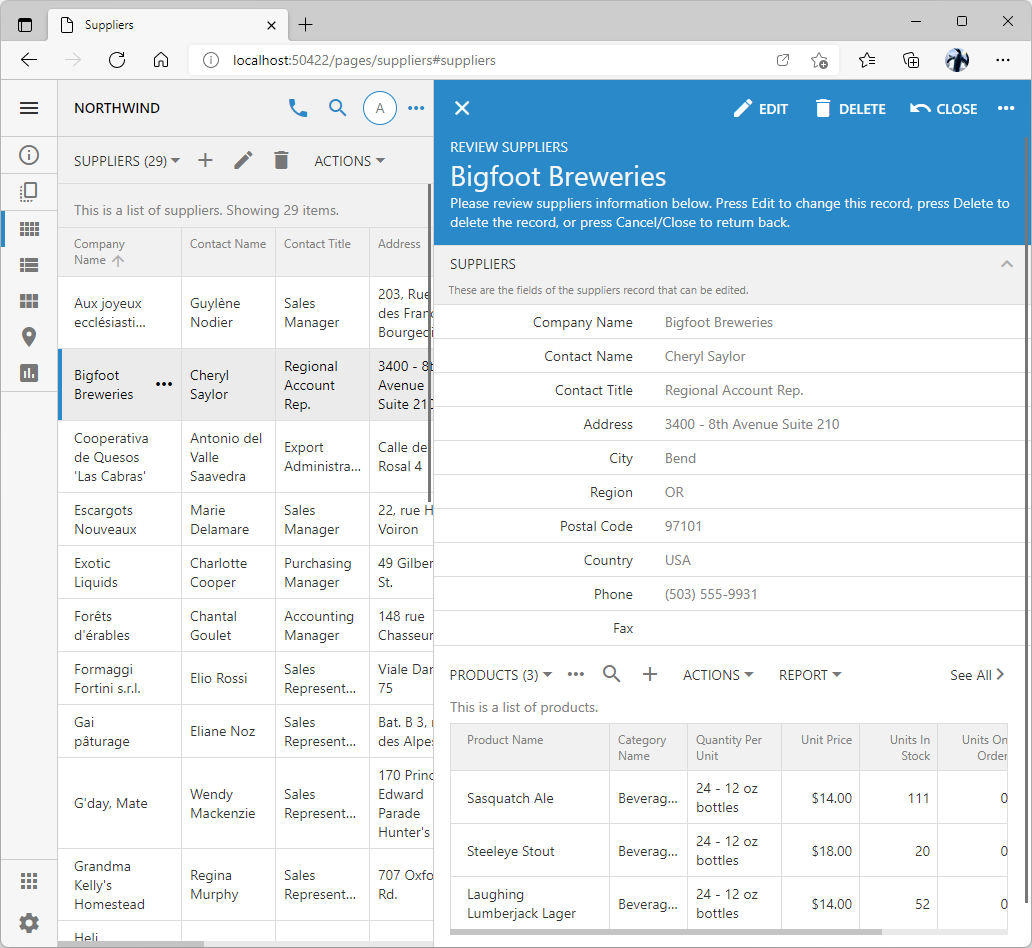 The reading pane in the app created with Code On Time.
Now visit the Categories and select the Cards view style in the sidebar.
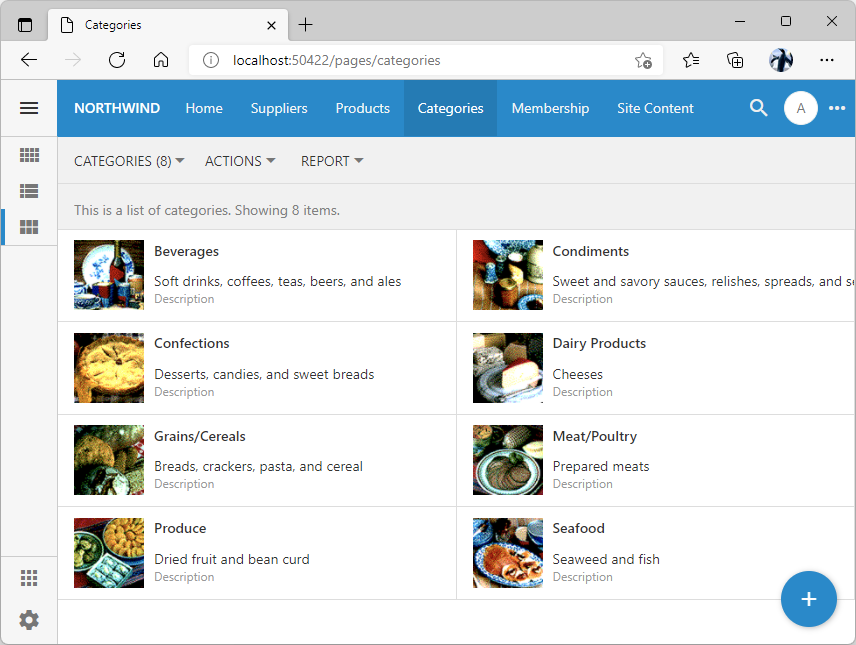 "Cards" list view style in an app created with Code On Time.
Select a category and observe that the related products are also visible in the form.
You can add new data models and revise the existing models with the Model Builder. You can customize the visual presentation in the Project Designer or create Code, SQL, and JavaScript business rules to respond to the changes in the state of data.
This application may meet and exceed your expectations for the user interface of an inventory management system as it is!
RESTful API Engine
What if you need to create a custom page that blends in but presents data in a custom fashion? How about replacing the Touch UI presentation with one of your own? What if you need to build a custom client application based on a particular JavaScript framework or implement it natively for a particular mobile operating system?
The built-in RESTful API Engine makes it possible to create custom pages embedded in the backend application or hosted on a different domain. Native and hybrid apps can “talk” to the same API.
Touch UI is the JavaScript frontend framework of applications created with Code On Time. The components of the framework are linked to the HTML pages. Applications are driven by XML data controllers describing the shape of data, the presentation views, and the business rules. The controllers are created from the data models when an application is generated. A page loaded in the browser requests the data from the backend application via the RPC-style requests to the API classified as the REST Level 0 according to the Richardson Maturity Model.
The backend application also includes the built-in RESTful API Engine that classifies as the REST with the Maturity Level 3. The API of this level features HATEOAS (Hypertext As The Engine Of Application State). In other words, the data returned by the engine includes the hypermedia controls (links), that allow developers to access resources available in the current state of data. The engine takes into account the user identity when injecting the links in the data.
The standard endpoint of the built-in RESTful API Engine is /v2. Switch to your app running in the browser and enter this path right after the port in the address bar.
You will see an error in the JSON format letting you know that the API is not enabled.
 Error message data is always formatted in the output. It includes the HTTP code and specific details.
Modify the app configuration in ~/app/touch-settings.json to enable the RESTful API Engine:
JSON
1234567{
  "server": {
    "rest": {
      "enabled": true
    }
  }
}
Refresh the same browser window and you will see the hypermedia returned in the response.
 Successful responses return the JSON data without formatting by default since the output is intended for the apps.
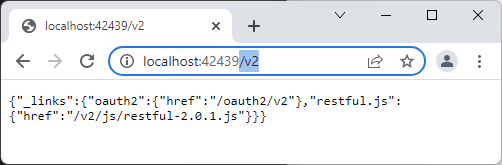
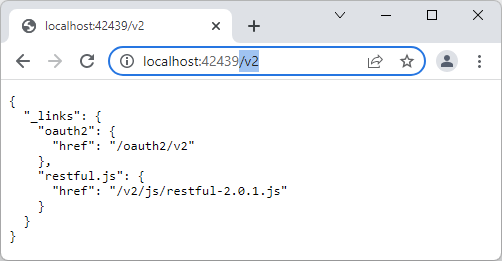
The successful response lacks the formatting and can be difficult to read. The output is intended for the apps to consume. Viewing the same URL in the Firefox yields a better presentation for humans. The hierarchical view of the JSON, Raw Data, “pretty” print, and response Headers are available.
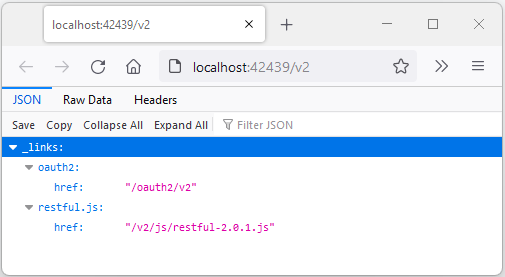 Output of the anonymous request to the RESTful API endpoint in Firefox.
Enable the formatted JSON output by setting the server.rest.ouptut.json.indent option to true in ~/app/touch-settings.json configuration file.
JSON
123456789101112{
  "server": {
    "rest": {
      "enabled": true,
      "output": {
        "json": {
          "indent": true
        }
      }
    }
  }
}
The API will yield the formatted JSON responses in any client.
Here is the output from cURL utility.
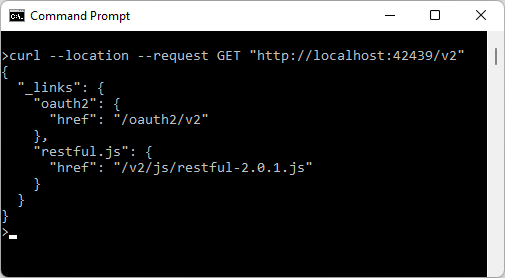 The formatted output of the RESTful API in Curl.
This is the formatted presentation of the API output in Google Chrome.
 The formatted output of the RESTful API in Google Chrome.
For this workshop, we recommend using the API development tools such as Postman or cURL.
Authentication
The API endpoint includes oauth2 and restful.js hypermedia controls in the responses to the anonymous requests. Client app requests must be authenticated with an access token or an API Key to get more data and hypermedia
Authorization with the OAuth 2.0 is discussed in the Standalone SPA4 with RESTful Hypermedia and OAuth 2.0 segment. You will learn how to get an access token from the backend application after receiving an approval from the end user. The tutorial explains how to use the oauth2 hypermedia link.
Trusted client apps can use the API keys when interacting with the backend application. The keys are either statically declared in the backend settings or dynamically loaded from the database. Each API Key is associated with a user name. For example, the following configuration defines the API Key of the admin user account in touch-settings.json. Any alpha-numeric sequence can serve as the key value. Multiple keys can be defined in the server.rest.authorization.keys array.
JSON
1234567891011121314151617181920{
  "server": {
    "rest": {
      "enabled": true,
      "output": {
        "json": {
          "indent": true
        }
      },
      "authorization": {
        "keys": [
          {
            "key": "94b79da7-e3a9-4152-9213-886f4c810bec",
            "user": "admin"
          }
        ]
      }
    }
  }
}
An API key is specified as the api_key or x-api-key parameter in the URL of the request. Another option is to specify the x-api-key request header.
This Postman screenshot shows the categories, products, and suppliers entries in the output of the API endpoint when the authorization key is specified in the Authorization settings. Alternatively developers can configure Postman for OAuth 2.0 Authorization.
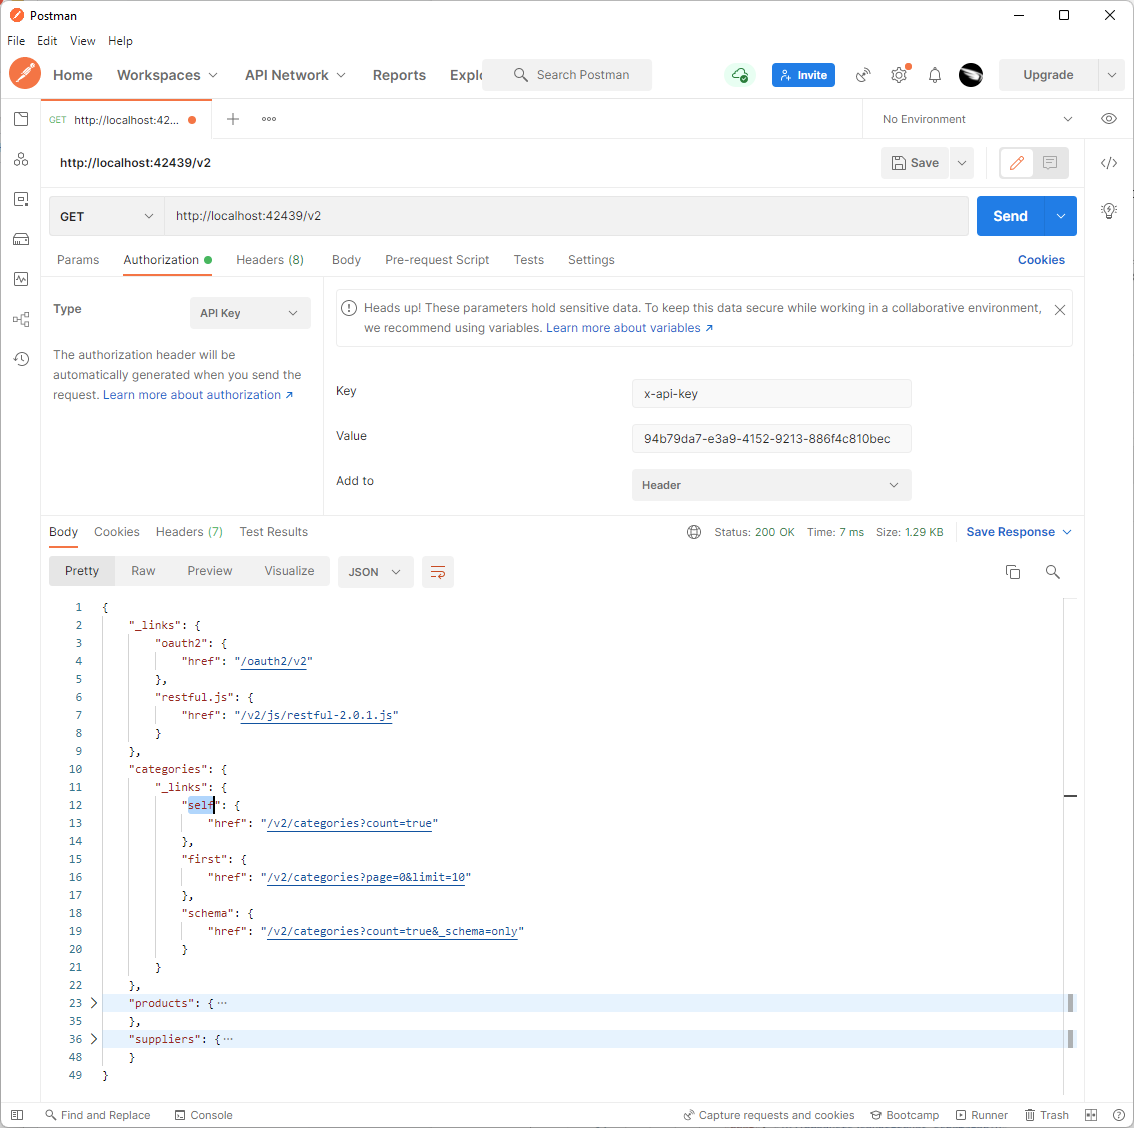 Output of the authenticated request to the RESTful API endpoint.
This is the JSON output of the authenticated request.
JSON
12345678910111213141516171819202122232425262728293031323334353637383940414243444546474849{
    "_links": {
        "oauth2": {
            "href": "/oauth2/v2"
        },
        "restful.js": {
            "href": "/v2/js/restful-2.0.1.js"
        }
    },
    "categories": {
        "_links": {
            "self": {
                "href": "/v2/categories?count=true"
            },
            "first": {
                "href": "/v2/categories?page=0&limit=10"
            },
            "schema": {
                "href": "/v2/categories?count=true&_schema=only"
            }
        }
    },
    "products": {
        "_links": {
            "self": {
                "href": "/v2/products?count=true"
            },
            "first": {
                "href": "/v2/products?page=0&limit=5"
            },
            "schema": {
                "href": "/v2/products?count=true&_schema=only"
            }
        }
    },
    "suppliers": {
        "_links": {
            "self": {
                "href": "/v2/suppliers?count=true"
            },
            "first": {
                "href": "/v2/suppliers?page=0&limit=10"
            },
            "schema": {
                "href": "/v2/suppliers?count=true&_schema=only"
            }
        }
    }
}
API keys are useful when developing client apps with the API development tools. Developers can define multiple keys to impersonate the test user accounts.
The primary purpose of the API keys is to provide the means of request authorization for the trusted client applications. Cloud scripts and custom utilities deployed in a secure environment can perform complex interactions with the RESTful API Engine of your application while acting under identity constraints of the specially designated user accounts.
Treat API keys as passwords and make sure to change them frequently. Cloud scripts shall pass the keys in the headers of HTTP requests to avoid having them intercepted by the 3rd parties or included in the traffic logs.
The SPA4 Client App tutorial discusses how to limit the availability of the API resources with the Access Control List (ACL). Developers can configure individual access to the data controllers in the resource path with the user roles and custom OAuth 2.0 scopes.
Hypermedia Controls (HATEOAS)
Hypermedia can be found in the root of a resource and in the output keys. For example, the oauth2 control specifies the link that will lead to the OAuth 2.0 resources of the backend. The self, first, and schema hypermedia controls in the products key will lead to the resources related to the Products data.
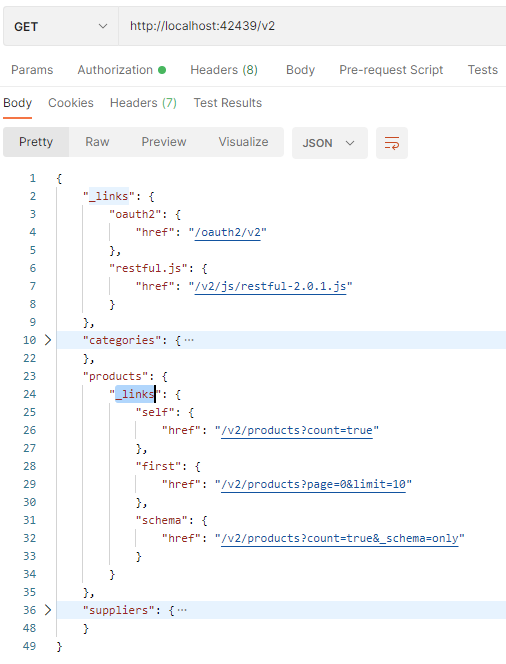 The API endpoint includes top-level resources with the embedded hypermedia controls and the global hypermedia with the OAuth 2.0 API link.
The HTTP method required for the hypermedia control explains how to access the resource. If the method is not specified, then GET is expected.
HATEOAS stands for the Hypermedia As The Engine of Application State. It infuses the data with the relevant links that will allow applications to transition from one resource to another or to change the state of a resource. The state of a resource data and user identity determine if a particular link is available.
Developers can program their apps to act just like humans do when we browse the web. Hyperlinks in web pages are text fragments that lead to the web resources. For example, the news title link will transition to the relevant news article when followed in a browser. The “checkout” link will transform the shopping cart into an order. Users do not have to know the physical URL that must be loaded in the browser to get to the corresponding resource.
Follow the first link in the products key. If you are using the Postman, then a new request tab will open. Make sure to specify the API Key in Authorization request properties before you hit Send.
You will see the first 10 products listed in the collection key. The number of rows matches the limit parameter in the URL. The default page size is 10. Set either the server.rest.output.pageSize.default option or server.rest.output.pageSize.products option in application configuration to a specific value to change the maximum number of items in the collection.
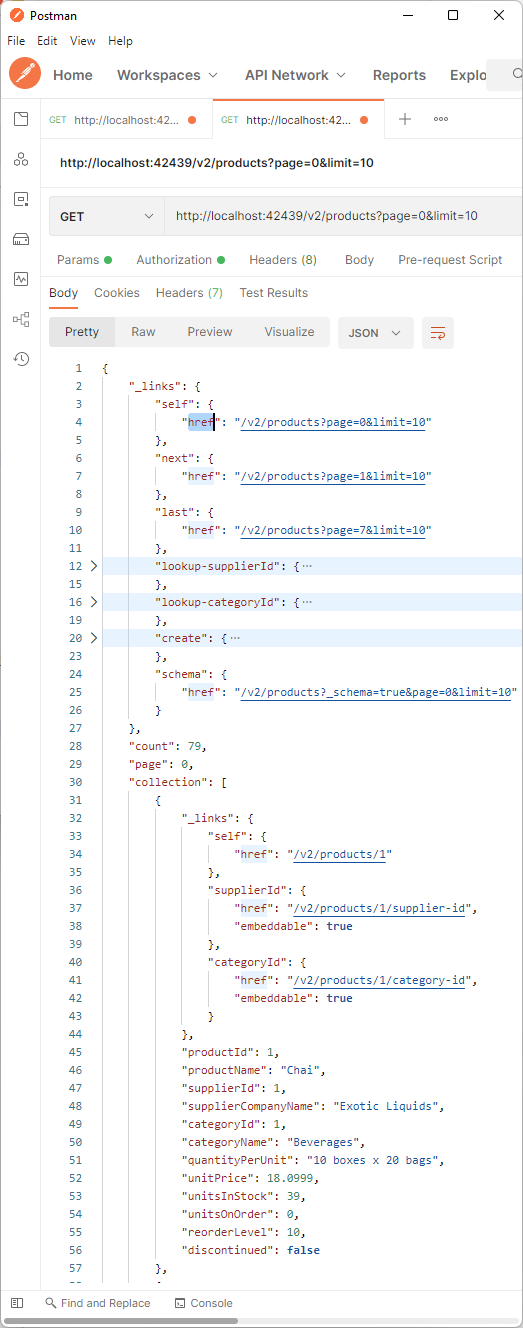 RESTful resource collection infused with hypermedia.
The self link tells where the data came from. Just follow this link to get the “fresh” copy of data. The next link tells how to access the next page. There is no prev link since we are on the “first” page.
Client applications created in this workshop will use first, prev, next, and last hypermedia links to page the product inventory. You will learn to use hypermedia and to access the resources directly.
Next
Continue to the Embedded SPA1 with RESTful Hypermedia segment to build the first client app of this workshop.
This tutorial is part of the RESTful Workshop designed to empower individual developers and teams to create amazing enterprise-quality backends for mobile and web applications. Zero experience and no code is required to provide your data with the REST API conforming to the Level 3 of Richardson Maturity Model with the built-in OAuth 2.0 and Open ID Connect.