Connected electronic gadgets make life easier. Personal medical devices, household appliances, media players, wireless speakers, and smart watches are just a few examples of devices that can access the internet via WiFi. A smart device becomes indispensable when connected directly to a user account. This requires a secure method of user authentication on the device. How does one enter their username and password on a control panel of a microwave or air conditioning unit?
OAuth 2.0 specifies the Device Authorization Grant, the protocol that makes it simple connecting devices with the limited input capabilities to user accounts and data. Code On Time produces apps with the built-in RESTful API Engine and multiple OAuth 2.0 authorization flows, including the Device Authorization Grant. Keep reading and learn how to integrate your apps into the physical world of your users, the Internet of Things (IoT)!
“Cool Gadget” Example
Let’s begin with the sample that simulates a device with the limited input capabilities. The “Cool Gadget” device is a simple HTML page that displays a user code consisting of letters. The code changes every ten minutes. The gadget can show the user identity information and the most expensive product entered in the Northwind application. For that, users must visit the URL specified below the 8-letter code.
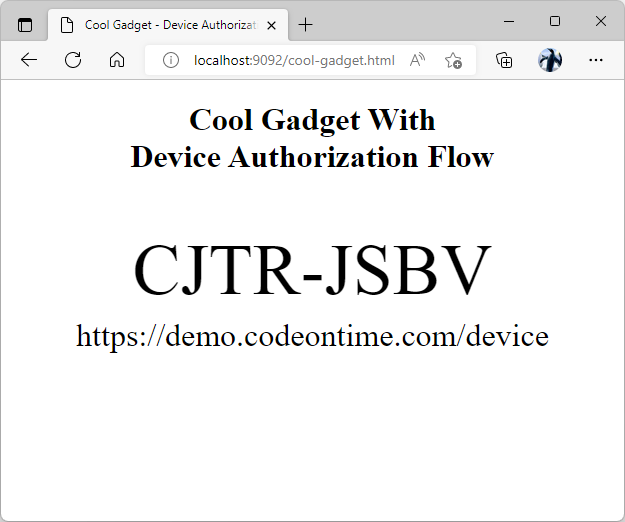
This HTML page implements the "Cool Gadget" device. It will display the user identity information and the most expensive product from https://demo.codeontime.com when the user authorizes the "gadget" with the OAuth Device Authorization Grant flow. Users must utilize their personal device to visit the URL specified below the code in the middle of the "gadget" screen. The "gadget" activates when a user enters the code and confirms their identity.
Users are not expected to touch or click anything on the page. If the “Cool Gadget” page is running on your laptop, then use a mobile browser on your phone, tablet, or another device to activate the gadget. Alternatively open a separate browser window or launch a browser made by a different vendor on the same device.
A visit to https://demo.codeontime.com/device will greet users with the Connect a Device prompt. Users must enter the code displayed on their “Cool Gadget” device. The form will submit automatically when all code letters are entered.
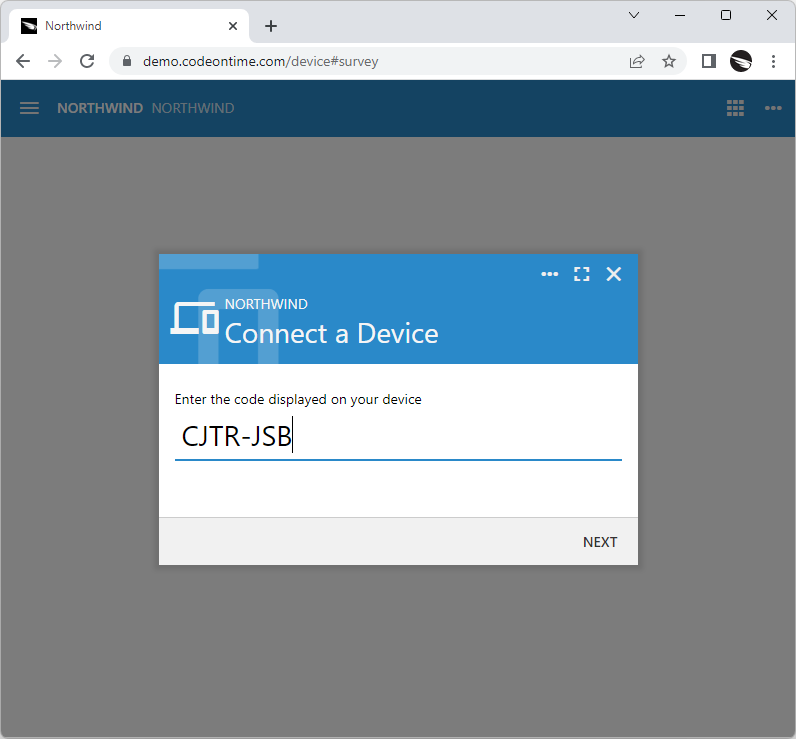
Users visit your application at the ~/device path to authorize the account access on a device with the limited input capabilities. The device displays the authorization URL and the code.
Next users will be prompted to sign in. If a user is already signed into the application in their browser, then this step of the authorization flow is skipped.

Users will be prompted to sign in when they enter the code displayed on the device at the ~/device path in the web application. This step may be optional if the user is signed into the app already.
The app will display the Account Access confirmation to the authenticated user. The name of the requesting device and its maker are displayed at the top followed by permissions requested by the device. Users may allow or deny the account access. There is also an option to switch the user account.
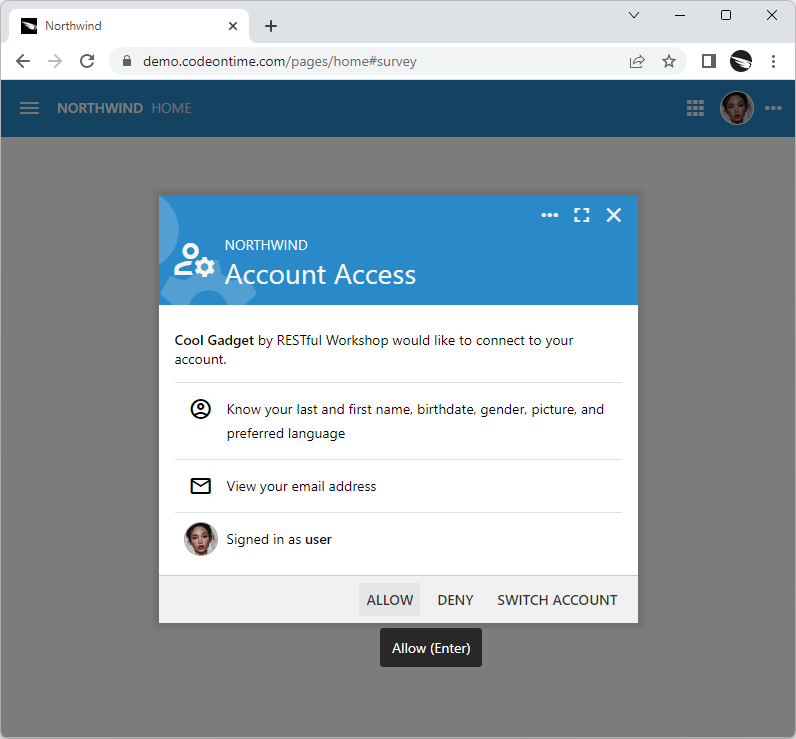
The standard Account Access prompt will show the name of the device and scopes requested for authorization. Users allow or deny access.
If the account access is granted, then the requesting party will get the access token with the requested permissions. In this particular instance, the device also wants to know the user name, email and picture. The identity token will be communicated to the “Cool Gadget” along with the access token.
The screen of the “Cool Gadget” will automatically change when the account access is granted. The user picture and email will be displayed in the bottom left corner of the page. The name and the price of the most expensive product in the Northwind database will show up in the middle.
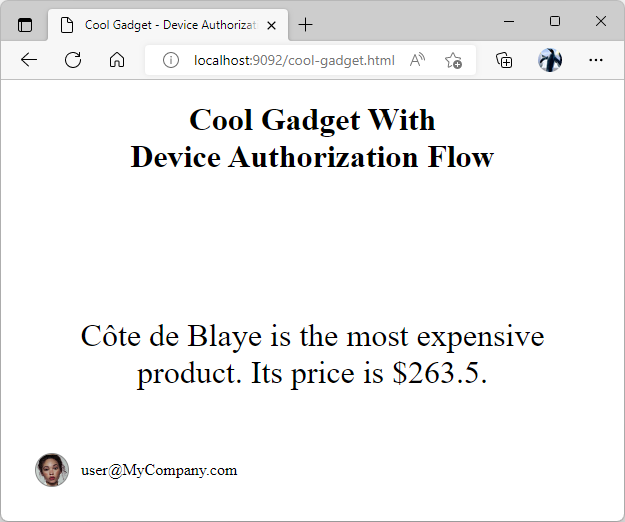
A device with the limited display capabilities will obtain the access token when the account access is granted by the user. The device simulation in the screenshot is displaying the user email, picture, and the most expensive product in the RESTful Application database when the account access is granted.
The gadget will display another user code after a brief delay.
The physical-world devices will retain the access and id tokens for future use. For example, the software of the air conditioning unit may remind the user via email or text message that the filter needs to be cleaned. The access token will allow the software to keep track of the filter changes and electricity consumption data in the user account records. This will be done via requests to the API of the backend application with access token specified in the request Authorization header. The identity token makes possible the communication of the device with the user.
Device Authorization Grant
Embedded software found in the connected devices is capable of performing HTTP requests. Let’s review the phases of the Device Authorization Grant flow that will take place when communicating with the RESTful API Engine of an application created with Code On Time.
RESTful API at https://demo.codeontime.com/v2 provides the OAuth 2.0 endpoint in the _links key.
JSON
12345678910{
  "_links": {
    "oauth2": {
      "href": "/oauth2/v2"
    },
    "restful.js": {
      "href": "/v2/js/restful-2.0.1.js"
    }
  }
}
Follow the oauth2 hypermedia link to https://demo.codeontime.com/oauth2/v2 for more options. Find the authorize-device hypermedia in the API definition below.
JSON
12345678910111213141516171819202122232425262728293031323334353637383940414243444546474849505152535455565758596061{
  "_links": {
    "authorize": {
      "href": "/oauth2/v2/auth"
    },
    "token": {
      "href": "/oauth2/v2/token",
      "method": "POST"
    },
    "tokeninfo": {
      "href": "/oauth2/v2/tokeninfo"
    },
    "userinfo": {
      "href": "/oauth2/v2/userinfo",
      "method": "POST"
    },
    "revoke": {
      "href": "/oauth2/v2/revoke",
      "method": "POST"
    },
    "authorize-client-native": {
      "href": "/oauth2/v2/auth/pkce",
      "method": "POST"
    },
    "authorize-client-spa": {
      "href": "/oauth2/v2/auth/spa",
      "method": "POST"
    },
    "authorize-server": {
      "href": "/oauth2/v2/auth/server",
      "method": "POST"
    },
    "authorize-device": {
      "href": "/oauth2/v2/auth/device",
      "method": "POST"
    },
    "schema": {
      "href": "/oauth2/v2?_schema=true"
    }
  },
  "scopes": {
    "openid": {
      "hint": "View the unique user id, client app id, API endpoint, token issue and expiration date."
    },
    "profile": {
      "hint": "View the user's last and first name, birthdate, gender, picture, and preferred language."
    },
    "address": {
      "hint": "View the user's preferred postal address."
    },
    "email": {
      "hint": "View the user's email address."
    },
    "phone": {
      "hint": "View the user's phone number."
    },
    "offline_access": {
      "hint": "Access your data anytime."
    }
  }
}
The embedded software will begin the user authorization via the URL specified in the authorize-device hypermedia link. Optionally the device may follow the hypermedia links of the API to find the URL and avoid the hard-coding of its value.
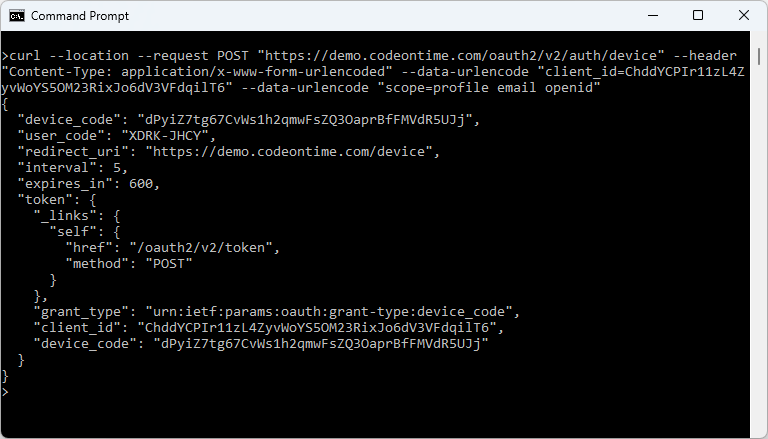
Here is the cURL request that will yield the user code and authorization URL to be displayed in the UI of the device.
text
1curl --location --request POST "https://demo.codeontime.com/oauth2/v2/auth/device" --header "Content-Type: application/x-www-form-urlencoded" --data-urlencode "client_id=ChddYCPIr11zL4ZyvWoYS5OM23RixJo6dV3VFdqilT6" --data-urlencode "scope=profile email openid"
The result of this request is shown below after being executed in the Command Prompt. The request posts the client_id and scope parameters to the URL in the authorize-device hypermedia link. The client_id value is obtained when the device is registered. The scopes profile, email, and openid will ask the user permission to release their identity information. The response in the JSON format contains the device_code, user_code, redirect_uri, interval, and expires_in keys.
The embedded software of the device with the limited display capabilities can use the cURL library to start the Device Authorization Flow. It will make the HTTP GET request to the ~/oauth2/v2/auth/device endpoint to get the user_code, redirect_uri, and the access token polling instructions from an application created with Code On Time.
The device must display the user_code and redirect_uri values in its user interface. The “Cool Gadget” presents both values in the middle of the page shown in the screenshots. The user code will expire in the number of seconds specified in the the expires_in key. The device must refresh the user authorization instruction by obtaining the new response from the authorize-device hypermedia link.
JSON
123456789101112131415161718{
  "device_code": "dPyiZ7tg67CvWs1h2qmwFsZQ3OaprBfFMVdR5UJj",
  "user_code": "XDRK-JHCY",
  "redirect_uri": "https://demo.codeontime.com/device",
  "interval": 5,
  "expires_in": 600,
  "token": {
    "_links": {
      "self": {
        "href": "/oauth2/v2/token",
        "method": "POST"
      }
    },
    "grant_type": "urn:ietf:params:oauth:grant-type:device_code",
    "client_id": "ChddYCPIr11zL4ZyvWoYS5OM23RixJo6dV3VFdqilT6",
    "device_code": "dPyiZ7tg67CvWs1h2qmwFsZQ3OaprBfFMVdR5UJj"
  }
}
There is also the token key in the authorize-device response above. It is pre-formatted and can be posted as-is to the URL in the self hypermedia link found in the key. The screenshot of the request with the token key object and the response are shown next in the Postman screenshot. Alternatively, the x-www-form-urlencoded data post with the grant_type, client_id, and device_code keys can be sent to the same URL.
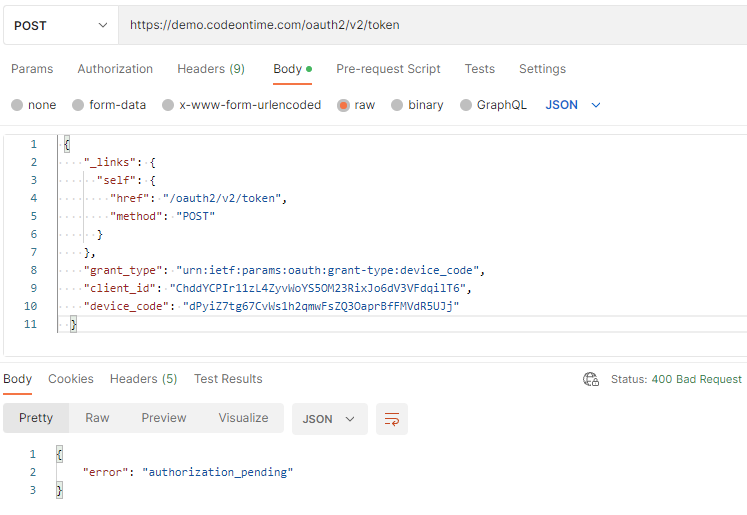
The response of the RESTful Application is shown in the Postman. The authoriation_pending error is returned, which tells the device that it must continue polling for the access token.
The response with the 400 HTTP status code is returned. The error key in the JSON body will have the authorization_pending value. The device must continue posting the same request to the same URL until the access_token key is included in the response body, which will happen when the account access is authorized by a user.
JSON
123{
    "error": "authorization_pending"
}
The interval of the request must match the interval key in the original response of the authorize-device hypermedia link. Application will return the slow_down error if the requests are coming too soon. The device must decrease the frequency of the requests when this happens. If the device authorization request is never approved, then the response error will have the expired_token value. The expired token is the value of the device_code in the reques. The new code will be needed. The device must stop polling for authorization and obtain another device_code value from the authorize_device link.
If the authorization request is approved by a user, then the token response with the 200 HTTP status code is returned. The following sample is the example of such a response.
JSON
1234567{
    "access_token": "HNUbDZ7axKXACOOG9C.ff+kAWmoFR+5zyWfk1F.8GsQHXCG8EzcsHuNfzH+k.75KvdqYURQxytIUqYPQ",
    "expires_in": 900,
    "token_type": "Bearer",
    "id_token": "eyJ0eXAiOiJKV1QiLCJhbGciOiJIUzI1NiJ9.eyJpc3MiOiJodHRwczovL2RlbW8uY29kZW9udGltZS5jb20vb2F1dGgyL3YyIiwiYXpwIjoiQ2hkZFlDUElyMTF6TDRaeXZXb1lTNU9NMjNSaXhKbzZkVjNWRmRxaWxUNiIsImF1ZCI6Imh0dHBzOi8vZGVtby5jb2Rlb250aW1lLmNvbS92MiIsInN1YiI6IjQxZDFiYjM2LTNkYzktNDkzMy05Mzg4LTg0MzdmMzgwYThhNCIsImlhdCI6MTY2NTc3Mjk1MywiZXhwIjoxNjY1NzczODUzLCJlbWFpbCI6ImFkbWluQE15Q29tcGFueS5jb20iLCJlbWFpbF92ZXJpZmllZCI6dHJ1ZSwibmFtZSI6bnVsbCwiZ2l2ZW5fbmFtZSI6bnVsbCwiZmFtaWx5X25hbWUiOm51bGwsIm1pZGRsZV9uYW1lIjpudWxsLCJuaWNrbmFtZSI6bnVsbCwicHJlZmVycmVkX3VzZXJuYW1lIjpudWxsLCJwcm9maWxlIjpudWxsLCJwaWN0dXJlIjoiaHR0cHM6Ly9kZW1vLmNvZGVvbnRpbWUuY29tL29hdXRoMi92Mi91c2VyaW5mby9waWN0dXJlcy9vcmlnaW5hbC81Vjh6ZE9XZi03UHN6WVF5Tndmak1ldHZCaGRlSkg2aXdSbnV3ZEhJNGZRLmpwZWciLCJnZW5kZXIiOm51bGwsImJpcnRoZGF0ZSI6bnVsbCwiem9uZWluZm8iOm51bGwsImxvY2FsZSI6bnVsbCwidXBkYXRlZF9hdCI6bnVsbCwic2NvcGUiOiJwcm9maWxlIGVtYWlsIG9wZW5pZCJ9.j_TxMucHcPr1VNjyhv6BqbvUFD8r5yUql2Bbeiwo0wI",
    "scope": "profile email openid"
}
The device must stop polling when the access_token is obtained. Any subsequent requests with the same device_code will return the invalid_request error.
The specific keys in the token response must be used by the embedded software of the device to authorize the requests to the backend application and to access the user identity information. The backend application is the Northwind sample. Its API is available at https://demo.codeontime.com/v2 and returns the oauth2 and restful.js hypermedia only. Make a request to this API with the access_token value provided in the Authorization header with the “Bearer “ prefix. The additional hypermedia will show up in the response.
Device Registration
The embedded software must be registered as the client app of the backend application. App Management API shall be used for this purpose. The value of the client_id specified in the authorize-device request above comes from the Cool Gadget registration record:
JSON
12345678910111213141516171819202122232425262728{
    "_links": {
        "self": {
            "href": "/oauth2/v2/apps/ChddYCPIr11zL4ZyvWoYS5OM23RixJo6dV3VFdqilT6"
        },
        "edit": {
            "href": "/oauth2/v2/apps/ChddYCPIr11zL4ZyvWoYS5OM23RixJo6dV3VFdqilT6",
            "method": "PATCH"
        },
        "delete": {
            "href": "/oauth2/v2/apps/ChddYCPIr11zL4ZyvWoYS5OM23RixJo6dV3VFdqilT6",
            "method": "DELETE"
        }
    },
    "name": "Cool Gadget",
    "author": "RESTful Workshop",
    "client_id": "ChddYCPIr11zL4ZyvWoYS5OM23RixJo6dV3VFdqilT6",
    "client_secret": null,
    "redirect_uri": "http://localhost:9092/cool_gadget.html#auth",
    "local_redirect_uri": null,
    "authorization": {
        "device": true,
        "native": false,
        "spa": true,
        "server": false
    },
    "trusted": false
}
The authorization key in the registration record allows the device and spa flows. The “spa” abbreviation stands for the Single Page Application. This flow is required for the “Cool Gadget” sample to work properly since it is implemented as the HTML page. The host browser will not allow communications with the Northwind application unless the spa authorization is set to true.
Set the redirect_uri to https://demo.codeontime.com/device if you do not require the Device Authorization Grant flow to work in browser-based scenarios.
“Cool Gadget” Implementation
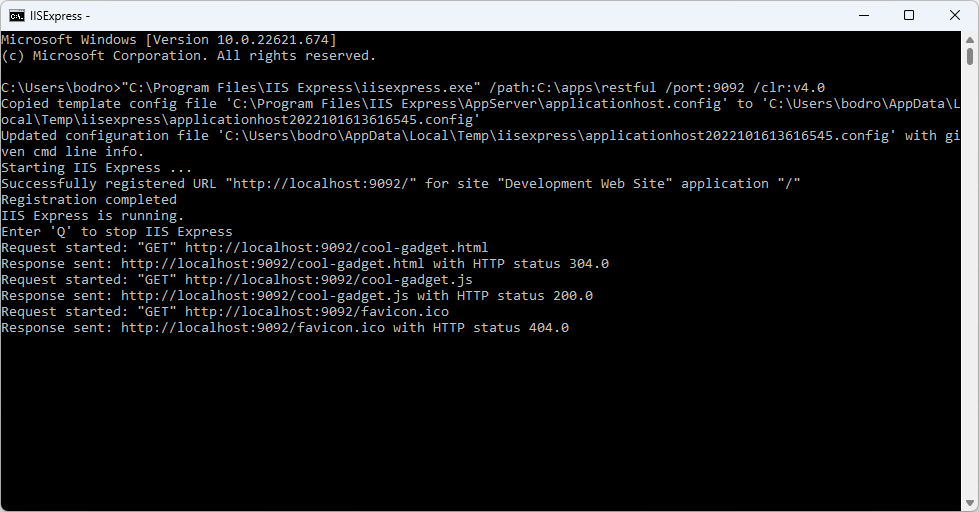
The “gadget” is implemented in cool-gadget.html and cool-gadget.js files. A web server is required to host the HTML page. It must be listening to the localhost port 9092. This requirement comes from the registration record. Microsoft IIS Express development server is required to run applications created with Code On Time in development mode. If you have installed the app builder and used it successfully, then you are ready to try the “gadget” on your development machine. Place the “gadget” files in the c:\app\restful folder and run the following in the command line:
"C:\Program Files\IIS Express\iisexpress.exe" /path:C:\apps\restful /port:9092 /clr:v4.0
The device with the limited display capabilities must be registered with the RESTful Application as a Client App. The Cool Gadget device simulation is registered as the device and spa. The registration of the simulated device as the single-page application is required since we are implementing the simulation in the browser.
Open a browser and navigate to http://localhost:9092/cool-gadget.html to try it out.
Source Code
The source code of the “Cool Gadget” follows next.
File cool-gadget.html
HTML
1234567891011121314151617181920212223242526272829303132333435363738394041424344454647484950515253545556575859606162636465666768697071727374757677787980818283848586<!DOCTYPE html>
<html lang="en">
<head>
    <meta charset="utf-8">
    <meta name="viewport" content="width=device-width, initial-scale=1">
    <title>Cool Gadget - Device Authorization Flow</title>
    <script src="cool-gadget.js"></script>
    <style>
        #anonymous, #authenticated {
            position: absolute;
            left: 0;
            width: 100%;
            height: 100%;
            top: 0;
        }

            #anonymous .user_code {
                font-size: 72px;
                position: absolute;
                text-align: center;
                width: 100%;
                top: 50%;
                margin-top: -72px;
                white-space: nowrap;
            }

            #anonymous .redirect_uri, #authenticated .message {
                position: absolute;
                text-align: center;
                font-size: 2em;
                top: 50%;
                margin-top: .5em;
                left: 1em;
                right: 1em;
            }

            #authenticated .user_info {
                font-size: 32px;
                position: absolute;
                text-align: center;
                width: 100%;
                top: 50%;
                margin-top: -32px;
                white-space: nowrap;
                /* font-weight: bold; */
                line-height: 34px;
                display: inline-block;
                height: 32px;
            }

            #authenticated .avatar {
                width: 32px;
                height: 32px;
                background-size: 100% auto;
                border-radius: 17px;
                border: solid 1px #888;
                background-position: center center;
                position: absolute;
                left: 34px;
                bottom: 34px;
            }

            #authenticated .email {
                position: absolute;
                bottom: 34px;
                left: 80px;
                height: 34px;
                line-height: 34px;
            }
    </style>
</head>
<body>
    <h1 style="text-align:center">Cool Gadget With<br />Device Authorization Flow</h1>
    <!-- anonymous user -->
    <div id="anonymous">
        <div class="user_code"></div>
        <div class="redirect_uri"></div>
    </div>
    <!-- authenticated user -->
    <div id="authenticated">
        <span class="avatar"></span>
        <span class="email"></span>
        <div class="message"></div>
    </div>
</body>
</html>
File cool-gadget.js
JavaScript
123456789101112131415161718192021222324252627282930313233343536373839404142434445464748495051525354555657585960616263646566676869707172737475767778798081828384858687888990919293949596979899100101102103104105106107108109110111(function () {
    var clientId = 'ChddYCPIr11zL4ZyvWoYS5OM23RixJo6dV3VFdqilT6', // specific to the Client App Registration
        authRequest,
        pendingTask;

    window.addEventListener('load', e => {
        requestDeviceAuthorization();
        setInterval(doTask, 10 * 1000);
    });

    function doTask() {
        var task = pendingTask;
        pendingTask = null;
        if (typeof task === 'function')
            task();
    }

    function requestDeviceAuthorization() {
        updateUI({ userCode: 'WORKING...', message: 'Please wait for the user code.' });

        var myHeaders = new Headers();
        myHeaders.append('Content-Type', 'application/x-www-form-urlencoded');

        var urlEncoded = new URLSearchParams();
        urlEncoded.append('client_id', clientId);
        urlEncoded.append('scope', 'profile email openid');

        var requestOptions = {
            method: 'POST',
            headers: myHeaders,
            body: urlEncoded
        };

        fetch('https://demo.codeontime.com/oauth2/v2/auth/device', requestOptions)
            .then(response => response.text())
            .then(result => {
                // parse the authorization request data
                authRequest = JSON.parse(result);
                // display the user code and the URL that must be used to authorize the device
                updateUI({ userCode: authRequest.user_code, message: authRequest.redirect_uri });
                // start requesting the access token
                pendingTask = getAccessToken;
            })
            .catch(error => console.log('error', error));
    }

    function updateUI(options) {
        document.querySelector('#anonymous').style.display = options.userCode ? '' : 'none';
        document.querySelector('#authenticated').style.display = options.userCode ? 'none' : '';
        document.querySelector('.user_code').innerHTML = options.userCode;
        document.querySelector('.redirect_uri').innerHTML = options.message;
        document.querySelector('#authenticated .avatar').style.backgroundImage = 'url(' + options.picture + ')';
        document.querySelector('#authenticated .email').textContent = options.email;
        document.querySelector('#authenticated .message').textContent = options.message;
    }

    function getAccessToken() {
        var myHeaders = new Headers();
        myHeaders.append('Content-Type', 'application/json');
        var requestOptions = {
            method: 'POST',
            headers: myHeaders,
            body: JSON.stringify(authRequest.token)
        };
        fetch('https://demo.codeontime.com/oauth2/v2/token', requestOptions)
            .then(response => response.text())
            .then(result => {
                var authResponse = JSON.parse(result);
                // the standard "pending authorization" is returned with the 400 HTTP status
                if (authResponse.error === 'authorization_pending')
                    pendingTask = getAccessToken;
                else if (authResponse.error === 'expired_token')
                    requestDeviceAuthorization();
                else if (authResponse.error) {
                    alert(authResponse.error);
                    requestDeviceAuthorization();
                }
                else
                    showTheMostExpensiveProduct(authResponse);
            })
            .catch(error => console.log('error', error));
    }

    function showTheMostExpensiveProduct(authResponse) {
        // parse the JWT specified in the 'id_token' of the authorization response
        var idToken = authResponse.id_token ? JSON.parse(atob((authResponse.id_token).split(/\./)[1])) : {};
        // get the first item in the list of products sorted in descending order
        updateUI({ message: 'Processing' });
        var myHeaders = new Headers();
        myHeaders.append('Authorization', 'Bearer ' + authResponse.access_token);
        var requestOptions = {
            method: 'GET',
            headers: myHeaders
        };
        fetch('https://demo.codeontime.com/v2/products?limit=1&sort=unitPrice%20desc', requestOptions)
            .then(response => response.text())
            .then(result => {
                var productList = JSON.parse(result);
                updateUI({
                    message:
                        productList.collection[0].productName +
                        ' is the most expensive product. Its price is $' +
                        productList.collection[0].unitPrice + '.',
                    email: idToken.email,
                    picture: idToken.picture
                });
                pendingTask = requestDeviceAuthorization;
            })
            .catch(error => console.log('error', error));
    }
})();
Let’s briefly discuss the implementation of the “gadget”.
HTML
There are two elements taking up the entire page. The first is displaying the user code with the authorization URL. The second displays the user email address and picture along with the most expensive product fetched from the Northwind application. The page also links the cool-gadget.js file.
JavaScript
The major elements of the cool-gaget.js are the doTask, requestDeviceAuthorization, getAccessToken, and showTheMostExpensiveProduct functions. The first three are directly involved in the Device Authorization Grant flow. The latter performs the custom logic of the “gadget”.
The client_id specified the client app ID known to the backend application. The global variable authRequest will store the result of the request to the authorize-device hypermedia link. The variable pendingTask is the function reference that will be executed within the 10-second interval when the doTask function is invoked.
JavaScript
123456789101112131415var clientId = 'ChddYCPIr11zL4ZyvWoYS5OM23RixJo6dV3VFdqilT6', // specific to the Client App Registration
    authRequest,
    pendingTask;

window.addEventListener('load', e => {
    requestDeviceAuthorization();
    setInterval(doTask, 10 * 1000);
});

function doTask() {
    var task = pendingTask;
    pendingTask = null;
    if (typeof task === 'function')
        task();
}
The requestDeviceAuthorization function is called when the app starts and whenever the new user code needs to be displayed in the device user interface. If the device authorization has been obtained, then the UI will display the new user code and authorization URL. Function getAccessToken will become the next task to execute.
JavaScript
12345678910111213141516171819202122232425262728function requestDeviceAuthorization() {
    updateUI({ userCode: 'WORKING...', message: 'Please wait for the user code.' });

    var myHeaders = new Headers();
    myHeaders.append('Content-Type', 'application/x-www-form-urlencoded');

    var urlEncoded = new URLSearchParams();
    urlEncoded.append('client_id', clientId);
    urlEncoded.append('scope', 'profile email openid');

    var requestOptions = {
        method: 'POST',
        headers: myHeaders,
        body: urlEncoded
    };

    fetch('https://demo.codeontime.com/oauth2/v2/auth/device', requestOptions)
        .then(response => response.text())
        .then(result => {
            // parse the authorization request data
            authRequest = JSON.parse(result);
            // display the user code and the URL that must be used to authorize the device
            updateUI({ userCode: authRequest.user_code, message: authRequest.redirect_uri });
            // start requesting the access token
            pendingTask = getAccessToken;
        })
        .catch(error => console.log('error', error));
}
Function getAccessToken fetches the /oauth2/v2/token URL of the backend and continues the authorization polling if the value of the error key in the result is authorization_pending. If there is no error key in the response, then the assumption is made that the access token has been returned. The “gadget” proceeds to fulfill its primary purpose.
JavaScript
1234567891011121314151617181920212223242526function getAccessToken() {
    var myHeaders = new Headers();
    myHeaders.append('Content-Type', 'application/json');
    var requestOptions = {
        method: 'POST',
        headers: myHeaders,
        body: JSON.stringify(authRequest.token)
    };
    fetch('https://demo.codeontime.com/oauth2/v2/token', requestOptions)
        .then(response => response.text())
        .then(result => {
            var authResponse = JSON.parse(result);
            // the standard "pending authorization" is returned with the 400 HTTP status
            if (authResponse.error === 'authorization_pending')
                pendingTask = getAccessToken;
            else if (authResponse.error === 'expired_token')
                requestDeviceAuthorization();
            else if (authResponse.error) {
                alert(authResponse.error);
                requestDeviceAuthorization();
            }
            else
                showTheMostExpensiveProduct(authResponse);
        })
        .catch(error => console.log('error', error));
}
The purpose of the “gadget” is to display the identity information of the user that has authorized the device. The “gadget” also fetches the most expensive product from the backend database. The code is parsing the id_token key to display the user email and picture. Then the fetch of the /v2/products endpoint will bring the list consisting of a single product in the descending order of the unitPrice field. The most expensive product information will appear in the middle of the page.
JavaScript
123456789101112131415161718192021222324252627function showTheMostExpensiveProduct(authResponse) {
    // parse the JWT specified in the 'id_token' of the authorization response
    var idToken = authResponse.id_token ? JSON.parse(atob((authResponse.id_token).split(/\./)[1])) : {};
    // get the first item in the list of products sorted in descending order
    updateUI({ message: 'Processing' });
    var myHeaders = new Headers();
    myHeaders.append('Authorization', 'Bearer ' + authResponse.access_token);
    var requestOptions = {
        method: 'GET',
        headers: myHeaders
    };
    fetch('https://demo.codeontime.com/v2/products?limit=1&sort=unitPrice%20desc', requestOptions)
        .then(response => response.text())
        .then(result => {
            var productList = JSON.parse(result);
            updateUI({
                message:
                    productList.collection[0].productName +
                    ' is the most expensive product. Its price is $' +
                    productList.collection[0].unitPrice + '.',
                email: idToken.email,
                picture: idToken.picture
            });
            pendingTask = requestDeviceAuthorization;
        })
        .catch(error => console.log('error', error));
}
The implementation of the “gadget” demonstrates the typical requests that will be performed by the embedded software of a physical device.
Add the offline_access scope when requesting the user code if the device needs to refresh the access token continuously. The refresh_token will be included along with the access_token when account access is granted.
Conclusion
Support for the Device Authorization Grant flow in applications created with Code On Time immensely extends their reach into the physical world of their users. A few tweaks in the app configuration will enable the RESTful API Engine.
No additional software is required to future-proof your creation!
This tutorial is part of the RESTful Workshop designed to empower individual developers and teams to create amazing enterprise-quality backends for mobile and web applications. Zero experience and no code is required to provide your data with the REST API conforming to the Level 3 of Richardson Maturity Model with the built-in OAuth 2.0 and Open ID Connect.