The REST API Level 2 and above must support HTTP methods (verbs) in resource handling. For example, the request with the GET method is expected to return the resource data while the request with the PATCH method is expected to modify some of its fields. The standard HTTP methods work well for CRUD. Unfortunately the limited number of HTTP verbs will not cover all possible scenarios of data manipulation.
RESTful API Engine allows specifying an action identifier directly in the resource URL of the POST request. The available custom actions are advertised in the resource hypermedia.
Example
Let’s modify the backend application to implement a custom action that will update the inventory when a product is sold.
The interactive users of Touch UI and the algorithmic clients of RESTful API will have the ability to sell products.
Users of the backend application will navigate to the Products or Suppliers page, choose a product, and press the Sell button. The popup form will ask users to specify the number of product units to sell. The Units In Stock field value of the selected product will decrease by the number of the sold units.
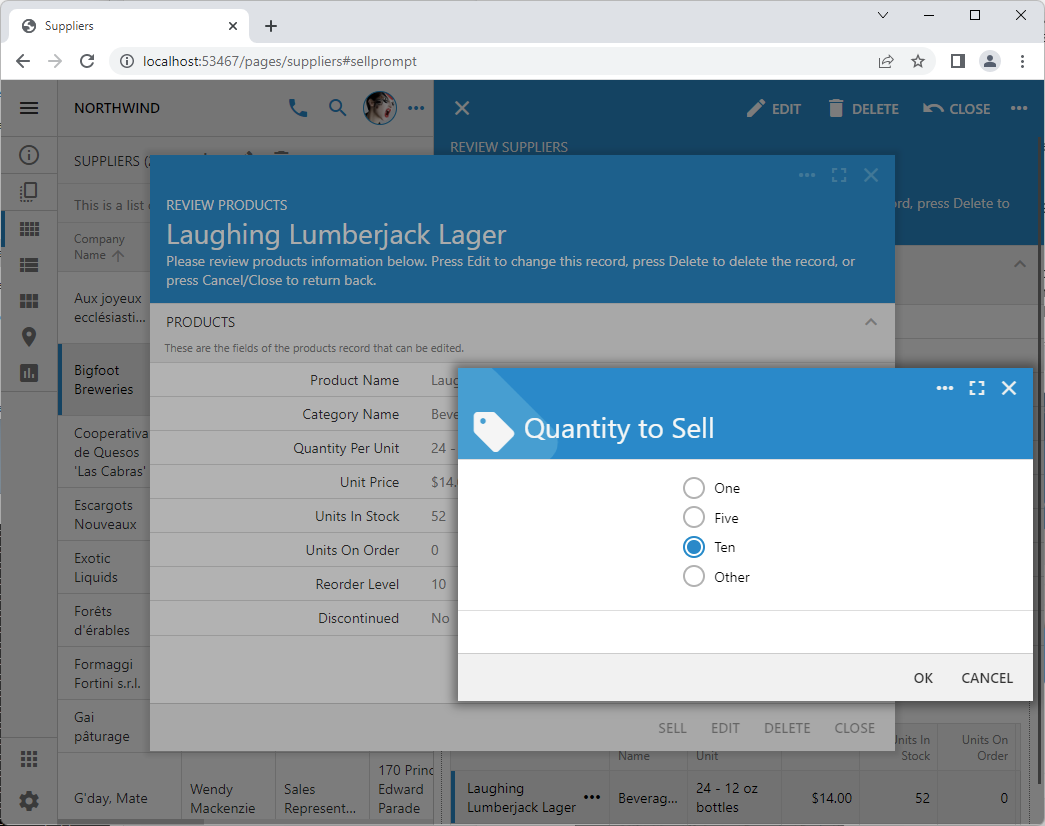 Confirmation controller "SellPrompt" presents the user with an option to sell 1, 5, or 10 units of a product with a single touch. The "Other" option allows entering the arbitrary quantity of units to sell. The prompt is displayed when users press the "Sell" button in the product form.
Developers evolve both UI and API by making changes to the data controllers in the Model Builder and Project Designer.
The API users will post the quantity of units to sell to the action URL, which will be available in the hypermedia of the singleton resources of products.
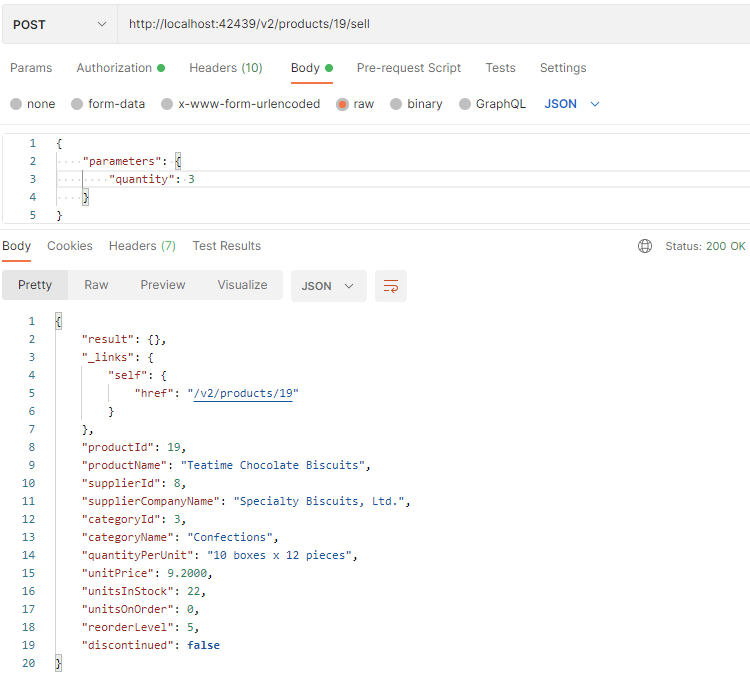 RESTful API Engine makes the custom action "sell" available to the client apps. The parameters of the action are specified in the "parameters" key of the payload. The new state of the resource is returned in the response.
Here is how the “Sell” user interface feature is correlating with the upcoming application design changes:
- The new Sell button will be displayed in the form when a product is selected. The button represents the custom action.
- The form Quantity to Sell will be shown when the button is pressed. The form is the view of the confirmation data controller.
- The business rule will execute when the Quantity to Sell is confirmed. The rule will reduce the UnitsInStock value of the product by the specified quantity.
Both Touch UI and RESTful API of the backend application will make the new feature known and available to their consumers. Humans will see the Sell button and the prompt to enter the Quantity to Sell. Applications will have access to the sell hypermedia control advertising the new functionality in the products resource singletons.
Start the App Builder, select the RESTful Backend Application project, choose Design, and activate the Controllers tab in the Project Explorer. Follow the instructions to add one action, one confirmation controller, and one business rule to the application.
Action
This is the sell action in the Products / Actions / ag2 (Form) action group:
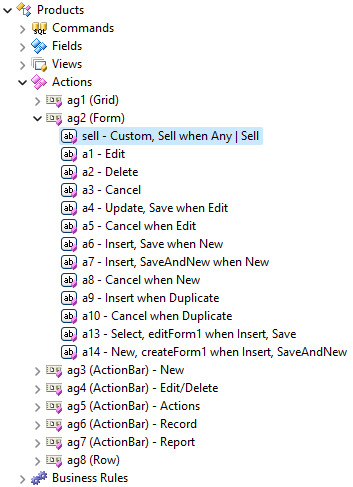 Action "sell" has the non-standard ID, which makes it available in the RESTful API hypermedia. It triggers the "Custom" command with the "Sell" argument. Actions placed in the group with the "Form" scope are rendered as buttons.
The action is rendered as the Sell button in the editForm1 view when a product is selected.
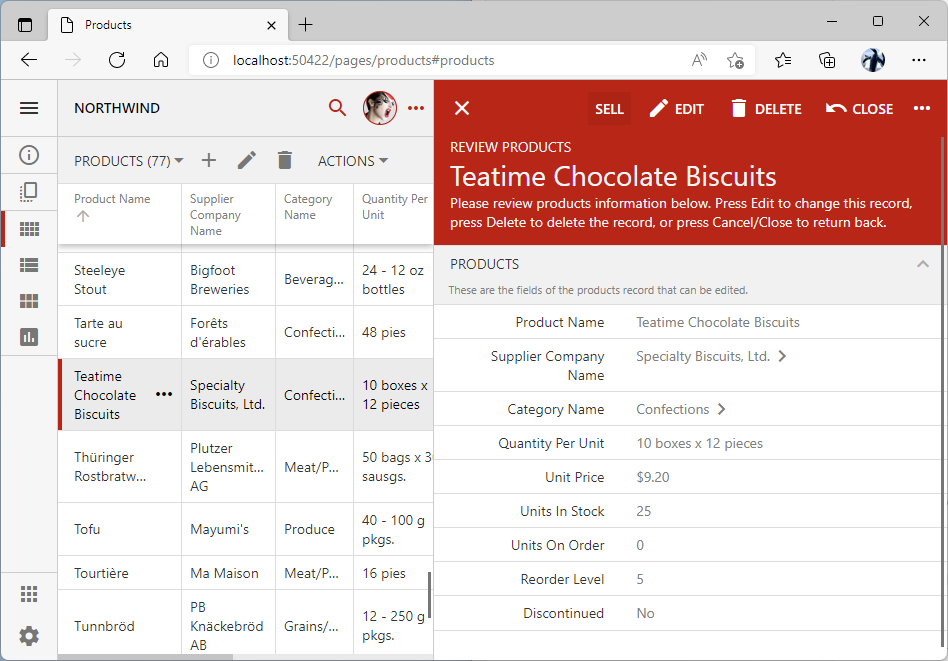 Action "sell" is presented in the "editForm1" as the "Sell" button when a product is selected or edited. The reading pane renders its buttons at the top, while the modal forms will display the buttons at the bottom.
Instructions to configure the action:
- Expand the Products / Actions / ag2 (Form) node, right-click, and choose the New Action option.
- Set the Command Name to Custom, enter Sell in the Command Argument, and enter Sell in the Header Text field.
- Set its When Last Command Name to Any. This will make the action visible regardless of what command was executed last by the state machine of Touch UI.
- Set When Key Selected to Yes. This will make action available only when a data item is selected. The action will be included in the hypermedia of the singleton resources only.
- Enter _controller=SellPrompt in the Confirmation property. This will force the framework to create an instance of the specified data controller, which will display its first view to the user. Note that If there is no _controller instruction, then the entire text of Confirmation is displayed in the standard OK / Cancel prompt. RESTful API engine will use the specified confirmation controller to validate the action arguments.
- Press OK to save the new action.
- Right-click the Products / Actions / ag2 (Form) / a100 action node and choose Rename. Type in sell and press Enter to rename the node. Actions are included in the hypermedia of the corresponding resource if their identifiers do not start with the letter “a” followed by a number.
- Drag the action node in front of the a1 to ensure that it is rendered in the first position of its scope.
Multiple actions can trigger the same command. Scope determines the Touch UI element that will trigger the action. Actions may render as form buttons, context menu options, action bar items, etc.
Confirmation Data Controller
This is the confirmation data controller SellPrompt.
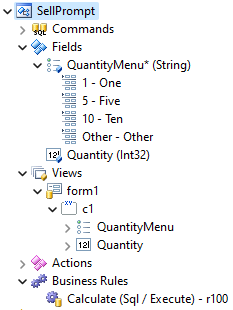 The data controller without a command can be used as the action confirmation controller. It has a virtual empty row that serves as the source of data for the fields. The first controller view is displayed with the "New" command by default.
The form1 view of the controller is displayed when the Sell button is clicked in the product form or when the Sell option is selected in its “more” menu. Users choose the number of units to sell from the radio button list. The Enter Quantity field is displayed if the Other radio button is selected.
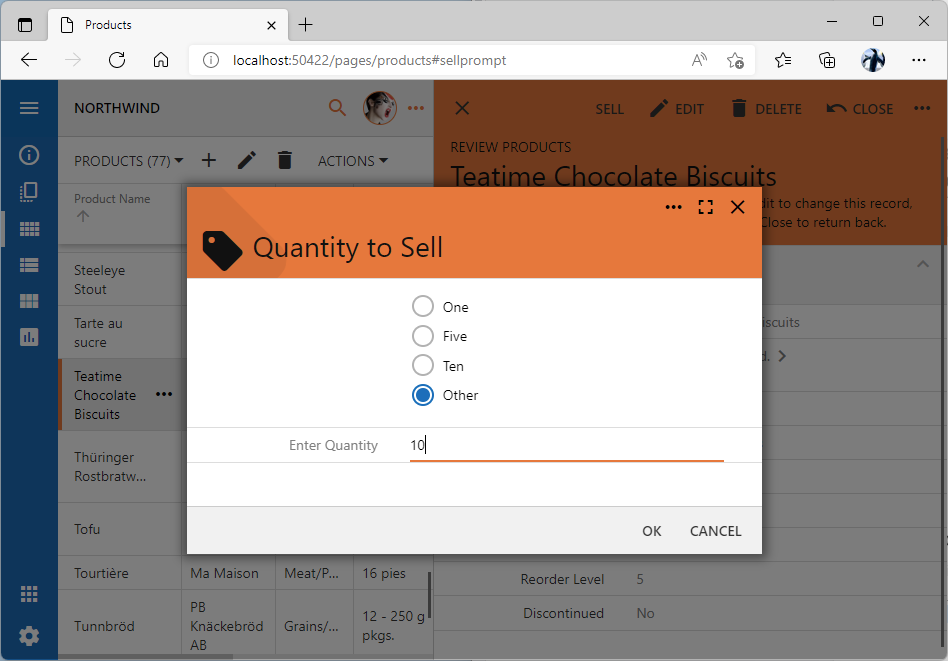 The "SellPrompt" controller presents a view with the fields "QuantityMenu" and "Quantity" . The first field is always visible. The second field is visible only when the "Other" radio button is selected.
Instructions to configure the confirmation data controller:
- Click the New Controller button on the toolbar of the Project Explorer.
- Enter SellPrompt in the Name field and save the controller.
- Expand the new controller node and right-click on its fields node.
- Choose the New Field option.
-
- Enter QuantityMenu in the Name field.
- Clear the Allow null values field.
- Select the Causes Calculate checkbox. The Calculate command will trigger when users change the field value.
- Set its Items Style to Radio Button List.
- Press OK to save the new field.
- Right-click the new field and select New Value/Text Item option.
-
- Enter 1 in the Value field.
- Enter One in the Text field.
- Save the new item.
- Add three more static items:
-
- Value =5, Text = Five
- Value = 10, Text = Ten
- Value = Other, Text = Other
- Right-click the SellPrompt / Fields node and choose the New Field option.
-
- Enter Quantity in the Name field.
- Set Type to Int32.
- Clear the Allow null values field.
- Press OK to save the new field.
- Right-click the SellPrompt / Views node and choose the New View option.
-
- Enter form1 in the Name field.
- Set Type to Form.
- Enter the following tag names separated by space in the Tags field:
-
- Tag modal-always will make the view to always appear as a modal popup.
- Tag modal-fit-content will force the view to adjust its height to fit the contents.
- Tag modal-max-xs will not let the view width to be wider than the extra-small.
- Tag modal-auto-grow will make the view grow its content when the previously hidden fields become visible.
- Tag material-icon-sell will display the “sell” material icon in the view header.
- Enter Quantity to Sell in the Label field.
- Press OK to save the new view.
- Ctrl-click the SellPrompt / Fields / QuantityMenu and SellPrompt / Fields / Quantity field nodes.
- Drag the selected fields onto the SellPrompt / Views / form1 view node.
- Double-click the SellPrompt / Views / form1 / QuantityMenu data field.
-
- Enter lookup-auto-advance tag name in the Tags field. The focus will shift from the tagged data field to the next input when its value is changed. The QuantityMenu data field is the only visible field in the form until its value is set to Other option. The selection of the Other option will reveal the Quantity field. The focus will automatically advance from the QuantityMenu static lookup to Quantity.
- Enter $blank in the Header Text field. The data field will have no label when rendered.
- Save the changes.
- Double-click the SellPrompt / Views / form1 / Quantity field.
-
- Enter $row.QuantityMenu == 'Other' in the Visible When field. This JavaScript expression is evaluated whenever the field values are changed. The variable $row represents the object with the properties set to values entered in the form inputs.
- Save the changes.
- Right-click the SellPrompt / Business Rules node and choose the New Business Rule option.
-
- Set Type to SQL.
- Enter Calculate in the Command Name field.
- Set Phase to Execute.
- Paste the text of the SQL business rule shown below into the Script field.
- Save the new business rule.
This is the script of the SellPrompt / Business Rules / r100 rule:
SQL
1234if @QuantityMenu != 'Other'
    set @Quantity = @QuantityMenu
else
    set @Quantity = null
The business rule will copy the value of the QuantityMenu field to the Quantity if the value of the former is not equal to the Other constant. Otherwise the Quantity value is cleared. The business rule will execute during the roundtrip initiated by Touch UI when the radio button option is selected in the menu. The Quantity field value is returned from the server to the client and copied into the corresponding input control. Field values entered in the form are referenced as parameters in the anonymous SQL script of the business rule. The script is written in the programming language of the database engine. Transact-SQL is the language of Microsoft SQL Server.
Developers familiar with the client-side programming can avoid the server round trip with the business rule of the JavaScript type. The final call of the preventDefault method in the script is telling Touch UI to stop the default execution flow.
JavaScript
12345if ($row.QuantityMenu !== 'Other')
    $row.Quantity = $row.QuantityMenu;
else
    $row.Quantity = null;
this.preventDefault();
Data controllers are the building blocks of applications created with Code On Time. The instance of a controller with a command will present a view with the data fetched after its execution. The controller without a command presents a view of an empty row in the “New” mode.
Business Rule
The SQL business rule Products / Business Rules / r100 executes on the server when the OK button is pressed in the Quantity to Sell confirmation. The execution context of the rule is the editForm1 view of the Products data controller.
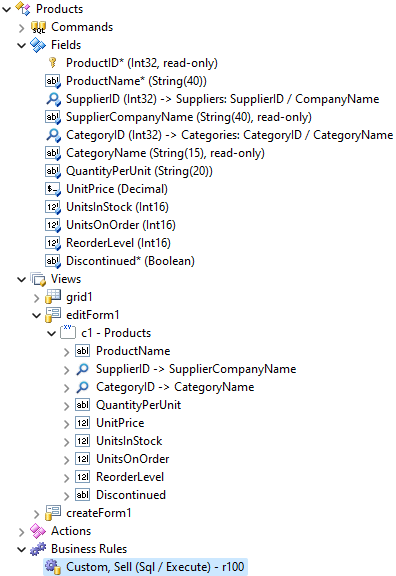 Business rules of a data controller execute in the order of their declaration when their "Command", "Argument", and "View" are matched to an action. JavaScript rules execute on the client. SQL, Code, and Email rules execute on the server.
This is the life-cycle of the sell action, SellPrompt confirmation controller, and Products / Business Rules / r100 rule:
- The action execution flow starts with the confirmation displayed to collect the parameters in the SellPrompt.
- User enters the quantity to sell and confirms the prompt.
- The focus returns to the product form.
- The framework executes the client-side business rules first and passes the action to the server-side code if the default execution flow has not been prevented on the client.
- The server-side framework searches for the rules to execute the sell action. The definition of the business rule r100 matches the command name and argument of the action. The rule is invoked by the framework.
- The rule manipulates the action prompt values via the parameters with the @Parameters_ prefix.
- The server-side framework returns the result of action processing to the client.
- If an error has been raised or a client-side script has been emitted by the server-side code, then the default user interface flow stops - the active form remains visible, the error is displayed, and the emitted JavaScript is executed.
- Touch UI navigates the user back to the previous view if there are no errors to display or scripts to execute.
The r100 rule implementation retrieves the UnitsInStock column value from the Products table. If the value of the @Parameters_Quantity is less than the number of available units, then the quantity of available units is reduced. Otherwise the error message is returned.
SQL
123456789101112-- figure the stock in the database
declare @InStock int
select @InStock = UnitsInStock from Products where ProductID = @ProductID
-- decrease the stock if available
if (@InStock >= @Parameters_Quantity)
    update Products
    set UnitsInStock = UnitsInStock- @Parameters_Quantity
    where ProductID = @ProductID
else
    set @Result_Error =
        'Not enough quantity in stock to sell ' +
        cast(@Parameters_Quantity as varchar) + ' units!'
This is the example of the error message when an attempt to sell too many units is detected. The product form remains open.
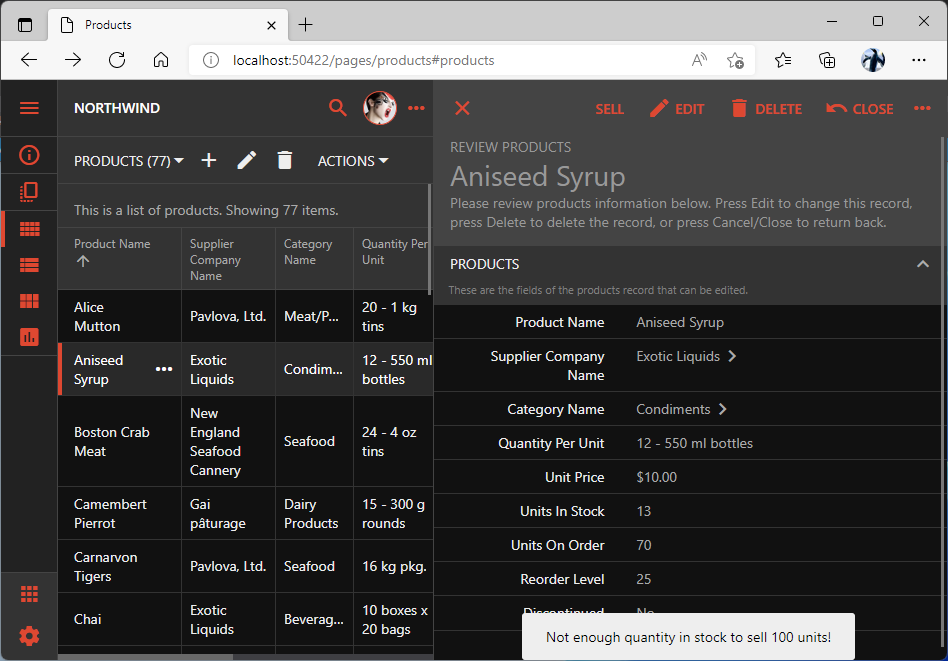 Errors raised by business rules are presented as notifications above the active view. The reading pane in the screenshot shows the "editForm1" view. The form has been active when the "Sell" action was initiated.
Instructions to configure the business rule:
- Right click the Products / Business Rules node and choose the New Business Rule option.
- Set Type to SQL.
- Enter Custom in the Command Name field.
- Enter Sell in the Command Argument field.
- Set Phase to Execute.
- Paste the text of the SQL business rule shown above into the Script field.
- Save the new business rule.
Business rules are triggered when their command and argument are matched with the custom or built-in action. The rules can be written in JavaScript, SQL, and Code (C# or VB).
Trying it Out
Generate the customized app and try out the sell action in the user interface. The value of the Units In Stock field of the sold product must be reduced after each sale. An error will be raised whenever an attempt to sell too many units is made.
Note that the action, the prompt, and the business rule will operate on the Products page and on the Suppliers page. The former provides direct access to products. The latter requires selecting a product associated with a supplier.
The sell action is also available in the hypermedia of the RESTful API. Touch UI Frontend and RESTful API Engine are providing an interpretation of the data controllers for their respective audiences.
Custom Actions in Singletons
The audience of the RESTful API Engine is represented by the client applications and software developers. The hypermedia is their primary interface.
The hypermedia control of the sell action can be found in the resource singletons of products. Take a look at the following singleton resource sample. The href property of the control is set to /v2/products/19/sell and the method property is set to POST. The number 19 in href is the primary key of the product.
JSON
123456789101112131415161718192021222324252627282930313233343536373839404142434445464748495051525354555657585960616263{
    "_links": {
        "self": {
            "href": "/v2/products/19"
        },
        "up": {
            "href": "/v2/products"
        },
        "collection": {
            "href": "/v2/products?count=true"
        },
        "first": {
            "href": "/v2/products?page=0&limit=5"
        },
        "supplierId": {
            "href": "/v2/products/19/supplier-id",
            "embeddable": true
        },
        "lookup-supplierId": {
            "href": "/v2/suppliers?count=true&fields=supplierId,companyName",
            "embeddable": true
        },
        "categoryId": {
            "href": "/v2/products/19/category-id",
            "embeddable": true
        },
        "lookup-categoryId": {
            "href": "/v2/categories?count=true&fields=categoryId,categoryName",
            "embeddable": true
        },
        "edit": {
            "href": "/v2/products/19",
            "method": "PATCH"
        },
        "replace": {
            "href": "/v2/products/19",
            "method": "PUT"
        },
        "delete": {
            "href": "/v2/products/19",
            "method": "DELETE"
        },
        "sell": {
            "href": "/v2/products/19/sell",
            "method": "POST"
        },
        "schema": {
            "href": "/v2/products/19?_schema=true"
        }
    },
    "productId": 19,
    "productName": "Teatime Chocolate Biscuits",
    "supplierId": 8,
    "supplierCompanyName": "Specialty Biscuits, Ltd.",
    "categoryId": 3,
    "categoryName": "Confections",
    "quantityPerUnit": "10 boxes x 12 pieces",
    "unitPrice": 9.2000,
    "unitsInStock": 19,
    "unitsOnOrder": 0,
    "reorderLevel": 5,
    "discontinued": false
}
Use Postman to execute an authenticated POST request without a body to the URL specified by the sell hypermedia control. The response will include the error message and the resource schema. The error is reported since the required parameters are missing. The schema explains the expected request input and response output.
JSON
123456789101112131415161718192021222324252627282930313233343536373839404142434445464748495051525354555657585960616263646566676869707172737475767778798081828384858687888990919293949596979899100101{
    "error": {
        "errors": [
            {
                "id": "77102da4-3bfb-480c-8168-2c143f7682b4",
                "reason": "invalid_argument",
                "message": "Field 'parameters' is expected in the body."
            }
        ],
        "code": 400,
        "message": "Bad Request"
    },
    "_schema": {
        "_input": {
            "_schema": {
                "parameters": {
                    "required": true,
                    "_schema": {
                        "quantityMenu": {
                            "type": "String",
                            "required": true,
                            "label": "$blank"
                        },
                        "quantity": {
                            "type": "Int32",
                            "required": true,
                            "label": "Enter Quantity"
                        }
                    }
                },
                "*": true
            }
        },
        "productId": {
            "type": "Int32",
            "required": true,
            "key": true,
            "readOnly": true,
            "label": "Product ID"
        },
        "productName": {
            "type": "String",
            "length": 40,
            "required": true,
            "label": "Product Name"
        },
        "supplierId": {
            "type": "Int32",
            "lookup": true,
            "label": "Supplier ID"
        },
        "supplierCompanyName": {
            "type": "String",
            "length": 40,
            "readOnly": true,
            "label": "Supplier Company Name"
        },
        "categoryId": {
            "type": "Int32",
            "lookup": true,
            "label": "Category ID"
        },
        "categoryName": {
            "type": "String",
            "length": 15,
            "readOnly": true,
            "label": "Category Name"
        },
        "quantityPerUnit": {
            "type": "String",
            "length": 20,
            "label": "Quantity Per Unit"
        },
        "unitPrice": {
            "type": "Decimal",
            "default": "((0))",
            "label": "Unit Price"
        },
        "unitsInStock": {
            "type": "Int16",
            "default": "((0))",
            "label": "Units In Stock"
        },
        "unitsOnOrder": {
            "type": "Int16",
            "default": "((0))",
            "label": "Units On Order"
        },
        "reorderLevel": {
            "type": "Int16",
            "default": "((0))",
            "label": "Reorder Level"
        },
        "discontinued": {
            "type": "Boolean",
            "default": "((0))",
            "required": true,
            "label": "Discontinued"
        }
    }
}
If the action has a confirmation, then the parameters field is expected. The _schema.input._schema key makes the engine expect the required parameters field in the request body with the quantityMenu and quantity fields designated inside. These are the fields of the SellPrompt action confirmation controller. The _schema.input._schema.* key is set to true to signify that the body of the request may also include any field of the resource.
The body of the custom action request can include any number of fields of the resource described in the _schema key. For example, the body may include the productName, reorderLevel, and unitsInStock fields. The engine automatically fetchs the singleton resource and treats the field values of the request as the “new” field values when the processing of the action begins. The implementation of a custom action can interpret the “old” and “new” values of the resource fields as needed. There is no default processing.
This the valid request body according to the schema:
JSON
123456{
    "parameters": {
        "quantityMenu": "any text",
        "quantity": 1
    }
}
Post this payload to the URL of the sell action. Repeat the request a few times and observe that the quantityInStock field of the resource is reduced by 1 in each instance.
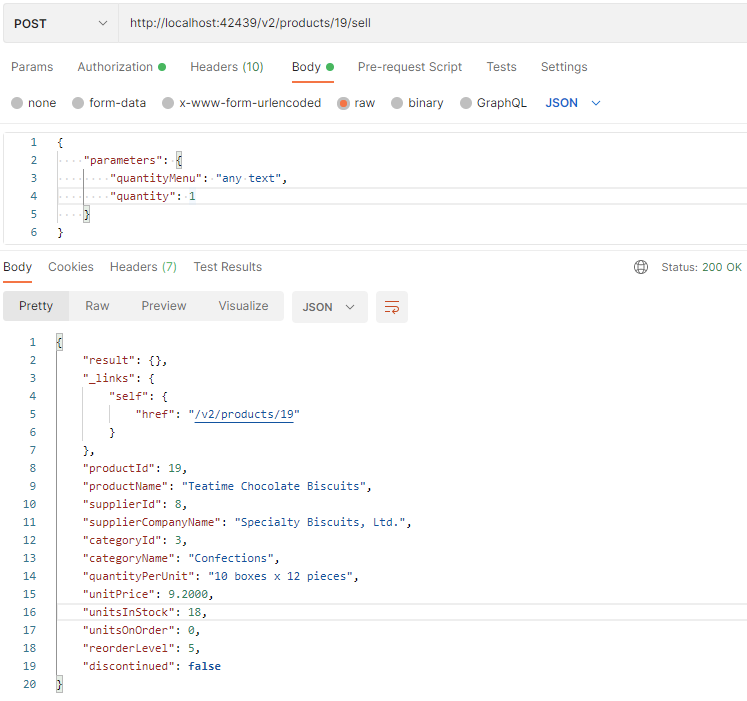 Custom action of a singleton may have the payload with custom "parameters" along with the optional resource fields. Parameters are automatically derived from the action confirmation controller. The optional resource fields in the request body are the "new" values of the singleton fields.
The utility field QuantityMenu has been introduced to the SellPrompt controller with the sole purpose of speeding up the input of the Quantity field. The Products / Business Rules / r100 rule is making use of the @Parameters_Quantity parameter only and ignores the QuantityMenu field.
The field parameters.quantityMenu is clearly redundant in the body of the request. How do we remove the unused quantityMenu field from the RESTful API while retaining its function in Touch UI?
The rest-api-none tag can be applied to views and data fields to make them invisible in the RESTful API.
Select the backend application project on the start page in Code On Time app builder. Choose Design, and activate the Controllers tab. Select the SellPrompt / Views / form1 / c1 / quantityMenu data field node. Add rest-api-none tag to the Tags and save changes. Generate the application.
Try the POST request to the sell action URL. The engine will let you know that the quantityMenu is not expected anymore
JSON
12345678910111213{
    "error": {
        "errors": [
            {
                "id": "0076be9b-f66a-4c31-a19e-f58ead30cded",
                "reason": "invalid_argument",
                "message": "Unexpected field 'parameters.quantityMenu' is specified in the body."
            }
        ],
        "code": 400,
        "message": "Bad Request"
    }
}
Remove the field quantityMenu from the parameters in the request body. The sell action will execute without errors. The field will also disappear from the sell resource schema.
Custom Actions in Collections
The custom action discussed above is available in the hypemedia of the singleton resources only, since its When Key Selected property is set to Yes. Actions that do not require a selection of an item will be available in the collection resources.
Follow the instructions to configure another custom action:
- Right-click the Products / Actions / ag3 (ActionBar) - New action group and choose the New Action context menu option.
- Set the Command Name to Custom.
- Enter DoSomething in the Command Argument.
- Enter Do Something in the Header Text.
- Set When Key Selected to No.
- Enter material-icon-archive in the Icon / Custom Style.
- Save the action.
- Right-click the new action node, choose Rename, and change the rule ID to doSomething.
Here is how the action is presented in Touch UI after the app has been generated. The action is visible in the action bar and in the system context menu whether or not a product is selected. Nothing happens when the action executes, since there are no business rules to handle the action.
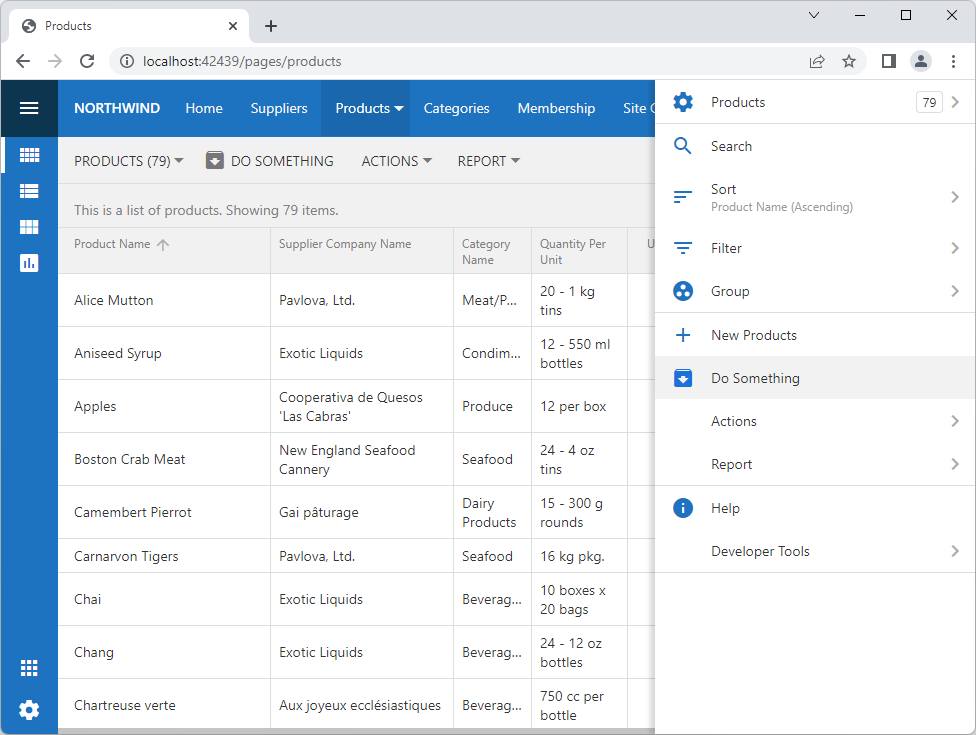 System context menu slides out on the right side of the screen when the "More" button is pressed in Touch UI apps. All actions available to the user in the given context are listed in the menu. Action "Do Something" can be activated from the context menu or the page toolbar.
The interface of apps and developers has also changed. The hypermedia of the products collection resource contains the do-something hypermedia control.
JSON
12345678910111213141516171819202122232425262728293031{
    "_links": {
        "self": {
            "href": "/v2/products"
        },
        "first": {
            "href": "/v2/products?page=0&limit=5"
        },
        "lookup-supplierId": {
            "href": "/v2/suppliers?count=true&fields=supplierId,companyName",
            "embeddable": true
        },
        "lookup-categoryId": {
            "href": "/v2/categories?count=true&fields=categoryId,categoryName",
            "embeddable": true
        },
        "create": {
            "href": "/v2/products",
            "method": "POST"
        },
        "do-something": {
            "href": "/v2/products/do-something",
            "method": "POST"
        },
        "schema": {
            "href": "/v2/products?_schema=true"
        }
    },
    "collection": [
    ]
}
The action is not advertised in the hypermedia of the singleton resources.
Actions with the unspecified value in the When Key Selected property are available in the hypermedia of both singletons and collections.
Try posting to the URI of the do-something hypermedia control. The response will have the collection hypermedia links and nothing else.
JSON
12345678910111213{
    "_links": {
        "up": {
            "href": "/v2/products?count=true"
        },
        "collection": {
            "href": "/v2/products?count=true"
        },
        "first": {
            "href": "/v2/products?page=0&limit=5"
        }
    }
}
If the x-restful-schema request header is set to only, then the schema will be included in the response. The framework will not attempt to execute the action.
JSON
1234567891011121314151617181920212223242526272829303132333435363738394041424344454647484950515253545556575859606162636465666768697071727374757677787980818283848586878889909192939495969798{
    "_schema": {
        "_input": {
            "_schema": {
                "parameters": {
                    "_schema": {}
                },
                "collection": {
                    "array": true,
                    "_schema": {
                        "productId": {
                            "type": "Int32",
                            "required": true
                        }
                    }
                },
                "*": true
            }
        },
        "productId": {
            "type": "Int32",
            "required": true,
            "key": true,
            "readOnly": true,
            "label": "Product ID"
        },
        "productName": {
            "type": "String",
            "length": 40,
            "required": true,
            "label": "Product Name"
        },
        "supplierId": {
            "type": "Int32",
            "lookup": true,
            "label": "Supplier ID"
        },
        "supplierCompanyName": {
            "type": "String",
            "length": 40,
            "readOnly": true,
            "label": "Supplier Company Name"
        },
        "categoryId": {
            "type": "Int32",
            "lookup": true,
            "label": "Category ID"
        },
        "categoryName": {
            "type": "String",
            "length": 15,
            "readOnly": true,
            "label": "Category Name"
        },
        "quantityPerUnit": {
            "type": "String",
            "length": 20,
            "label": "Quantity Per Unit"
        },
        "unitPrice": {
            "type": "Decimal",
            "default": "((0))",
            "label": "Unit Price"
        },
        "unitsInStock": {
            "type": "Int16",
            "default": "((0))",
            "label": "Units In Stock"
        },
        "unitsOnOrder": {
            "type": "Int16",
            "default": "((0))",
            "label": "Units On Order"
        },
        "reorderLevel": {
            "type": "Int16",
            "default": "((0))",
            "label": "Reorder Level"
        },
        "discontinued": {
            "type": "Boolean",
            "default": "((0))",
            "required": true,
            "label": "Discontinued"
        }
    },
    "_links": {
        "up": {
            "href": "/v2/products?count=true&_schema=only"
        },
        "collection": {
            "href": "/v2/products?count=true&_schema=only"
        },
        "first": {
            "href": "/v2/products?page=0&limit=5&_schema=only"
        }
    }
}
The schema of the collection custom action is similar to the schema of the singleton custom action. Optional parameters and field names of the resource may be defined in the request body. There is also the optional collection key that must be specified as an array of objects with the primary key field values. If the collection is not specified or empty, then the server-side framework will execute the matched business rules one time only. If the collection is specified, then the framework will execute the business rules once for each item.
The following SQL business rule will raise an error if the collection of primary keys is not specified. Otherwise it will increase the UnitPrice of each product in the collection by 1 cent.
SQL
123456if @ProductID is null
    set @Result_Error = 'A collection of product identifiers is expected.'
else
    update Products
      set UnitPrice = UnitPrice + 0.01
      where ProductID = @ProductID
Add the rule to the Products data controller in the Project Designer. Make sure that the Command Name is set to Custom, the Command Argument is set to DoSomething, and the Phase is set to Execute. Generate the application. Post the request without a body to the URI of the do-something action. The error message will be returned.
JSON
12345678910111213{
    "error": {
        "errors": [
            {
                "id": "3ac6f887-0953-4743-b6bc-9a09c0d84e85",
                "reason": "method_rejected",
                "message": "A collection of product identifiers is expected."
            }
        ],
        "code": 500,
        "message": "Internal Server Error"
    }
}
The same request with the following body will execute with no errors and change the UnitPrice of the products specified in the collection array.
JSON
12345678910111213{
  "collection": [
    {
      "productId": 1
    },
    {
      "productId": 17
    },
    {
      "productId": 35
    }
  ]
}
Reporting Actions
Actions may return binary data in the response. The server-side code of the application framework has the built-in processing for the Report command. It creates a dynamic RDLC report from the data controller definition and produces the output in Adobe PDF, Microsoft Word, Microsoft Excel, or TIFF format with the help of the Microsoft Report Viewer.
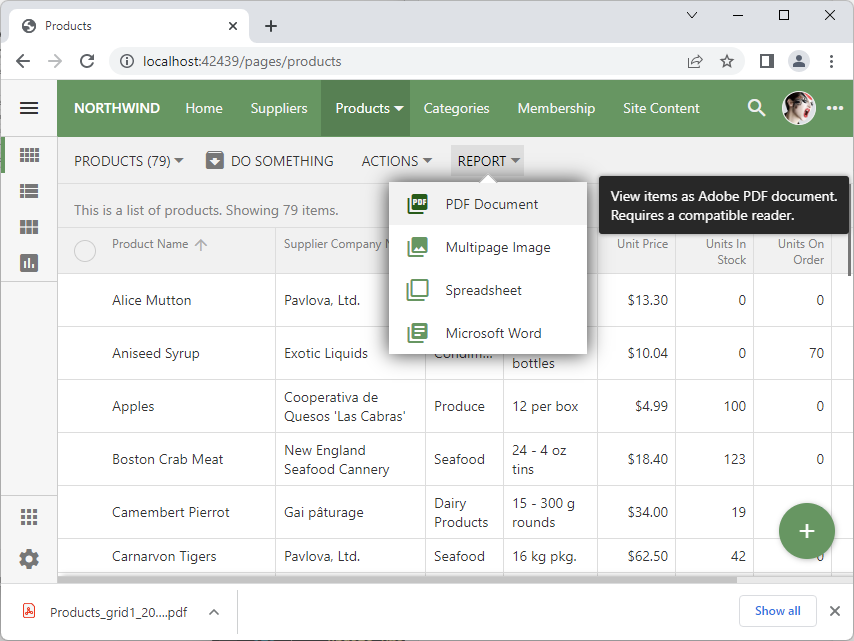 Touch UI fetches the output of "Report" actions and forces the browser to display the "Download" prompt. The native or installed viewers are required on the client to view the reports.
Developers have an option to create the custom reports in RDLC format for the specific data controller views. Custom “Code” business rules may override the default processing and return any type of binary data in the response to the Report action. The third-party tools can be engaged to produce the output.
RESTful API engine will advertise an action with the Report command name and the non-standard identifier in the resource hypermedia. Reporting actions are configured with no value in the When Key Selected property. This makes them available in the hypermedia of both collections and singletons.
Rename the Products / Actions / ag7 / a1 action node to report1 in the Project Designer.
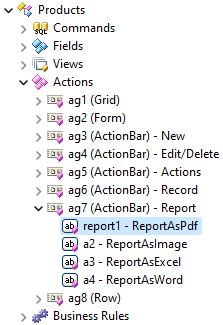
Generate the app and locate the report1 hypermedia control in the products collection.
JSON
12345678910111213141516171819202122232425262728293031323334{
    "_links": {
        "self": {
            "href": "/v2/products"
        },
        "first": {
            "href": "/v2/products?page=0&limit=5"
        },
        "lookup-supplierId": {
            "href": "/v2/suppliers?count=true&fields=supplierId,companyName",
            "embeddable": true
        },
        "lookup-categoryId": {
            "href": "/v2/categories?count=true&fields=categoryId,categoryName",
            "embeddable": true
        },
        "create": {
            "href": "/v2/products",
            "method": "POST"
        },
        "do-something": {
            "href": "/v2/products/do-something",
            "method": "POST"
        },
        "report1": {
            "href": "/v2/products/report1"
        },
        "schema": {
            "href": "/v2/products?_schema=true"
        }
    },
    "collection": [
    ]
}
Note that the HTTP method is not specified in the report1 control. Follow the link in Postman and execute an authenticated GET request. The request will fetch the four pages of the PDF document produced by the action.
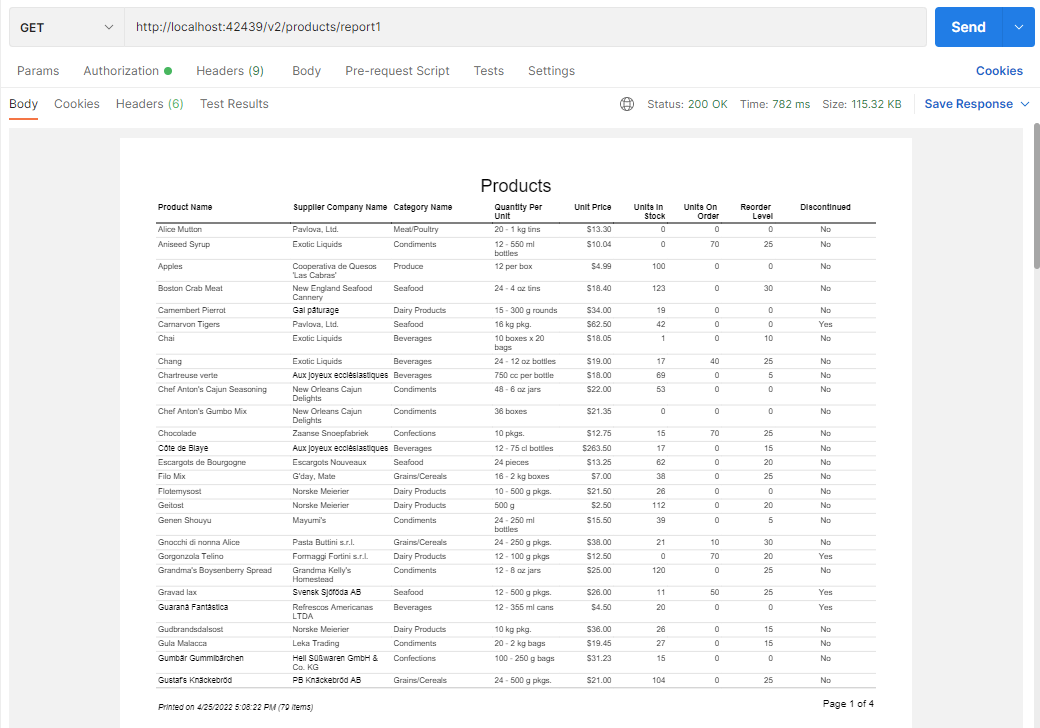 All items of a collection are included in the report output by default.
Set the filter parameter of the request to unitPrice > 50 expression. Set the sort parameter to UnitPrice desc value. Both parameters will appear in the URL. Execute the request. One page report of products priced over $50 and sorted in the descending order of the Unit Price will be returned.
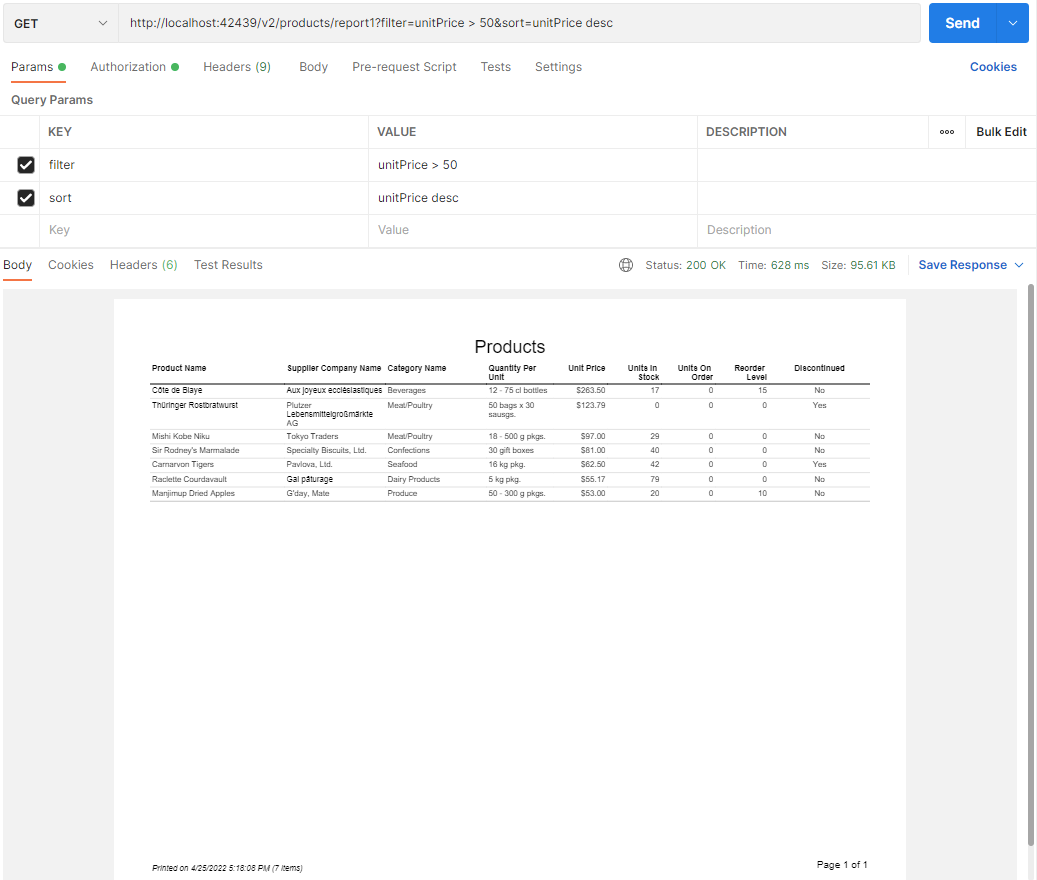 Parameters "filter" and "sort" specified in the URL will change the number of items and sort order in the report. If the "Report" action is executed with the POST method then the body of the request may include "parameters" and "collection" fields.
The same output will be produced if the request method is changed to POST. The reporting actions can be executed with either GET or POST method.
Reporting actions can have their own parameters and include only a specific set of collection items identified by their primary keys. Execute the request with the POST method to specify the parameters and collection fields in the request body.
Action Result
A custom action executed on a singleton will return the resource itself in the response. A custom action executed on a collection will return the hypermedia only. Developers may provide a custom action result for either resource type.
Returning Simple Values
Change the script of the SQL business rule responding to the Custom / DoSomething action in the Products controller as follows:
SQL
1234set @Result_ReturnValue = getdate()
set @UnitPrice = 9.99
set @UnitsInStock = 10
set @ReorderLevel = 5
The script manipulates the resource fields and the special Result_ReturnValue parameter. Execute the POST request to the URL of the do-something hypermedia control. The corresponding values will appear in the response.
JSON
12345678910111213141516171819{
    "_links": {
        "up": {
            "href": "/v2/products?count=true"
        },
        "collection": {
            "href": "/v2/products?count=true"
        },
        "first": {
            "href": "/v2/products?page=0&limit=5"
        }
    },
    "result": {
        "returnValue": "2022-04-25T18:59:00.0000000",
        "unitPrice": 9.9900000000,
        "unitsInStock": 10,
        "reorderLevel": 5
    }
}
Returning Result Set
If the resource field names and returnValue are not enough to present the action result, then consider producing a result set. The script must set the BusinessRules_EnableResultSet system parameter to 1. This will prepare the framework to expect a rowset to be in the output of the rule.
Change rule script of the do-something action like this:
SQL
12set @BusinessRules_EnableResultSet = 1
select count(*) CountOfShippers, getdate() 'Today' from shippers
The response will include the custom fields countOfShippers and today in the result key.
JSON
1234567891011121314151617{
    "_links": {
        "up": {
            "href": "/v2/products?count=true"
        },
        "collection": {
            "href": "/v2/products?count=true"
        },
        "first": {
            "href": "/v2/products?page=0&limit=5"
        }
    },
    "result": {
        "countOfShippers": 3,
        "today": "2022-04-25T19:17:29.5570000"
    }
}
Note that the SELECT statement in the rule does not have the FROM clause. Microsoft SQL Server creates a virtual rowset with a single row in this instance. If only one row is returned, then the fields will be embedded directly into the result key.
Change the SELECT statement in the script to select * from shippers. The result key will have the collection of items.
JSON
1234567891011121314151617181920212223242526272829303132{
    "_links": {
        "up": {
            "href": "/v2/products?count=true"
        },
        "collection": {
            "href": "/v2/products?count=true"
        },
        "first": {
            "href": "/v2/products?page=0&limit=5"
        }
    },
    "result": {
        "collection": [
            {
                "shipperId": 1,
                "companyName": "Speedy Express",
                "phone": "(503) 555-9831"
            },
            {
                "shipperId": 2,
                "companyName": "United Package",
                "phone": "(503) 555-3199"
            },
            {
                "shipperId": 3,
                "companyName": "Federal Shipping",
                "phone": "(503) 555-9931"
            }
        ]
    }
}
The column names in the rowset produced by the rule represent a subset of the collection resource field names, then the result is replaced with the collection key in the response body.
Enter the following as the script of the same business rule and generate the app.
SQL
123456set @BusinessRules_EnableResultSet = 1
select top 3
    ProductId,
    ProductName,
    UnitPrice
from Products
The response to the do-something action will have the collection key instead of the result. The missing fields of the collection resource are included explicitly with the null values.
JSON
123456789101112131415161718192021222324252627282930313233343536373839404142434445464748495051525354555657{
    "_links": {
        "up": {
            "href": "/v2/products?count=true"
        },
        "collection": {
            "href": "/v2/products?count=true"
        },
        "first": {
            "href": "/v2/products?page=0&limit=5"
        }
    },
    "collection": [
        {
            "productId": 1,
            "productName": "Chai",
            "unitPrice": 18.0500,
            "categoryId": null,
            "categoryName": null,
            "discontinued": null,
            "quantityPerUnit": null,
            "reorderLevel": null,
            "supplierCompanyName": null,
            "supplierId": null,
            "unitsInStock": null,
            "unitsOnOrder": null
        },
        {
            "productId": 2,
            "productName": "Chang",
            "unitPrice": 19.0000,
            "categoryId": null,
            "categoryName": null,
            "discontinued": null,
            "quantityPerUnit": null,
            "reorderLevel": null,
            "supplierCompanyName": null,
            "supplierId": null,
            "unitsInStock": null,
            "unitsOnOrder": null
        },
        {
            "productId": 3,
            "productName": "Aniseed Syrup",
            "unitPrice": 10.0400,
            "categoryId": null,
            "categoryName": null,
            "discontinued": null,
            "quantityPerUnit": null,
            "reorderLevel": null,
            "supplierCompanyName": null,
            "supplierId": null,
            "unitsInStock": null,
            "unitsOnOrder": null
        }
    ]
}
Invoking Custom Actions in Client Apps
The CRUD with Hypermedia tutorial explains how to build a plain JavaScript client for the RESTful API Engine of the backend application. It provides a perfect playground to demonstrate the custom actions sell and report1.
Extend the renderProductData function to add the Report button to the product list toolbar. The code snippet of the modified function shows the definition of the button with the yellow background. The button will be enabled if there is the report1 hypermedia in the product list data. The action is advertised in the hypermedia of the products collection resource.
JavaScript
12345678910111213141516171819202122232425262728293031323334function renderProductData() {
    var sb = [
        '<table border="1" cellpadding="5" cellspacing="0">',
        '<tr><th>Product</th><th>Category</th><th>Supplier</th><th>Unit Price</th><th>Units In Stock</th></tr>'];
    for (var i = 0; i < products.collection.length; i++) {
        var p = products.collection[i];
        sb.push('<tr data-index="', i, '">');
        sb.push('<td>', htmlEncode(p.productName), '</td>');
        sb.push('<td>', htmlEncode(p.categoryName), '</td>');
        sb.push('<td>', htmlEncode(p.supplierCompanyName), '</td>');
        sb.push('<td>', htmlEncode(p.unitPrice), '</td>');
        sb.push('<td>', htmlEncode(p.unitsInStock), '</td>');
        sb.push('</tr>')
    }
    sb.push('</table>');
    sb.push('<div class="toolbar">')
    var hypermedia = products._links;
    sb.push('<button data-hypermedia="new"', hypermedia.create ? '' : ' disabled="disabled"', '>New</button>');
    // *************************************************************************
    // The "Report" button with the yellow background
    sb.push('<button data-hypermedia="report" style="background-color:yellow"',
        hypermedia.report1 ? '' : ' disabled="disabled"', '>Report</button>');
    // *************************************************************************
    sb.push('<button data-hypermedia="self"', hypermedia.self ? '' : ' disabled="disabled"', '>Refresh</button>');
    sb.push('<button data-hypermedia="first"', hypermedia.first ? '' : ' disabled="disabled"', '>First</button>');
    sb.push('<button data-hypermedia="prev"', hypermedia.prev ? '' : ' disabled="disabled"', '>Prev</button>');
    sb.push('<button data-hypermedia="next"', hypermedia.next ? '' : ' disabled="disabled"', '>Next</button>');
    sb.push('<button data-hypermedia="last"', hypermedia.last ? '' : ' disabled="disabled"', '>Last</button>');
    var hypermediaArgs = urlArgs(products._links.self);
    sb.push('Page: ', parseInt(hypermediaArgs.page) + 1, ' of ', Math.ceil(products.count / hypermediaArgs.limit),
        ' (', + products.count + ' items)');
    sb.push('</div>');
    document.querySelector('#product-list').innerHTML = sb.join('');
}
The Report button appears right next to the New button in the pager toolbar. A browser prompt to save the PDF file of the report will appear when the button is clicked.
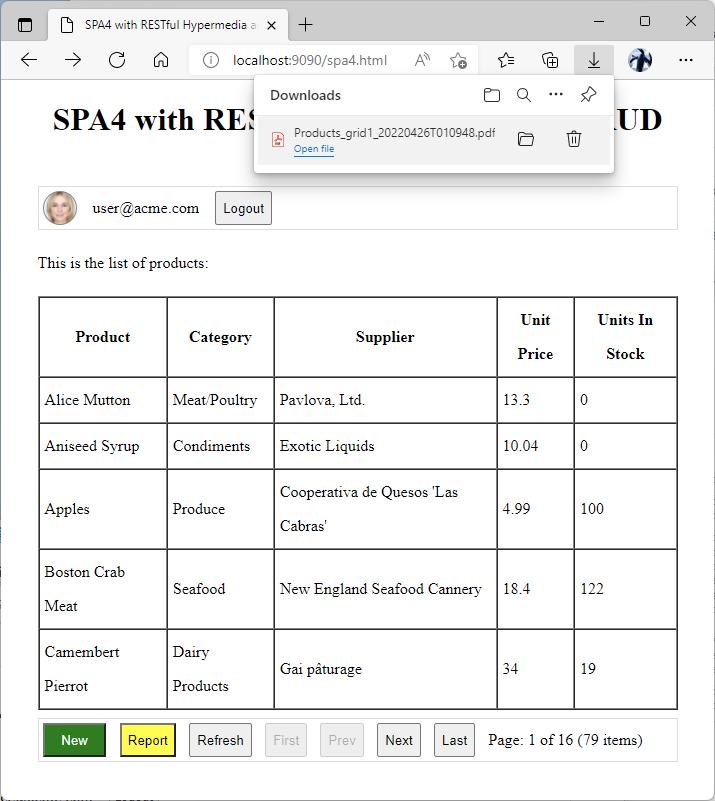 The system browser prompt is displayed when the "Report" button is clicked. Client apps can process the JSON, XML, and YAML responses from the server. The application engine can also stream out the binary data, such as PDF reports or images.
Change the readProduct function to add the Sell button to the Edit Product form. The button will appear next to the Update button if there is the sell hypermedia link in the obj instance of the fetched product.
JavaScript
12345678910111213141516171819function readProduct(selectedIndex) {
    $app.restful({
        url: products.collection[selectedIndex]._links.self
    }).then(obj => {
        showForm({
            title: 'Edit Product',
            from: obj,
            buttons: [
                { text: 'Update', hypermedia: 'edit' },
                { text: 'Sell', hypermedia: 'sell' }, // the "Sell" button definition
                { text: 'Delete', hypermedia: 'delete' }
            ]
        }).then(form => {
            form.fields.forEach(f => {
                form.elem.querySelector('[data-field="' + f.name + '"]').value = obj[f.name];
            });
        });
    })
}
The browser confirmation will appear when the button is clicked.
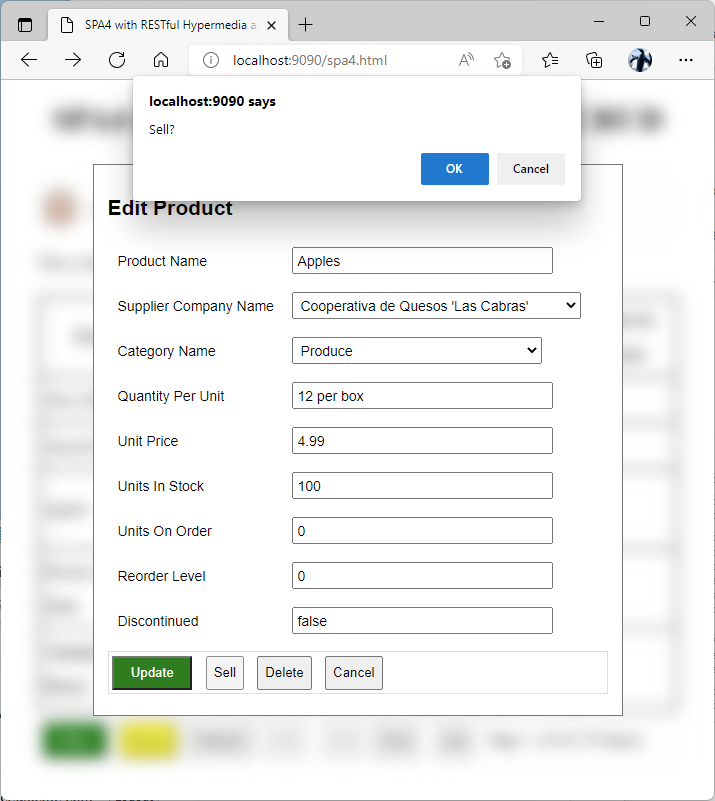 A click on the "Sell" button will execute a sale of one product unit. If the sale has failed, then the product form will remain visible and an alert with the error message will be displayed.
Finally, modify the handleHypermedia function to include the implementation of the sell and report actions.
JavaScript
12345678910111213141516171819202122232425262728293031323334353637383940414243444546474849505152535455565758596061function handleHypermedia(e) {
    var row = e.target.closest('[data-index]')
    if (row && products)
        readProduct(row.getAttribute("data-index"));
    else {
        var btn = e.target.closest('[data-hypermedia]');
        if (btn && products) {
            var hypermedia = btn.getAttribute('data-hypermedia');
            switch (hypermedia) {
                case 'sell':
                    // invoke custom action "sell"
                    if (confirm('Sell?'))
                        $app.restful({
                            url: showForm.sell,
                            body: {
                                "parameters": {
                                    "quantity": 1
                                }
                            }
                        })
                            .then(() => {
                                hideForm();
                                refreshProductList(products._links.self);
                            })
                            .catch(restfulException);
                    break;
                case 'report':
                    // invoke action "report1"
                    $app.restful({
                        url: products._links.report1,
                    }).then(blob => {
                        let dataUrl = URL.createObjectURL(blob);
                        let a = document.createElement('a');
                        a.setAttribute('download', blob.name);
                        a.setAttribute('href', dataUrl);
                        a.click();
                        URL.revokeObjectURL(dataUrl);
                    });
                    break;
                case 'new':
                    newProduct();
                    break;
                case 'create':
                    postProduct();
                    break;
                case 'edit':
                    patchProduct();
                    break;
                case 'delete':
                    deleteProduct();
                    break;
                case 'cancel':
                    hideForm();
                    break;
                default:
                    refreshProductList(products._links[hypermedia]);
                    break;
            }
        }
    }
}
The function will respond to the click on the Sell button by invoking the $app.restful method with the url argument set to the hypermedia control of the sell action. The control is the property of the showForm function used to display the selected product item. The body argument specifies the custom action parameters with the quantity of 1. The implementation will “sell” a single product unit only. The form is closed if the product was sold successfully and the current page of the product list is refreshed.
The function will respond to the click on the Report button by invoking the $app.restful method with the url argument set to the report1 hypermedia control found in the product list data. If the response content type is not JSON, XML, or Yaml, then the $app.restful method will convert the response data into a Blob object. The then chain function expects the binary content and creates an Object URL from the blob in the argument. The URL is assigned to a dynamically created link element. The link is clicked programmatically to cause the Save File prompt of the browser to appear.
Next
Once in a while the client apps will need to submit the binary data to the backend application or have it fetched and presented to users. Multiple fields of the Binary Large Object type may be a part of a resource. Learn how to specify the BLOBs as parameters of the $app.restful method and in the raw HTTP requests.
This tutorial is part of the RESTful Workshop designed to empower individual developers and teams to create amazing enterprise-quality backends for mobile and web applications. Zero experience and no code is required to provide your data with the REST API conforming to the Level 3 of Richardson Maturity Model with the built-in OAuth 2.0 and Open ID Connect.