Touch UI provides the following view of the Categories in the backend application. The Picture field contents can be downloaded, replaced, or deleted by users. The sketch pad allows making visual annotations on the image.
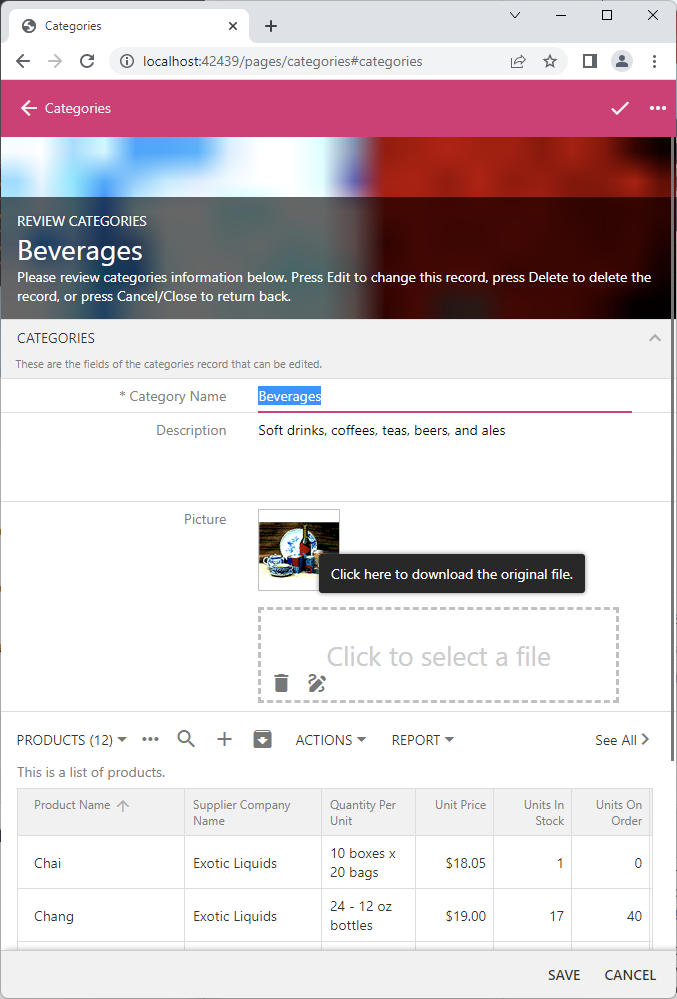 Images can be downloaded, replaced, or deleted. The BLOB input of Touch UI allows making the visual annotations on the image. The BLOB data is physically stored in the database or external storage.
Every row in the Categories table contains a Binary Large Object (BLOB) in the Picture column. The data type of the column is image. Modern database engines allow storing the binary data of variable length directly in the tables. Applications created with Code On Time work with the BLOBs stored in the database or external storage, such as a folder of the file system or a container in Microsoft Azure.
The JSON data presented below is the categories singleton resource returned by the backend. There are five fields and lots of hypermedia. The picture field and products field have the API links as their values. The former corresponds to the physical column Categories.Picture. The latter is the products field defined in the Categories model.
RESTful API allows fetching the BLOB values, passing BLOBs in the CRUD requests, and replacing or deleting the BLOBs in the singleton resource fields.
JSON
12345678910111213141516171819202122232425262728293031323334353637383940414243444546474849505152{
    "categoryId": 1,
    "categoryName": "Beverages",
    "description": "Soft drinks, coffees, teas, beers, and ales",
    "picture": "/v2/categories/1/picture",
    "products": "/v2/categories/1/products",
    "_links": {
        "self": {
            "href": "/v2/categories/1"
        },
        "up": {
            "href": "/v2/categories"
        },
        "collection": {
            "href": "/v2/categories?count=true"
        },
        "first": {
            "href": "/v2/categories?page=0&limit=10"
        },
        "products": {
            "href": "/v2/categories/1/products?count=true",
            "embeddable": true
        },
        "products-first": {
            "href": "/v2/categories/1/products?page=0&limit=10",
            "embeddable": true
        },
        "edit": {
            "href": "/v2/categories/1",
            "method": "PATCH"
        },
        "replace": {
            "href": "/v2/categories/1",
            "method": "PUT"
        },
        "replace-picture": {
            "href": "/v2/categories/1/picture",
            "method": "PUT"
        },
        "delete-picture": {
            "href": "/v2/categories/1/picture",
            "method": "DELETE"
        },
        "delete": {
            "href": "/v2/categories/1",
            "method": "DELETE"
        },
        "schema": {
            "href": "/v2/categories/1?_schema=true"
        }
    }
}
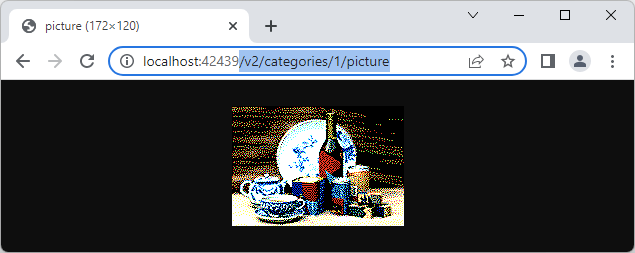
Fetching BLOBs
The BLOB can be fetched if the value of the singleton resource field is not equal to null. The link in the value identifies the resource followed by the name of the field. The original file name of the BLOB may follow the field name in the resource URL with certain configurations of the resource data controller.
Links in Values
The BLOB link in the sample data shown above consists of the /v2/categories/1 singleton resource URL and the picture field name concatenated together. An attempt to load the blob in the incognito or private browser mode will force the backend application to return the error. An authorization key or access token is required to read the resources known to the RESTful API.
 RESTful API must be enabled explicitly in the application configuration. An authorization key or access token is required to access a resource.
Navigate to the backend application in the new browser window, sign in, and enter the same URL in the address bar. The image will be loaded successfully . Touch UI application creates an encrypted cookie to track the user identity. The BLOB request will be authenticated since the cookie is sent by the browser with each request.
 RESTful API Engine identifies the user automatically when the host application is making a request. The cookie with the self-encrypted user access token provides the identity information.
Standalone single page applications and other HTTP clients will have to specify an authorization key or access token explicitly. Here is the blob fetched by Postman with the authorization key specified in the URL.
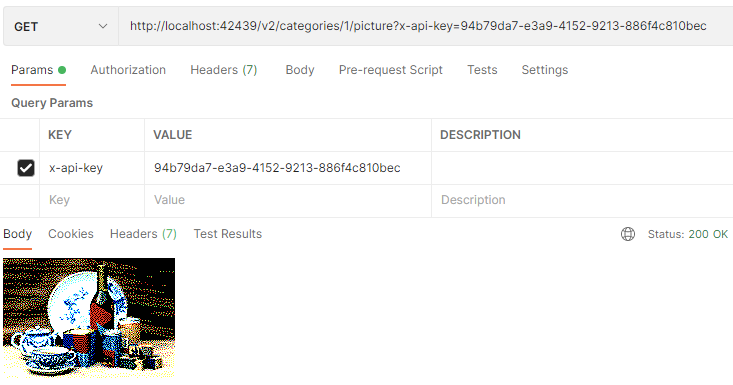 Postman shows the BLOB fetched from the resource with the authorization key specified in the "x-api-key" query parameter. RESTful API Engine requires an access token or authorization key to be specified explicitly by the external applications.
Most client applications will not be able to secure an authorization key or set up a cookie with the user identity. JavaScript client apps can establish a secure communication channel with the backend by taking advantage of the restful.js script. It is being used extensively in the standalone single page apps of the workshop.
Here is the customized SPA4 with RESTful Hypermedia and CRUD client app that fetches the images from the backend application in a secure fashion. An image appears in the Category cell when clicked by users.
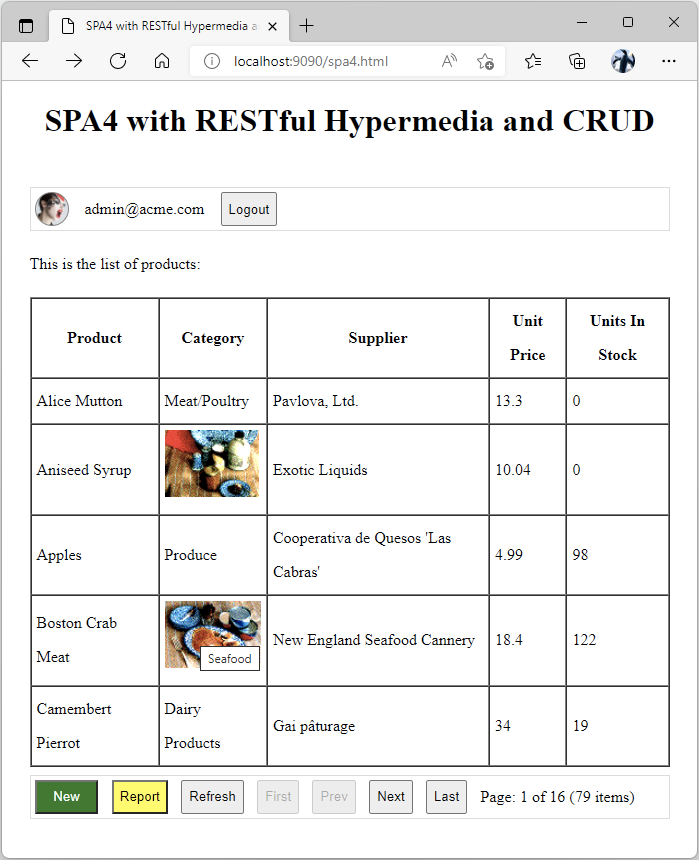 The standalone single page application fetches the image of the product category on-demand when the category name is clicked. The app follows the hypermedia links to find the product category "picture" field value.
The BLOB resource URL cannot be assigned to the src attribute of the image and must be fetched from the backend with the access token specified in the request header.
This is the modified version of the handleHypermedia function that does the image retrieval and assignment.
JavaScript
12345678910111213141516171819202122232425262728293031323334353637383940414243444546474849505152535455565758function handleHypermedia(e) {
    var row = e.target.closest('[data-index]')
    if (row && products) {
        let tableCell = e.target.closest('td');
        if (tableCell.previousSibling != null && tableCell.previousSibling.previousSibling == null) {
            // the cell in the "Category" column was clicked
            $app.restful({
                url: products.collection[row.getAttribute("data-index")]._links.self,
                hypermedia: 'categoryId >>'
            }).then(obj => {
                $app.restful({
                    url: obj.picture
                }).then(blob => {
                    // create an object URL
                    let dataUrl = URL.createObjectURL(blob);
                    // create an image element and replace the cell content with it
                    let img = document.createElement('img');
                    img.src = dataUrl;            // set the image src
                    img.title = obj.categoryName; // set the image tooltip
                    img.style.maxWidth =          // set the maximum image width
                        tableCell.getBoundingClientRect().width - 12 + 'px';
                    // clear the cell content
                    tableCell.innerHTML = '';
                    // insert image in the cell
                    tableCell.appendChild(img);
                });
            });
        }
        else
            readProduct(row.getAttribute("data-index"));
    }
    else {
        var btn = e.target.closest('[data-hypermedia]');
        if (btn && products) {
            var hypermedia = btn.getAttribute('data-hypermedia');
            switch (hypermedia) {
                case 'new':
                    newProduct();
                    break;
                case 'create':
                    postProduct();
                    break;
                case 'edit':
                    patchProduct();
                    break;
                case 'delete':
                    deleteProduct();
                    break;
                case 'cancel':
                    hideForm();
                    break;
                default:
                    refreshProductList(products._links[hypermedia]);
                    break;
            }
        }
    }
}
The original implementation orchestrates the UI flow in the app by responding to the clicks on the product list rows and buttons. The Edit Product form is displayed when users click anywhere in the product row.
The extended code figures when the click occurs in the second column of the product table and goes on to fetch and display the category image in the table cell:
- First, it invokes the $app.restful method. The self link of the clicked product item is specified in the url parameter. The hypermedia parameter tells the method to locate and fetch the categoryId hypermedia control in the singleton product resource. The obj argument in the then chain function will be the instance of the category object just like the one shown at the top of the tutorial.
- The obj argument has the picture property. Another call of the $app.restful method will fetch the BLOB object from the url specified in the property value. The blob argument of the then chain function is the instance of the Blob object. The $app.restful method converts the server response into a Blob instance if the content type of the response is not JSON, XML, or YAML.
- Finally, the Object URL is created from the Blob instance and the table cell contents are replaced with the image that has its src attribute set to base-64 encoded URL. The image is fitted to the cell boundaries and has its title set to the category name to serve as a tooltip.
The products resource collection items do not have the URL of the category picture. The display of the category image takes three requests:
- The product item is fetched from the self hypermedia link of the selected item in the product collection.
- The category is fetched from the categoryId hypermedia control of the product item.
- The BLOB is fetched from the resource specified by the picture field of the product category.
Client application discovers the missing data by following the hypermedia links.
A shrewd developer may figure the correct category image URL and reduce this discovery sequence to a single request:
JavaScript
123456789101112131415161718// the cell in the "Category" column was clicked
Let productItem = products.collection[row.getAttribute("data-index")];
$app.restful({
    url: '/v2/categories/' + productItem.categoryId + '/picture'
}).then(blob => {
    // create an object URL
    let dataUrl = URL.createObjectURL(blob);
    // create an image element and replace the cell content with it
    let img = document.createElement('img');
    img.src = dataUrl;            // set the image src
    img.title = productItem.categoryName; // set the image tooltip
    img.style.maxWidth =          // set the maximum image width
        tableCell.getBoundingClientRect().width - 12 + 'px';
    // clear the cell content
    tableCell.innerHTML = '';
    // insert image in the cell
    tableCell.appendChild(img);
});
The item in the product collection has the categoryId, which can be used to construct the URL of the categories resource singleton field without much difficulty.
The explicit resource URLs in the client application create a tight coupling between the client and the current implementation of the backend. This may lead to broken apps when the backend evolves over time.
If efficiency is important, then consider including the additional fields in the collections and singletons by denormalizing the data models. Avoid using the explicit URLs in the client code to ensure the application longevity and maintainability.
Public Links
Making dedicated requests to fetch an image from the server may seem exotic, but unavoidable if the images cannot be exposed to the world. BLOB objects may represent documents, images, video, and sound files, which frequently require limited access.
The product category image is not something that needs to be kept private. If that is the case, then an authorization key must become a part of the image URL specified in the src attribute of the img element. The job of fetching the image from the server can be outsourced to the browser and Document Object Model.
Let’s introduce the public authorization key in the ~/app/touch-settings.json configuration file of the backend application. Note that there is also the server.rest.acl section specifying the Access Control List of the API.
JSON
123456789101112131415161718192021222324252627282930313233343536{
  "ui": {
    "roles": "Administrators"
  },
  "server": {
    "rest": {
      "enabled": true,
      "output": {
        "json": {
          "indent": true
        }
      },
      "authorization": {
        "keys": [
          {
            "key": "94b79da7-e3a9-4152-9213-886f4c810bec",
            "user": "admin"
          },
          {
            "key": "public",
            "user": "user"
          }
        ]
      },
      "acl": {
        "categories": {
          "administrators": ".",
          "users": "GET"
        },
        "products|suppliers": {
          "administrators": "."
        }
      }
    }
  }
}
The word “public” is the fitting name for the public authorization key. In this example, the user account is associated with the public key.
The authorization key can be specified as the x-api-key or api_key query parameter. There is also a more elegant method of specifying the authorization key in the URL. The key may be included in the path right after the API version like this:
https://demo.codeontime.com/v2/public/categories/8/picture
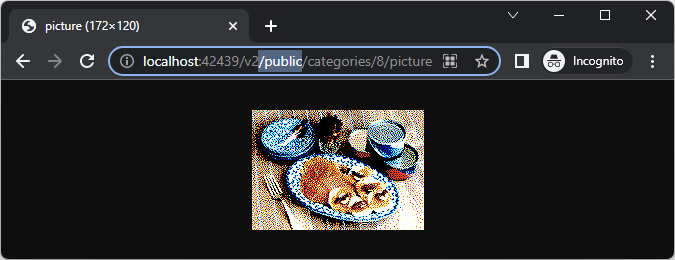 The URL with the public key in the path will fetch the image in the incognito mode if the access control list allows it.
The word “public” in the key name has no special meaning and can be replaced with any mnemonic. Any authorization key discoverable by the third party is the public key.
Developers must configure an access control list (ACL) to limit the API exposure to the unauthenticated users that will consume the resources with a public authorization key.
The ACL in the configuration above will allow the identities with the Users role to perform the GET requests to the categories resources. Users in the Administrators role can perform requests to the resources of categories, products, and suppliers with any HTTP verb.
The names of the server.rest.acl key properties are the controller rules (regular expressions) that will be evaluated against the names of the data controllers. If the rule of the access control list is matched with the data controller name in the resource path, then the restful API will evaluate the identity rules (the properties of the matched controller rule). The property names are the application user roles or the OAuth 2.0 scopes. If the current user is in role or has the scope in the access token, then the engine will try to match the HTTP method or the custom action identifier with the identity rule value (also a regular expression). If there is no match, then the access is denied.
This is the code that will use the public authorization key to fetch the category images when the category name is clicked in the product grid.
JavaScript
12345678910111213// the cell in the "Category" column was clicked
let productItem = products.collection[row.getAttribute("data-index")];
let img = document.createElement('img');
img.src =
    'https://demo.codeontime.com/v2/public/categories/' +
    productItem.categoryId + '/picture'; // set the image src
img.title = productItem.categoryName;    // set the image tooltip
img.style.maxWidth =                     // set the maximum image width
    tableCell.getBoundingClientRect().width - 12 + 'px';
// clear the cell content
tableCell.innerHTML = '';
// insert image in the cell
tableCell.appendChild(img);
There are no explicit resource fetching requests. A simple assignment to the src property of the img element does the job. The only concern is the hard-coded URL pointing to the backend application.
File Names in Links
The Categories table does not store the attributes of the Picture image file. The original name, type, and length of the file is not known. The BLOB processing code of the framework detects the image data automatically and sets the appropriate content type and a generic file name in the response to the request to fetch a BLOB resource. The generic content type application/octet-stream will describe a BLOB that does not contain an image.
The resource /v2/public/categories/1/picture will fetch the BLOB data even though it appears to lack the physical file name.
Application framework relies on the optional utility fields to provide the extended information about the BLOB fields of a data controller. The field names FileName, ContentType, and Length will be treated as the default utility fields. Developers can be more specific and prefix the default utility field names with the name of the corresponding BLOB field.
Alter the Categories table by adding the FileName, ContentType, and Length columns to store the extended properties of the BLOB in the Picture column. Make sure that the BLOB and the utility columns allow null values.
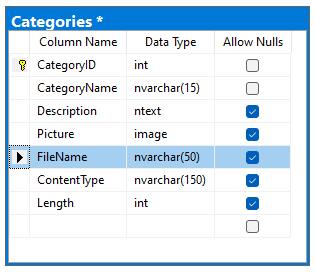
Select the backend application project on the start page of the app generator, choose Refresh, and proceed to incorporate the new database schema in the project metadata. Select the Model option in the summary, choose the Categories model, and select the new columns to include them in the entity data model.
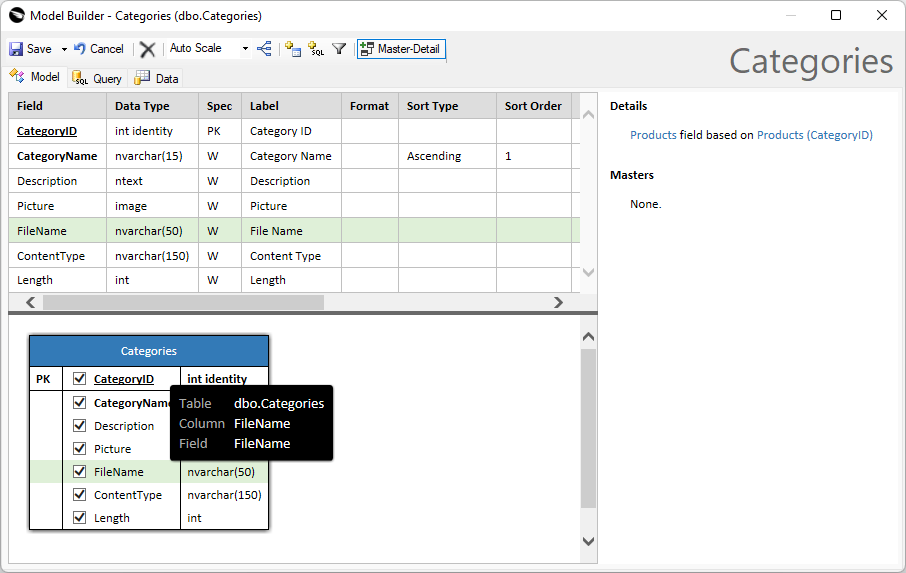 Model Builder makes it easy to perform iterative enhancement of the data models when the database schema is changed.
Save the Categories model and proceed to generate the app. The new fields will become a part of the user interface. Begin adding a new category and observe how the File Name, Content Type, and Length are automatically set to the properties of the selected Picture file.
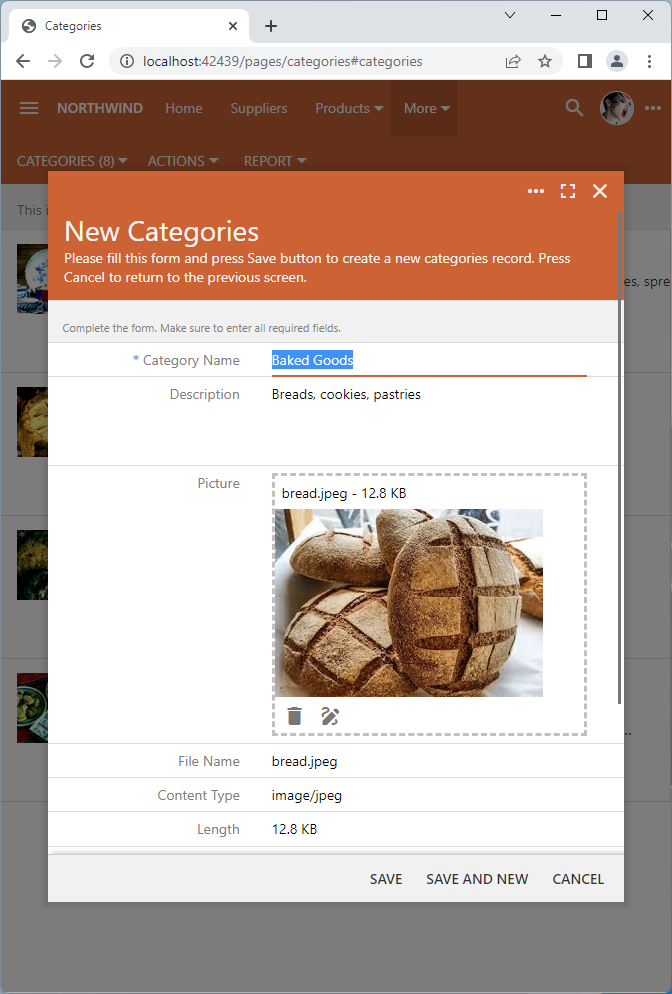 Touch UI automatically detects the "utility" fields and captures the File Name, Content Type, and Length of the binary data when a file is selected or dropped on the BLOB input field.
Changes to the model are also reflected in the RESTful API. Here is how the new categories singleton resource may appear to the apps and developers:
JSON
1234567891011121314151617181920212223242526{
    "_links": {
        "self": {
            "href": "/v2/public/categories/197"
        },
        "up": {
            "href": "/v2/public/categories"
        },
        "collection": {
            "href": "/v2/public/categories?count=true"
        },
        "first": {
            "href": "/v2/public/categories?page=0&limit=10"
        },
        "schema": {
            "href": "/v2/public/categories/197?_schema=true"
        }
    },
    "categoryId": 197,
    "categoryName": "Baked Goods",
    "description": "Breads, cookies, pastries",
    "picture": "/v2/public/categories/MTk3L3BpY3R1cmUvag.jpeg",
    "fileName": "bread.jpeg",
    "contentType": "image/jpeg",
    "length": 13155
}
Note that that picture value now has the file name but lacks the identifier of the singleton. The resource /v2/categories/197/picture transforms to /v2/categories/MTk3L3BpY3R1cmUvag.jpeg in the BLOB value. The URL is not affected by the original file name but inherits the file extension. The extension helps users to understand the nature of data.
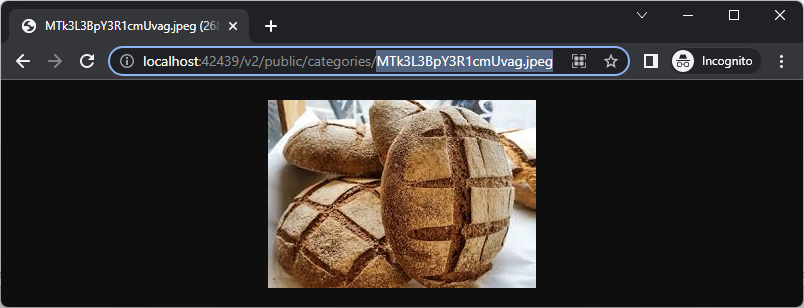 The BLOB value with the authorization key in the path can be used in the public-facing websites. The extension of the file name gives a hint about the data type.
If the “FileName” utility field is a part of the data controller, then its resource will have the BLOB value URL ending with the file name composed of its base64-url-encoded BLOB field name preceded by the previous path segment. The encoded file name will have the same extension as the original file.
ETag and 304 Not Modified
The headers of the response to the BLOB resource request will include the ETag (entity tag). The value is the unique hash of the BLOB content. Web browsers capture the ETag and send it with the subsequent requests to fetch the same resource.
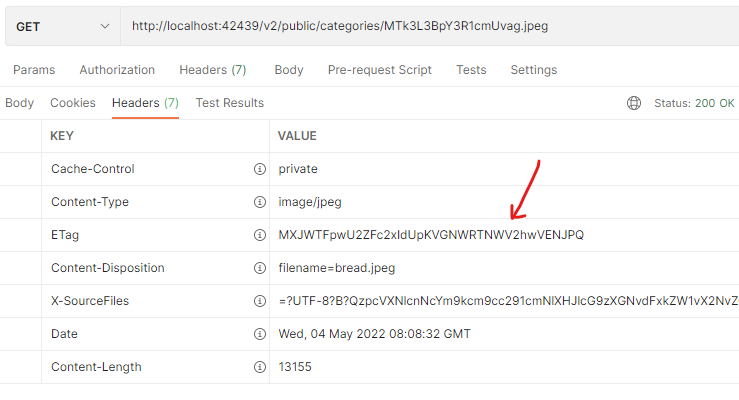 The response of the BLOB resource request includes the ETag, Content-Type, Content-Disposition, and Content-Length headers. ETag value can be used to avoid the unnecessary transmission of the unchanged BLOB. Type, Disposition, and Length provide the client with the BLOB metadata.
The RESTful API Engine will compare the optional If-None-Match header of the request with the ETag of the resource. If both values are the same, then the engine will not send the BLOB data in the response. The body will be empty and the response status code will be set to 304 Not Modified. The client application will use the previously fetched resource data.
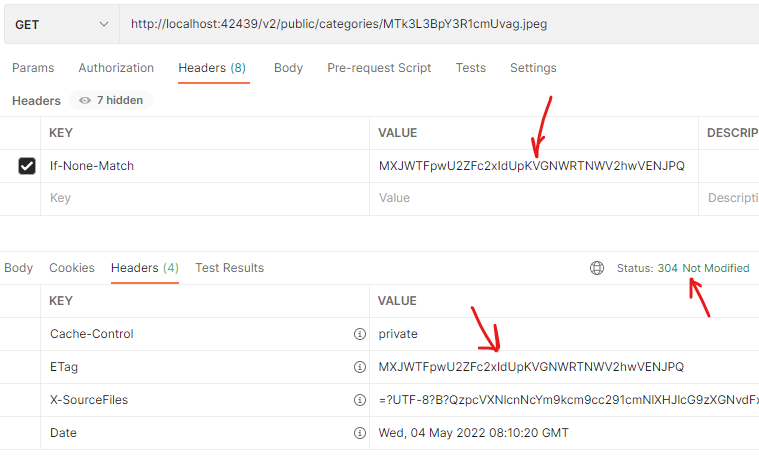 The "304 Not Modified" response includes the ETag of the resource that has not changed since the last fetch.
Web browsers and views automatically use the If-None-Match and ETag headers, which helps avoid the unnecessary transmission of data.
BLOBs in CRUD Requests
Binary field values can be specified in the CRUD operations with PUT, POST, and PATCH verbs. These HTTP methods correspond to the replace, create, and edit hypermedia controls in the resources of the RESTful API Engine.
The BLOB values can be found in the collection and singleton resources. The values of the BLOB fields are the API resources links.
Multipart Form Data
The content type multipart/form-data tells the server that the binary content is specified in the request body. The HTML forms with the “file” inputs are submitted with this content type in the “formdata” format by the web browsers and views.
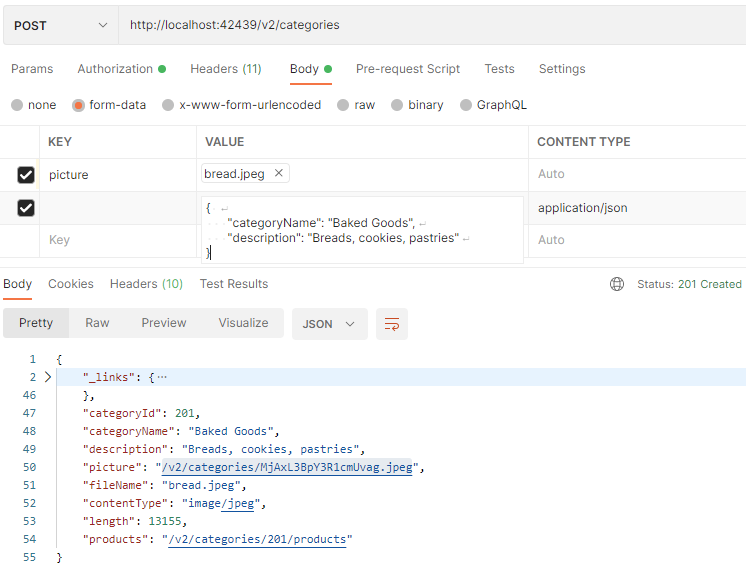
Here is how the request with the binary data is constructed in Postman. This request will create a new category. Individual field values are listed as key-value pairs in the form-data tab of the request body. The picture field is configured as the file. The response body shows the new resource with the BLOB link in the picture value.
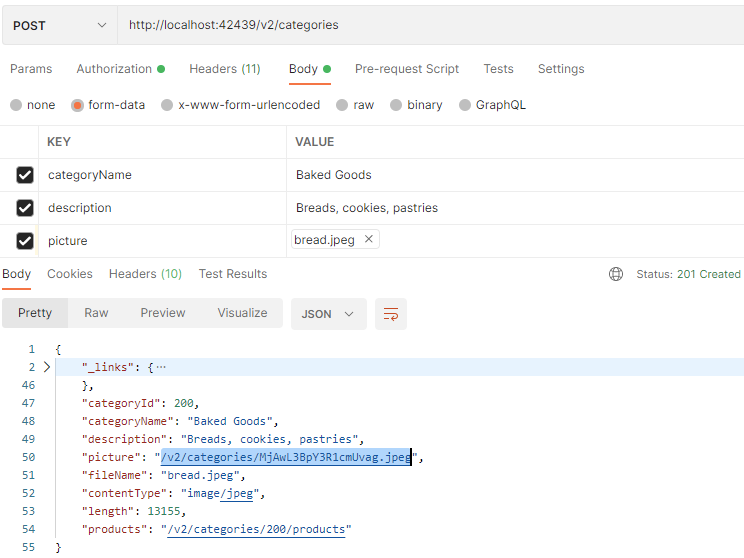 This is the "create" request in the Postman with the form-data fields in the request and the new category resource in the response. The "file" value is specified in the "picture" field of the request. The properties of the file are automatically captured by the RESTful API Engine in the "fileName", "contentType", and "length" fields of the new resource.
The plain JavaScript code that will create a category in the browser page is presented next. It uses the Fetch API to make the POST request. Note the use of the x-api-key header set to the authorization key of the admin user.
JavaScript
12345678910111213141516171819var myHeaders = new Headers();
myHeaders.append("x-api-key", "94b79da7-e3a9-4152-9213-886f4c810bec");

var formdata = new FormData();
formdata.append("categoryName", "Baked Goods");
formdata.append("description", "Breads, cookies, pastries");
formdata.append("picture", fileInput.files[0], "bread.jpeg");

var requestOptions = {
  method: 'POST',
  headers: myHeaders,
  body: formdata,
  redirect: 'follow'
};

fetch("https://demo.codeontime.com/v2/categories", requestOptions)
  .then(response => response.text())
  .then(result => console.log(result))
  .catch(error => console.log('error', error));
The categoryName and description request fields can be specified in the single JSON object as the value of the unnamed field in the form-data. Its content type must be set to application/json. The binary fields of the resource must be specified as the named fields of the form-data. The order of the fields in the form-data is not important.
 The non-binary fields of he request are specified in the form-data field without a name in the JSON format.
The raw HTTP request with the multipart/form-data content type is presented in the sample below. The request will create a new category. Client applications can configure HTTP requests on their own or use the libraries available with their chosen implementation technologies.
HTTP
1234567891011121314151617181920POST /v2/categories HTTP/1.1
Host: localhost:42439
x-api-key: 94b79da7-e3a9-4152-9213-886f4c810bec
Content-Length: 408
Content-Type: multipart/form-data; boundary=----WebKitFormBoundary7MA4YWxkTrZu0gW

----WebKitFormBoundary7MA4YWxkTrZu0gW
Content-Disposition: form-data; name="picture"; filename="bread.jpeg"
Content-Type: image/jpeg

(data)
----WebKitFormBoundary7MA4YWxkTrZu0gW
Content-Disposition: form-data; name=""
Content-Type: application/json

{
   "categoryName": "Baked Goods",
   "description": "Breads, cookies, pastries"
}
----WebKitFormBoundary7MA4YWxkTrZu0gW
Method $app.restful
The standalone single page applications SPA4 and SPA5 are linking the lightweight external script with the definition of $app.restful method. The method automatically specifies the access token in the HTTP request headers to identify the user. The method refreshes the expired access token. An explicit resource URL or a hypermedia control can be specified in the url property of the method argument.
The restful.js resource of the backend application provides the standalone clients with a thin wrapper on top of the Fetch API.
The $app.restful method also detects the Blob fields specified in the body property of the argument. The request body with the Blob fields is automatically converted to an instance of the FormData object.
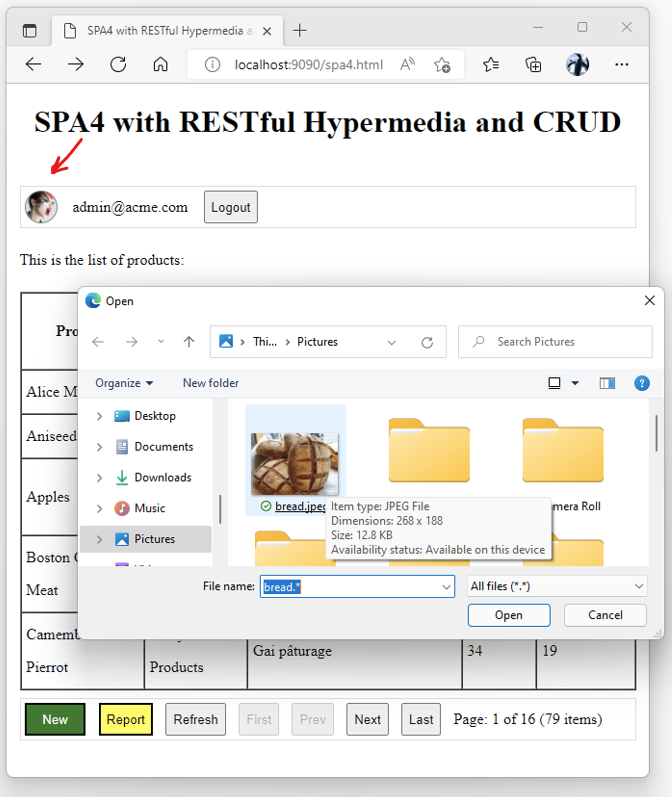
Let’s modify the CRUD-enabled version of SPA4 to create a category with the user-defined image in the picture field. Users will click on their avatar to activate the File Chooser prompt. The selected image file will become the picture of the new “Baked Goods” category. The name and the description of the category will be hard-coded for simplicity.
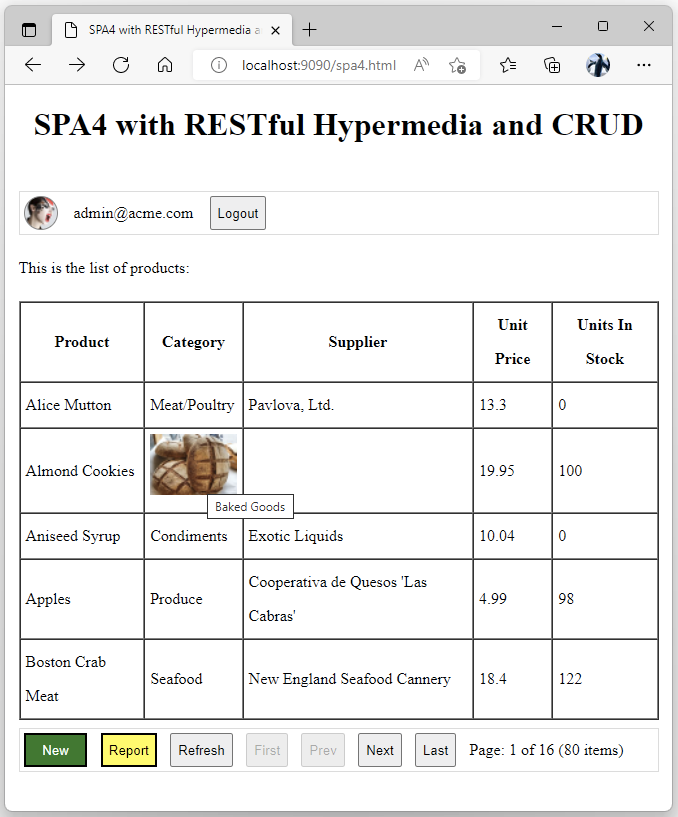
Users can create new products in this category and observe the picture when the Category column is clicked in the product row.
Add the following code at the bottom of the closure in the spa4.js. The code will attach the click handler to the avatar when the spa4.html page is loaded in the browser window.
JavaScript
123456789101112131415161718192021222324252627window.addEventListener('load', e => {
    // add 'click' event handler to the user avatar
    document.querySelector('#avatar').addEventListener('click', e => {
        // create a "file" input
        var fileInput = document.createElement('input');
        fileInput.type = 'file';
        // wait for the "picture" file to be selected
        fileInput.addEventListener('change', e => {
            // create the "Baked Goods" category with the selected picture
            $app.restful({
                url: '/v2/categories',
                method: 'POST',
                body: {
                    categoryName: "Baked Goods",
                    description: "Breads, cookies, pastries",
                    picture: fileInput.files[0] // the picture image
                }
            }).then(newCategory => {
                // show the ID of the new category
                alert(newCategory.categoryId);
            }).catch(restfulException);

        });
        // display the File Chooser prompt in the browser
        fileInput.click();
    });
});
The code dynamically creates an input of the file type and “clicks” it programmatically. The prompt to select a file is displayed. The change event will trigger on the input when a file is selected by the user. The $app.restful method executes the POST request with the categoryName, description, and picture specified in the body property of the method argument. The picture is set to the selected file.
Replacing and Deleting BLOB Values
The categories resource singleton hypermedia contains the replace-picture and delete-picture controls.
The blob image in the picture field of the resource can be replaced with the $app.restful method that has the replace-picture hypermedia object specified in its url property of the argument. The value field in the body property must be set to the new Blob or File value.
The delete-picture hypermedia control in the url property of the method argument will clear the BLOB value in the picture field.
The pair of the explicit url and method values can replace the hypermedia control in the $app.restful argument properties.
Next
Hypermedia in the resources provides instant documentation for developers and methods to transition the resource state or access the related data for the algorithms.
Learn to navigate the RESTful resources in the development tools and client apps.
This tutorial is part of the RESTful Workshop designed to empower individual developers and teams to create amazing enterprise-quality backends for mobile and web applications. Zero experience and no code is required to provide your data with the REST API conforming to the Level 3 of Richardson Maturity Model with the built-in OAuth 2.0 and Open ID Connect.