Apps created with Code On Time have the built-in barcode reader. The reader uses the ZXing library to detect barcodes in the feed from a device camera. The 1-D and 2-D barcodes in Aztec, Data Matrix, PDF417, and QR Code formats are supported. The barcode reader viewfinder can be displayed inline next to the data field in a custom form. The standard Scan action in the app context menu makes it possible to read barcodes on-demand.
Barcode detection with the device camera works in offline and online modes.
 The built-in barcode reader can be activated from the app context menu at any time. The detected barcode is sent automatically to the app for processing. The reader accumulates multiple barcodes in the Inventory Mode and requires users to send them explicitly. The custom processing is implemented with the UI Automation scripts. Users can also copy the scanned barcode and paste it manually in a form data field.
Inline Barcode Detection
Multiple data fields in form view can be marked with the input-scanner tag to enable the barcode capture. The barcode reader viewfinder will display below the input of the first tagged field without value when the form is in the Edit or New mode. The viewfinder becomes hidden when the field value gets its value either when the barcode is detected or when the value is entered directly by the user. The field input becomes focused when barcode is detected. The viewfinder will move automatically to the next empty field tagged with input-scanner.
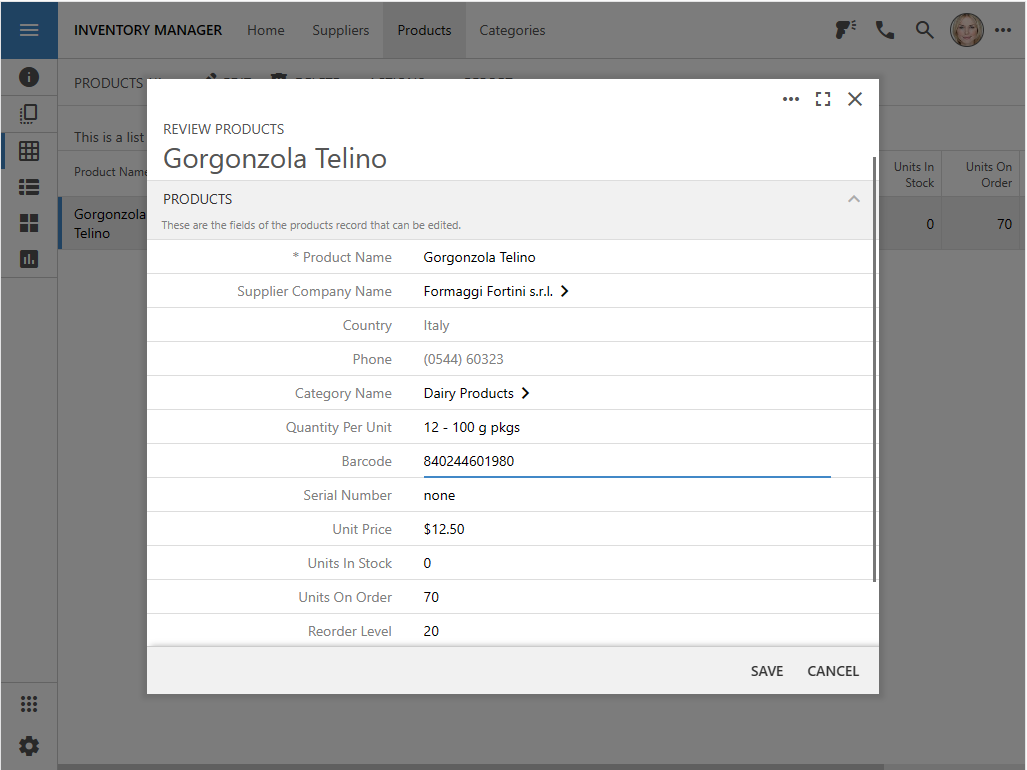
The Barcode and Serial Number data fields are tagged as input-scanner in Products / views / createForm1 view. The barcode reader viewfinder is displayed below the Serial Number when the Barcode value is detected or entered directly by the user. If all tagged fields have a value, then the barcode reader will remain inactive until one of the values is cleared.
The Inventory Manager example explains how to use Code On Time to build a simple inventory management system. Let’s modify this app to allow tracking of inventory with the barcodes.
Adding Barcode Detection to an App
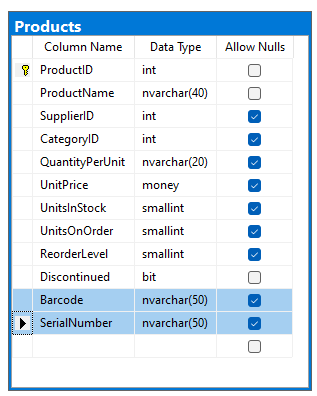
Begin by adding the Barcode and SerialNumber columns to the Products table. The columns must be long enough to keep the values of the product barcode and optional serial number.
Select the project on the start page of the app generator and choose Refresh. Proceed to refresh the project metadata to make the app generator aware of the database schema changers.
Choose the Models option on the summary page, select the Products model and check the Barcode and SerialNumber columns in the diagram. This will add the new columns as the fields of the model above the diagram. Scroll the list of the model fields to the bottom and drag each new field to be positioned below the QuantityPerUnit field.
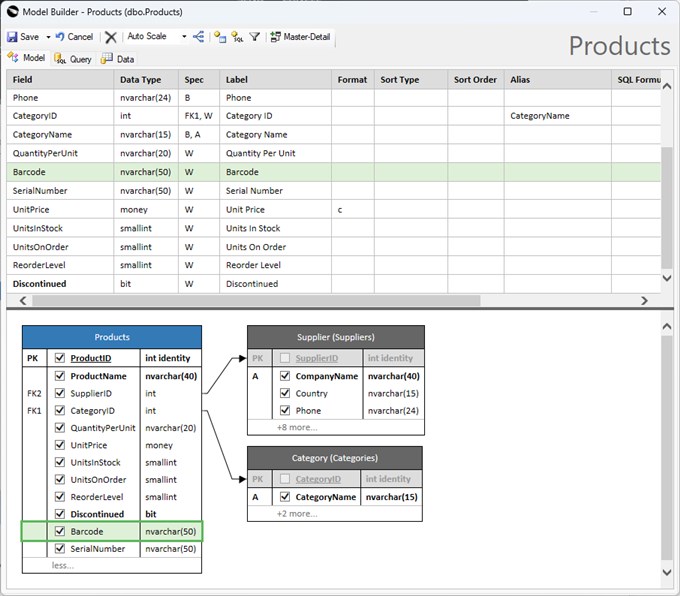
This is the model of the Products data controller with the Barcode and SerialNumber fields in the Inventory Manager application. The changes to the model are reflected automatically in the corresponding data controller views when the app is re-generated.
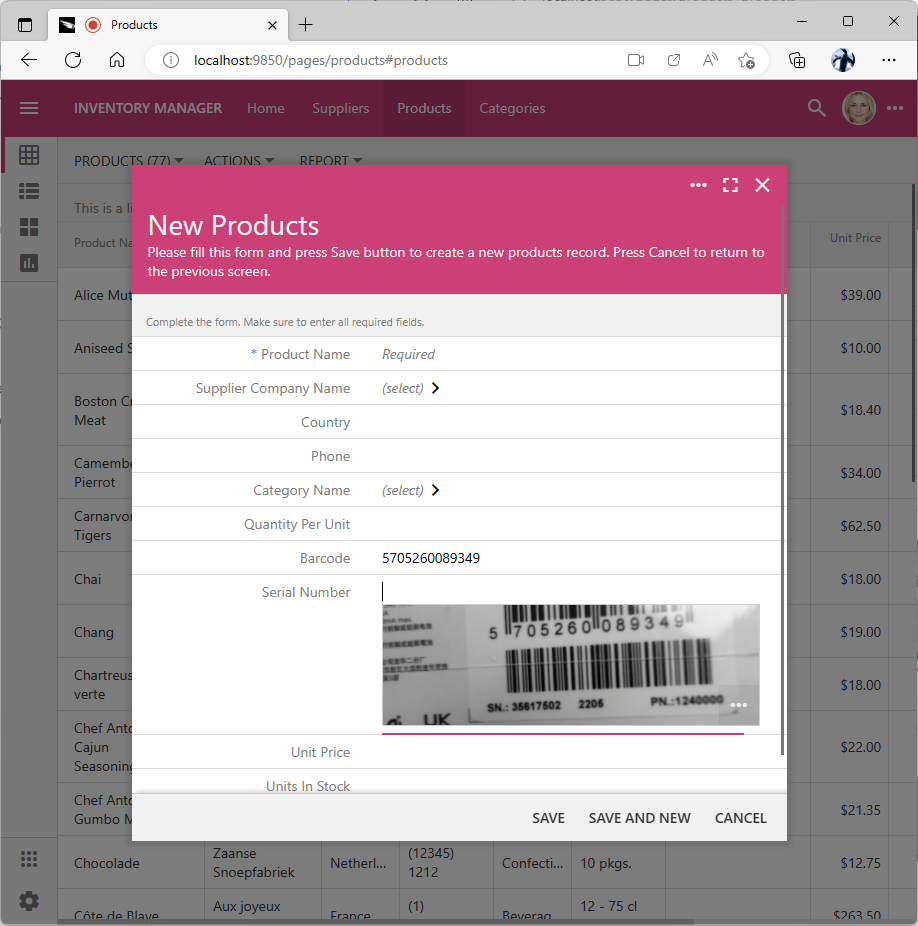
Save the model, press Finish, and choose the Design option. Switch to the Controllers tab in the Project Explorer and locate the Products / views / createForm1 / c1 category. There you will find the new data fields Barcode and SerialNumber. Enter input-scanner in the Tags property of each field and press OK to save. This will ensure that the barcode detection will assist the end users entering the new inventory items.
Next delete the Products / views / grid1 / SerialNumber data field. Not every product will have a serial number in the typical inventory. Later you will learn how to use the remaining Products / views / grid1 / Barcode data field and UI Automation to locate products with the help of the built-in standalone barcode reader.
Generate the app and try entering new products with automatic detection of the barcode and serial numbers.
Barcode Reader Viewfinder
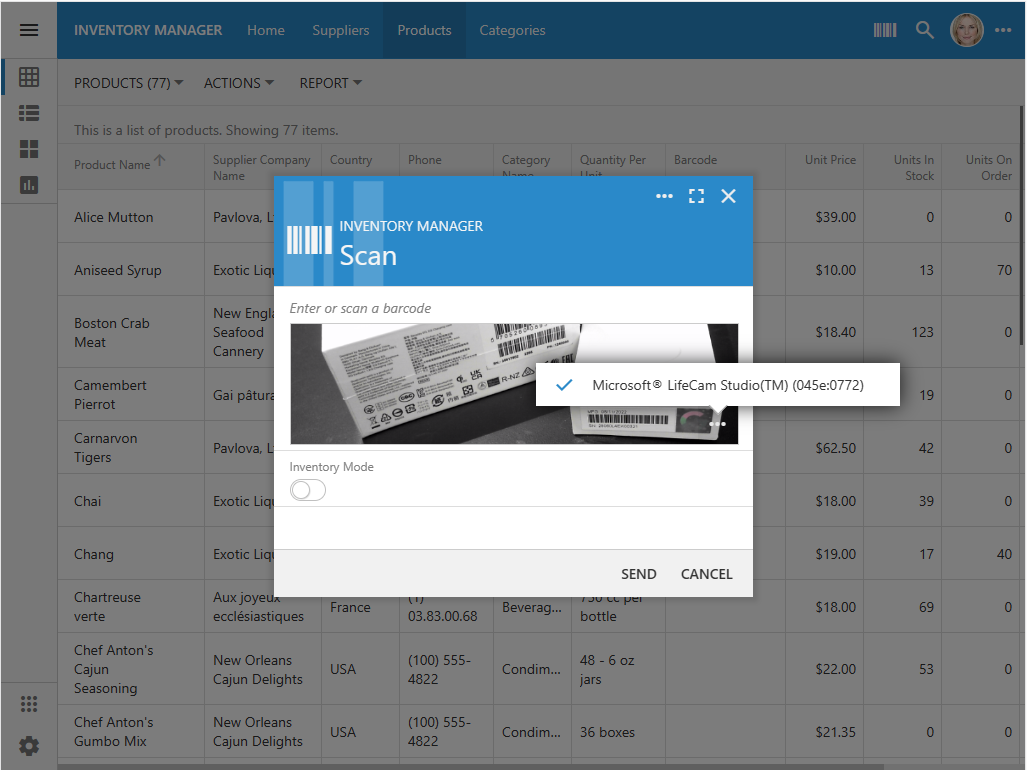
The “more” button in the bottom right corner of the viewfinder opens up the context menu. It allows switching the camera used by the barcode reader. The app will remember the camera choice. The last scanned barcode is also present as an option in the menu. Selected barcode value becomes the value of the field.

The “more” menu of the viewfinder allows switching the barcode reader camera and choosing the last detected barcode.
By default the viewfinder of the barcode reader will take up the entire width of the space allowed for the data field. The height is set to 120 pixels. Developers can modify the default height in the ~/app/touch-settings.json configuration file like this:
JSON
1234567{
  "barcodeReader": {
    "size": {
      "height": 80
    }
  }
}
The width and height of the viewfinder can be controlled on the field level. For example, the input-scanner-size-100x100 tag will specify the square viewfinder, which is more practical for the QR Code detection. The shorthand input-scanner tag is equivalent to the input-scanner-size-100%x120 tag.
The viewfinder of the inline barcode reader disappears when the value is detected or selected from the context menu. Tag the field as input-scanner-view-finder-always to keep the scanner always visible and active. This option is set for the inline barcode reader in the built-in Scan form to allow collecting multiple barcodes in the inventory mode.
The field value itself will always be hidden if the data field is tagged as input-scanner-value-hidden in the form view. The viewfinder will remain visible when a barcode is detected. The field value will change with every new detected barcode. Set the Causes Calculate property of the field to true to have the app trigger the Calculate command with the field name in the Command Argument. Add the business rules to respond to the changed field value.
Barcode Scanning Tip
Intuitively we tend to bring the camera closer to the object to get a scan faster. This will typically make the barcode so large that the colorful surroundings disappear from the picture and the barcode gets detected when the camera gets it in focus.
You can get a quick scan by keeping the object at a comfortable distance if you aim the viewfinder to have the barcode close to its left edge.
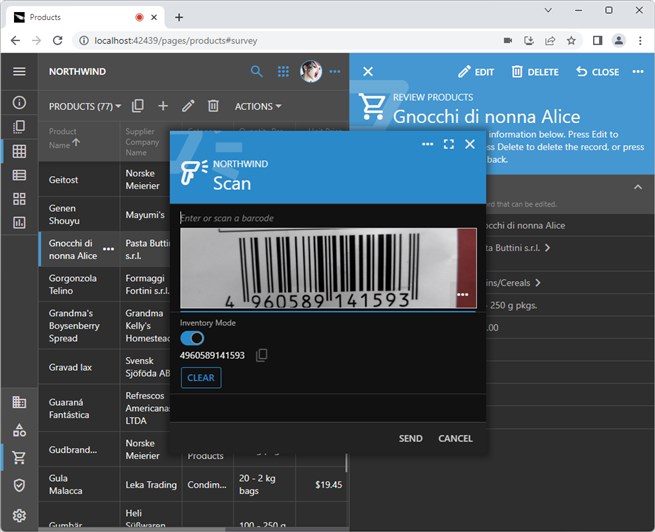
“Scan” Action and Form
The system Scan action is available in the context menu of the app. Its purpose is to provide users with an opportunity to scan a barcode at any moment. The action will bring up the Scan form with the barcode reader viewfinder being the first input. By default, the detection of a 1-D or 2-D barcode will close the form instantly and place the scanned barcode in the processing queue of UI Automation.
The detected barcodes are collected in the form If the Inventory Mode is enabled. Users will have to press the Send button to submit the collection of barcodes for processing. If the app does not have the automation rules defined, then users can scan barcodes, copy them to the clipboard, and paste them in the data fields while entering data.
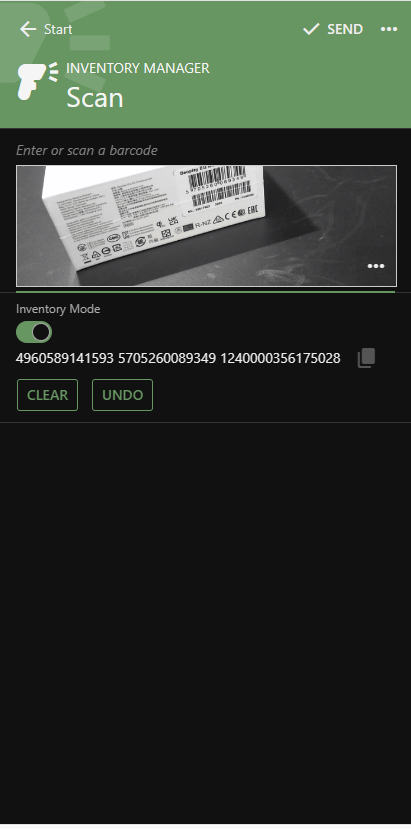
Users can enter the hard-to-scan barcodes in the input above the viewfinder. The Inventory Mode toggle allows collecting multiple barcodes. The Clear button will erase all barcodes in the inventory. The Undo button will remove the last detected barcode from the inventory. The Copy icon displayed on the right side of the detected barcodes will copy the entire set to the clipboard. The detected barcodes are sent instantly for processing if the Inventory Mode is not enabled.
If the scanning of barcodes is not anticipated in the app, then disable the Scan action in ~/app/touch-settings.json file:
JSON
12345{
  "barcodeReader": {
    "enabled": false
  }
}
If users are expected to scan barcodes frequently and there are UI Automation rules to process them, then consider promoting the Scan action to the app toolbar. You can also supply an alternative icon to better reflect the type of barcodes that will be scanned by the app.
JSON
1234567{
  "barcodeReader": {
    "promote": true,
    "icon": "material-icon-barcode",
    "format": "1D"
  }
}
The settings above will change the Scan form and move the corresponding action up front:
The standalone barcode reader is promoted with the toolbar icon in the screenshot. The custom material-icon-barcode icon is also visible in the header of the Scan form.
See some of the available icon options here. Make sure to enter material-icon- prefix in front of the lowercase icon text and replace the spaces with the dash character. The default value for the barcodeReader.icon option is material-icon-barcode-reader.
The barcode reader will respond to all code formats recognized by the ZXing library. If the application is not expected to process QR Codes then set the barcodeReader.format option to 1D as shown in the configuration example above. This will eliminate unwanted detection of barcodes not supported by the app and improve the battery life of the mobile devices.
The default value of the barcodeReader.format is Multi. The other values include 1D, QRCode, Aztec, DataMatrix, and PDF147.
Errors
Users must grant the permission to use the device camera explicitly. This will happen when the app attempts to begin the barcode detection.
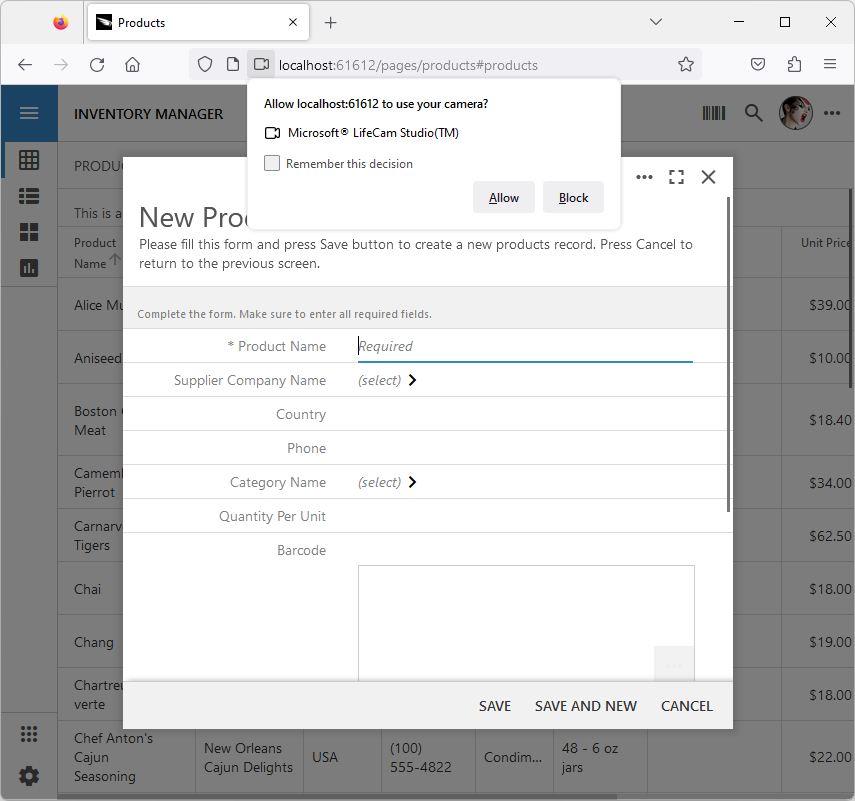
The permission to access the device camera will require the user's approval. If the permission is granted, then the security prompt will not appear until the access to the device camera is explicitly revoked from the application. The “active camera” indicator will be displayed whenever the camera is in use by the app. Application framework intelligently stops the use of the camera by the barcode reader to conserve the battery of the device.
If the permission is not granted or if the camera is being used by another device, then the error message will be displayed in the barcode reader viewfinder.

The error message will be displayed in the area of the barcode reader viewfinder if the camera cannot be used. The system error message will depend on the nature of the problem and the operating system of the device.
Users can grant or revoke the camera access either by clicking on the “camera” icon in the address bar or in the settings of the installed application.
Automation with Barcodes
The easiest way to make use of the built-in barcode scanner is to apply the input-scanner tag to a data field in a form view. The barcode reader viewfinder will appear below the empty field and go away when the value is detected or entered manually.
Users frequently tell developers that it takes too many clicks to accomplish some of their goals. For example, users may need to scan the barcode, search for the matching product in the inventory, open the form to edit the product, increase its quantity, and save the changes. It would be so much easier for users to read the barcode and have the app do the rest! UI Automation was born to allow rapid development of intelligent rules that can take advantage of the application user interface to implement complex data manipulations.
Complex responses to the detection of a barcode are implemented in the app with UI Automation. Applications can filter, search, open data items in forms, increment quantities, and much more.
Custom automation rules are written in JavaScript. The rule evaluation is triggered by any alpha-numeric sequence placed in the automation queue. A barcode value is a perfect example of such a sequence. The rules are evaluated in the order of their declaration by the UI Automation processor. Each rule tests the current state of the application, such as the active page, the form, the presence of a specific data field, the type of code in the queue, etc. If there is a full match, then the rule sends its commands to the application user interface, such as “filter data by the barcode value”, “open the form”, “change value of the field”, etc. The first matched rule will stop the evaluation. If no rules are matched, then the detected barcode value will appear as the notification.
The barcodes detected in the Scan form are placed in the UI Automation queue for processing. The processor must be enabled explicitly in the ~/app/touch-settings.json configuration file. The following settings will promote the Scan action to the toolbar and enable automation.
JSON
12345678910{
  "barcodeReader": {
    "promote": true
  },
  "ui": {
    "automation": {
      "enabled": true
    }
  }
}
Next we will explore a few scenarios of automation with barcodes. Make sure to associate several barcodes with the products in the inventory to test the rules.
Identifiers
The automation script developers do not need to know the physical field names or details of the business rules. The UI Automation scripts are sending instructions to the user interface of the application. The names of the fields, actions, and pages must match the visible text presented to users. This makes it possible to add the automation routines to the completed application at some future date.
The script developers may choose to shorten the labels. For example, the field Quantity Per Unit can be referred to as qua in the scripts. The field Supplier Company Name can be referred to with the comp+name identifier.
The reference to the field Unit Price may be presented as @UnitPrice if this is the exact spelling of the field name. The label of the Save button in the edit form may be specified as @a4 or as save. The former is the action id and the latter is its text label.
The framework treats all identifiers as case-insensitive regular expressions. The “+” character represents the optional spaces that are separating the words. If the exact identifier is known, then use the “@” prefix in front of it.
Filtering
Create the ~/app/js/barcode-automation.js file in the application code base. The name of the file is irrelevant as long as it is placed under ~/app/js folder.
Enter the following code in the file:
JavaScript
123456789101112131415(function () {

    $app.ifThisThenThat((app, context) =>
        app.if(context
            .page('Products')
            .list()
            .barcode()
            .field('Barcode')
        )
            .then(() =>
                app.filter('Barcode', context.barcode())
            )
    );

})();
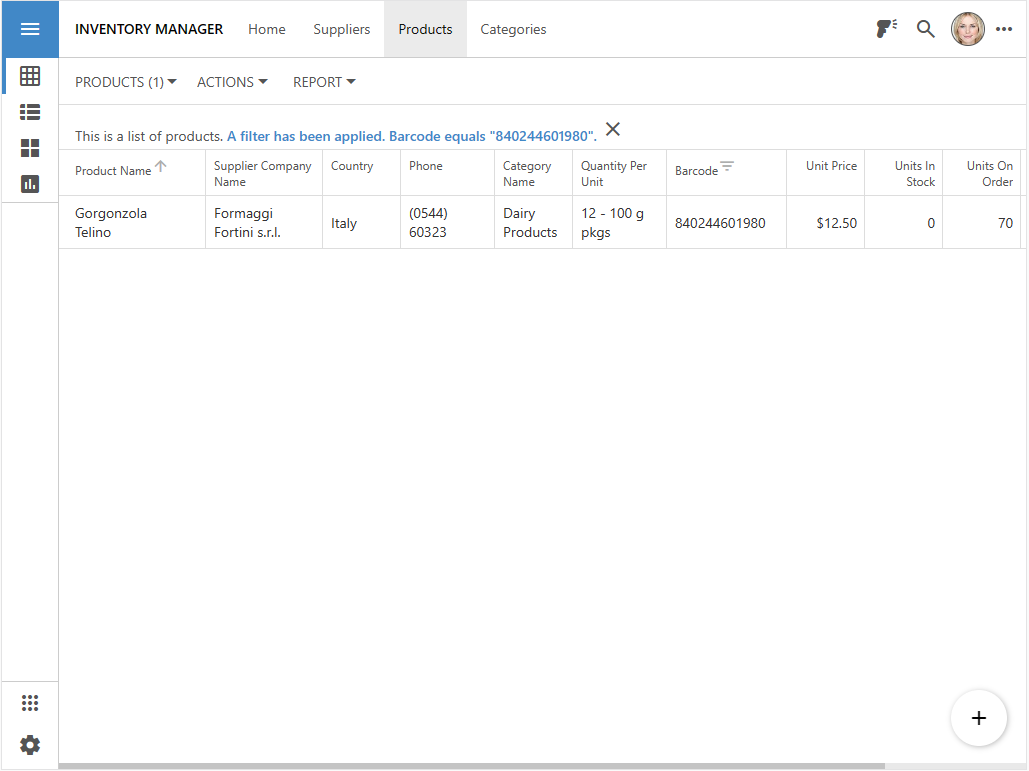
Navigate to the Products page, select the Scan action in the toolbar or app context menu. Scan a barcode associated with a product. The corresponding product will instantly appear in the filtered list.
UI Automation rules are triggered when a barcode is scanned with the built-in barcode reader or the external Barcode, QR-Rode or RFID reader. The rules perform actions on behalf of the user when a given set of conditions is matched.
A single call of the $app.ifThisThenThat method registers the UI automation rule. The argument of the method is the function that accepts the app and context parameters. The object specified in the app parameter provides the methods that allow controlling the application frontend. The object specified in the context parameter allows testing of the application state. The registration happens whenever an application page is loaded. Hundreds of rules can be registered without any significant impact on the app since no work is being done other than placing the reference to the function into the internal rule array.
Rules are called in the order of their declaration when the automation queue gets new items.
The rule implementation is the collection of chained calls started with the if method and followed by the then methods.
The if method of the app accepts the chained collection of the calls to the methods of the context object instance.
- In this particular case the first chained method tests if the current application page is titled as “products”. The parameter of the page method is the string or a regular expression evaluated against the current page title.
- Next, the rule calls the list method to make sure that there is data on the page presented in the Grid, List, or Cards view style.
- The third chained call of the barcode method ensures that there is a barcode in the automation queue.
- The last chained call of the field method ensures that there is a field with the “Barcode” label in the active view.
JavaScript
123456789app.if(context
    .page('products')
    .list()
    .barcode()
    .field('Barcode')
)
    .then(() =>
        . . . . .
    )
If all chained methods of the context object instance are resolved successfully, then the automation rule is considered to be matched. No other rules will be executed thereafter. The result of the if method is the promise that will resolve its then methods asynchronously.
The only “then” method of the automation rule is asking the app to apply a filter to the Barcode field. The method filter accepts the text label of the field and its expected value. The rule implementation extracts the barcode value from the context object instance.
JavaScript
123456app.if(
    . . . .
)
    .then(() =>
        app.filter('Barcode', context.barcode())
    )
Execution of automation rules disables the transition and fading effects. The filters applied to data are not remembered by the app. Note that the UI Automation will cancel the active Quick Find and Advanced Search forms when the execution of the matched rule starts.
Automation rules test and use the text in the UI elements. Names and IDs used in the app implementation are ignored.
The methods of the app object instance are asynchronous. For example, filtering may require a request to the server with the follow-up processing on the client. Each method returns a promise that will resolve when the method has completed its execution. Place multiple calls of the app instance methods into their own “then” implementation to ensure that the asynchronous interactions with the UI will execute in the correct order.
Finding and Selecting
Method app.filter limits the items in the active view to those that have a particular value in a specific field. None of the filtered items will be selected.
UI Automation provides the context.row and app.rowFilter methods that work together to allow selection of an item if such an item is matched to the barcode in the processing queue.
Consider the modified filtering example below. The chain of calls on the context instance finishes with the row method that verifies the existence of a data item that has its Barcode field value equal to the value of the barcode in the context. If there is no match, then the processor will move to evaluate the next rule. If there is a match the rule will use the app.rowFilter to filter and select the row. Then the Edit command will be sent to the UI. Finally, the focus will be set on the Barcode field in the opened form.
JavaScript
1234567891011121314151617181920212223242526(function () {

    $app.ifThisThenThat((app, context) =>
        app.if(context
            .page('products')
            .list()
            .barcode()
            .field('Barcode')
            .row('Barcode', context.barcode())
        )
            .then(() => app.rowFilter('Barcode', context.barcode()))
            .then(() => app.action('Edit'))
            .then(() => app.focus('Barcode'))
    );

    $app.ifThisThenThat((app, context) =>
        app.if(context
            .page('products')
            .list()
            .barcode()
            .field('Barcode')
        )
            .then(() => app.notify('There is no product with the barcode: ' + context.barcode()))
    );

})();
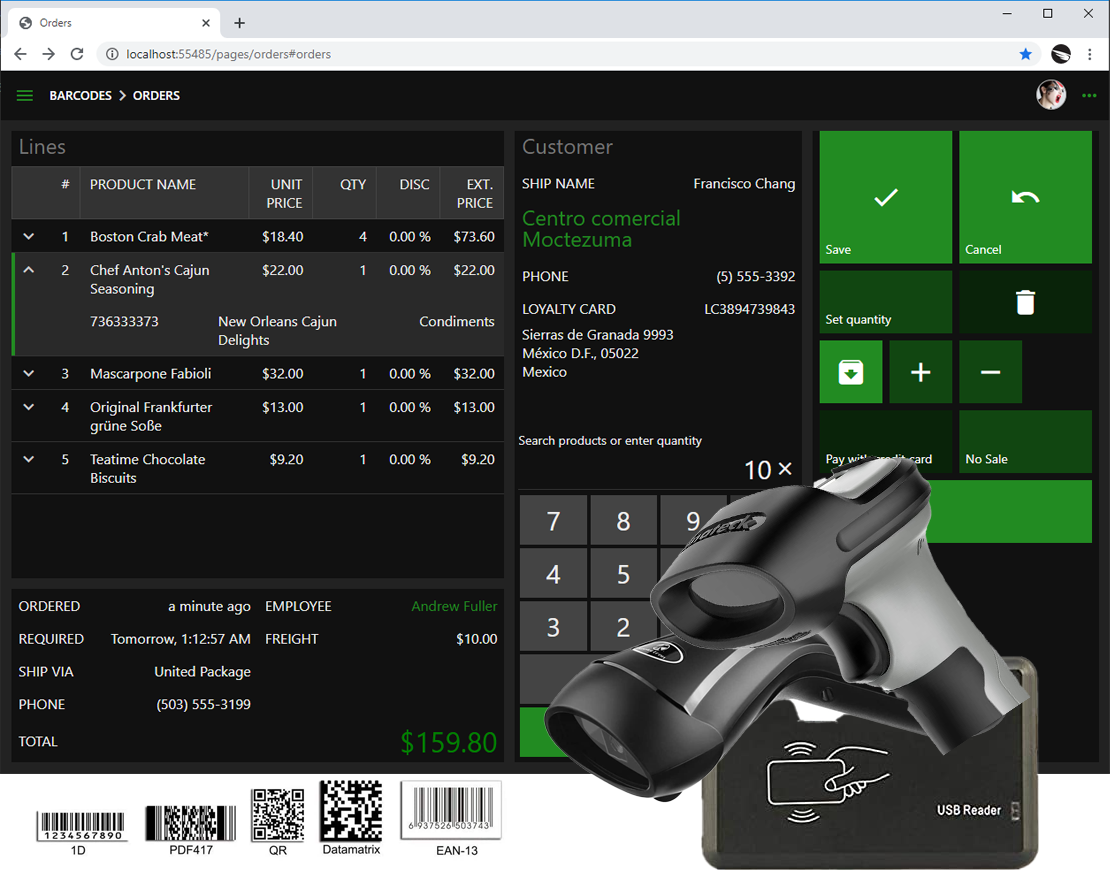
The result of the barcode scan is shown in the screenshot.
The UI Automation rule can locate a specific data item, select it in the view, open the data item in Edit mode, and set focus on a specific field. This entire sequence can be triggered by a single scan with the built-in barcode reader or external scanner.
Note that the automation script includes two rules. The chain of calls passed to the if method of the second rule is shorter than the if chain of the first rule. It does not have the test of the row. This is the fallback rule. It will execute if the previous has failed to locate the product by barcode. The implementation of the product notifies users that product search has failed. If the rule is not included, then the scanning of a barcode without a match to a product will simply show the barcode value in the notification.
Provide the fallback automation rules to let users know that an attempt to do the processing was made but failed. Otherwise users may think that the app is not working.
Incrementing Quantities
The next modification of the automation script adds a few more steps to the “then” chain of the app instance. The call of the app.inc(‘units in stock’) will increment the Units In Stock field and the call of the app.action(‘save’) will save the form.
JavaScript
123456789101112131415161718(function () {

    $app.ifThisThenThat((app, context) =>
        app.if(context
            .page('products')
            .list()
            .barcode()
            .field('Barcode')
            .row('Barcode', context.barcode())
        )
            .then(() => app.rowFilter('Barcode', context.barcode()))
            .then(() => app.action('Edit'))
            .then(() => app.inc('units in stock'))
            .then(() => app.action('save'))
            .then(() => app.notify(`${context.val('Product Name')}: ${context.val('Units In Stock')} units in stock.`))
    );

})();
If the barcodes are scanned in the inventory mode, then multiple product stock quantities will be updated during the automation sequence. Barcodes will be processed one at a time until the processing queue is empty.
A single scan of a barcode will increment the stock quantity of the matching product.
Adding New Items
Append the following fallback script to complement the incrementing rule. The rule will execute if there is no product with the matching barcode. The rule will execute the New action
JavaScript
1234567891011121314151617$app.ifThisThenThat((app, context) =>
    app.if(context
        .page('products')
        .list()
        .barcode()
        .field('Barcode')
    )
        .then(() => app.action('New'))
        .then(() => app.val({
            'Barcode': context.barcode(),
            'Units In Stock': 1,
            'Units On Order': 0,
            'Reorder Level': 0
        }))
        .then(() => app.focus('Name'))
        .then(() => app.notify('This barcode is not in the inventory. Please enter the product details.', 'long'))
);
The result of the barcode scan without a match to a product is shown next. Users will see the New Products form with the default values set to the Barcode, Units In Stock, Units On Order, and Reorder Level. The focus will be set on the Product Name field. Users may dismiss the form or enter the new product in the inventory.
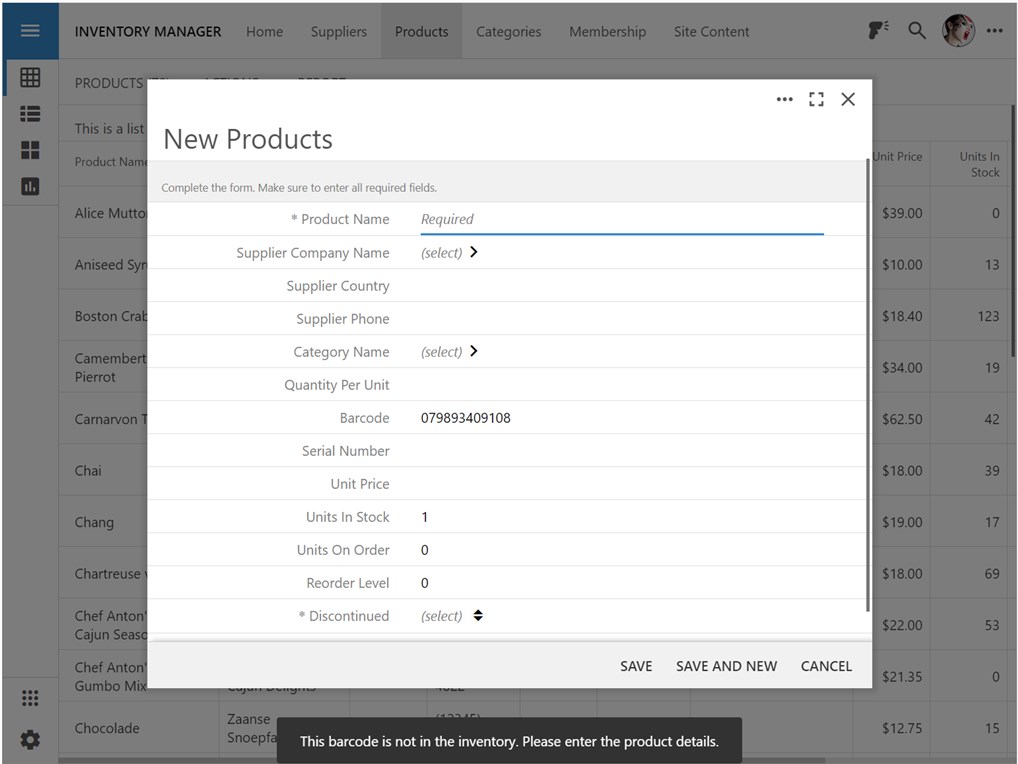
The fallback automation rules may inform users about the failure to find a data item or open a form with the default values making it easy for users to enter missing data items.
If This Then That
Developers can build collections of automation rules with the If This Then That pattern. Such collections can introduce intelligent responses to simple events such as a barcode scan.
Workstations can be provided with the custom barcodes representing the magic words. For example, QR Code for “New Product” will place the “New Order” phrase in the UI automation queue when scanned with the built-in barcode reader. The following rule will bring up the product form in the new mode if placed at the top of the automation script.
JavaScript
123456789$app.ifThisThenThat((app, context) =>
    app.if(context
        .page('products')
        .barcode('New Product')
    )
        .then(() => app.action('New'))
        .then(() => app.focus('Name'))
        .then(() => app.notify('Please enter the new product.'))
);
Increase user productivity and app acceptance rate with the help of the built-in Barcode Reader and UI Automation rules.
Reading Barcodes in Offline Mode
Built-in barcode reader works in the offline mode. Barcode detection is performed directly on the device and does not require an online connection.
UI Automations rules are written in JavaScript. They become part of the custom application frontend installed by Offline Sync when users sign in. The rules will respond to the barcode detection just like they do when users work in the online mode.
External Barcode Readers
An external barcode reader can be paired with the device. Scanning of barcodes will send their values to the application as text. If the form input is active, then the value of the barcode will be entered as if the user has typed it in.
Touch UI can detect the input from the external Barcode, QR Code, and RFID readers. The text characters produced by the external readers are sent to the focused app at a rapid pace, which is typically faster than most users can type.
It is easy to enable the handling of the external barcode readers for UI Automation in the app. Change ~/app/touch-settings.json as follows. Option barcode.enabled controls if the rapid input is transformed into barcode values.
JSON
12345678910111213{
  "barcodeReader": {
    "promote": true
  },
  "barcode": {
    "enabled": true
  },
  "ui": {
    "automation": {
      "enabled": true
    }
  }
}
The app will begin recognizing the rapid character input from the barcode readers and place the scanned barcodes to the UI Automation queue for processing. If the barcode processing is enabled, then scanning of the barcode will not enter text in the form fields when they are in focus.
See the external barcode reader sample code for more examples of UI Automation.
Kiosk UI
Apps created with Code On Time include the built-in Kiosk UI. This innovative user interface provides a “glass panel” for Touch UI that hides the pages with the data views and forms. Developers can craft a simplified presentation that will reflect changes in the state of the app behind the “glass panel”. Users interact with the app through barcode scans, numeric pad, and custom buttons on the panel.
Learn more about Kiosk UI here.
Kiosk UI hides the complexity of Touch UI forms behind the panel with the numeric pad and custom buttons. The panel responds to the changes in Touch UI state and gives users a simplified view of information. Users input data via the numeric pad. Barcode scans with the built-in or external readers are processed with UI Automation rules.