Custom actions are a common requirement in any project. Typically a dedicated menu option or a button in a form allows users to execute a custom code. For instance, application users may need to have an option to discontinue a product or replace the product’s supplier. Let’s explore how this can be accomplished with Code On Time.
Actions and Business Rules
In Code On Time applications, Actions and Business Rules work together as a powerful system to extend the built-in functionality of your application. This tutorial will guide you through the process of creating them, but first, it's important to understand the core concepts.
- An action is the user-facing component—a button or a menu item that the end-user can see and interact with. You configure an action to define its appearance (e.g., its 'Text', 'Icon', and 'Description') and, most importantly, where it appears in the UI. Actions are organized into Action Groups, and the group's 'Scope' property determines if the actions are displayed on an
Action Bar, in a Form, within a row's Grid context menu, or elsewhere.
- A business rule is the implementation logic that executes when an action is triggered. It is a self-contained block of code that can be written in
SQL, server-side C#/Visual Basic (Code), JavaScript, or as an Email template. This is where you define what happens when the user clicks the action's button or menu item.
The two are linked by the Execute / Command property of the action and the When / Command property of the business rule. When a user triggers an action, the framework looks for a business rule with a matching 'Command' and 'Argument' to execute. This decouples the UI presentation from the business logic, allowing a single rule to be triggered by multiple actions if needed.
Furthermore, the execution of server-side business rules can be fine-tuned using the When / Phase property (Before, Execute, After). This allows your custom logic to run before the framework's default operation (ideal for validation), in place of it, or after it has completed (ideal for logging), giving you precise control over the application's data modification lifecycle.
The following sections will demonstrate these concepts with practical, step-by-step examples.
Sample Project
Create an application with Code On Time using the Northwind database as a data source and add Products, Suppliers, and Categories data models to it.
The relevant portion of the database schema is shown below.
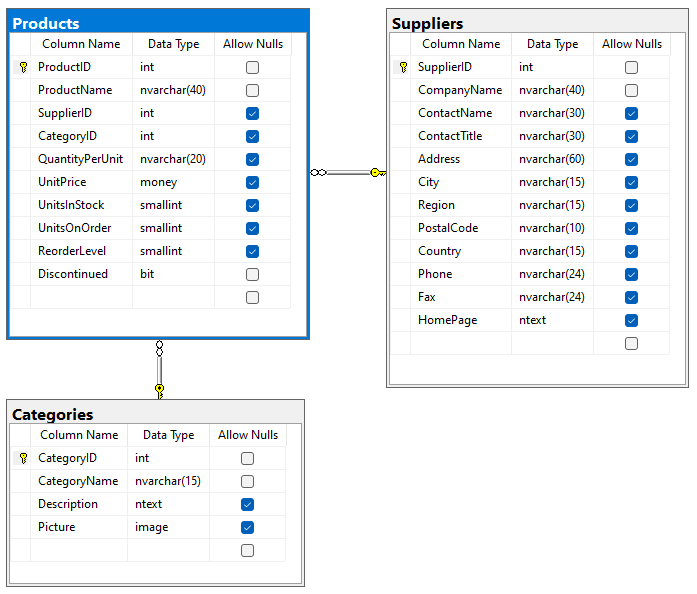 This diagram shows the database schema for the inventory management system. Code On TIme will inspect this very structure, automatically constructing data models and recognizing the foreign key between
 Products and Suppliers to create a rich, interactive lookup interface in the final app.
A realistic application effortlessly created by Code On Time from the data models allows users to manage products in a grid or edit individual products in a form. Both views allow designating the product as discontinued or replacing the product supplier in the powerful lookup control.

The framework automatically provides sophisticated lookup controls for foreign key fields, creating a powerful user experience out of the box. Instead of making users navigate to a separate page, this control allows them to type-ahead for matches, select from a search screen, or even create new suppliers in-place, significantly reducing friction in the data entry workflow.
Let’s create a dedicated Mark as Discontinued and Change Supplier actions in the Products controller. The actions will appear as a context menu option of the 'grid1' view and as a button in the editForm1 view.
Adding Options to the Grid Context Menu
Click Search in the App Studio toolbar and enter products actions grid.
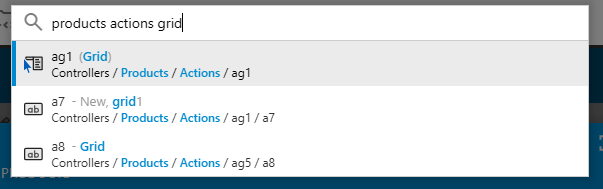
The App Studio's search tool quickly traverses the entire project configuration hierarchy to find matching elements. As a project grows in complexity, this search becomes a vital organizational tool, allowing a developer to bypass manual navigation and jump directly to the relevant node in the App Explorer.
Choose the first option to navigate to the ag1 action group of the Products data controller.
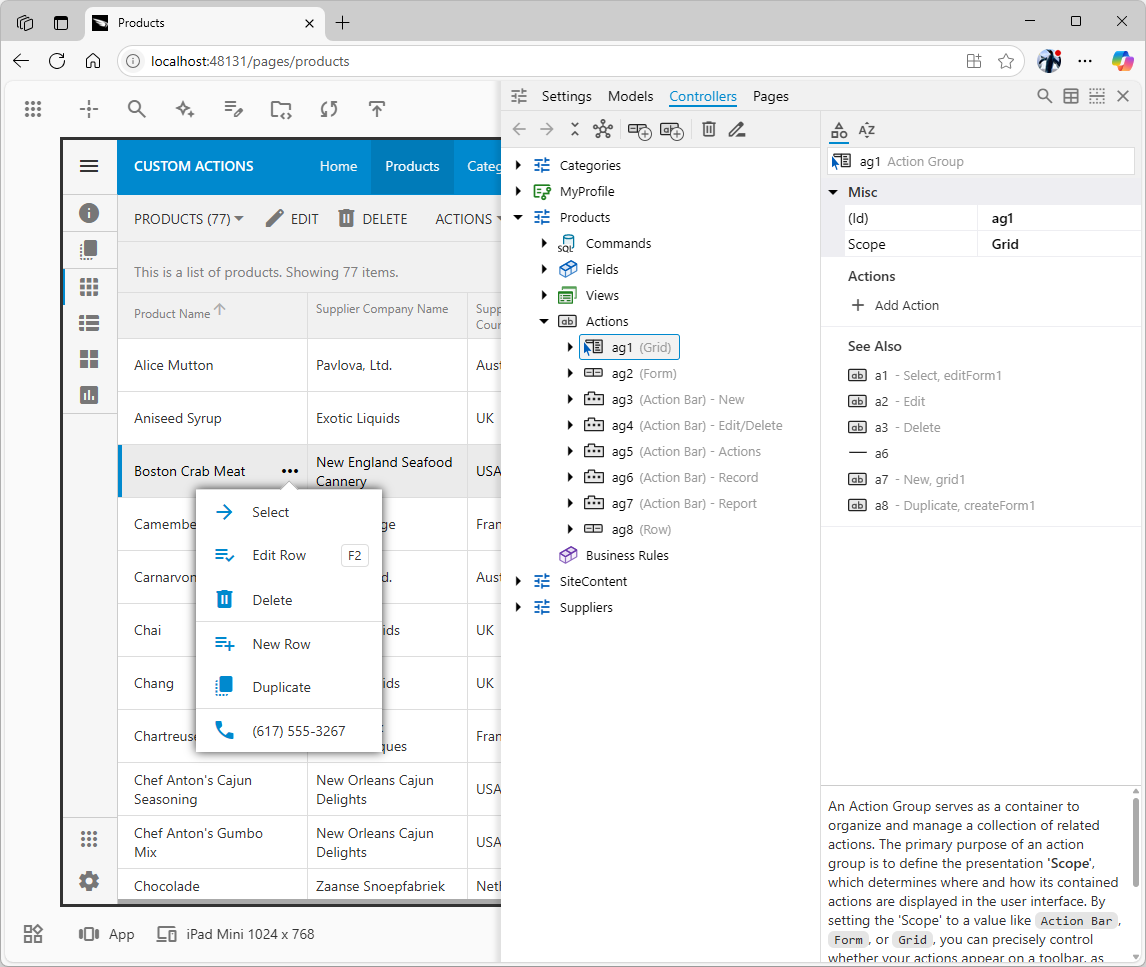
The App Explorer shows the properties of an Action Group, which serves as a container to organize and manage related actions. Its Scope property (here set to Grid) is the crucial setting that determines where its actions will appear in the UI, in this case, the context menu for each data row.
Click the Add Action link in the ‘Actions’ below the group properties. The new action will become selected in the App Explorer.
Configure the action as follows:
- Enter
markAsDiscontinued as the action ‘(Id)’.
- Enter ‘MarkAsDiscontinued’ in the ‘Execute / Command / Argument’ property. This will help to distinguish this
Custom action from other custom actions that may be defined in the future in this data controller.
- In the ‘Presentation’ property group, enter
Mark as Discontinued in the ‘Text’ property, Remove product from the catalog. in the ‘Description’ property, archive in the ‘Icon’ property, and Alt+M in the ‘Shortcut’ property.
- Set the ‘Confirmation / Text’ to
Are you sure you want to mark this product as discontinued?.
Drag the markAsDiscontinued action node to the desired position in the ag1 action group.
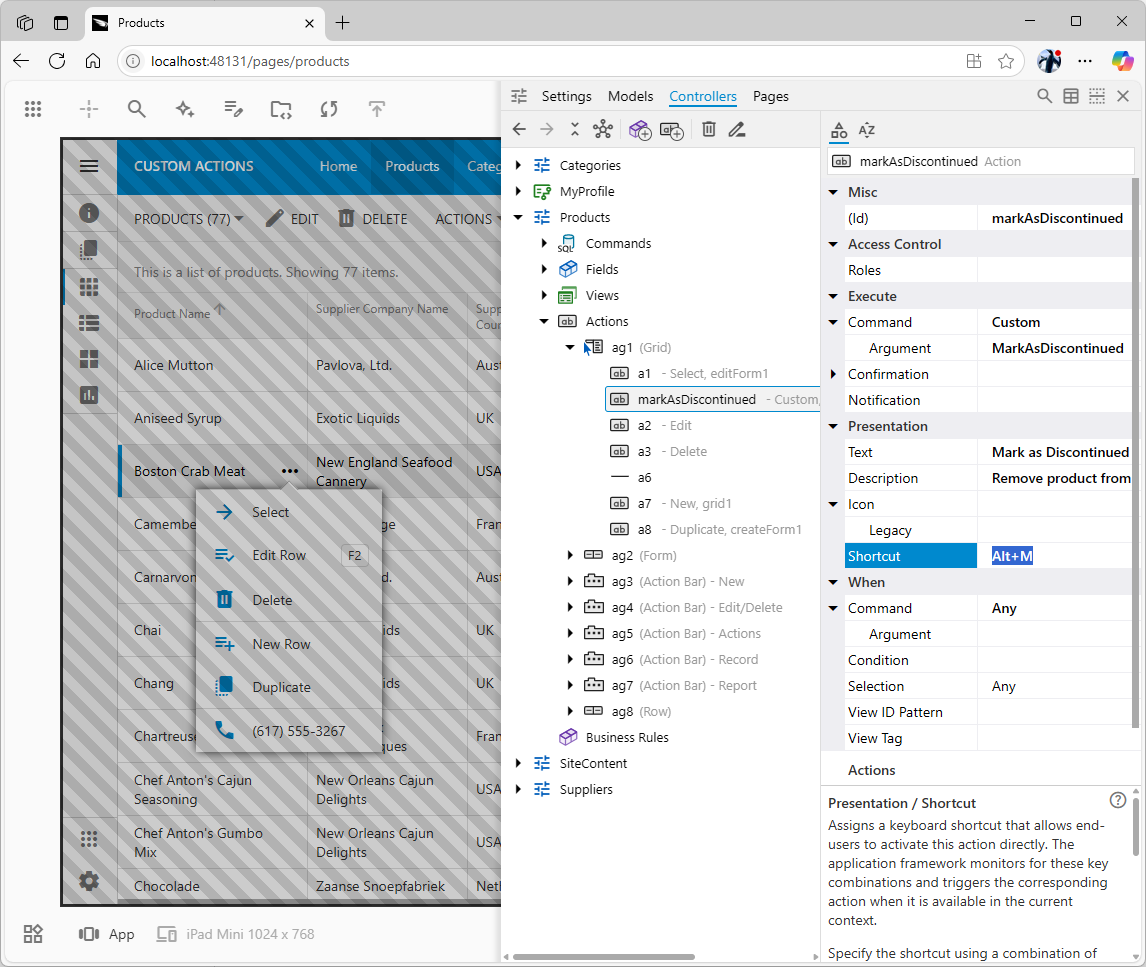
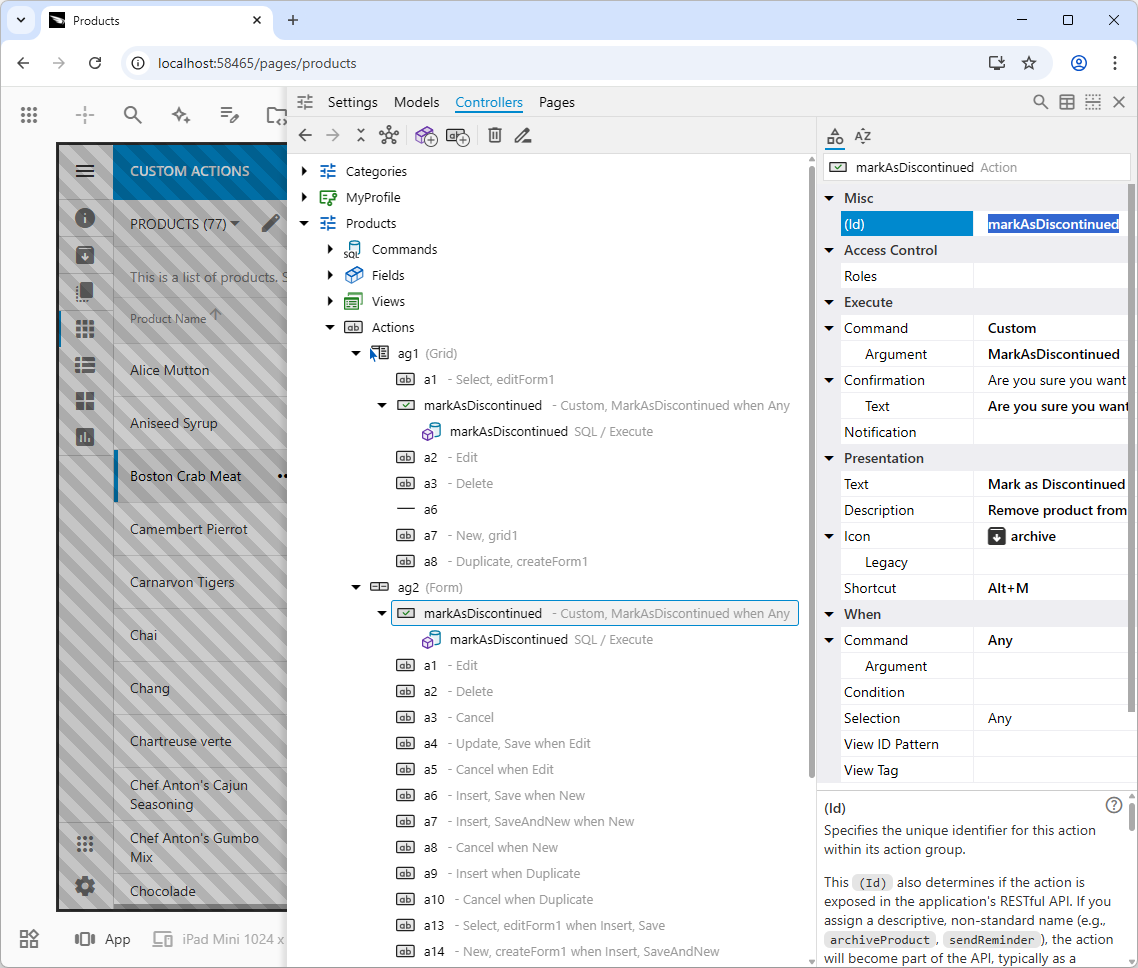
This shows the final configuration of the markAsDiscontinued action after its properties have been set. The App Studio's side-by-side design creates an efficient feedback loop between these settings and the live application. Note that the action's position is significant; by default, the first action in a 'Grid' scope group is the one executed when a user simply selects a row.
Click on the “frozen” live app to dismiss the App Explorer. Click the app once more or choose the Reload button in the notification toast to reload the app. If you need to make more changes without reloading the application, then click the Controllers quick access button located at the bottom of the studio toolbar along the right edge of the browser window.
Hold Ctrl and click any product to make it selected. If you do not hold the control key, then the editForm1 with the product details will appear.
Press Alt+M on the keyboard and the action confirmation popup will appear.
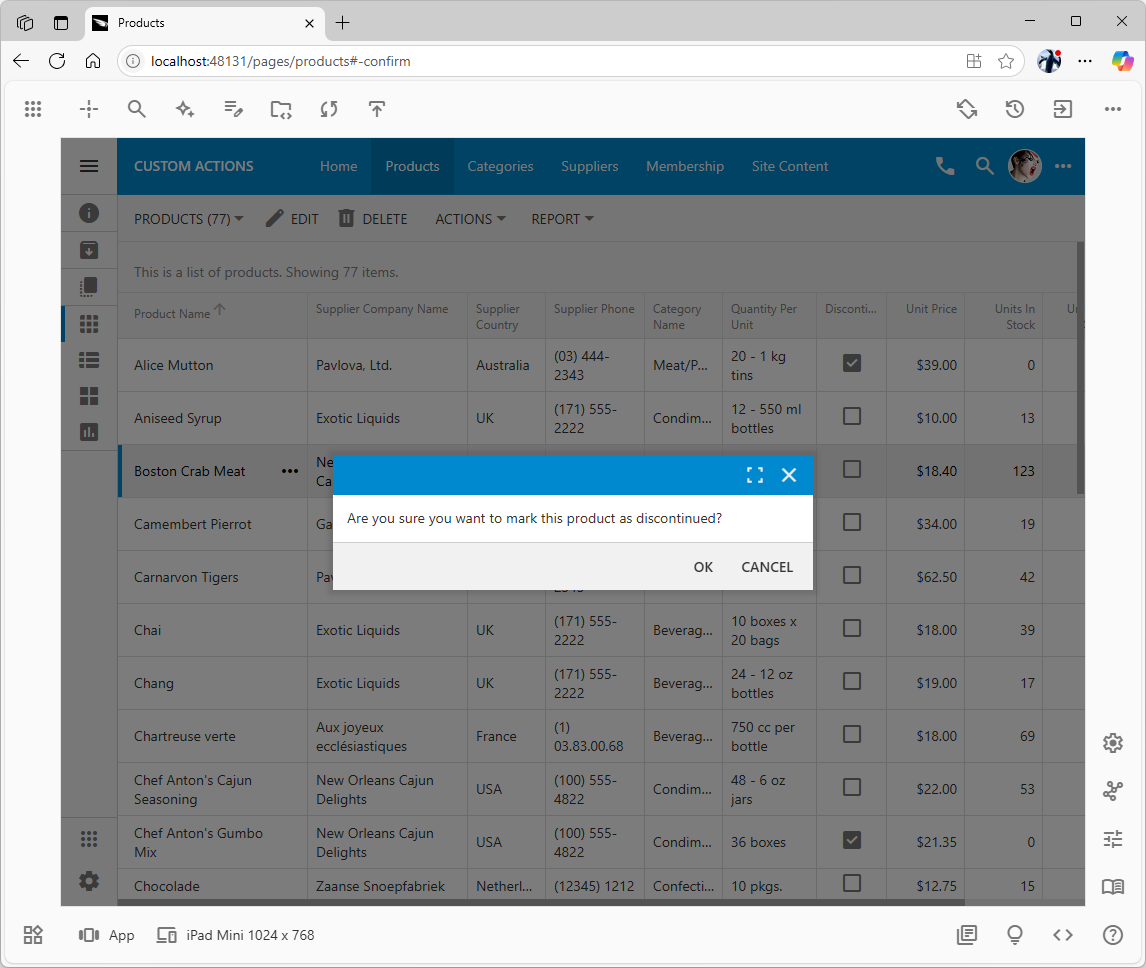
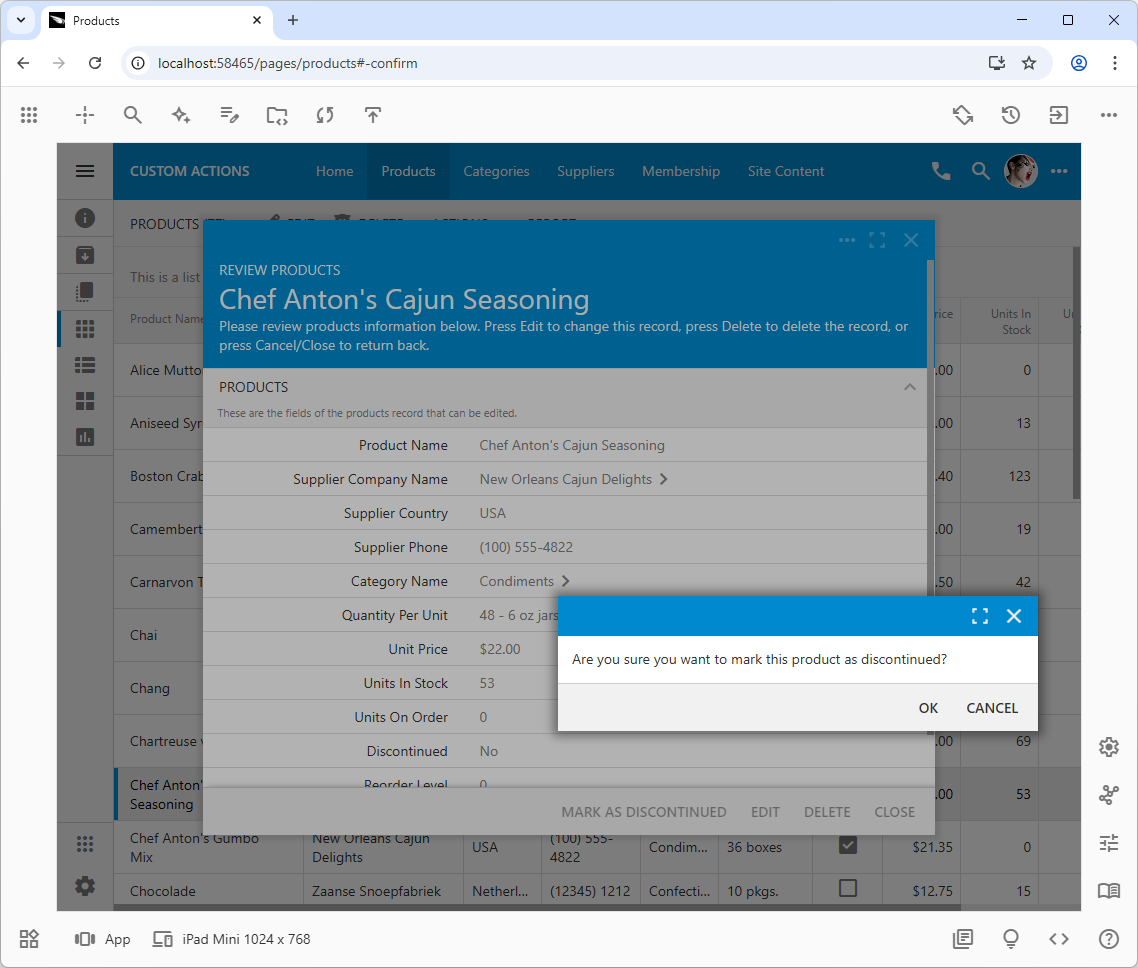
A simple modal confirmation dialog appears when the action is invoked, serving as a crucial safeguard against accidental operations. This dialog, generated from the action's Confirmation / Text property, is intuitive for the end-user, who can dismiss it with the 'Esc' key or confirm it with the 'Enter' key.
There is also an alternative way to invoke the markAsDiscontinued action. The ‘More’ icon (three horizontal or vertical dots) is visible next to the name of the selected product. Cancel the confirmation popup and hover over other products. The ‘More’ icon will appear on hover in the Product Name column. The icon will be visible in every product row on a touch screen. Touch or click the ‘more’ icon to open the row context menu. The description of the action appears when users hover over its menu option. Choose the Mark as Discontinued option in the context menu of the product to initiate the action. Selecting the action will yield the same response as with the keyboard shortcut - the confirmation popup Are you sure you want to mark this product as discontinued? will appear in the middle of the screen.
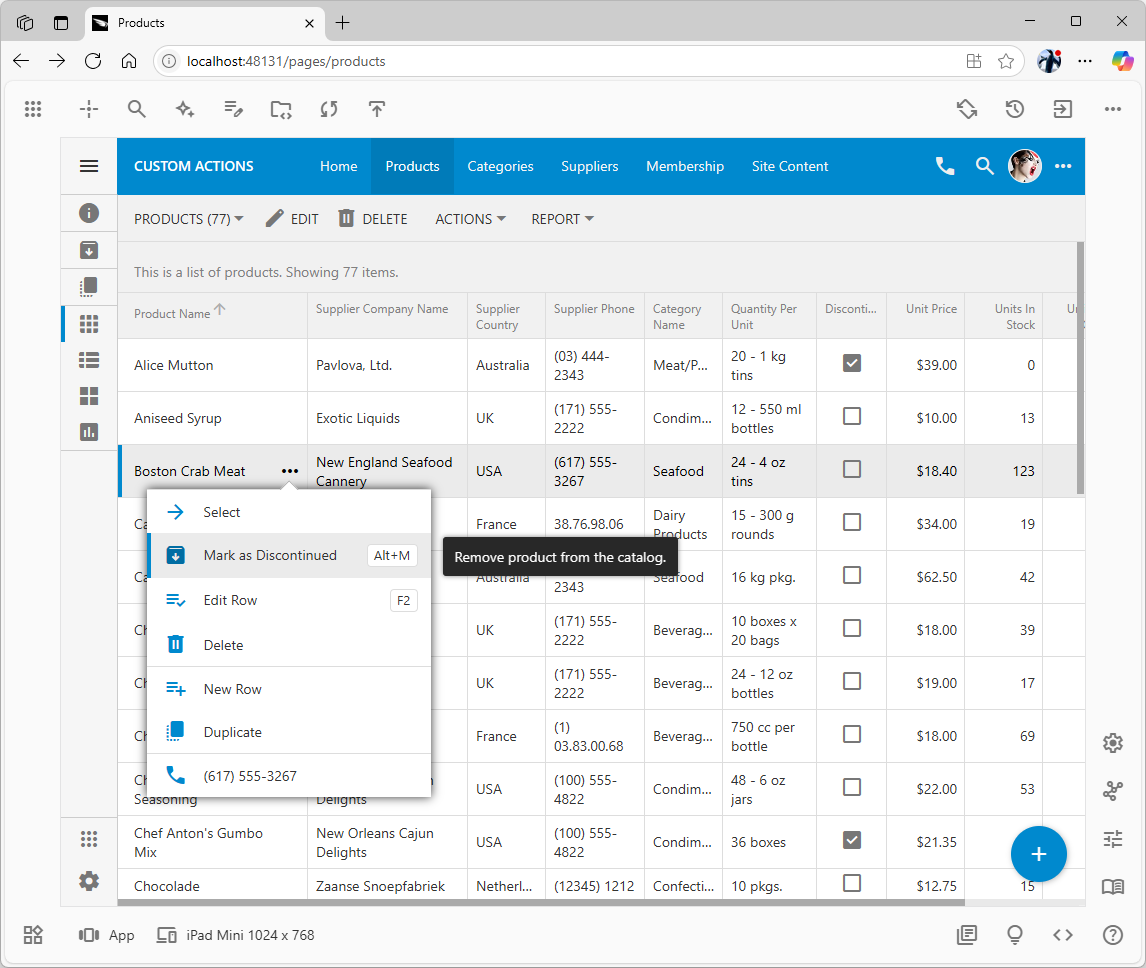
Clicking the 'More' icon next to the first column displays the row's context menu, which is populated with actions defined in the 'Grid' scope group. The tooltip that appears on hover, "Remove product from the catalog," is pulled directly from the action's Description property, demonstrating how configuration directly maps to the user experience.
The markAsDiscontinued action is the option in the context menu of the grid. This option is also available in the app’s system context menu that can be accessed by pressing the More button on the app’s toolbar. All actions available to the user in the current context are included in the system context menu.
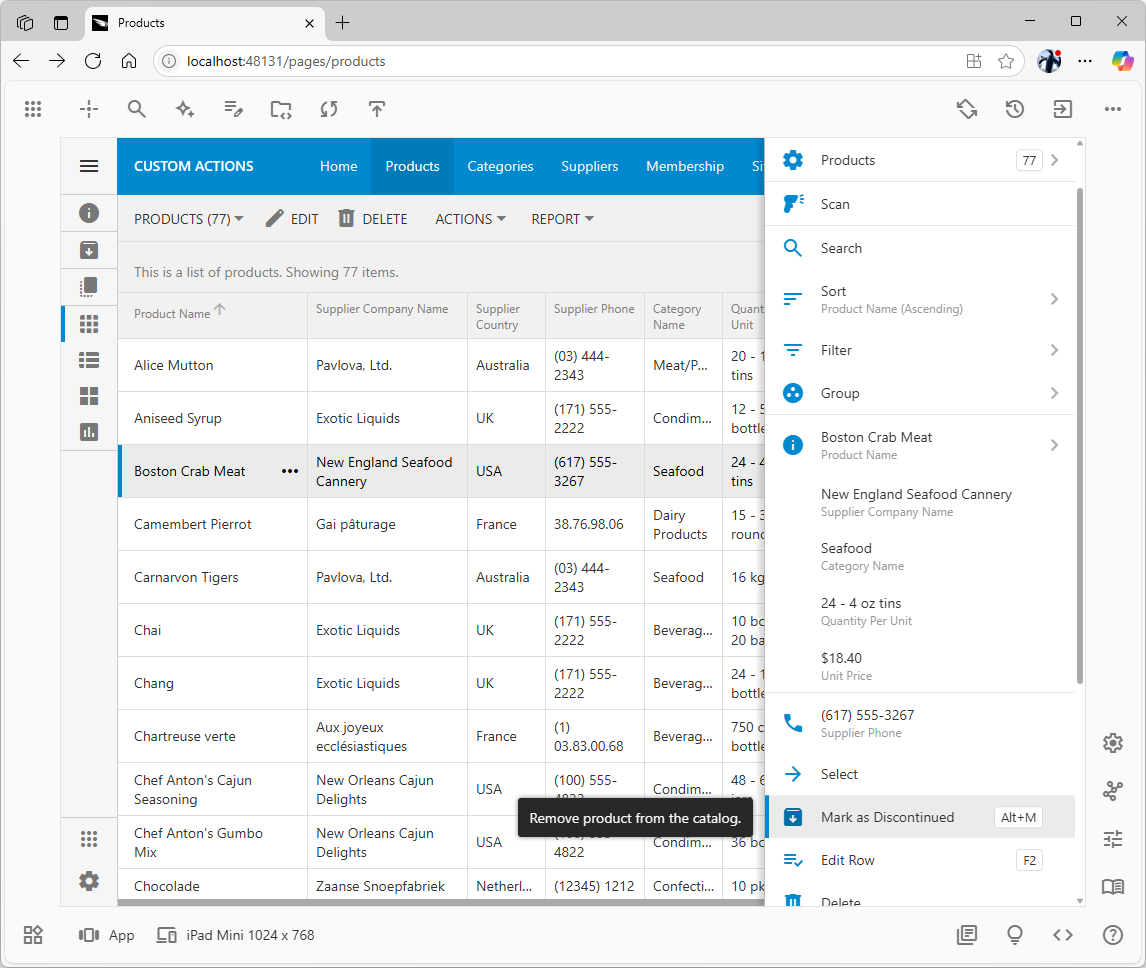
The 'More' icon on the main system toolbar opens a full-height panel that acts as a universal command palette. This menu conveniently aggregates all actions from all scopes that are available to the user in the current context, providing a consistent and accessible location to discover and execute commands..
Responding to Custom Actions
Pressing the OK button in the action confirmation dialog will send the field values of the selected data item through the processing stack of the framework on the client and on the server:
- First, the client library will give the app’s JavaScript business rules a chance to handle the action in the
Before and Execute phase.
- If the client-side business rules have not prevented the default execution by calling
this.preventDefault(), then the framework will send the field values and the command name and argument to the server-side code of the application for processing.
- If no exception were raised or errors reported and no instructions to execute custom JavaScript were emitted on the server, then the application framework will do the following:
-
- Refresh the current view of data in the “Grid” view such as
grid1.
- Close the “Form” view such as
editForm1 and return to the previous view and have it refreshed if it is not a form (e.g. grid1 view).
- The selected item in the previous “Grid” view will remain selected and display a fresh set of rows.
- Finally, the client-side business rules will have a chance to perform the processing in the
After phase of the command execution sequence.
Let’s respond to the markAsDiscontinued action and set the Discontinued' column value in the selected row of the Products` table accordingly.
The script of the SQL business rule is an anonymous block of SQL code to be executed by the database engine of the app’s data source. Developers can write any code that will be recognized as valid by the database server, including IF.. THEN, SELECT, INSERT, UPDATE, EXEC, etc.
The @ProductName parameter does not need to be declared. It is automatically bound to the value of the ‘ProductName’ field in the selected data item. The value assigned to the system parameter @Result_ShowNotification will instruct the app’s front end to display a notification when the control of the action execution flow is returned to the client. This particular instruction is the JavaScript code emitted by the server-side framework. Its presence will interrupt the default action processing flow. The assignment of 1 to the boolean system parameter @Result_Continue is instructing the front end to execute the server-generated JavaScript and to continue the default execution flow, which will finalize with refreshing of the products in the grid.
If the last line of code is not included, then the product’s ‘Discontinued’ value in the selected row will remain unchanged in the grid even though its value is correctly updated in the database.
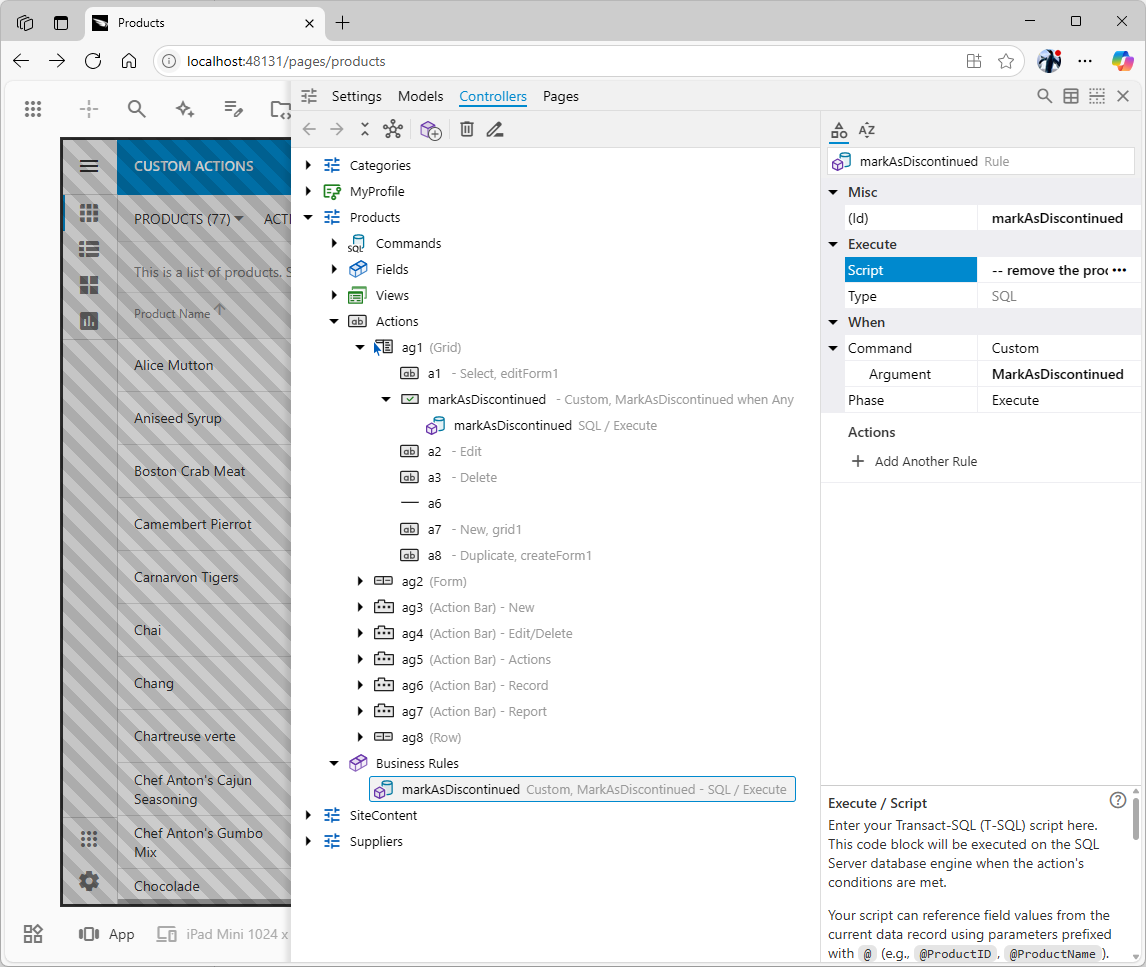
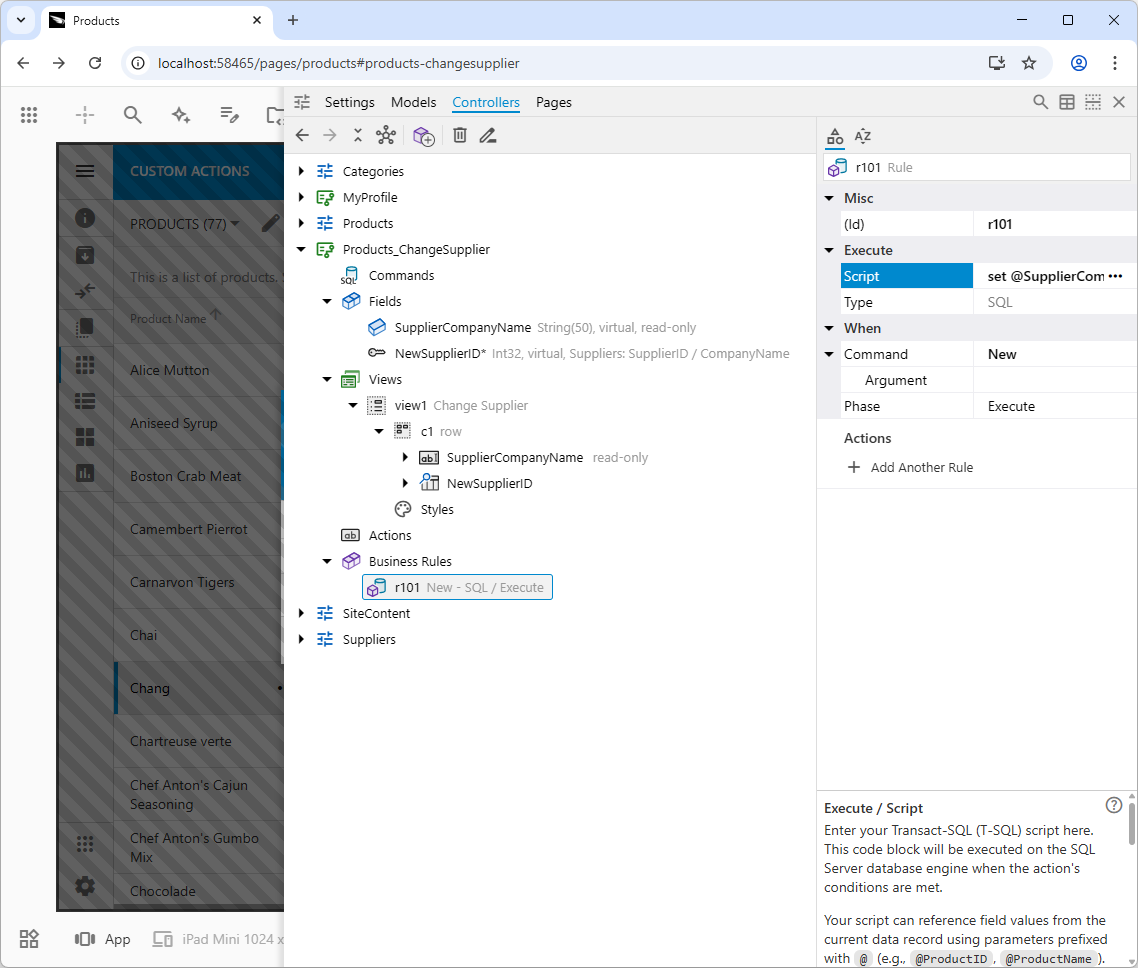
The Business Rules node in the controller hierarchy is the central hub for its business logic. The business rules are also available as child nodes of the actions they will be handling. The rule in the screenshot is linked to the markAsDiscontinued action because its When / Command and When / Argument properties match the action's corresponding Execute properties, a pattern that decouples the UI from the business logic. The markAsDiscontinued rule is available under Business Rules and also as the child of the parent action `ag1 / markAsDiscontinued’.
Note that the markAsDiscontinued rule is available under the Business Rules node and also directly under the ag1 / markAsDiscontinued action node.
Reload the application, choose Mark as Discontinued in the row’s context menu, confirm, and observe the corresponding notification displayed at the bottom of the screen.

This non-intrusive "toast" notification illustrates the communication flow from the server back to the client. The server-side business rule doesn't just update the database; it also composes and sends this message using the @Result_ShowNotification parameter to "close the loop" and confirm the action's success to the user. Alternatively, a message can be specified in the action’s ‘Execute / Notification’ property providing a simple method of execution confirmation.
Adding Buttons to the Form View
Search for products actions form and select the ag2 (Form) item in the search result. The action group ag2 and its associated properties will then be visible in the App Explorer.
The actions of the group with the Form scope appear as buttons in the forms views. Actions define a state machine that makes them appear when a specific command name with an argument was executed in the same scope. If an action does not have the ‘When / Command’ and ‘When / Command / Argument’ specified, then such action will appear when the view is displayed initially.
Expand the ag1 (Grid) group and drag its markAsDiscontinued action onto the ag2 (Form) node in the Products controller while holding the Ctrl key. Alternatively, use the context menus of the nodes to Copy and Paste the markAsDiscontinued node from ag1 to ag2. Drag the copied node to the first position in the ag2 action group. The markAsDiscontinued business rule shortcut is automatically available under Products / Actions / ag2 / markAsDiscontinued node.
An action defined in a group with the Form scope will appear as a button in the form view. Here we see the markAsDiscontinued action copied into the ag2 (Form) group. The same instance of the business rule is also linked here, demonstrating how the same logic can be reused and presented in different UI contexts.
Reload the app and click on a product row that has not been discontinued yet. Press the Mark As Discontinued button in the editForm1 view. The action confirm will be displayed on top of the form. The form will close if the action is confirmed, followed by a familiar notification at the bottom of the screen.
The Mark As Discontinued action, when initiated from the form button, behaves identically to its clone in the grid's context menu. This is because both actions trigger the same command and are handled by the same business rule, ensuring logical consistency and reducing code duplication.
If the Edit button is pressed while the form is open, then the Mark as Discontinued action button will remain visible. This is because its ‘When / Command’ property is set to Any by default. Change the property to Select or clear its value, if you want the action button to appear only when the form is in the initial state after a product is selected in the grid.
Collecting Parameters With “Confirmation” Controller
There will be times when a business rule will require additional parameters. Let’s say a Change Supplier option is added to the products’ context menu. The name of the custom action hints at the requirement to specify the supplier for the product. A form is needed to collect a parameter from the user when the action is initiated. Data controllers do support views of the “Form” type. Therefore a new controller must be implemented to confirm the action.
Right-click anywhere in the empty space of the Controllers hierarchy in the App Explorer and select Add Controller. Alternatively choose an existing controller and click the Add Another Controller button in the toolbar, select the namesake option in the controller’s context menu, or press the link with this name in the ‘Actons’ section in properties.
- Change the controller’s name to
Products_ChangeSupplier. Including the “Products” in the name of the new controller will hint at the existing relationship and simplify maintenance in the future.
- Select Fields in the ‘See Also’ section in the controller properties.
-
- Click Add Field and rename the new field to the
SupplierCompanyName.
- Configure that the field value is read-only.
- Add another field and rename it to
NewSupplierID.
-
- Set its ‘Type’ to
Int32.
- Change its ‘Label’ to
New Supplier.
- Specify that the field value is required.
- In the ‘Pick List’ group, configure the following:
-
- Select
Lookup in the ‘Input Style’.
- Select
Suppliers in the ‘Controller’.
- Select
grid1 in the ‘Items View’.
- Select
SupplierID in the ‘Value Field’.
- Select
Company Name in the ‘Text Field’.
- Select the
Products / Views node and press Add View in ‘Actions’.
-
- Enter
Change Supplier in the ‘Header / Label’.
- Enter
compare_arrows in the ‘Header / Icon’.
- In the ‘Presentation’ group, set ‘Modal’ to
Always, set ‘Modal / Fit Content’ to Yes, set ‘Modal / Max Width’ to sm - 576px.
- Drag the
SupplierCompanyName and NewSupplierID fields onto the view1 node. This will create the c1 category in the view and bind the fields to the view. The nodes under c1` are data fields with view-specific properties.
-
- Select the
c1 category and clear its ‘Appearance / Header Text` property.
- Add a business rule to the
Products_ChangeSupplier. Configure the properties of the r101 rule as follows.
-
- Add a new action to the
Products / Actions / ag1 (Grid) group and configure the action as follows:
-
- Enter
changeSupplier as the action ‘(Id)’.
- Enter
ChangeSupplier in the ‘Execute / Command / Argument’ property.
- In the ‘Presentation’ property group, configure properties as follows:
-
- Enter
Change Supplier in the ‘Text’ property,
- Enter
Replace the product supplier. in the ‘Description’ property,
- Enter
compare_arrows in the ‘Icon’ property
- Enter
Alt+M in the ‘Shortcut’ property.
- Select
Products_ChangeSupplier in the ‘Execute / Confirmation / Controller’ property.
- Set its ‘View’ sub-property to
view1.
- Drag the
changeSupplier action node to the desired position in the ag1 action group.
The script of the business rule r101 will set the value of the read-only Supplier Company Name field to the supplier of the product that was selected in the current context. The parameters with the @Context_ prefix are bound to the field values of the active view at the moment when the business rule is executing. The rule r101 executes when the form’s metadata is prepared on the server in response to the Change Supplier selected by the user in the product row’s context menu. The value of any field of the selected row in the Products / Views / grid1 is available if specified with the @Context_ prefix.
The business rule 101 does not have an explicitly defined action that triggers its execution. It responds to the system command New triggered by the framework to allow users to enter the values for the new data row. In this instance, the “new row” is the template for the parameters of the changeSupplier action in the Products controller. Typically the New command will reveal an action with the Insert command to allow creating new data items.
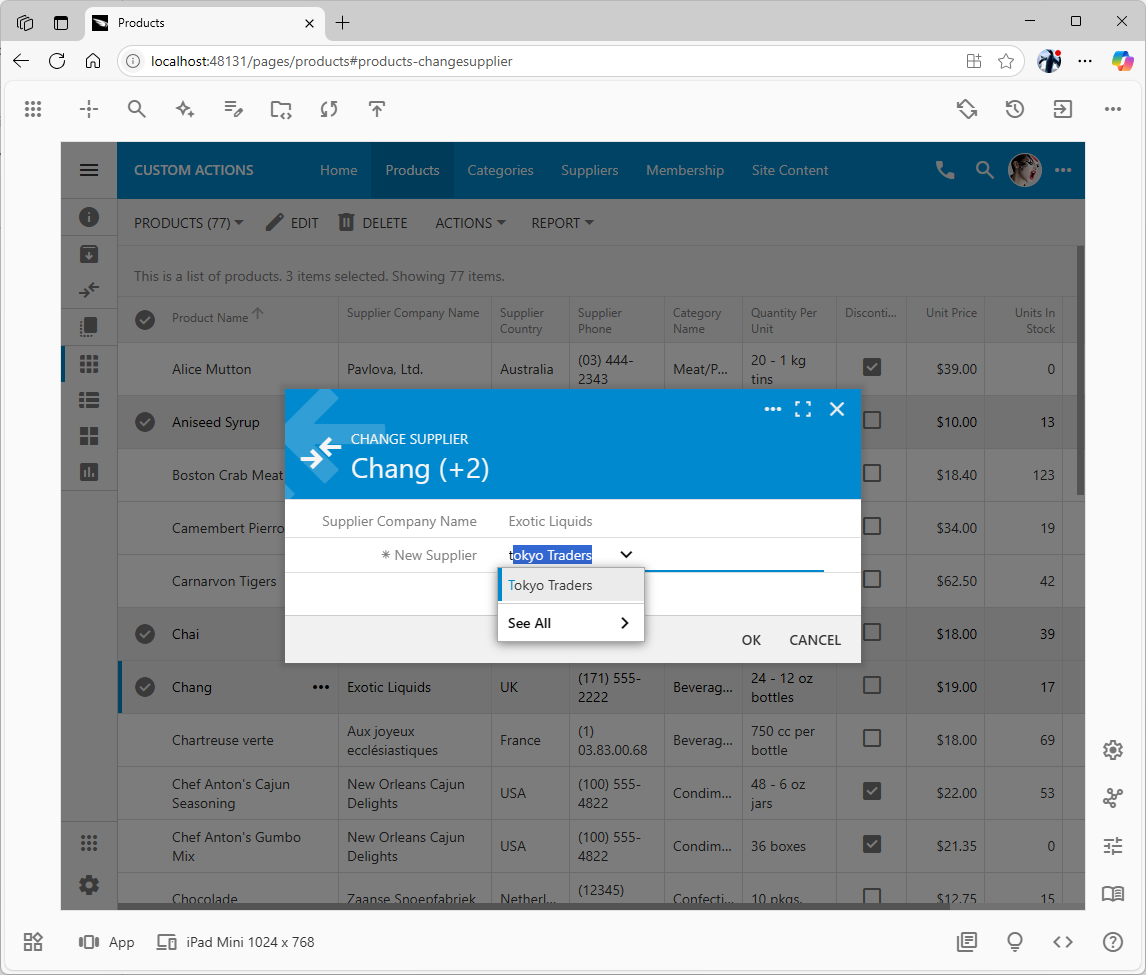
Reload the application and choose the Change Supplier in the context menu of the product row. The Change Supplier confirmation prompt will appear with the name of the selected product shown in the header. The form’s Supplier Company Name is read-only and shows the product supplier thanks to the business rule responding to the New command. Users can choose a supplier in the New Supplier input.
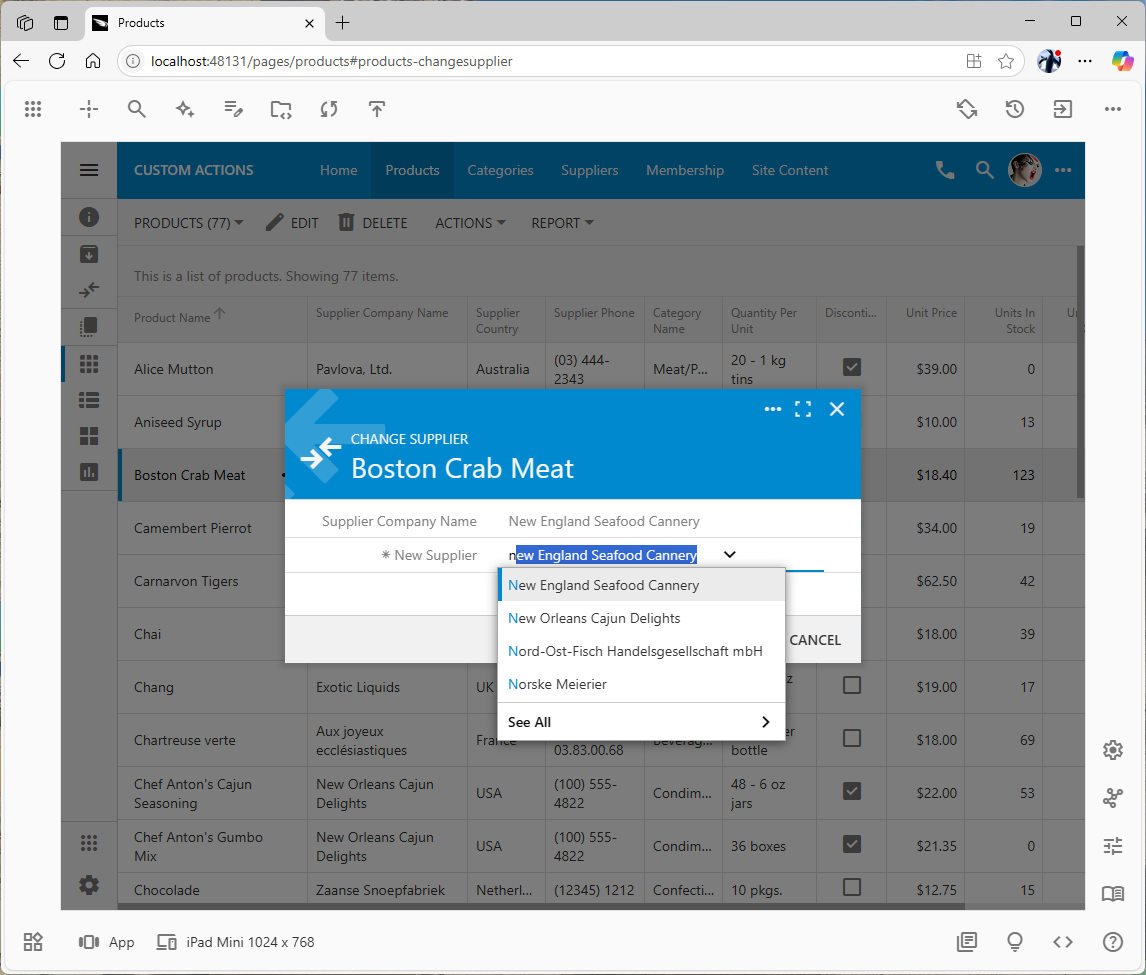
The view1 form of the Products_ChangeSupplier is shown when the user is selecting a new supplier for the product. The form is displayed when app users initiate the changesSupplier action in the `Products controller. This modal form acts as a temporary data collection tool. This powerful technique allows for the creation of complex, multi-step operations that require additional user input without cluttering the primary interface.
Using the “Confirmation” Controller Parameters
The confirmation controller is referring to the SupplierCompanyName of the selected product with the “@Context_” prefix in the SQL business rule. If a Code business rule is being implemented, then the parameter symbol must be omitted from the prefix in the argument of the SelectFieldValue(string fieldName) method.
An SQL business rule of the data controller that had its action confirmed must refer to the collected parameters as “@Parameters_” followed by the name of the field in the confirmation controller. The business rule handling the confirmed changeSupplier action must reference the new supplier as @Parameters_NewSupplierID.
Search for changesupplier action and select the first option. Right-click the changeSupplier node and select Add Business Rules in the context menu. Set its ‘Type’ to SQL.
Enter the following script in the ‘Execute / Script’ property of the changeSupplier business rule in the Products controller:
SQL
12345678910111213-- Replace the product supplier
update Products
set Products.SupplierID = @Parameters_NewSupplierID, Products.Discontinued = 0
where Products.ProductID = @ProductID

-- Find the name of the new supplier
select @SupplierCompanyName = Suppliers.CompanyName
from Suppliers
where Suppliers.SupplierID = @Parameters_NewSupplierID

-- Let the user know the name of the product supplier
set @Result_ShowNotification = 'The new supplier is "' + @SupplierCompanyName + '"'
set @Result_Continue = 1
The script will replace the product’s supplier and clear the Discontinued flag. Then it will fetch the new supplier’s name from the Suppliers table using the @Parameters_NewSupplierID parameter. The rule will instruct the app’s frontend to display a notification and continue the default action execution flow when the control is returned from the server code to the client app in the browser.
Reload the application and validate the business logic.
Executing Action on Multiple Rows
There is a view selector dropdown above the product list. It shows the view’s header and the number of items in the view. Open the dropdown and choose the Multi Selection option in the menu. Select a few products in the grid1 view. Press the Alt+R on the keyboard. The confirmation prompts will show the name of the last selected product and the number of other selected items in parentheses.
Enter a new supplier and press OK.
The framework is designed to handle batch operations gracefully. When an action is initiated with multiple items selected, the confirmation UI adapts to show the primary record and the count of other selected items. The same business logic will then be executed by the server for each item in the selection.
The server-side framework will iterate over the selected items and execute the Custom | Change Supplier action on each of them. The business changeSupplier will replace the supplier of all selected products.
The frontend will clear the checkboxes of the affected products, refresh the view, and keep the selection on the last selected product.
Conditional Action Confirmation
The NewSupplierID field in the Products_ChangeSupplier controller requires a value. Users are forced to choose a supplier in the confirmation controller’s form for the changeSupplier action to proceed. This simple validation may not be sufficient in some situations.
Let’s impose a requirement that the new supplier must have at least one product in the same category as the original supplier. In other worlds, both suppliers must specialize in the product’s category. For example, the selected product Ipoh Coffee belongs to the Beverages category. Its supplier Leka Trading can be replaced with the Exotic Liquids, but not with a supplier that does not have a product in the same category.

This view, filtered to the "Beverages" category, illustrates the data ecosystem for a specific product. This visual context helps in formulating the business rule that a new supplier must also have a presence within this same category..
For that, the ‘CategoryID’ of the selected product must be known when the application is about to validate the new supplier selected by the user.
Persisting Context Information
Let’s add the CategoryID to the confirmation controller to persist the category of the product selected in the current context before the confirmation form is displayed.
Conditional Confirmation
The Products_ChangeSuppier controller lacks defined action groups. Consequently, when confirming actions from other controllers, the frontend framework automatically augments the confirmation controller. This augmentation involves adding a Form-scoped action group that includes actions with Confirm and Cancel commands.
To control the action confirmation form, an action group must be explicitly defined. Search for Products_ChangeSupplier actions and choose the first match. Configure the actions as follows:
- Click Add Action Group and set the scope of the new action group to
Form.
- Press Add Action and set the properties as follows
-
- Set ‘(Id)’ to
confirm.
- Keep the
Custom value in the ‘Execute / Command’ and enter Confirm in the ‘Execute / Command / Argument’.
- Enter
Apply in the ‘Presentation / Text’ property.
- Scroll the properties down and click Add Another Action link:
-
- Set
(Id)’ to cancel`.
- Choose
Cancel in the ‘Execute / Command’ property.
- Enter
Cancel in the Presentation / Text property.
Reload the app and try replacing a product supplier. You will notice that pressing the Apply button has no effect other than forcing the input of the new supplier. The action confirmation form remains open even when the new supplier is specified and the button is pressed. The Custom command and field values in the form do travel through the processing stack from the client to the server and back whenever the button is pressed. The “confirmation” state of the controller will keep the “Form” view from closing until the Confirm or Cancel command is executed. The Cancel button works as expected - users can dismiss the form by pressing the corresponding button or the standard Close icon in the form’s title.
Let’s create a business rule in the confirmation controller to handle the Custom command and Confirm argument. The rule will validate the selected supplier and issue the Confirm command if the new supplier meets the criteria of specializing in the same category of products.
- Search for
Products_ChangeSupplier confirm in the studio and choose the first match.
- Right-click the
confirm action node and select the Add Business Rule option in the context menu of the node.
- Set the ‘Type’ of the new rule to
SQL.
- This rule will execute whenever the
Apply button is pressed. Enter the following code in the Execute / Script property of the confirm rule:
SQL
1234567if @NewSupplierID in (select distinct Products.SupplierID
                      from Products where Products.CategoryID = @CategoryID)
    -- instruct the client framework to issue the 'Confirm' command
    set @Result_Confirm = 1
else
    -- set focus on the "NewSupplierID" and display a notification next to the field input
    set @Result_Focus = 'NewSupplierID, This supplier doesn''t specialize in this product''s category.'
The configuration of the Products_ChangeSupplier controller with the full set of fields and the confirm business rule is shown in the screenshot below.
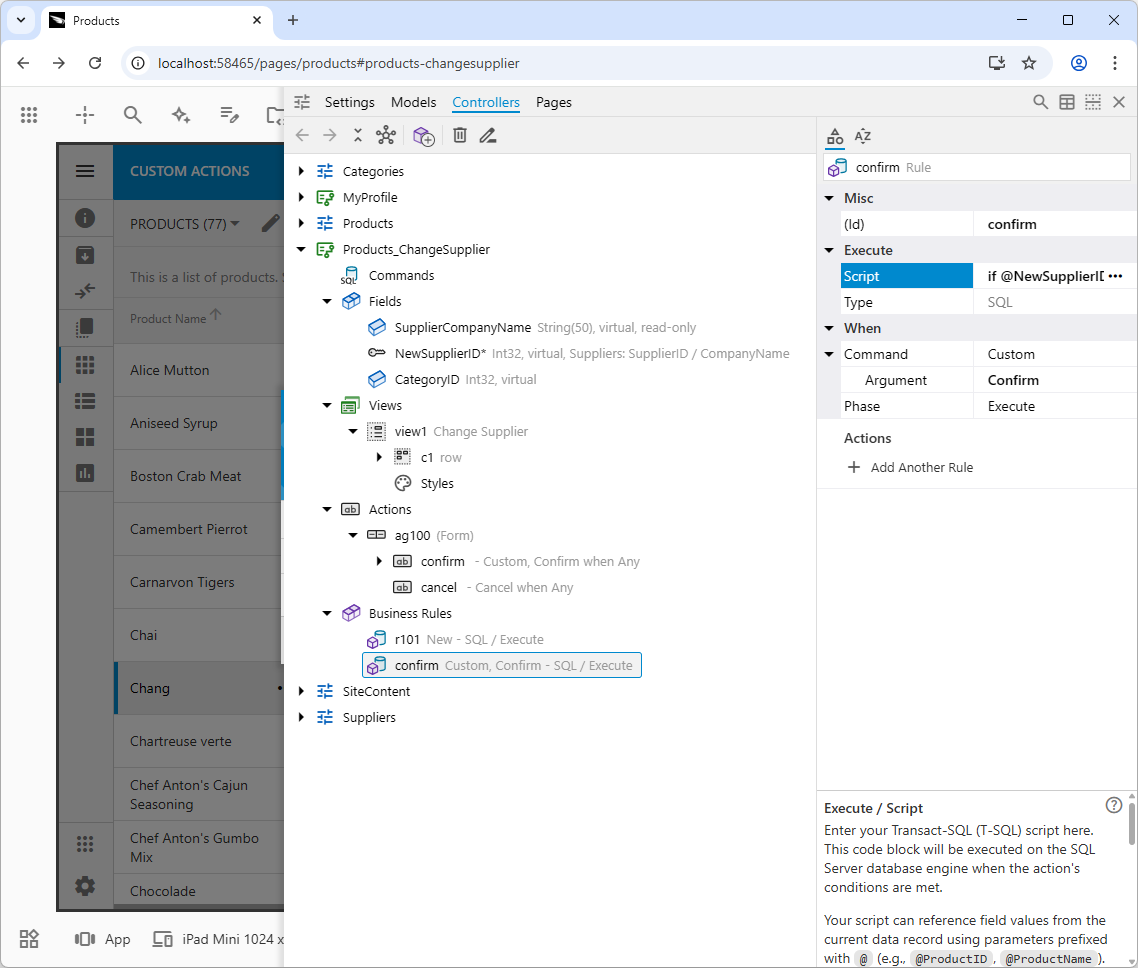
This configuration implements a two-stage confirmation. The user's click on the "Apply" button first triggers a custom Confirm command that only executes this validation rule. Only if the validation logic passes does the rule programmatically trigger the real Confirm command on the client by setting the @Result_Confirm parameter.
This is how the validation rule responds when the invalid supplier is selected.
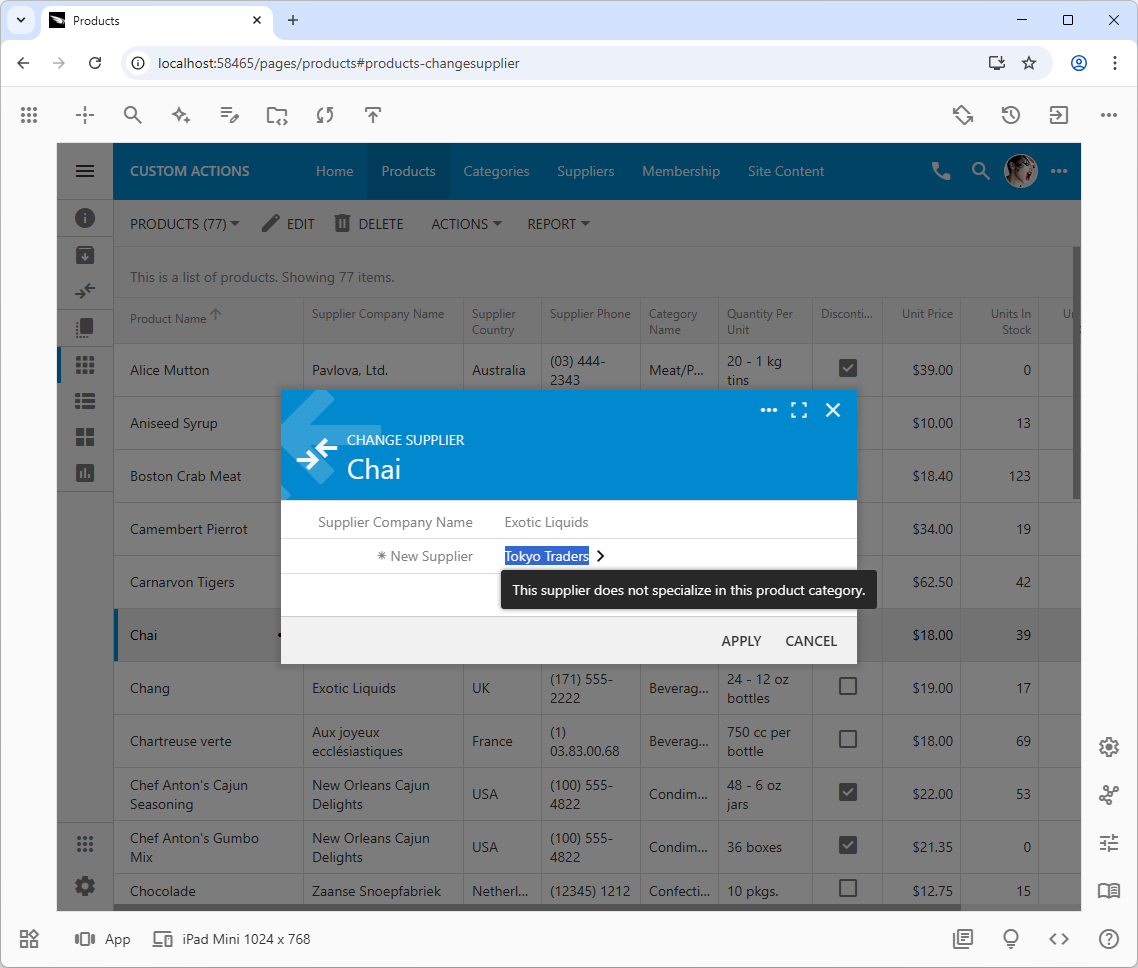
This targeted error message showcases intelligent server-client communication. Instead of returning a generic error, the server-side business rule uses the @Result_Focus parameter to instruct the client-side UI to focus on the specific field that failed validation and display a helpful message directly next to it. Use a comma to separate the field name from the message. The front end will automatically activate the tabbed category or category associated with another wizard step if the field input is not visible at the moment.
Innovation: Using SQL to Command the User Interface
Developers familiar with database-driven applications know SQL as the language for data manipulation. Traditionally, its role ends at the database server. However, the application framework dramatically expands the capabilities of SQL, elevating it to a powerful language that can direct the behavior of the client-side user interface. This innovative approach allows developers to orchestrate complex front-end interactions without writing a single line of JavaScript.
The magic lies in a "bridge" created by the framework, which facilitates a two-way conversation between your SQL business rules and the user's browser. This bridge is built on a special set of parameters that the framework understands.
Passing Context from Client to Server
When a business rule executes, it often needs to know the context of the user's action. The framework makes this incredibly simple by automatically packaging data from the UI into SQL parameters.
@Context_ Parameters: When a confirmation controller is used, your SQL business rule can access any field value from the original row that initiated the action. As seen in the r101 rule, set @SupplierCompanyName = @Context_SupplierCompanyName pulls the supplier's name from the selected product row in the grid to display it in the confirmation form.@Parameters_ Parameters: After a user fills out a confirmation form, the values they entered are passed back to the final business rule. The changeSupplier rule uses @Parameters_NewSupplierID to get the ID of the new supplier that the user selected in the modal dialog.
This seamless passing of context and parameters eliminates the need for manual data binding and allows the developer to focus purely on the logic.
Sending Commands from Server to Client
The most innovative aspect of this system is its ability to send commands from the SQL script to the client application. This is achieved through a reserved set of @Result_ parameters. When your SQL script assigns a value to one of these parameters, the framework intercepts it and translates it into a specific front-end action.
This tutorial demonstrated several examples of this server-to-client command flow:
- Displaying Notifications: In the
markAsDiscontinued rule, the simple statement set @Result_ShowNotification = '...' instructs the front end to display a non-intrusive "toast" notification to the user after the action completes.
- Controlling Workflow: In the
changeSupplierValidationRule, set @Result_Confirm = 1 is a command that tells the client framework to proceed with the 'Confirm' command, effectively closing the modal form and allowing the action's lifecycle to continue.
- Directing User Focus and Validating In-Place: The most powerful example is the use of
set @Result_Focus = 'NewSupplierID, ...'. This single line of SQL instructs the browser to set the user's focus on the NewSupplierID input field and display a specific validation message directly next to it. The framework is even smart enough to activate the correct tab or wizard step if the field is not currently visible.
For the ultimate level of front-end control, the framework provides the @Result_ExecuteOnClient parameter. Assigning a string of JavaScript code to this parameter allows a server-side business rule to emit that script directly to the client. This process is cumulative; every assignment to @Result_ExecuteOnClient adds a new block of JavaScript to a list. When the server response returns to the browser, all collected scripts are evaluated and executed in the order they were added, enabling limitless possibilities for custom client-side behavior driven directly from your server logic.
This approach fundamentally changes the role of a database developer. You are no longer just manipulating data; you are building a rich, responsive, and interactive user experience using the declarative power of SQL.
Going Beyond SQL with "Code" Business Rules
SQL business rules offer a fast and declarative way to interact with your database. However, there are times when business requirements demand more: interacting with external web services, performing complex in-memory calculations, or executing logic that goes beyond the capabilities of SQL. For these scenarios, the application framework provides "Code" business rules, allowing you to write your logic in a full-featured programming language like C# or Visual Basic.
"Code" business rules follow the same execution pattern as their SQL counterparts. They are triggered by the Command and Argument of an action and can be configured to run during the same execution phases. The key difference is that instead of writing SQL script, you implement your logic within a method in a dedicated class file.
Accessing Data and Commanding the Client
The framework ensures a consistent development experience between SQL and Code rules.
- To access the values of fields from the current data row or from a confirmation controller, you use the
SelectFieldValue("FieldNameGoesHere") method. This method provides access to the same values as the @ or :-prefixed parameters in SQL, but without needing the prefix.
- To command the client-side UI, you use the
Result property of your business rule class. This property is an instance of the ActionResult object and provides methods that are the direct equivalent of the @Result_ parameters. In fact, the framework simply interprets the @Result_ parameters in SQL rules and translates them into calls to the Result object's methods.
For example:
set @Result_ShowNotification = '...' in SQL is equivalent to Result.ShowNotification("...") in C#.set @Result_Confirm = 1 in SQL is equivalent to Result.Confirm() in C#.set @Result_Focus = 'Field,Msg' in SQL is equivalent to Result.Focus("Field", "Msg") in C#.
C# Examples: Replicating the "Change Supplier" Logic
Let's revisit the Products_ChangeSupplier controller and see how the SQL rules can be replaced with C# implementations to achieve the exact same functionality.
Creating and Editing “Code” Rules
Search for the changesupplier r101 in the App Studio and select the first match. In the App Explorer, Ctrl+Click the confirm rule and delete both SQL business rules from the Products_ChangeSupplier.
Add the new rule under the Business Rules node and set its ‘Type’ to Code and its ‘Execute / Command’ property to New. There is no ‘Execute / Script’ property for this rule but there is the Edit Code link in the ‘Actions’ section of the Properties Grid. Clicking the link will display a notification at the bottom of the screen: Click the app to generate the rule’s code.. The code file for the rule does not exist yet. Tap out of the App Explorer and click the “frozen” application.
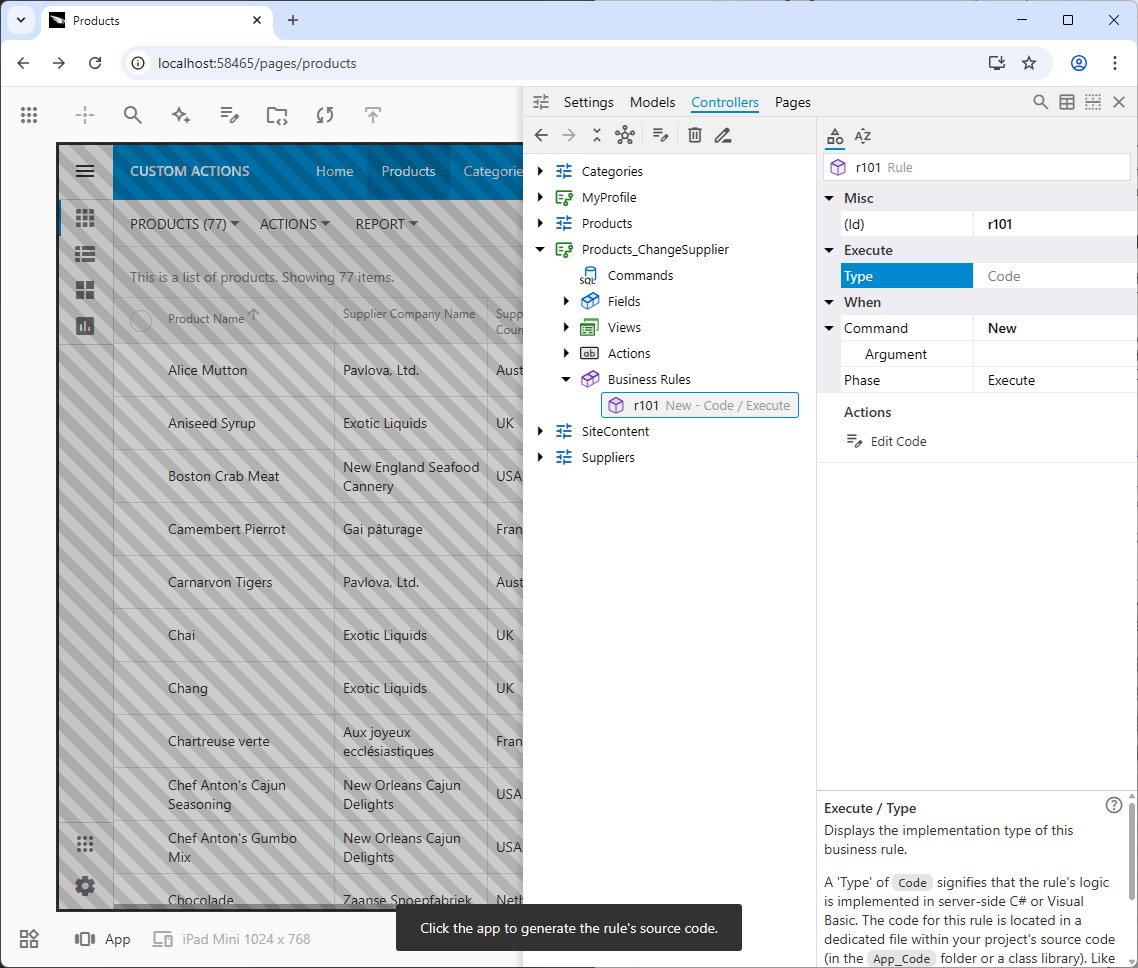
The “Code” business rule does not have the Execute / Script property until the app is re-generated. The app in the need of a code generation will remain “frozen” even after being reloaded in the browser. The developer will need to click the app surface to re-generate the code base when they are ready. The Edit Code button in the properties will remind that the code generation needs to take place before the code becomes available for editing.
The code generation will take place before the app reloads. Click the Controllers quick access button at the bottom on the right toolbar to bring back the App Explorer. The r101 will be selected in the hierarchy. You will notice the ‘Execute / Script’ read-only property showing the relative path of the Products_ChangeSupplier/Products_ChangesSupplier.r101.cs file. If you click the Edit Code link in the ‘See Also’ section, Visual Studio will load the project with the code business rule file ready for editing. Note that the rule’s code is generated once. It is up to the developer to make changes to the code file.
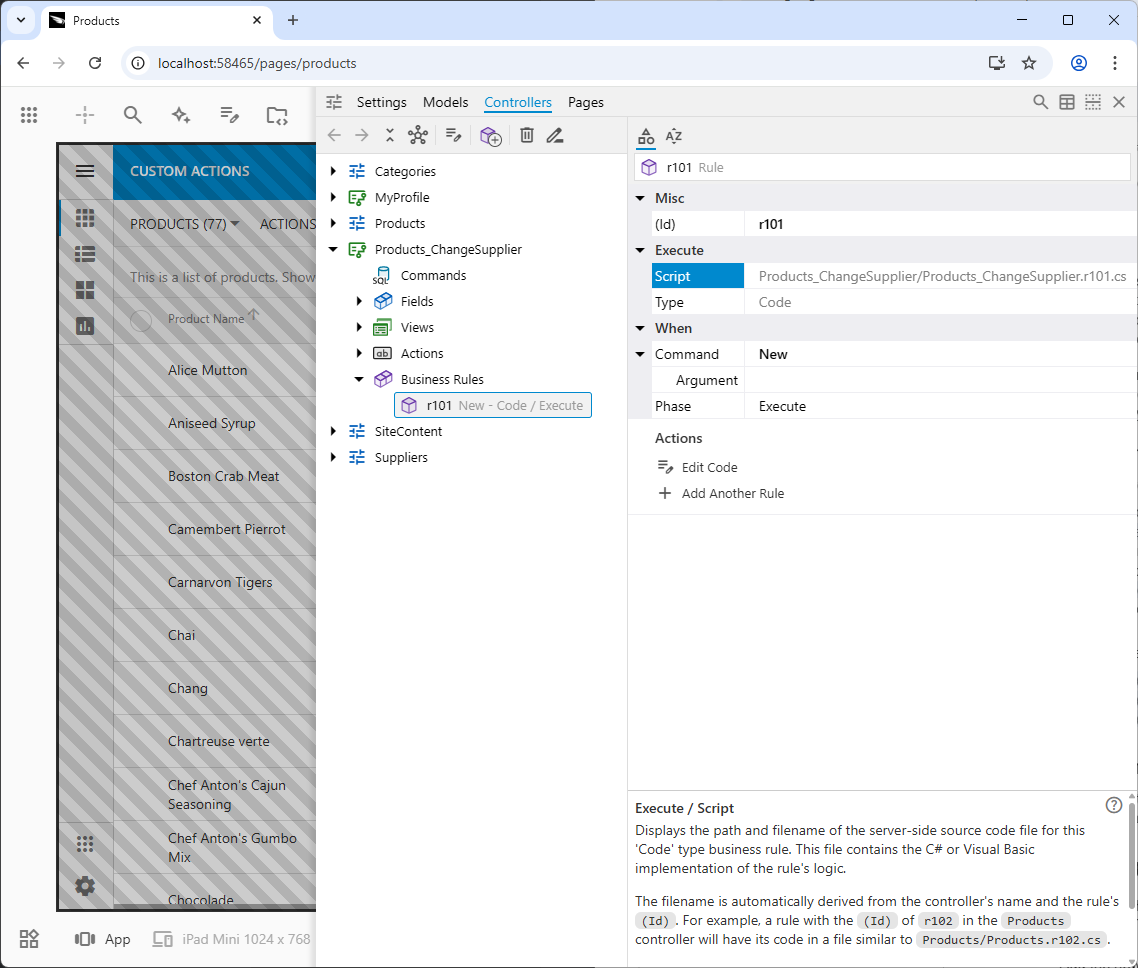
The ‘Execute / Script’ property of the Code business rule is read-only. Its value shows the relative path to the code file implementing the rule. Click Edit Code in the properties of the rule to have its code loaded in Visual Studio.
Now create the business rule to handle the confirm action following the same steps explaining how to add an SQL business rule for the action. Make sure to set this rule's type to Code.
Click the app to generate the template for the second rule, activate the App Explorer and proceed to edit code of the rules as explained below.
Initializing the Confirmation Form
The r101 SQL rule was responsible for populating the SupplierCompanyName and CategoryID fields when the confirmation form was displayed. Here is the C# equivalent:
C#
123456789101112131415161718192021// ~/app/App_Code/custom/Products_ChangeSupplier.r101.cs
using System;
using MyCompany.Data;
using MyCompany.Models;

namespace MyCompany.Rules
{
    public partial class Products_ChangeSupplierBusinessRules : MyCompany.Data.BusinessRules
    {

        /// <summary>This method will execute in any view for an action
        /// with a command name that matches "New".
        /// </summary>
        [Rule("r101")]
        public void r101Implementation(Products_ChangeSupplierModel instance)
        {
            instance.SupplierCompanyName = Convert.ToString(SelectFieldValue("Context_SupplierCompanyName"));
            instance.CategoryID = Convert.ToInt32(SelectFieldValue("Context_CategoryID"));
        }
    }
}
This code executes when the New command is triggered. It uses SelectFieldValue to read the Context_SupplierCompanyName and Context_CategoryID from the selected product and assigns them to the instance of the data model, which the framework then uses to render the form. Note that the instance parameter can be renamed to improve the code readability (e.g. changeSupplier or changeSupplierParams).
Implementing Conditional Validation
The confirm SQL rule validated that the new supplier specializes in the product's category. The C# version uses the SqlText class to execute a database query and then uses C# logic to process the result.
C#
123456789101112131415161718192021222324252627282930313233343536// ~/app/App_Code/custom/Rules/Products_ChangeSupplier.confirm.cs
using System;
using MyCompany.Data;
using MyCompany.Models;

namespace MyCompany.Rules
{
    public partial class Products_ChangeSupplierBusinessRules : MyCompany.Data.BusinessRules
    {

        /// <summary>This method will execute in any view for an action
        /// with a command name that matches "Custom" and argument that matches "Confirm".
        /// </summary>
        [Rule("confirm")]
        public void confirmImplementation(Products_ChangeSupplierModel instance)
        {
            var specializesInProductCategory = false;
            using (var qry = new SqlText(
                "select distinct Products.SupplierID from Products where Products.CategoryID = @CategoryID"))
            {
                while (qry.Read(new { CategoryID = instance.CategoryID.Value }))
                {
                    if (instance.NewSupplierID.Equals(qry["SupplierID"]))
                    {
                        specializesInProductCategory = true;
                        break;
                    }
                }
            }
            if (specializesInProductCategory)
                Result.Confirm();
            else
                Result.Focus("NewSupplierID", "This supplier doesn't specialize in this product's category.");
        }
    }
}
Here, the confirmImplementation method is decorated with the Rule("confirm") attribute. It creates and executes a SqlText query to fetch all valid suppliers for the product's category. It then iterates through the results in C#. If the chosen NewSupplierID is found, it calls Result.Confirm() to proceed with the action. Otherwise, it calls Result.Focus(...) to stop the workflow and display a validation error on the client.
An Optimization Note
The C# validation code above is written for clarity, demonstrating how to execute a query and iterate over a result set. For this specific requirement, a more efficient query can be constructed to ask the database a more direct question, avoiding the need to transfer a list of IDs and iterate in the middle-tier.
A more optimized implementation might look like this:
C#
1234567891011121314151617// Optimized Validation
[Rule("confirm")]
public void confirmImplementationOptimized(Products_ChangeSupplierModel instance)
{
    var query = @"select count(*) from Products
                  where CategoryID = @CategoryID and SupplierID = @NewSupplierID";
    var specializes = (int)SqlText.ExecuteScalar(
        query, new {
            CategoryID = instance.CategoryID.Value,
            NewSupplierID = instance.NewSupplierID.Value
        });

    if (specializes > 0)
        Result.Confirm();
    else
        Result.Focus("NewSupplierID", "This supplier doesn't specialize in this product's category.");
}
This version uses SqlText.ExecuteScalar to execute a query that returns a single value (0 or 1). This is significantly more performant as it minimizes data transfer and complexity.
Conclusion
Custom actions provide developers with a powerful and flexible mechanism to extend application functionality and tailor it to specific business needs. At their core, custom actions allow you to trigger server-side logic (through business rules) directly from the user interface, whether from grid context menus, form buttons, or even system-wide menus. Developers can define these actions, integrate them seamlessly into the UI, and implement robust SQL or Code business rules to execute any necessary operations, from updating data to generating notifications.
Beyond basic execution, the framework supports sophisticated scenarios such as collecting additional parameters from users via "confirmation" controllers. This enables highly dynamic and context-aware actions, where user input can drive complex business logic. Furthermore, custom actions can be designed to operate on single or multiple selected records, facilitating efficient batch operations. The ability to implement conditional confirmations, with client-side validation, ensures data integrity and a refined user experience.
In essence, custom actions empower developers to build highly interactive and business-rule-driven applications, automating workflows and providing users with intuitive tools to manage their data with precision and efficiency.