Tagging comes naturally to Internet users. We tag posts, images, and videos to stay organized. We follow tags to stay up-to-date with the endless information stream. Surprisingly, this common feature is a challenge for developers to implement. Tagging requires many-to-many relationships in the application database and a significant amount of server and client-side programming. Code On Time has an unfair advantage over the competing tools and frameworks since the support for tagging is built into the backend framework and the frontend of applications!
User Experience
Users can filter and search for the data items with the desired combination of tags. A read-only field in a form is rendering tags as a simple comma-separated list. An editable field provides two kinds of tagging input - a dynamic tag list with a dedicated text input or a static checkbox list.
Data Input
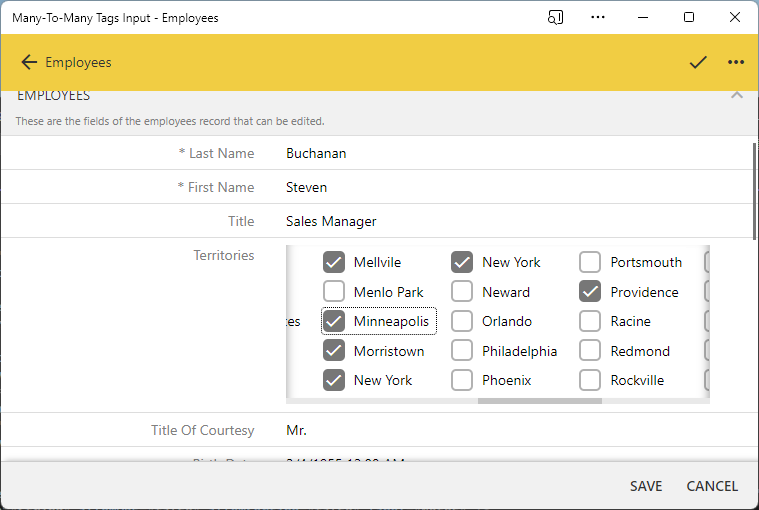
Here is the tags input in the reading pane of the employee record shown in the edit mode. Individual tags associated with the employee are outlined in the Territories field. Users can type ahead to assign a sales territory to an employee. Tags are selectable with a tap, click, or with the “arrow” keys on the keyboard. Pressing of the Delete or Backspace key will remove the selected tag from the list.
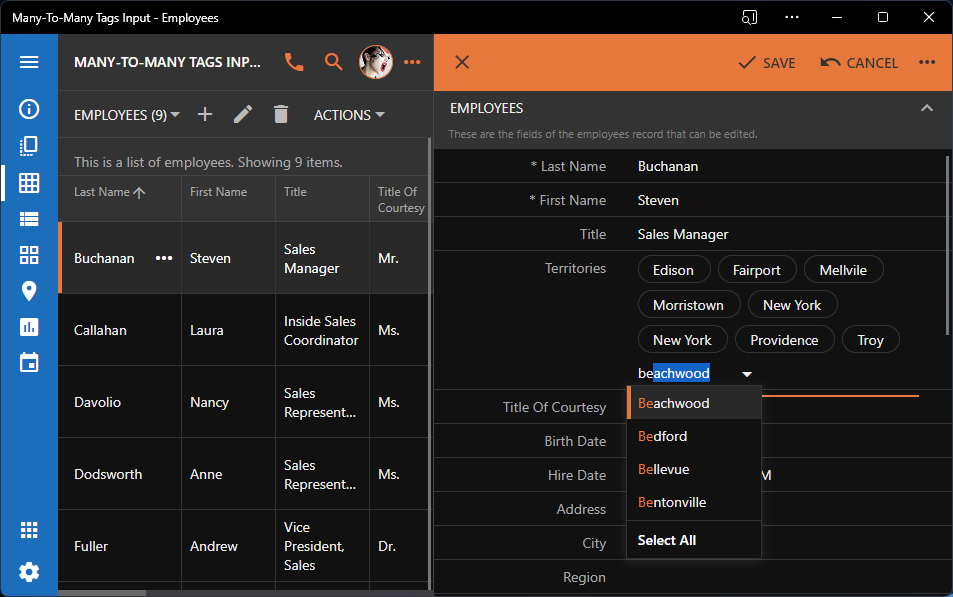 The reading pane is the standard feature of the apps created with Code On Time. Users may opt to display the data item details side-by-side with the item list. Many-to-many fields collapse and expand the contents when the list of selected tags is changing.
This is the same data input on a device with a small form factor. The field will expand and shrink vertically to accommodate the selected tags. Users may select all items visible in the dropdown attached to the tag input with a single tap of the Select All option.
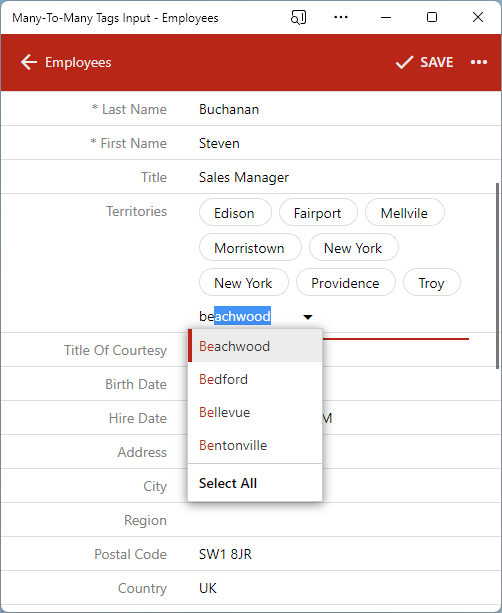 Forms are displayed in the fullscreen mode on the devices with the small form factor. The data input of a many-to-many field will work on screens of any size without reduction in the functionality.
Editable tags are outlined and do not provide any controls unless selected. Tapping or clicking on the item will show its context menu. Option Delete will remove the tag from the list. Option View will display a form with the tag details.
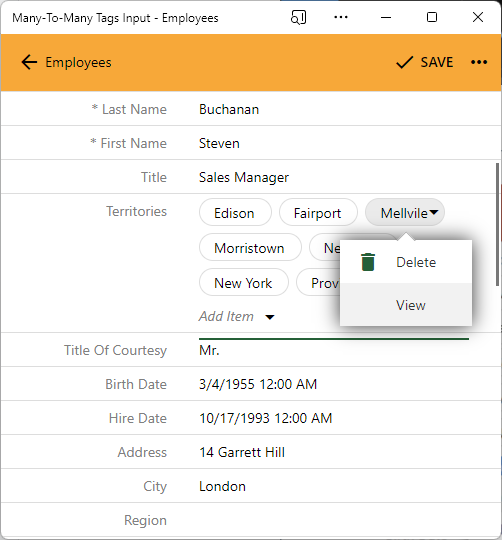 Tags are rendered as the list with a simple outline of the tag text values for improved readability. Additional user interface options are available when a tag is selected. Each tag is a data object. Users may view the details of the object in the dedicated form. The rich context helps users to work with the data and explore the relationships when needed.
Searching and Filtering
Tags are rendered as the static comma-separated list of values when the many-to-many field of a data item is presented in the List view style. The server-side framework is optimized to fetch the tags of the visible data items in a single database request. The tags are sorted in the order specified in the controller, which is responsible for the lookup of the tags.
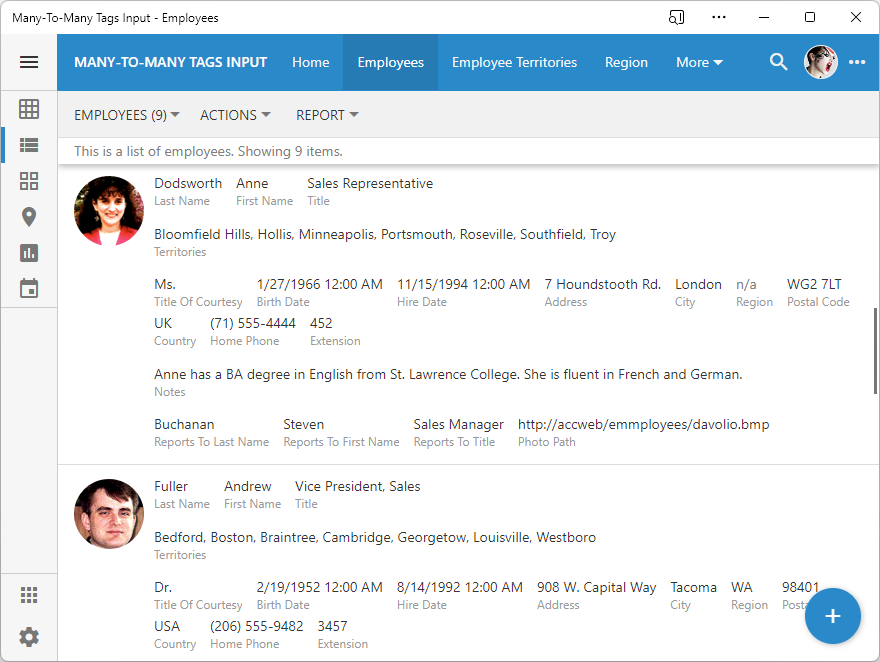 Many-to-many fields display the tags as a simple comma-separated list. The server-side framework performs a single database request to fetch tags associated with the data items that are being returned to the server. This significantly improves the performance of applications.
Data items are frequently presented in the Grid view style. Tags in the cell of the many-to-many field column are also rendered as the comma-separated list.
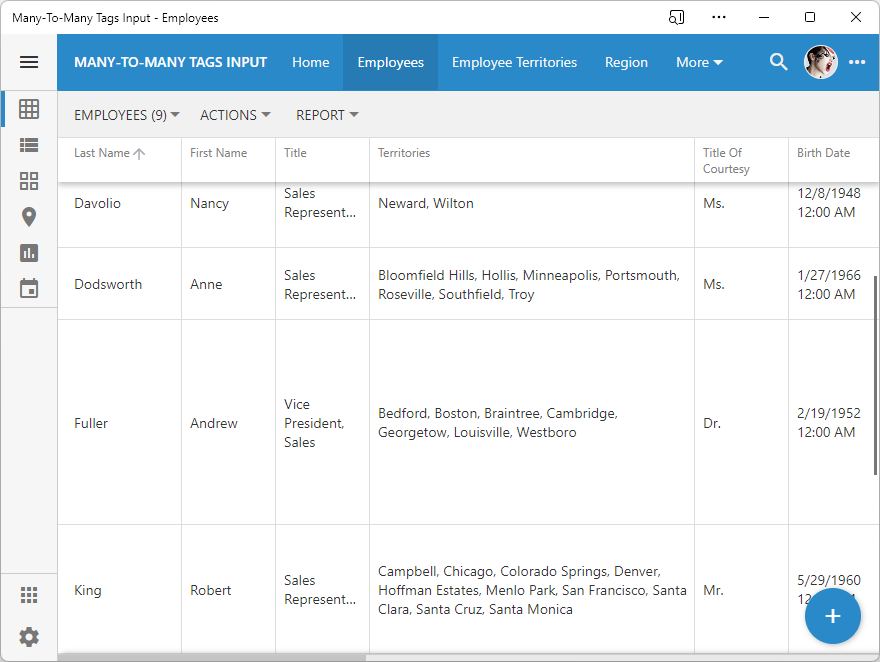 Grid is the default presentation view style. Many-to-many fields are rendered as a comma-separated list of tags in the grid cells of a data items.
A tap on the column header will display the context menu that includes the full set of available tags. Users may choose one or more tags to locate the matching set of data items in the current view. Displayed items are guaranteed to have all tags that were selected in the menu. Data items that are not tagged with all selected tags are excluded from the presentation with the help of the smart queries composed by the application framework on the server.
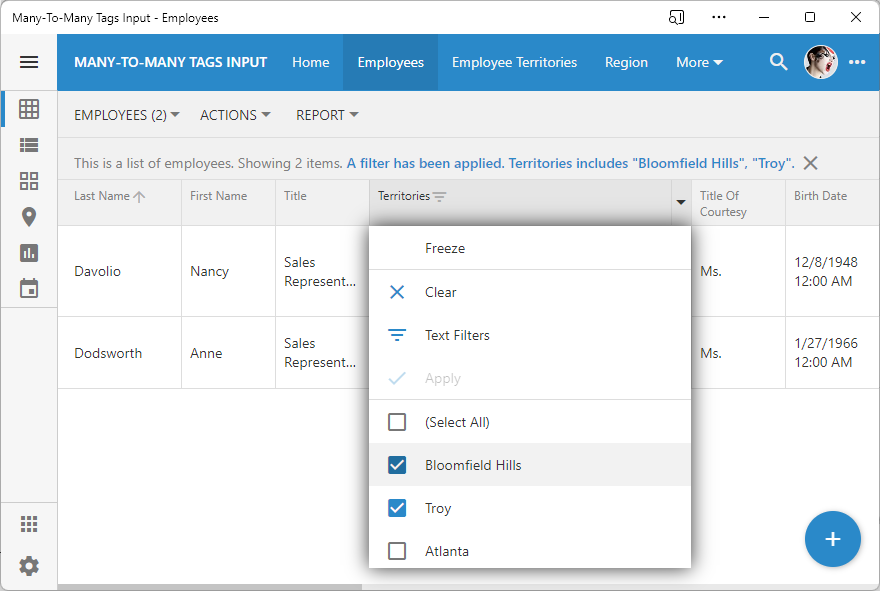 Tapping on the grid column will present available filtering and sorting options along with the list of sample values. Tap-hold or right-click the column header to access the context menu without sample values.
The built-in Advanced Search form is available as an alternative to the Quick Find in every data controller. The form is displayed when users tap the “more” menu on the right-hand side of the standard search input. It allows querying in the many-to-many fields with the sample set of tags. Only the data items that are tagged with the specified values will be displayed in the search output. Users may also search for the tagged data items by the partial tag value with the contains, starts with, or end with options.
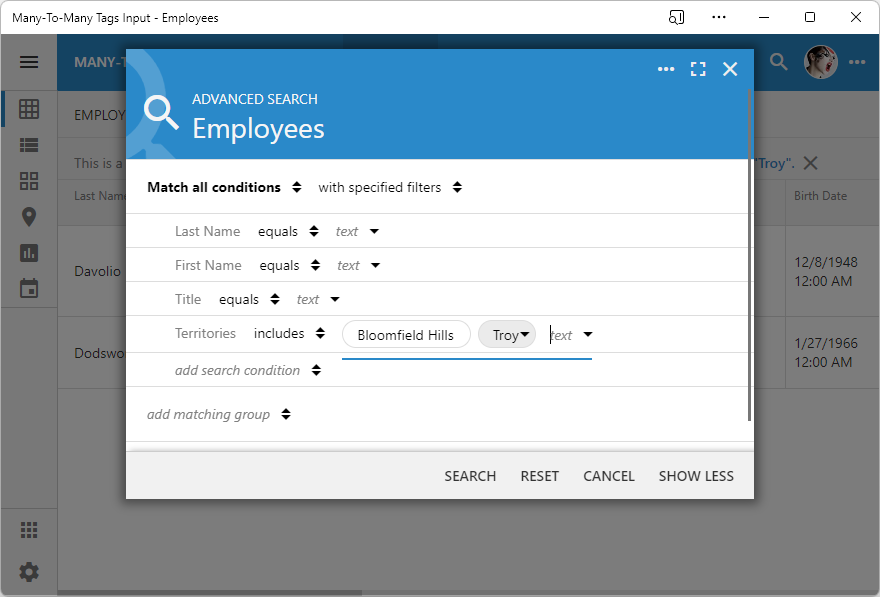 Searching and filtering in the many-to-many fields is possible with the "includes" and "does not include" operators. Users type-ahead the desired tags that must be associated with the data items in the output. Other operators provide various methods of search by the partial tag value.
Implementing Many-To-Many Relationships
Typical tags input requires a many-to-many relationship in the database. Tables Employees and Territories are linked with the junction table EmployeeTerritories in the database diagram shown below. If a sales territory is assigned to an employee, then a row is created in the EmployeeTerritories table binding together the primary keys of the corresponding parent rows in Employees and Territories. In this particular example the EmployeeID and TerritoryID are also a part of the composite primary key of the EmployeeTerritories table, which prevents the duplicate assignment of territories to the same employee.
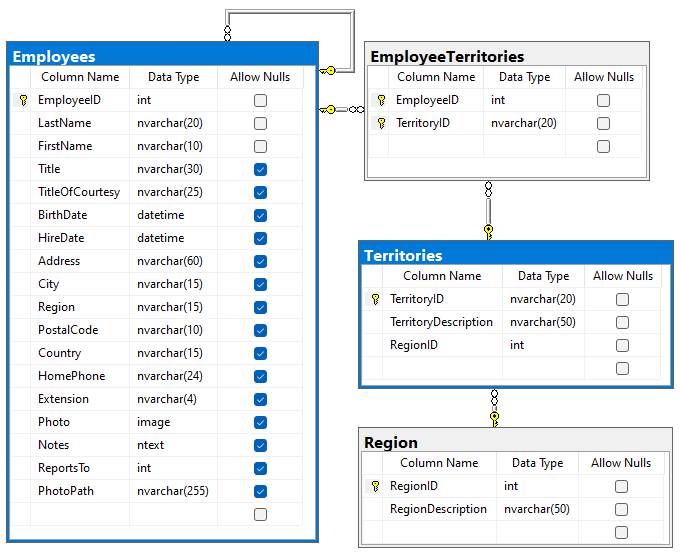 The typical many-to-many relationship schema includes two tables linked through the corresponding primary keys of the third "junction" table.
The diagram reveals the complexity of the searching and filtering with tags. Tag values in the filer come from the Territories table. Users expect to see the Employees table rows that are linked to multiple rows in the EmployeeTerritories table. The application framework injects the SQL expressions referencing the EmployeeTerritories into the WHERE clause when fetching the Employees data items.
Data models are the building blocks of applications created with Code On TIme. A model defines the set of fields and the source of data. Data may come from the database or external API.
The app builder transforms each data model into a metadata file called “controller”. The data controller provides information used by the frameworks of the application backend and frontend at runtime. The metadata instructs the framework how to fetch and process data on the server. The same metadata tells the frontend how to perform the data presentation. Developers customize the various aspects of the data controllers in the Project Designer. The data controllers produced by the app builder are functional out-of-the-box and may be used frequently without any customization.
It is easy to set up a many-to-many relationship in the app built with Code On Time. Create a data model for each database entity. Then define the many-to-many field in the Project Designer.
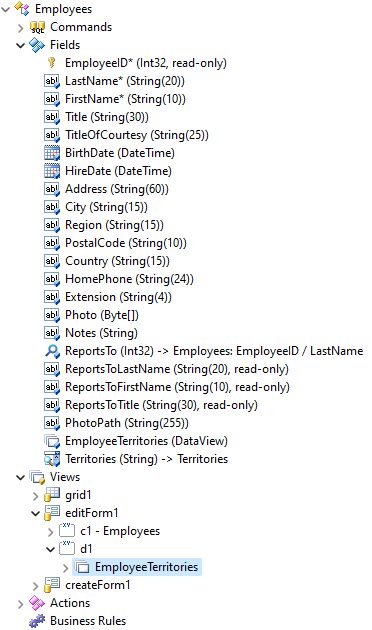
“Employees” Model
Set the sort type of the LastName field to Ascending. Borrow the LastName, FirstName, and Title from the self-referring ReportsTo relationship.
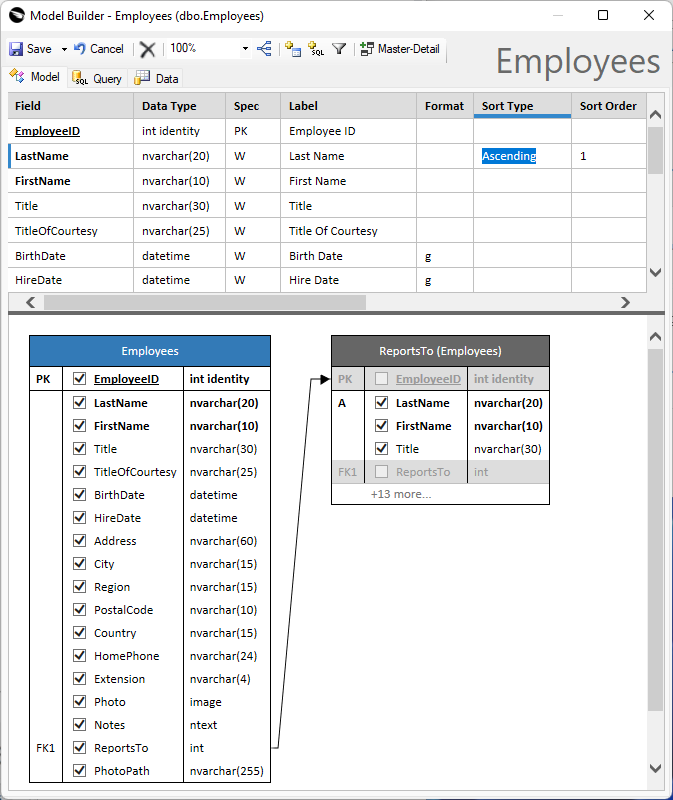 The data model created by the app builder includes the base table and up to three levels of parent lookup tables. The base table is designated with the blue header. Additional columns can be borrowed from the lookup tables as read-only fields.
“EmployeeTerritories” Model
Make the employee territories sorted by EmployeeLastName and TerritoryDescription. This will improve presentation of data when the available combinations of employees and territories are viewed by users. The data controller based on this model will help the framework to fetch the territory tags associated with the employees. The application framework will use this controller when creating the filtering expressions in response to the search and filter commands initiated by users in the frontend. .
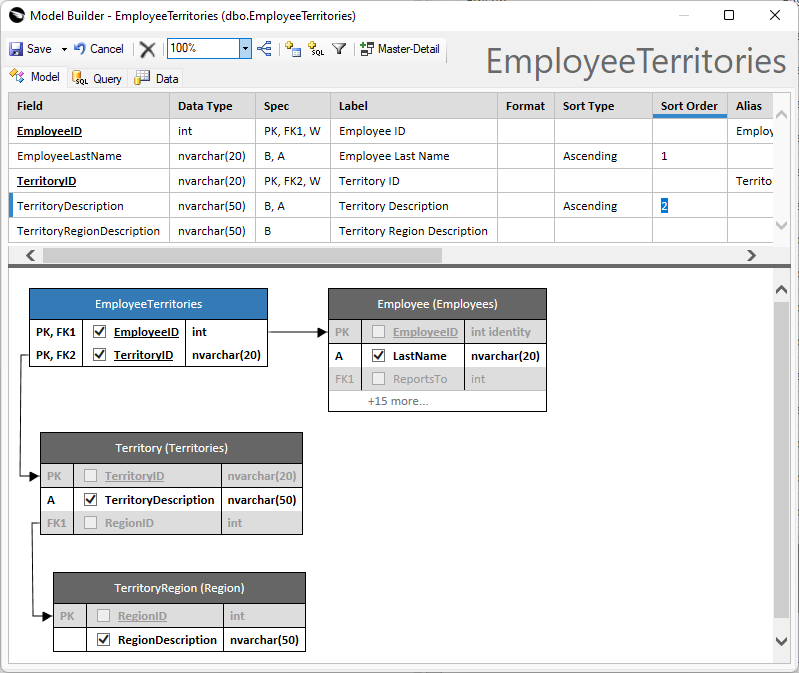 The data model of the "junction" table of the many-to-many relationship provides the runtime information that will allow the application framework to fetch, update, and filter the many-to-many "virtual" field.
“Region” Model
Follow up with the app builder suggestion to create the Region model. Keep all settings in their default state.
 The app builder will suggest to create some data models that are inferred from the foreign keys in the database schema. For example, the Region table is indirectly required in the app since the Territories table (the source of tags) has a reference to it.
“Territories" Model
Finally, define the Territories data model with the TerritoryDescription sorted in the ascending order. The list of available tags will be handled by the data controller based on this model.
 The applications will benefit from the sort type and order explicitly defined in the data models. Database engines do not guarantee a particular sort order in the query rowset. The explicitly defined sorting guarantees the predictable output. A many-to-many field has its tags presented in the order defined in the data controller metadata derived from the model.
If the territories are not sorted, then the list of territory tags will appear to users without order.
“Territories” Many-To-Many Field
The app builder transforms the models into the data controllers. The fields at the top of a model will migrate to the corresponding data controller. Additional field properties can be defined in the Project Designer. Each controller is provided with the grid1, editForm1, and createForm1 views. A data field is the binding of a controller field to a view. Most fields have an explicit binding in each view. Primary key fields and the lookup aliases are bound to the views at runtime. A collection of actions are helping the controller to orchestrate the runtime behavior of the views.
The virtual field Territories needs to be defined in the Employees data controller and bound to its views.
Start the app generator and select your project, choose the Design option. Select the Controllers tab in the Project Designer, right-click the Employees / Fields node, choose “New Field”, enter Territories in the Name field, set the Type to String, mark the field as “virtual”. Next set the Items Style to Check Box List in the Lookup section, set Items Data Controller to Territories, and the Target Controller to EmployeeTerritories. Save the new field.
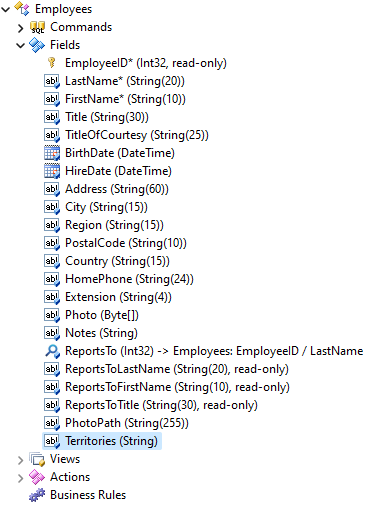 The fields of the data controller are reflecting the fields of its data model. Developers may define additional fields that will have their values computed with code at runtime. Virtual fields will have the NULL value by default. Configuring a virtual field as a many-to-many field will automatically engage the required processing built into the framework.
Next, bind the new field to the views. Drag the Employees / Fields / Territories node onto grid1, editForm1, and createForm1 views. Drag each instance of the Territories data field in the views to be positioned after the Title data field.
 The order of data fields in the views will determine the order of the physical data values in the lists and forms. The automatic rendering of the responsive UI allows developers to concentrate on the application requirements and business logic. Developers can provide custom layouts when needed.
Note that only one instance of a field can be bound to a view.
Presentation Styles
If the total number of tags is not significant, then it may be beneficial to have all tags presented to users in the edit mode. Otherwise only the selected tags must be displayed and an option to quickly assign additional tags must be provided.
Check Box List
A collection of checkboxes is displayed, if the Items Style of the Territories field is set to Check Box List in the data controller. Users will see the horizontally scrollable set of tags for this configuration.
 The checkbox list provides a full set of available tags for users to choose from. The "Columns" property of the view data field distributes the tags in the specified number of columns. Horizontal scrolling of tags is enabled automatically when needed. By default, the number of columns is calculated dynamically and depdends on the height of the form.
Auto Complete
A simple change of the Items Style value to Auto Complete will transform the field presentation to the compact list of territory tags assigned to an employee. Users can typeahead in the attached text box to search and assign the territories. The input field will exclude the duplicate assignments automatically. Users will see the available tags only when they start typing. The top 200 tags are displayed when the dropdown arrow is tapped or clicked.
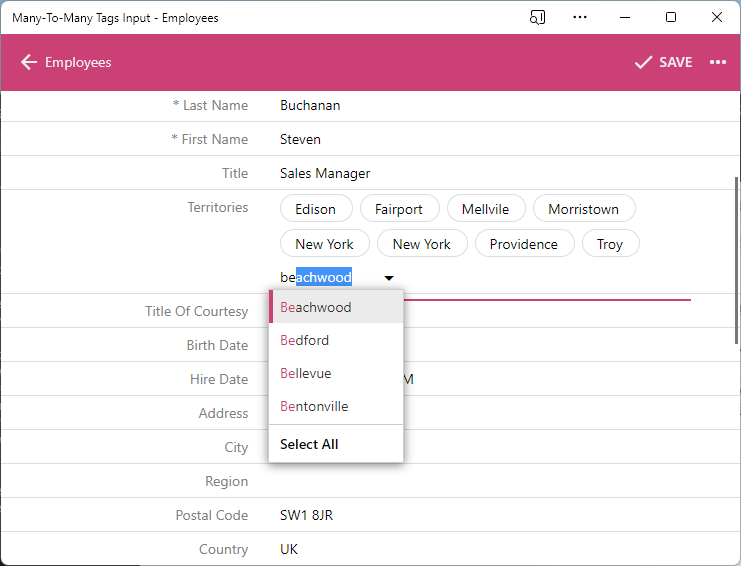 The text box next to the tag list provides the means of quick tag input. Option "Select All" will add all visible tags to the field value when chosen in the dropdown menu.
Drop Down List
Changing of the Items Style in the definition of the virtual field Territories will introduce a slight change in the behavior of the frontend. All available tags will remain visible in the dropdown as users search for the territories. The frontend will fetch the full set of territories when the form is displayed. In contrast, the auto complete configuration will allow the app to fetch the matching tags on-demand.
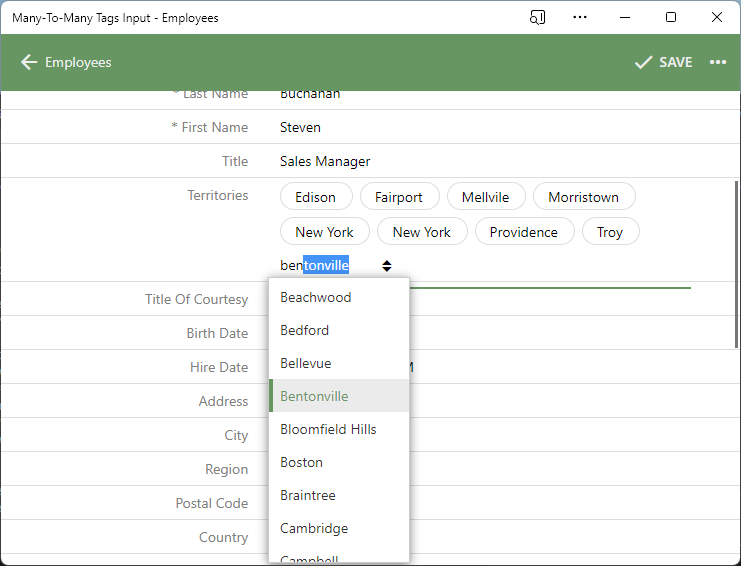 Set the Items Style to "Drop Down List" to have all available tags visible in the dropdown menu at all times. Typing of the text will focus on the first matching tag. The tags that do not match the sample will remain visible in the menu.
Lookup
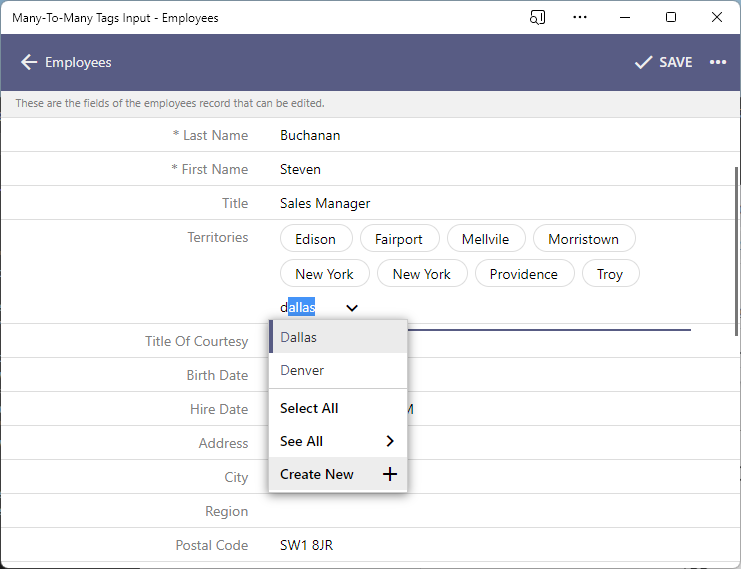
If the tags have additional meaningful properties beside the tag name, then the Lookup is recommended as the Items Style of a many-to-many field. From the user perspective, the input behavior is identical to the Auto Complete. There is also the See All option at the bottom of the dropdown menu.
 Option "See All" is available in the dropdown menu if the Items Style property of the many-to-many field is set to "Lookup". The dedicated form with the "Grid" or "List" view of tags will be displayed when the option is selected. Users will have the "Create New" option if the New Data View property of the field is set to the "createForm1" view of the data controller responsible for the tag list.
The form with the list of available tags is displayed when the See All option is chosen. Tag properties Territory ID (zip or postal code), Territory Description, and Region Description will be visible in the grid. Users may locate tags with Quick Find or Advanced Search forms specific to the Territories controller. For example, users may locate tags of the Southern region.
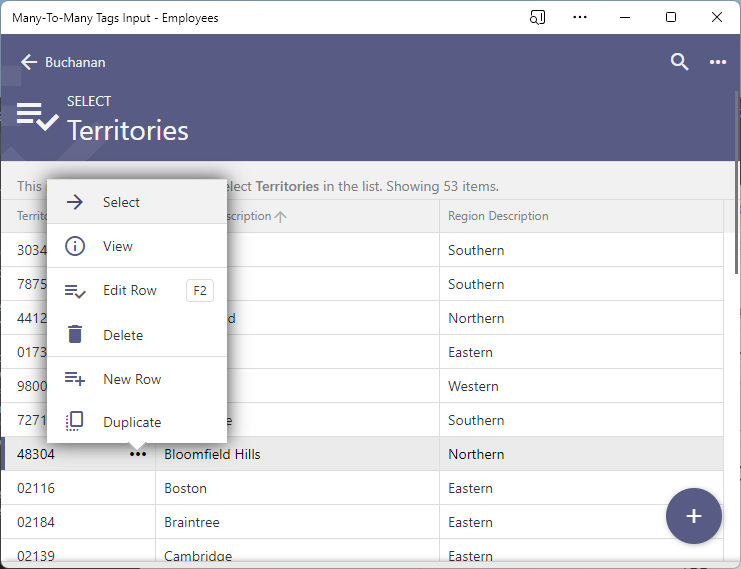 The form with the tags is displayed when the "See All" option is selected in the text box of the many-to-many field input. Tags are presented in the "Grid", "List", or "Cards" view style.
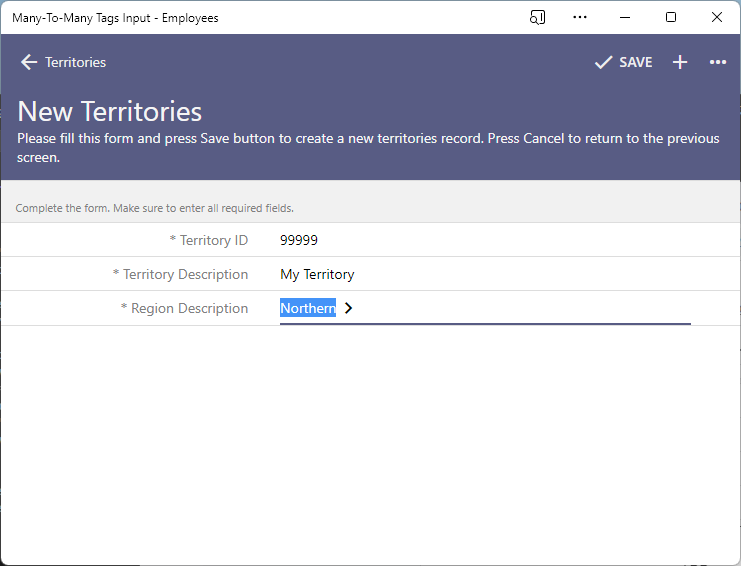
If the New Data View property of the Territories field in the Employees controller is set to createForm1, then users will be able to create new territories in the See All form or do so directly in the many-to-many input when they choose the Create New option in the dropdown menu of tags.
The form with the details of the new territory will allow users to enter the postal code, description, and region of the new tag. The new territory will be immediately assigned to the employee.
 Users may create new tags in the many-to-many field input. The newly created tag will be automatically added to the list of tags in the input. The ability to create new items is controlled by the New Data View property of the data controller field .
Master-Detail vs Many-To-Many
Tags input may be added to a data controller form view with a relatively minor effort. Tags are perfect when a single word or phrase can convey to users the meaning of the data association. For example, the New York and Providence in the Territories field will clearly indicate to users that the employee is responsible for these territories.
If more than one attribute is required to describe the relationship of the data item and the tag, then implement it as the simple DataView field instead. The master-detail relationship will be a better choice than the many-to-many association.
Select your project on the start page of the app generator and choose the Model option. Select the Employees data model. Click the master-detail option on the toolbar of the model builder. The list of suggestions will have the EmployeeTerritories field. The suggestion is prompted by EmployeeTerritories.EmployeeID foreign key column in the corresponding table.
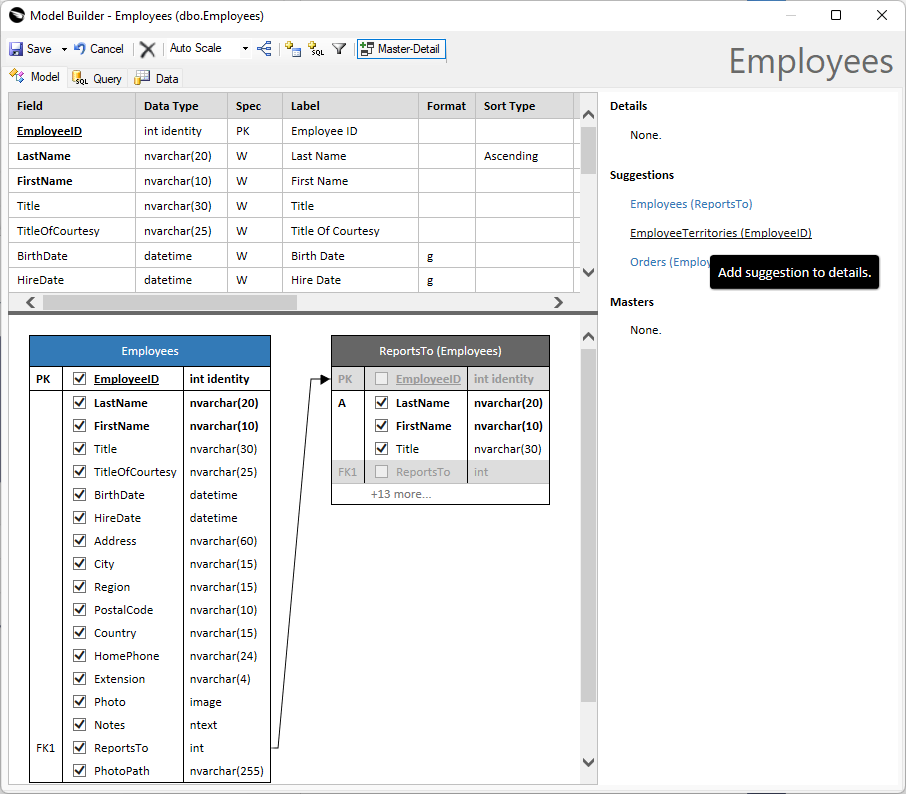 Model Builder provides the "Master-Detail" sidebar that allows defining the DataView fields. Such fields represent the "detail" in the master-detail relationships inferred from the foreign keys in the database schema.
Click on the EmployeeTerritories suggestion and the prompt will appear to confirm that the detail relationship will be created in the Employees data model.
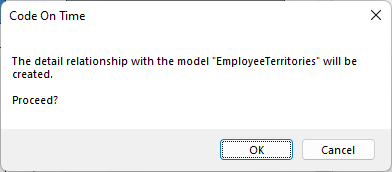 If the creation of the DataView field in confirmed in the Model Builder, then the new data model of the "detail" will be created and displayed. If the corresponding model exists already, then the "master" model will remain displayed.
The suggestion will migrate to the Details list in the Master-Detail sidebar of the model. The EmployeeTerritories field is based on the EmployeeTerritories model. Click on the field name in the details to configure some of its properties. Click the base model to see the underlying data model.
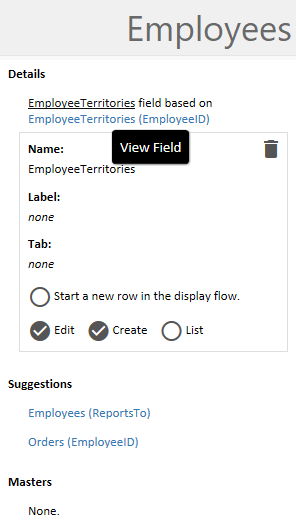 "Master-Detail" sidebar allows specifying the basic features of the DataView fields when the field name is clicked. The name, the label, and the optional tab can be entered directly in the model.
Save the Employees model and press Finish. Proceed to generate the app. The Employees data controller will have the EmployeeTerritories field with the DataView type added to the list of fields. Views createForm1 and editForm1 will have the binding to this field.
Run the app and select an employee. The list of linked territories
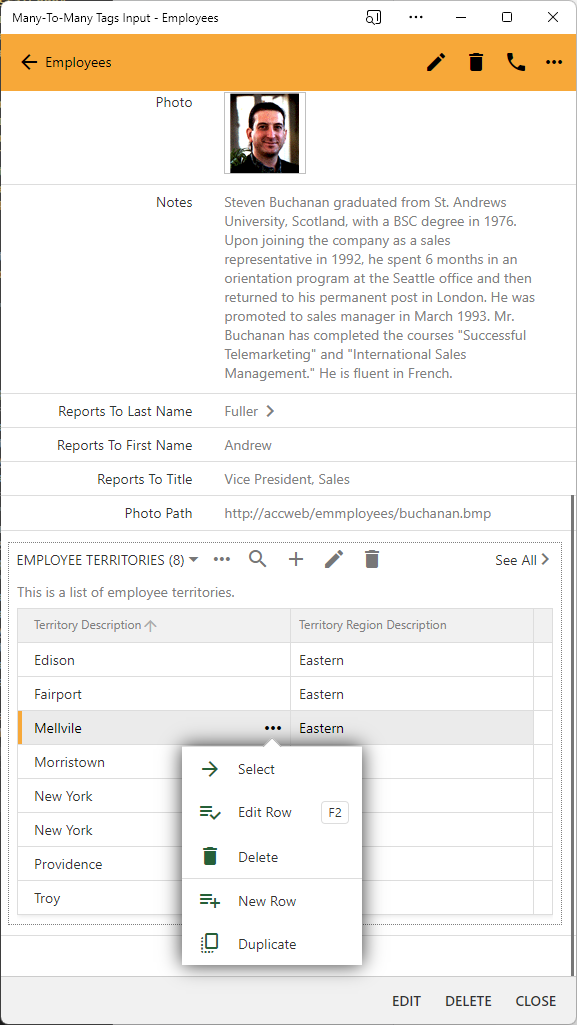 By default, the DataView fields will appear at the bottom of the form views. Model Builder provides the basic controls that allow tucking the DataView fields in the tabs or starting the new "row" in the display flow. Use the Project Designer to make more complex customization of the field flow in the form views.
Inspect the EmployeeTerritories data field in editForm1 view. The app generator places the DataView field into the dedicated category d1. Developers may drag other fields to this category or move the data field to the default category c1 as needed. The position of the data field in the categories will be reflected in the user interface when the app is re-generated.
 The app generator will create a dedicated category for the DataView field according to the master-detail flow configuration in the Model Builder.
Model Builder provides the hassle-free method of adding the DataView field to a controller. Another alternative is to create the DataView field in the Project Designer.