Blog: Posts from September, 2008

Labels
AJAX(112) App Studio(7) Apple(1) Application Builder(245) Application Factory(207) ASP.NET(95) ASP.NET 3.5(45) ASP.NET Code Generator(72) ASP.NET Membership(28) Azure(18) Barcode(2) Barcodes(3) BLOB(18) Business Rules(1) Business Rules/Logic(140) BYOD(13) Caching(2) Calendar(5) Charts(29) Cloud(14) Cloud On Time(2) Cloud On Time for Windows 7(2) Code Generator(54) Collaboration(11) command line(1) Conflict Detection(1) Content Management System(12) COT Tools for Excel(26) CRUD(1) Custom Actions(1) Data Aquarium Framework(122) Data Sheet(9) Data Sources(22) Database Lookups(50) Deployment(22) Designer(177) Device(1) DotNetNuke(12) EASE(20) Email(6) Features(101) Firebird(1) Form Builder(14) Globalization and Localization(6) How To(1) Hypermedia(2) Inline Editing(1) Installation(5) JavaScript(20) Kiosk(1) Low Code(3) Mac(1) Many-To-Many(4) Maps(6) Master/Detail(36) Microservices(4) Mobile(63) Mode Builder(3) Model Builder(3) MySQL(10) Native Apps(5) News(18) OAuth(8) OAuth Scopes(1) OAuth2(11) Offline(20) Offline Apps(4) Offline Sync(5) Oracle(10) PKCE(2) PostgreSQL(2) PWA(2) QR codes(2) Rapid Application Development(5) Reading Pane(2) Release Notes(179) Reports(48) REST(29) RESTful(29) RESTful Workshop(15) RFID tags(1) SaaS(7) Security(80) SharePoint(12) SPA(6) SQL Anywhere(3) SQL Server(26) SSO(1) Stored Procedure(4) Teamwork(15) Tips and Tricks(87) Tools for Excel(2) Touch UI(93) Transactions(5) Tutorials(183) Universal Windows Platform(3) User Interface(338) Video Tutorial(37) Web 2.0(100) Web App Generator(101) Web Application Generator(607) Web Form Builder(40) Web.Config(9) Workflow(28)
Archive
Blog
Posts from September, 2008
Sunday, September 28, 2008PrintSubscribe
ASP.NET AJAX Globalization

All web application projects generated by Code OnTime Generator are built on standard ASP.NET infrastructure. Excellent globalization support is an element of ASP.NET that can be quickly turned on in a matter of minutes. Let's give it a try.

Generate an Aquarium Express application with Northwind database and wait until it shows up in a web browser. Select Orders data controller in a drop down of the default page. A view similar to the one below will be presented.

image

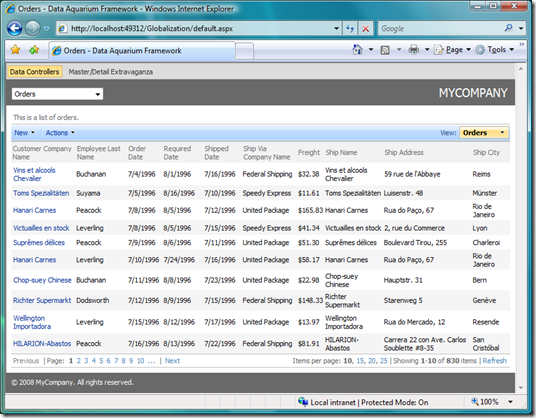
Notice that by default Order Date, Required Date, Shipped Data, and Freight are using formatting accepted in United States. Dates are displayed in mm/dd/yyyy format. Currency values are displayed with a leading symbol of US dollar.

Open the generated web site in Visual Studio or Web Developer Express and select MasterPage.master in Solution Explorer. Find markup of asp:ScriptManager and add EnableScriptGlobalization attribute as shown in the snippet.

<asp:ScriptManager ID="sm" runat="server" ScriptMode="Release" 
    EnableScriptGlobalization="true"/>

Next bring up web.config configuration file of your web site and change globalization section as follows.

<globalization culture="en-gb" uiCulture="en-gb" />

Run the web site and select Orders option in data controller drop down one more time.

image

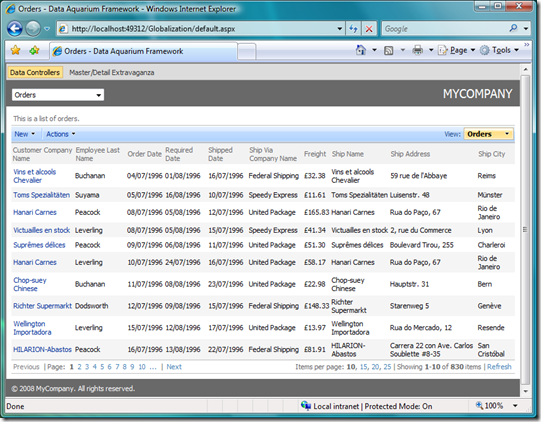
Now you can see that all dates are displayed in dd/mm/yyyy format common to European countries. Values in Freight column are also presented with a symbol of British pound.

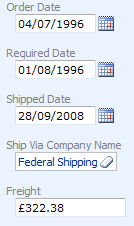
The same consistent display is available when users are editing data in any grid or form view of Aquarium Express or Data Aquarium Framework applications.

image

You can read more about globalization and localization support in ASP.NET at http://msdn.microsoft.com/en-us/library/c6zyy3s9.aspx.

Monday, September 22, 2008PrintSubscribe
Data Field Aggregates

A common requirement in many applications is to display various aggregate values when data is presented in a grid view.

The latest release of Data Aquarium Framework introduces a new feature that does exactly that. Aggregate feature is shown in the following screen shot. See a live demo of this feature.

image

Columns Required Date, Shipped Date, and Freight are displaying values in the aggregate row at the bottom of the grid view just above the pager. Here is how these data fields are defined in grid1 view of data controller ~/Controllers/Orders.aspx in a sample application.

<view id="grid1" type="Grid" commandId="command1" label="Orders">
  <headerText>This is a list of orders. </headerText>
  <dataFields>
    <dataField fieldName="OrderID"/>
    <dataField fieldName="CustomerID" aliasFieldName="CustomerCompanyName" />
    <dataField fieldName="EmployeeID" aliasFieldName="EmployeeLastName" />
    <dataField fieldName="OrderDate" columns="10"/>
    <dataField fieldName="RequiredDate" columns="10"  aggregate="Max"/>
    <dataField fieldName="ShippedDate" columns="10"  aggregate="Max"/>
    <dataField fieldName="ShipVia" aliasFieldName="ShipViaCompanyName" />
    <dataField fieldName="Freight" dataFormatString="c" columns="15"
      aggregate="Sum"/>
    <dataField fieldName="ShipName" columns="40" />
  </dataFields>
</view>

Attribute aggregate specified an aggregate function that instructs the data controller to calculate aggregates when a total number of records in a data set is being determined.

An SQL statement with corresponding aggregate functions is executed, which provides maximum speed and efficiency. Many commercially available grids will calculate aggregates by scanning the entire record set. Data Aquarium Framework simply relies on speed and power of your database server.

Aggregates automatically take into account any filters that may have been imposed on a data set by users and master-detail links. In this illustration you can see orders filtered by Ship Via and Ship Name. Aggregates were recalculated accordingly.

image

Sunday, September 21, 2008PrintSubscribe
Header and Footer Text in Form Views

Custom headers and footers can boost ease of use of your applications created with Data Aquarium Framework.  Take a look at the following screen shot.

image

Data field Unit Price features custom header and footer. Here is how we have defined this view in ~/Controllers/Products.xml of our sample application.

<view id="editForm1" type="Form" commandId="command1" label="Review Products">
  <headerText>Please review products information below. 
    Click Edit to change this record, click Delete to delete the record, 
    or click Cancel/Close to return back.</headerText>
  <categories>
    <category headerText="Products">
      <description>These are the fields of the products record 
        that can be edited.</description>
      <dataFields>
        <dataField fieldName="ProductName" columns="40" />
        <dataField fieldName="SupplierID" aliasFieldName="SupplierCompanyName" />
        <dataField fieldName="CategoryID" aliasFieldName="CategoryCategoryName" />
        <dataField fieldName="QuantityPerUnit" columns="20" />
        <dataField fieldName="UnitPrice" dataFormatString="c" columns="15">
          <headerText>Price of Unit:</headerText>
          <footerText>
            <![CDATA[ 
            <div style="color:navy">
            Enter price of unit in USD. Make sure to consult catalog of products 
            sold by our competitors at
            <a href="http://www.amazon.com" target="_blank">amazon.com</a>
            </div>]]>
          </footerText>
        </dataField>
        <dataField fieldName="UnitsInStock" columns="15" />
        <dataField fieldName="UnitsOnOrder" columns="15" />
        <dataField fieldName="ReorderLevel" columns="15" />
        <dataField fieldName="Discontinued" />
      </dataFields>
    </category>
  </categories>
</view>

HeaderText is displayed above the field value while the FooterText is displayed just under the field value. By default the field header is inherited from the label attribute of the base field.

You can break down the fields in the standard views in a few categories to further improve the form presentation.

Header and footer text will also automatically display in a custom form. Define the following markup in your web form that displays products.

<aquarium:DataViewExtender ID="ProductsExtender" runat="server" 
    Controller="Products" TargetControlID="ProductList" />
<div id="Products_editForm1" style="display: none">
    {ProductName}<br />
    {SupplierID}<br />
    {CategoryID}<br />
    {UnitPrice}
</div>

This simple markup will alter the form view presentation shown in the screen shot above to look like the one below.

image

Custom form templates allow ad hoc form view presentation when standard layout does not provide enough flexibility.