Clipboard is an indispensable tool if you are composing an email, creating a document, or writing code. “Cut and paste” helps us to rearrange our thoughts. “Copy and paste” comes handy when we are out of ideas.
An input field in a custom business app provides instant access to the system clipboard when editing a value. A selected fragment of text can be dragged and dropped into a new position. App users work with the collections of data items. A data item represents a group of related fields. Wouldn't it be great to take advantage of the clipboard and drag & drop to copy or move the items between or within the data collections?
Clipboard and Drag & Drop With Structured Data
The clipboard commands and drag & drop can benefit a business app when applied to the structured data. Consider the Order Management Dashboard presented below.
You can see the end user dragging the product from the menu and dropping it directly on the list of details of the selected order. The product Boston Crab Meat is semi-transparent in the menu of 77 products while it is being dragged. The “drop” frame outlines the Order Details as a target accepting the product. The mouse pointer is displayed as the “copy” arrow. The tooltip with the name of the dragged item is shown next to the pointer.
The result of the product “drop” is shown next. The product is no longer visible in the menu of 76 products presented on the right-hand side of the dashboard. The dropped product is now linked to the selected order. It is visible in the list of details. The “drop” frame has disappeared.
The following screenshot shows the state of the dashboard just moments after the user has started dragging the product. The list of details is still empty. The mouse pointer is a no-drop icon indicating that the drop is not accepted in the current position. The “drop” frame will appear when the pointer is over the list of details.
The end user can select the Copy command from the context menu of a product. The “drag indicator” doubles as the “more” menu when tapped or clicked. The command is also visible on the toolbar of the Products grid.
Here is the result of the Paste command executed three times on the Order Details. The product Aniseed Syrup has disappeared from the menu of products, which is now reduced to 75 items. The product is visible in the list of order details with the quantity set to 3. The Paste command on the toolbar of the details shows the tooltip with the description of the copied item and its source.
This application also enables the drag & drop capabilities for the Shippers. It may be useful when implementing the rearranging of items.
The “drag indicator” icon is shown in each row next to the values in the first column of the grid. It replaces the standard “more” icon. The mouse pointer switches to the “grab” style when hovering over the icon. It prompts the end user that the corresponding item can be dragged.
Dragging of the item will switch the pointer to “no-drop” when dragging over the targets that do not accept the drop. The dragged item is semi-transparent and the tooltip next to the system pointer explains what is being dragged.
The list of shippers is configured to accept the drop of its own items. The mouse pointer style is “move” when hovering over the items in the same list.
Dragging to the other user interface elements of the Shippers grid will cause the entire list to become the “drop” target.
Cut/Copy/Paste and Drag & Drop in Touch UI
Touch UI provides the built-in data clipboard with the persistent state. System actions Cut/Copy/Paste and item dragging is enabled in the app with the simple tagging of the corresponding data views. Commands CutPaste, CopyPaste, and DragDrop are automatically executed by the framework in response to the user actions. Developers can create custom JavaScript, SQL, and Code business rules responding to the commands. The command argument indicates the name of the source data controller. Developers have access to the target row of the command and the row that was cut, copied, or dragged. The source row fields are prefixed with the name of the source data controller. There is no built-in processing for the commands and their interpretation and security is left up to the application developers.
If multiple items were copied, cut, or dropped, then the corresponding command is executed for each item in the context of the transaction. The successful execution of the command for all items will result in the automatic commit. An error will rollback the effect of CutPaste, CopyPaste, and DragDrop for all items.
Clipboard objects created with Cut and Copy commands are available to all pages of the application. This makes it possible to offer a comprehensive clipboard experience with the structured data. The clipboard contents remain persisted until the next Cut/Copy is executed by the user. This enables pasting the same data multiple times. Developers may opt to clear the clipboard after each CutPaste or CopyPaste command when needed.
The unique unified data processing of Touch UI allows creating a consistent clipboard and drag & drop experience for the structured data.
Let’s learn how to build this Order Management Dashboard.
Dashboard Configuration
Begin by creating a new project with Code On Time. Connect to the instance of the Northwind database. Create the following models with the default settings: Orders, Customers, Employees, Shippers, OrderDetails, Categories, Products, and Suppliers.
Optionally configure the orders to sort by dates with the most recent ones at the top.
Activate the project designer and create the new custom data controller with the name Dashboard1. This controller is not based on any data model. Select Orders, OrderDetails, and Products controllers with Ctrl+click and choose Copy in the context menu of either one of them.
Right-click the Dashboard1 controller and choose Paste. This will create the corresponding DataView fields.
Set the Filter Source of OrderDetails field to Orders and Filter Field #1 to Order ID. This will enable the master-detail relationship between the Orders and the Details in the dashboard. If the order is selected, then the details will be filtered to show the linked items.
Set the Filter Source property of the Products field to Orders but do not select any filter fields. The product menu will behave as any other detail in the master-detail relationship. It will hide if there is no order selected in the dashboard. It will show up and refresh when the order selection has changed. The server-side code will also have access to the primary key of the order.
Create the view form1, set its type to Form, the label to Order Manager, and tag it as material-icon-category.
Create two categories in the form1. Set the flow of both categories to New Column. Rename the categories by selecting the corresponding command in the context menu to orders and products.
Drag the Orders and OrderDetails fields to the first category. Set the Page Size of the Orders data field to 3. Also set its Auto Highlight First Row to Yes. This will ensure that only the three most recent orders are visible with the first one selected when the dashboard is loaded. Next set the Page Size of the OrderDetails data field to 25.
Drag the Products field to the second category and set the Page Size of the created data field to 7.
The Dashboard1 data controller will look like this in the Project Designer on the Controllers tab.
Now it is time to configure the Cut/Copy/Paste and Drag & Drop.
Tag the Dashboard1 / views / form1 / orders / OrderDetails data field as shown below to enable the pasting and dropping of Products into Order Details
item-paste-Products item-drop-Products
Tag the Dashboard1 / views / form1 / products / Products data field with the following tags to enable Cut, Copy, and dragging of Products:
item-cut item-copy item-drag myapp-product-menu
The custom tag myapp-product-menu will be used later when filtering the product menu.
Create the page called Dashboard and drag it after the Home page. Copy and paste the data controller Dashboard1 onto the page. Set its property Show Action Buttons to None. Enter Wide in the Icon / Custom Style property to remove the sidebar on the page.
The visual configuration of the dashboard is now complete!
Implementing Paste and Drop
Commands CopyPaste, CutPaste, and DragDrop are executed on the OrderDetails data controller when the user pastes the previously cut or copied product or drags and drops one from the product menu onto the view.
We will create a single SQL business rule to handle all of these situations. Our objective is to insert or update a record in the Order Details table.
Create a new SQL business rule in the OrderDetails data controller. Set its phase to Execute and its Command Name to CutPaste|CopyPaste|DragDrop regular expression. Enter the following script:
The business rule is triggered when the command with the name matching the regular expression is detected by the app framework on the server.
The SQL script will attempt to increment the Quantity column of the existing [Order Details] row with the product ID matching the parameter @Products_ProductID. This parameter is supplied by Touch UI and its value is set to the dragged, cut, or copied ProductID. Note that it is possible to access any other property of the product by specifying the name of the data controller as a prefix separated with the underscore character from the field name.
Touch UI also supplies the value of the parameter @OrderID. It is set to the value of the OrderDetails.OrderID field in the “drop” or “paste” target item. If the target is the entire Order Details view then the field values are set to NULL with the exception of the fields specified in the Filter Fields property. The values of these fields are borrowed from the selected master row. The business rule has the value of the selected OrderID regardless of the drop or paste target.
If no rows have changed after UPDATE then the SQL business rule will INSERT an order detail with the same product and order identifiers with the quantity of 1.
Filtering Items in the Product Menu
Let’s make it so that the product menu in the dashboard is empty unless an order is selected.
Choose the Products data controller in the Project Designer and set its Handler property to ProductsBusinessRules. Browse the app to generate the placeholder file ~/app/App_Code/custom/Rules/Products/ProductBusinessRules.cs. Right-click the controller and choose Edit Handler in Visual Studio.
Enter the following code:
Method EnumerateDynamicAccessControlRules will impose the access control restrictions when the app is retrieving the data for grid1 view of the Products tagged as myapp-product-menu. This is exactly how the product menu is configured in the dashboard. The name Orders specified in the Filter Source property of the data view field Products is ensuring that the order ID selected in the dashboard is available under the “Orders” alias to the business rules.
If the order ID is not available, then our list of products will be limited to those with the primary key set to -1. Such products do not exist and therefore the user will see the empty list of products.
Otherwise we will deny access to the products that are already linked to the details of the selected order. Such products will not be visible in the product menu.
Trying It Out
Run the app and try populating order details with Cut/Copy/Paste and Drag & Drop. You will notice that the product menu gets shorter as more details are created in the selected order. The framework automatically syncs the details and the product menu with the server after each successful CutPaste, CopyPaste, or DragDrop command.
If you insert a new detail with the help of the New command or delete a few details from the order then the product menu will become out of sync. The selected order is not changed if you perform these operations. The menu will have to be refreshed manually.
Copy and Cut commands move data to the app clipboard. The data remains there even when you refresh the page or restart the browser and sign in with the user identity. You may want to clear the clipboard after each Paste.
Paste and Drop do not display a confirmation message and execute instantly. There may be circumstances when the user assent is required.
JavaScript Business Rules
Let’s perfect the syncing of the product menu and provide some pre and post processing when products are pasted or dropped onto the order details.
Create the file ~/app/js/dragdrop.js with the following code. It declares the syncProductMenu() function and the custom client-side business rules for OrderDetails.
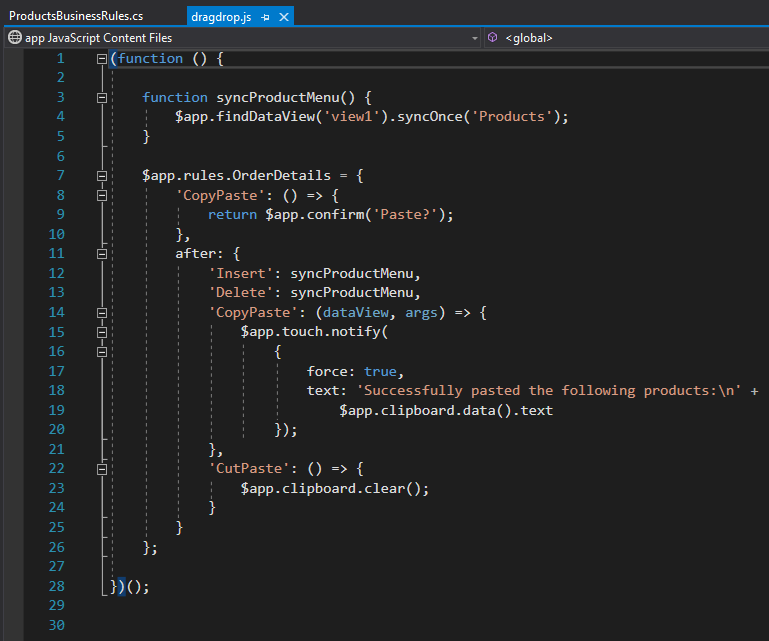
The function syncProductMenu() will locate the product menu on the dashboard and request it to sync once. The default ID of the Dashboard1 data controller instance is view1. The name of the dataview field Products is specified as the argument of syncOnce method. This method will wait for the user interface to stop being busy and sync the data. Subsequent calls to syncOnce will cancel the previous requests to avoid redundant calls. Use this method whenever a dataview on the page requires a data refresh.
The business rule responding to the CopyPaste command will interrupt the execution and display a confirmation. The method $app.confirm returns a promise to the framework. Touch UI will proceed to execute the command if the promise is resolved, which happens when the user agrees to proceed by pressing the OK button in the confirmation prompt.
The post-processing will sync the product menu after the details are inserted or deleted.
If the copy CopyPaste command has completed successfully, then a custom confirmation with the text describing the clipboard contents is displayed.
The command CutPaste is followed by the clearing of the clipboard.
Advanced Techniques
The default scope of the app clipboard is “global”. Data placed in the clipboard is available on all pages of the app to Paste. You can limit the scope of the clipboard to the current page by setting the option clipboard.scope to “local” in ~/app/touch-settings.json file.
Tags item-paste-Controller and item-drop-Controller make it possible for the user to target individual items in the data view. End users can also paste and drop data by targeting the entire view. There will be situations where the items shall not become the target. Tag view-paste-Controller will make it possible to paste only through the context menu of the dataview. Tag view-drop-Controller will cause the drop target to extend to the entire view when its item is target.
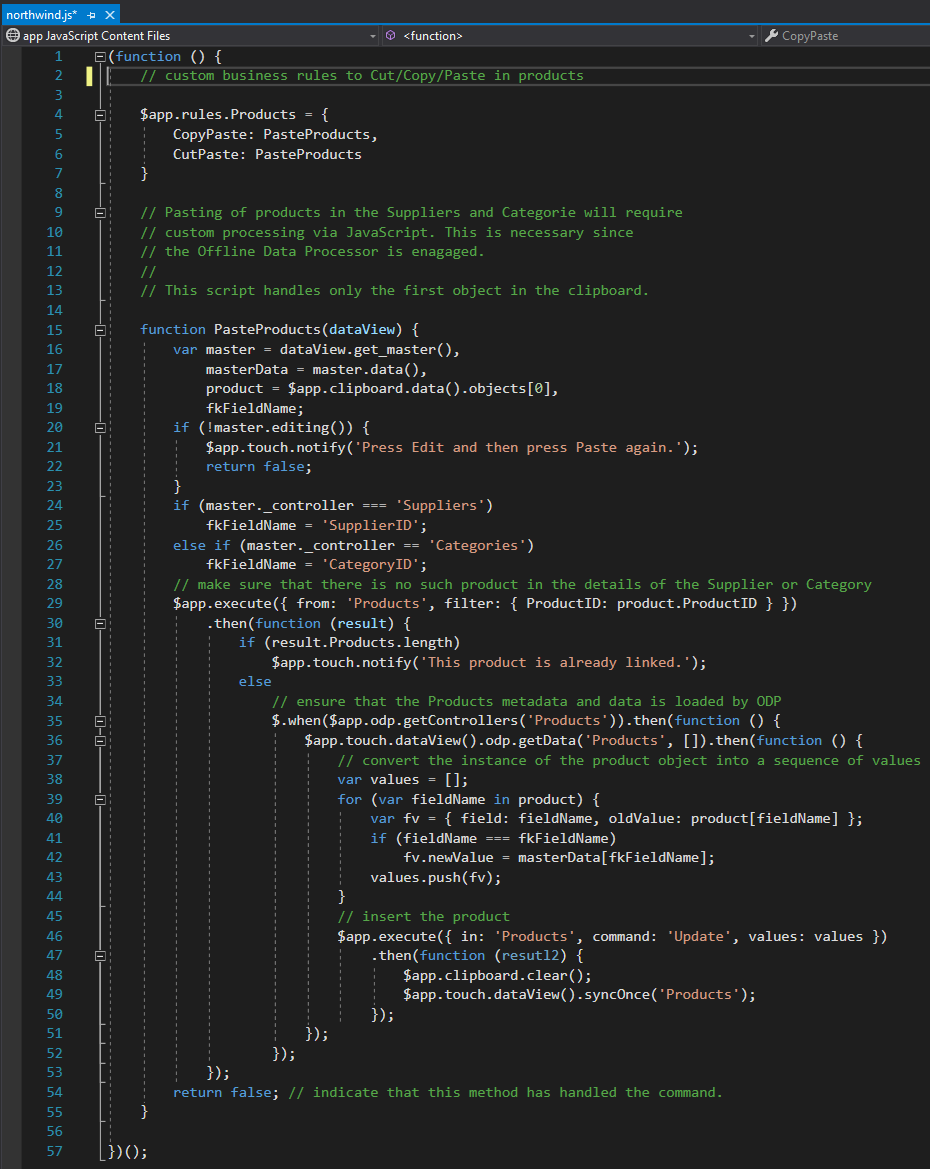
Cut/Copy/Paste and Drag & Drop are relying on the clipboard to accumulate and perform execution of the CutPaste, CopyPaste, and DragDrop commands. There is no default interpretation for these commands. If your app is relying on the Offline Data Processor to allow transaction input of master-detail records, then the server-side execution of these commands makes little sense. The master-detail data is accumulated and staged by the ODP directly in the WebView. Only the saving of the master record will cause the transaction to be executed on the client. If you want to support the data clipboard and drag & drop with ODP then you will need to write a custom interpretation of the commands in JavaScript.
The live app
https://demo.codeontime.com allows cutting and pasting products between supplier and category masters. ODP is enabled on the Categories and Products pages, since their
Offline property is set to
yes. ODP is enabled in the "offline" pages loaded in the web browser and also in the disconnected mode when the app is hosted in Cloud On Time. following script implements a custom
CutPaste and
CopyPaste, which will replace the category or the supplier of the pasted product.
Conclusion
The dashboard can be further enhanced to allow dragging and dropping the order details onto the product menu to provide an alternative method to delete the details.
If the order detail is dropped onto another order, then the detail product can be moved between orders.
The dedicated Products page can provide the Copy and Cut commands. The pasting of the products into Order Details will automatically work on the dashboard page since the clipboard contents are persisted.
If the items in the dataview have a sequential order, then tagging the dataview as item-drag item-drop-Controller will enable the drag & drop movement of items. Use the physical name of the data controller instead of “Controller” in the tag. Implement the business rule to change the item indexes in the response to the DragDrop command.
The consistent user interface of Touch UI makes it possible to create amazing apps with spectacular results that are impossible to achieve with any other tool.