Blog

Labels
AJAX(112) App Studio(7) Apple(1) Application Builder(245) Application Factory(207) ASP.NET(95) ASP.NET 3.5(45) ASP.NET Code Generator(72) ASP.NET Membership(28) Azure(18) Barcode(2) Barcodes(3) BLOB(18) Business Rules(1) Business Rules/Logic(140) BYOD(13) Caching(2) Calendar(5) Charts(29) Cloud(14) Cloud On Time(2) Cloud On Time for Windows 7(2) Code Generator(54) Collaboration(11) command line(1) Conflict Detection(1) Content Management System(12) COT Tools for Excel(26) CRUD(1) Custom Actions(1) Data Aquarium Framework(122) Data Sheet(9) Data Sources(22) Database Lookups(50) Deployment(22) Designer(177) Device(1) DotNetNuke(12) EASE(20) Email(6) Features(101) Firebird(1) Form Builder(14) Globalization and Localization(6) How To(1) Hypermedia(2) Inline Editing(1) Installation(5) JavaScript(20) Kiosk(1) Low Code(3) Mac(1) Many-To-Many(4) Maps(6) Master/Detail(36) Microservices(4) Mobile(63) Mode Builder(3) Model Builder(3) MySQL(10) Native Apps(5) News(18) OAuth(8) OAuth Scopes(1) OAuth2(11) Offline(20) Offline Apps(4) Offline Sync(5) Oracle(10) PKCE(2) PostgreSQL(2) PWA(2) QR codes(2) Rapid Application Development(5) Reading Pane(2) Release Notes(179) Reports(48) REST(29) RESTful(29) RESTful Workshop(15) RFID tags(1) SaaS(7) Security(80) SharePoint(12) SPA(6) SQL Anywhere(3) SQL Server(26) SSO(1) Stored Procedure(4) Teamwork(15) Tips and Tricks(87) Tools for Excel(2) Touch UI(93) Transactions(5) Tutorials(183) Universal Windows Platform(3) User Interface(338) Video Tutorial(37) Web 2.0(100) Web App Generator(101) Web Application Generator(607) Web Form Builder(40) Web.Config(9) Workflow(28)
Archive
Blog
Thursday, May 19, 2011PrintSubscribe
Cascading Lookups

ASP.NET web applications created with Code On Time application generator offer impressive lookup capabilities. Numerous lookup styles allow configuring sophisticated data lookup scenarios including cascading lookups. Cascading lookups is a data lookup scenario involving more than one lookup field.

Example of Cascading Lookups

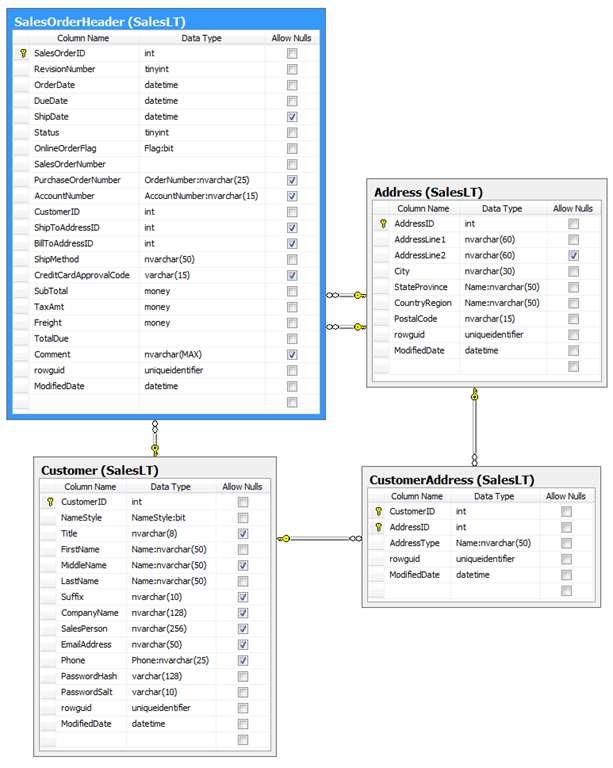
Consider the fragment of Adventure Works LT database presented below.

Table SalesOrderHeader has three lookup fields. Field CustomerID references table Customer, fields ShipToAddressID and BillToAddressID are referencing the same table Address. Shipping and billing addresses may be represented by the same or different rows in the table Address. The many-to-many table CustomerAddress links a Customer and an Address.

If a new Sales Order Header is created and a customer is identified and associated with the header then it will be logical to assist end users of your application in selecting a customer address by limiting the list of all addresses to those that are matching the selected customer. Selection of one lookup value (CustomerID) in a row must cascade as a filter to other dependent lookups (ShipToAddressID and BillToAddressID).

Configuring Cascading Lookups

If you generate a new Web Site Factory application from the database and start creating a new Sales Order Header then you will see a page similar to the one presented below. The screen shot shows that a customer has been selected already and shipping and billing addresses are blank.

image

Click on (select) link in Ship To Address Line1 or Bill To Address Line1 and you will be presented with lookup window that allows selecting an address. The entire collection of addresses stored in the database is available for selection. The screen shot shows that the application user has activated the search bar to find the right address and is trying to find an address using predictive input.

image

Let’s make the task of selecting an address easier and limit the list of addresses to those that are associated with the user account.

First we will examine lookup configuration of ShipToAddressID and BillToAddressID fields.

Run the web application generator, select the project name and click Design to activate the project Designer.

Select “All Controllers” tab and locate SalesOrderHeader data controller.

Click on the controller name and select Fields tab.

Select ShipToAddressID field and click Edit button.

Scroll to Lookup section of the field properties. The configuration of lookup properties is presented below.

Property Items Data Controller is set to Address, which instructs the generated web application to show the first grid view of Address data controller when a user click on (select) link of the lookup field.

image

If you inspect configuration of BillToAddressID field then you will find that it is exactly the same. This type of configuration is automatically performed by Code On Time web application generator when a baseline application is constructed straight from your database.

Table Address does not offer any information that will help us to identify the addresses that belong to a specific customer.

Table CustomerAddress has a pointer to a Customer and provides a perfect replacement for Address data controller.

By default only the first mandatory field from master table Address is included by the application generator in the data controller CustomerAddress. We suggest defining the following de-normalization map for your project to expand available fields borrowed from master tables in tables CustomerAddress and SalesOrderHeader.

SalesLT.SalesOrderHeader => SalesLT.Customer
LastName
FirstName
CompanyName

SalesLT.CustomerAddress => SalesLT.Customer
CompanyName
LastName
FirstName

SalesLT.CustomerAddress => SalesLT.Address
AddressLine1
AddressLine2
City
StateProvince
CountryRegion
PostalCode

The application in the screen shots was generated with this de-normalization map.

Let’s change the configuration of field ShipToAddressID as follows:

  1. Set Data Controller property to “CustomerAddress”.
  2. Set Data Value Field property to “AddressID”.
  3. Set Data Text Field property to “AddressAddressLine1”.
  4. Set Content Fields under Dynamic Properties section to “CustomerID=CustomerID”.

image

Step (4) will instruct the data controller CustomerAddress to filter data by field CustomerID (field on the left hand side of the equal sign) with the value stored in field CustomerID (field on right hand side of the equal sign) in the current row of Sales Order Header data controller.

This change does not effect the command text of the data controller SalesOrderHeader in any practical way. The lookup configuration will be taken into account only when a user selects a value for ShipToAddressID or BillToAddressID field.

Save the changes and modify the field BillToAddressID by following exactly the same steps.

Generate your project, start creating a new Sales Order Header record, select “Family’s Favorite Bike Shop” customer in Customer Company Name field. Try select a shipping or billing address. Only two records will be available for selection. Both records match the selected customer.

image

Try changing a customer and observe that a different selection of addresses is presented each time.

Lookup Styles

You can change the style of lookups using the Items Style property. If you change the style of CustomerID, ShipToAddressID, and BillToAddressID then the cascading lookup behavior will still take place.

Lookup field CustomerID is presented  in Lookup and  two address reference fields are presented in Auto-Complete styles below.

image

A combination of Auto-CompleteList Box and Radio Button List lookup styles is shown next.

image

Clearing Dependent Lookup Fields

Most scenarios of cascading lookups will require  a particular combination of master and detail selections in the lookup fields. If a master values has changed then a cascading clearing of dependent lookup fields may be called for. In fact inconsistent selection of master and detail lookup fields may cause data integrity issues.

An extra step is involved in clearing dependent cascading lookup field values.

Select CustomerID master field in Designer and set its “Copy” property as follows:

ShipToAddressID=null
ShipToAddressAddressLine1=null
BillToAddressID=null
BillToAddressAddressLine1=null

The screen shot shows the “Copy” property of CustomerID when opened in Designer.

image

The primary purpose of “Copy” property is to allow specifying multi-field copy instructions executed upon lookup selection. Read about multi-field lookup at /blog/2010/02/multi-field-lookup.html.

If you enter “null” on the right-hand side of the equal sign then the field value will be cleared when the value of the lookup field has changed. In this particular case any changes to CustomerID field must cause clearing of fields ShipToAddressID and BillToAddressID. Both fields are aliased with ShipToAddressAddressLine1 and BillToAddressAddressLine1 fields accordingly. If you configure only the foreign key fields to be reset upon changes of the master field CustomerID then fields will get cleared but their visual representations will remain intact. Therefore we require clearing of alias fields as well.

Property “Copy” provides surgical level of control over resetting of dependent fields in a cascading lookup field groups. If you have more than one level of dependency then make sure to configure clearing of fields on all levels.

Wednesday, May 18, 2011PrintSubscribe
Bug Fixes, Just-In-Time Formatting of Numbers

The new update includes the enhanced client library. Any numeric values with data format strings are automatically formatted as soon as a field input control loses its focus.

The following issues were resolved in this release:

  • Processing of numeric values entered with percent symbol are correctly converted to  floating values. You can enable Percent data format if you enter letter “p” in the data format string of a numeric field in Designer.
  • Source code generated in Visual Basic projects now uses “TypeOf X is Y” expressions to determine if an instance X is of a specific type Y of if an instance X is implementing interface Y. This corrects the issue that was introduced in last update that had to do with various conversion error messages when business rules were invoked.
  • Client library now correctly processes read only primary key values that are not auto-incremented. This fixes the problem with Designer that was reported as “Cannot create duplicate object” and was preventing creation of page containers and actions.
  • Interactive History is correctly rendered in IE 9 and WebKit browsers.

Make sure to clear the browser cache after re-generating your project.

Tuesday, May 17, 2011PrintSubscribe
File Upload / Download

Code On Time applications support direct uploading of external files into the database.

Basics

Consider the following database schema based on the Northwind sample available with Microsoft SQL Server. Table Categories features Picture field of type image. This data type allows capturing binary content. The purpose of this particular field is to capture a picture representing a category as suggested by the field name.

image

Generate a Web Site Factory web application with this three tables and navigate to Categories page. The screen shot below shows an automatically created page of categories stored in the database. Field Picture is provided with an automatic preview thumbnail.

image

Users can create new categories and upload category pictures as shown next.

Create a new category record in createForm1 view by selecting New Categories button on action bar.

image

Save and edit the new category and indicate that you want to upload a file.

image

Click Browse button and select the image file. File uploading will start immediately.

image

The file is being uploaded in editForm1.

image

The file has been uploaded as indicated by the message at the top of the page.

image

Note that file uploading works only with existing records. The Picture field is available only in editForm1 and grid1 view.

Uploading of binary content is executed asynchronously. If a record does not exist yet then it is not possible to save a file to the database.  Create a new record first, save it, and only at that time upload any files that must be associated with a record.

Code On Time applications will be offering a delayed uploading option that will work with new records by postponing operation until a new record is successfully stored in the database. Creation of  a new record and file uploading will become one smooth operation.

Capturing Extended File Properties

Generated applications do not limit the type of content submitted by end users. If an Adobe PDF file or Microsoft Word document is uploaded instead of an image then the file content will be saved in the database. The thumbnail will not display a preview in that case. If you were to download the file from the application to your hard drive by right-clicking on the thumbnail and selecting Save Target As option then you will notice the following message.

image

The name of the file is represented as generic CategoriesPicture_27, the file type is unknown, the content type is octet-stream.

The binary file stores the file contents only. The file name and content type are not known.

You can easily remedy the situation by introducing utility fields to capture the file name, content type, and length of the uploaded file. The latter is not strictly needed since the application can determine the size of the file by inspecting the database. File length can be useful if you users need to known the file size prior to downloading the file on their computer.

Change Categories table as shown below. Three new columns complement field Picture in table Categories. We have added columns PictureFileName, PictureContentType, and PictureLength. Make sure to allocate enough space for Content Type field to accommodate very long content types introduced in the latest versions of Microsoft Office.

image

Refresh the meta data of your project and regenerate the application.

Create a new category, select the category in the grid view and start editing category properties. New utility fields are displayed right under the Picture field.

image

Upload any document or image.

Notice that the thumbnail of the uploaded file shows the file extension. The utility fields have captured their corresponding properties.

image

Right-click  the thumbnail, select Save Target As and observe the prompt that may look as follows.

image

The name of the file is correctly suggested in “Save As” dialog. The type of the file is also correct.

If you click on the thumbnail directly then the file will open in the application associated with the file type on your computer.

We suggest that your further customize the data controller in the project Designer as shown in the next screen shot. 

image

All utility fields are marked as hidden in createForm1.

Field PictureContentType is “hidden” in editForm1 and grid1.

Field PictureFileName has its Text Mode property set to Static in editForm1 and grid1.

Field PictureLength is “hidden” in editForm1 and Static in view grid1.

These changes will ensure that utility information is captured and only the file name and file size are displayed as read-only values.

Implementing Virtual Fields to Store BLOB/ FILE Content

The new architecture of the framework in Code On Time applications allows full control of the upload / download processing of binary fields with the data controller business rules.

Let’s create a virtual “Picture” field in Products data controller and store the uploaded files in the external file system folder. Such approach may help to reduce the size of the database and provides developers with total control of the process.

To be continued.

Continue to Bug Fixes