How does one go about building a line-of-business database application?
One option would be to start with the database. This database-first approach would have you design the perfect database schema that fulfills all the predicted needs for your business. Once development of the schema is complete, it is time to move on to the forward-facing elements of the application – the user interface, API requirements, and so on. But which technology do you pick? There are dozens of frameworks and development tools that are introduced every year, and dozens more that go out of style in the same year. Many of these technologies focus on the presentation and data binding, with little thought towards the implementation of server-side components. This results in having to pick a combination of technologies that are synergistic. Once the tools are chosen, you will need to learn how to use the them to their fullest extent – this may take a long time.
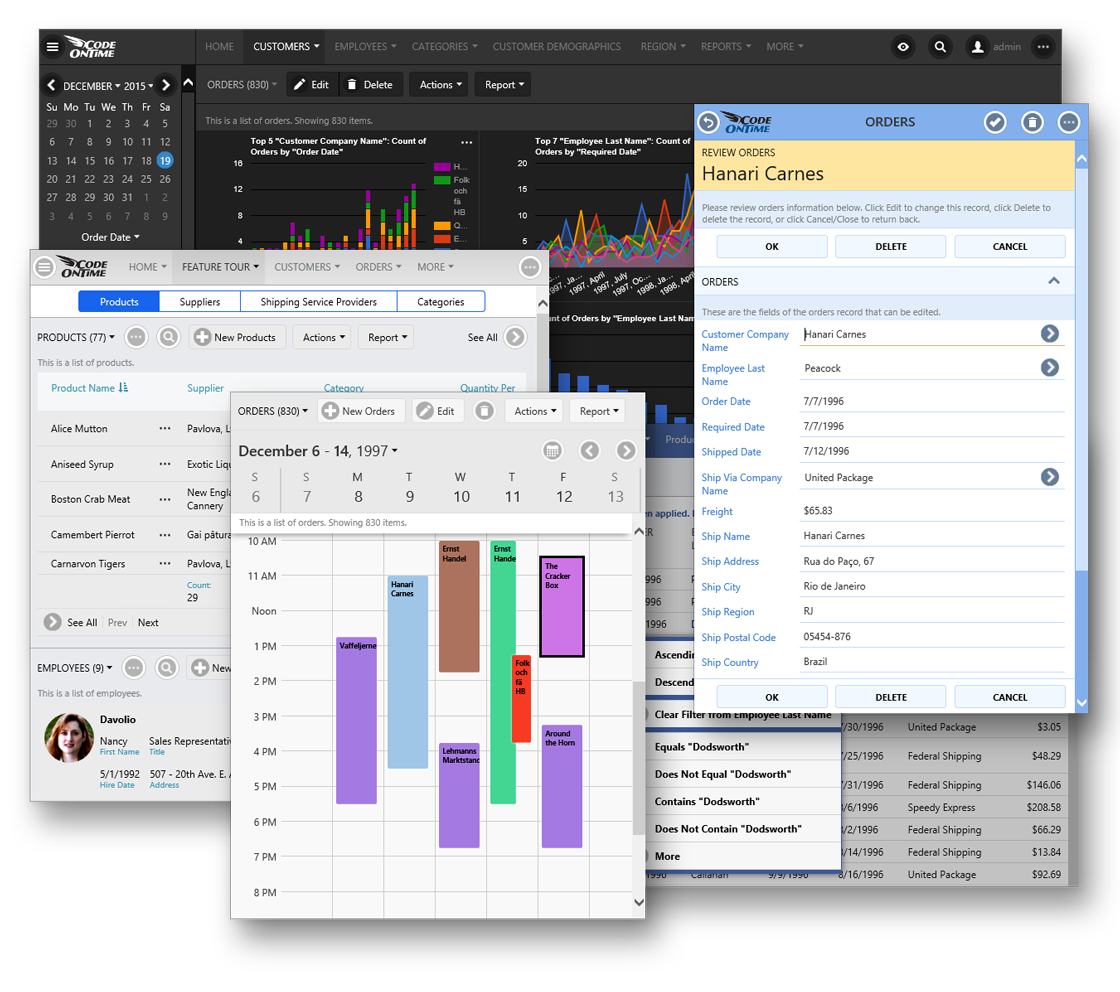
Once the frameworks have been selected, you must spend a long time implementing the architecture required for your database structure. In addition, each and every page for each database object must be designed and written. Imagine how long it would take to create every screen picture below!
Another option would be to develop the user interface first, and build the database as you go. This option faces many of the challenges in the first option - developing user interface is difficult.
Even after the application has been completed, what happens in the following situations?
- Project requirements change
- New and improved framework or library released
- Selected framework deprecated
- Performance or scalability issues
The common solution to this problem is to rewrite a portion of the application, or sometimes even move on to a different technology stack. The sheer amount of time spent on this cycle can be cost-prohibitive.
A better solution would be to de-couple the shape and structure of your database from the appearance of the user interface and the behavior of the server-side piece. That way, the client library would provide a generic mechanism to render CRUD applications. The server-side library would be able to dynamically create SQL scripts based on the data model and handle requests in a generic fashion. It would then be trivial to extend this app with features, such as sort, filter, charting, scheduling, reporting, access control rules, etc. When changes need to be made in the app, only the model would need to be changed – these changes would then be reflected in both the server and client side frameworks.
Let us introduce you to a third option – Code On Time application generator. The first step is to design your database schema. Then, define data models for your business entities. The application generator will compose data controllers, views, fields, and all other necessary metadata. In addition, the server and client side frameworks are generated for immediate use. The data models can be reshaped in order to more accurately represent the business entities. If further changes to the models are needed, then the controllers can be customized directly – this will impact the display and behavior of the app. Finally, if in-depth customization is needed, the application can be extended with custom components, stylesheets, and code, in order to add the final touch. This iterative approach to application development greatly increases turnaround time for new features or changes to database schema, without wasting time on moving inputs or changing SQL scripts.

Curious to see what it takes to develop an app with the app generator? Let’s create a simple application to manage products, using the Northwind sample web application.
Building your first app
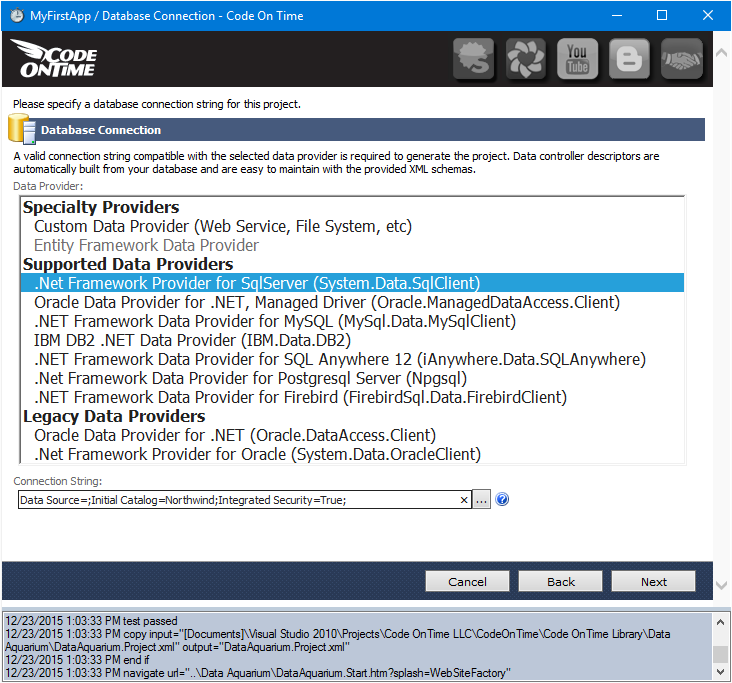
The first step of any project is to connect to your database.
The schema will be analyzed in order to provide a list of database objects that can be used to define data models.
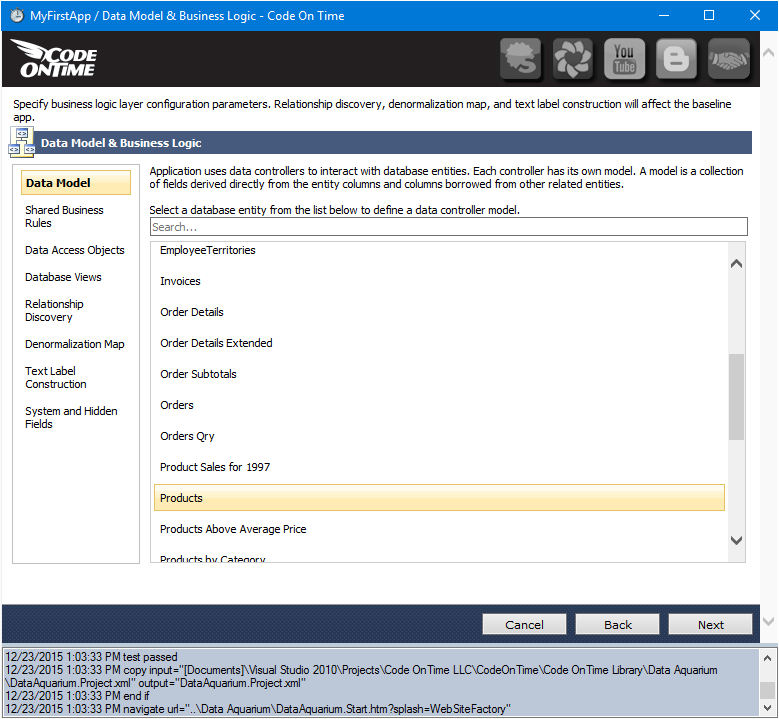
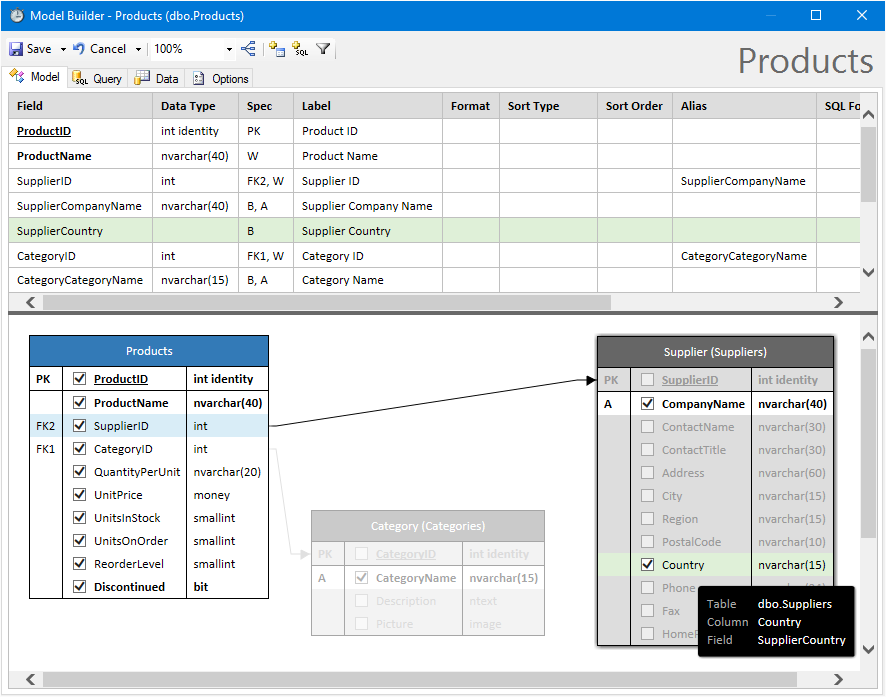
Select a database object to start building a data model. The generator will take the object definition, as well as explore object relationships in the schema, in order to create a default model. Every column in the primary object will be included, and the first string field from each related object will be included. Relationships up to a depth of 3 will be traversed in order to properly normalize the data for the user interface.
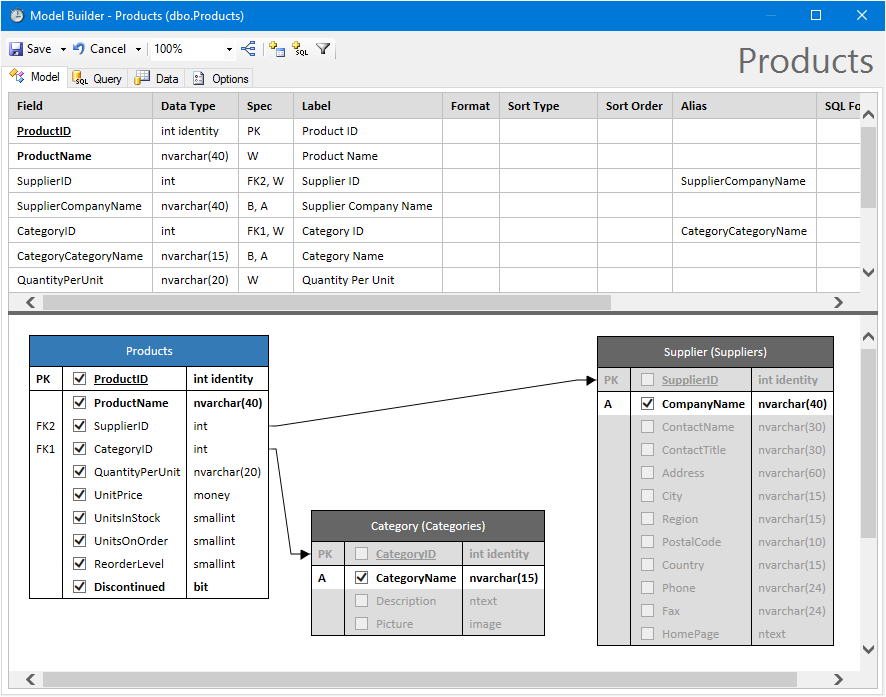
With most development stacks, it is a pain to add a field to the user interface – you would have to add a new input into any record creation forms, viewing and editing forms, and include it in the list view. With the Data Model Builder, this process is easy – simply check the relevant column in the diagram, and the column will be automatically added to the list of fields. This field will be added to every list, grid, and form related to this database object, and any SQL script will include this column. Even lookup inputs will show this new column in the preview, with no effort on your part.
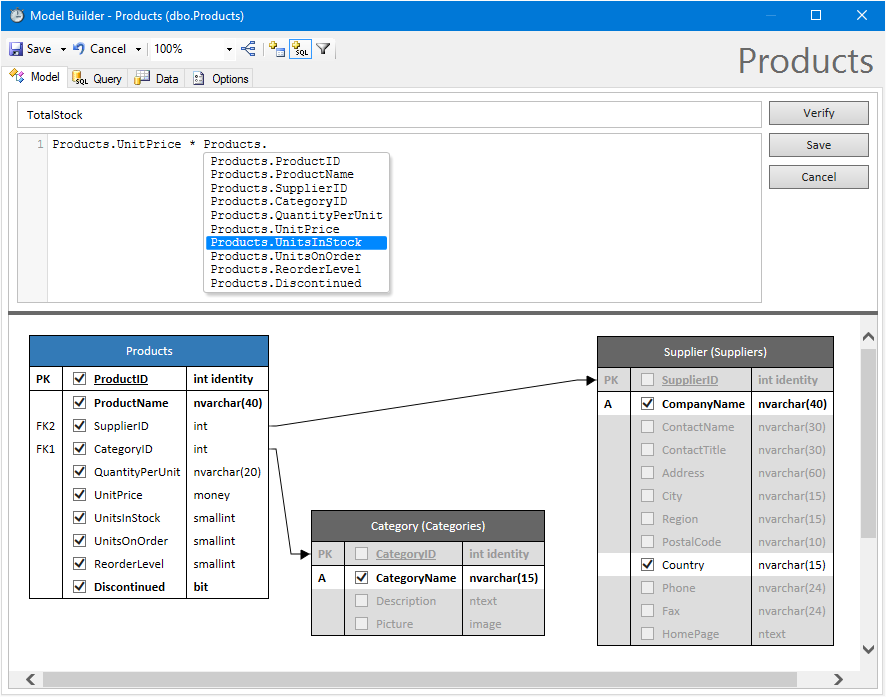
Creating new fields based on SQL formulas is also trivial with the Data Model Builder. Hit the “New SQL Formula” button on the toolbar, and type in your custom formula. You can also drag-and-drop from the diagram to compose the formula.
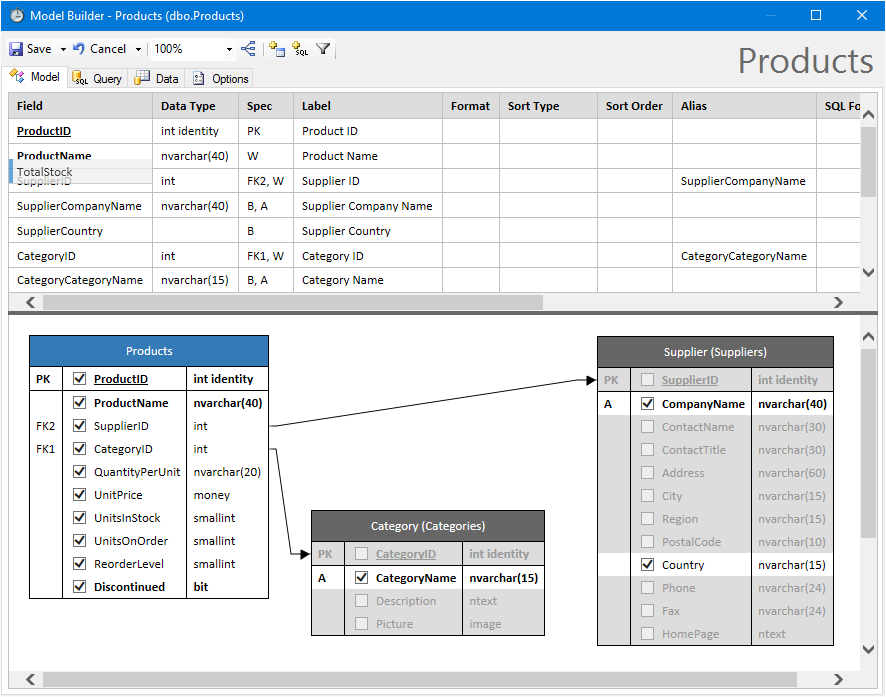
Want to change the order that the field is presented in the user interface? Use drag-and-drop to position the field in the order that you want.
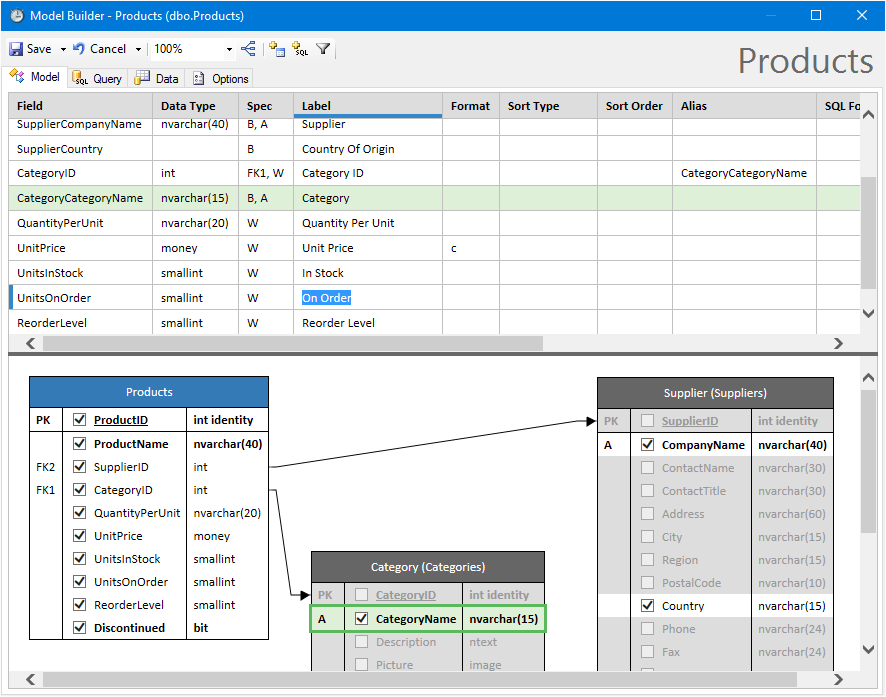
Writing labels and descriptions for each field in the user interface is a time-consuming process. Instead of finding each and every place where the field is referred to, simply type in a label to used to refer to the field. This label will be used globally throughout all labels, column headers, and sorting / filtering descriptions.
The data can be quickly filtered by adding a WHERE expression to the data model.
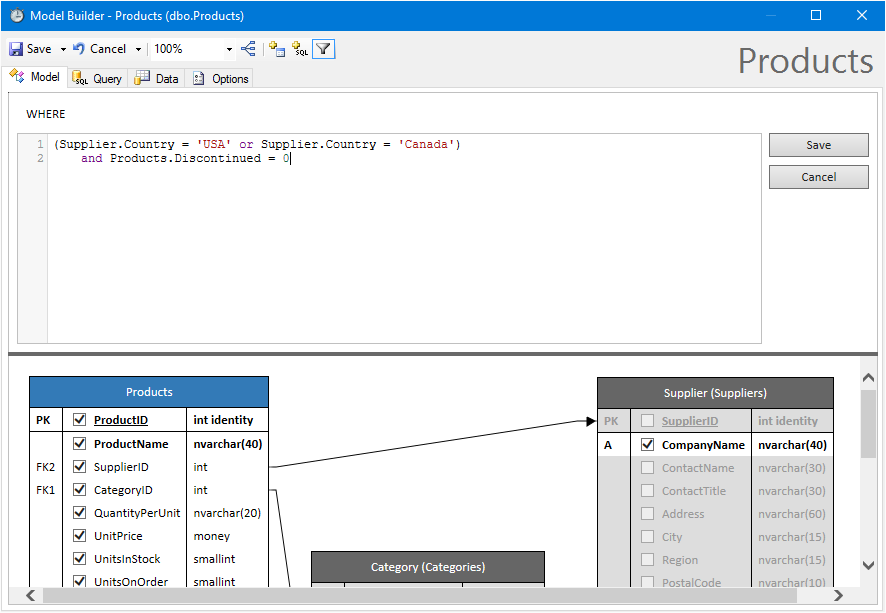
On the “Query” tab of the Data Model Builder, you can view the automatically created SQL query for this model – every action performed by the user will use this query as a dictionary in order to dynamically create the relevant Create, Read, Update, and Delete scripts. Think of all the hours saved composing generic queries for each business object!

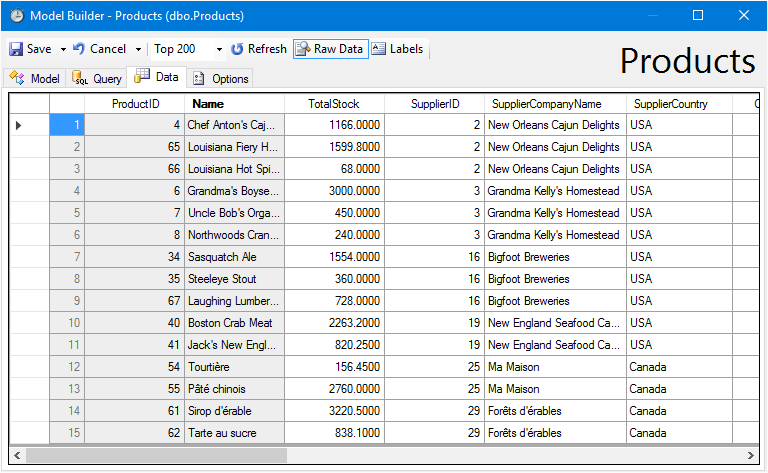
The “Data” tab will show a preview of the expected output given the current design of the data model. It shows a list of records that are selected when the query is executed. By default, “Raw Data” mode is enabled – this will display both “text” field of lookups, as well as the “value” foreign key field, used by the backend. Any data format strings will not be applied.
Disabling Raw Data mode will show a more accurate representation that the end user will see. Value fields will be hidden in favor of the display text, and data formats will be applied.
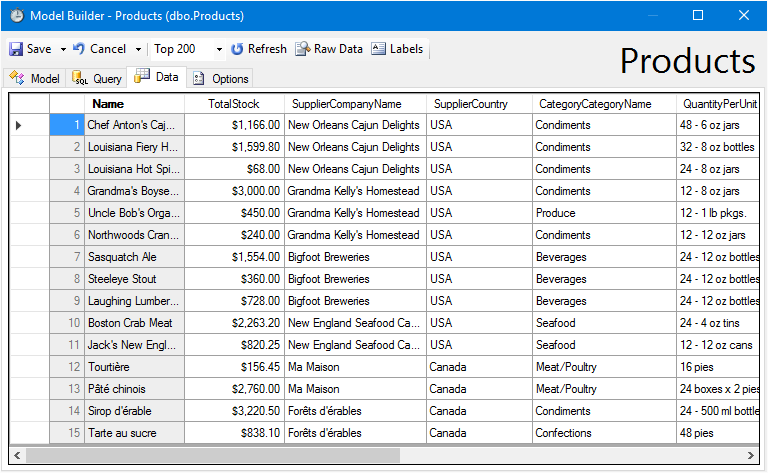
The “Show Labels” button will switch the column headers between the column name, and the label defined on the field list.
Once the data model is ready, the next step is to generate the application. The application will start once the process is complete. A Products page will have been automatically added.
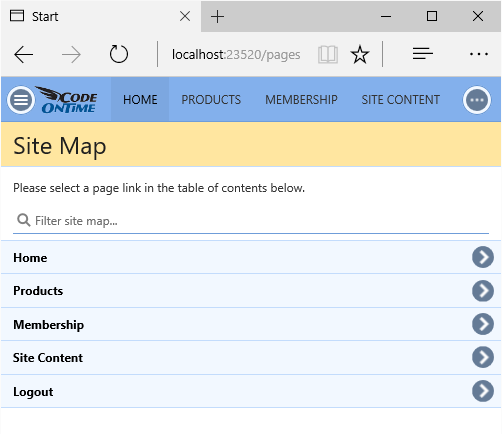
The Products page shows a grid of records, defined by the data model. A standard set of actions and views have been added to controller, enabling users to create new records, update existing records, or delete records.
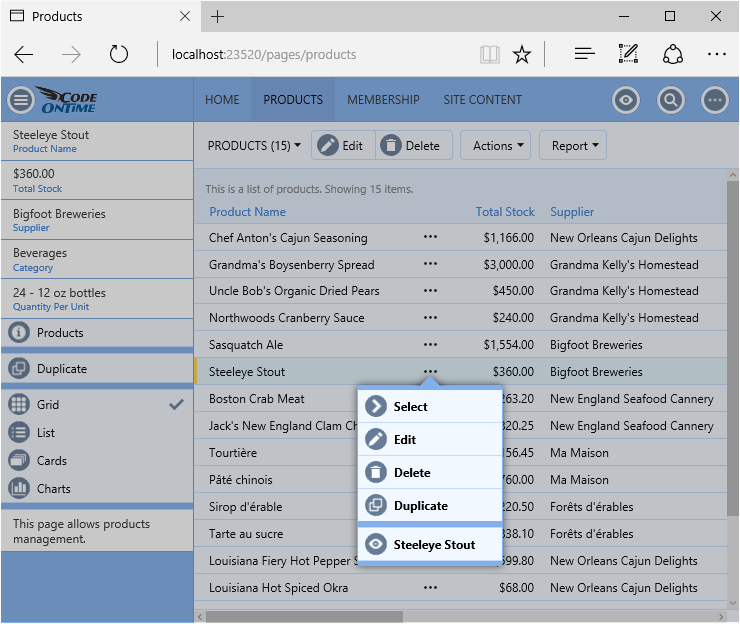
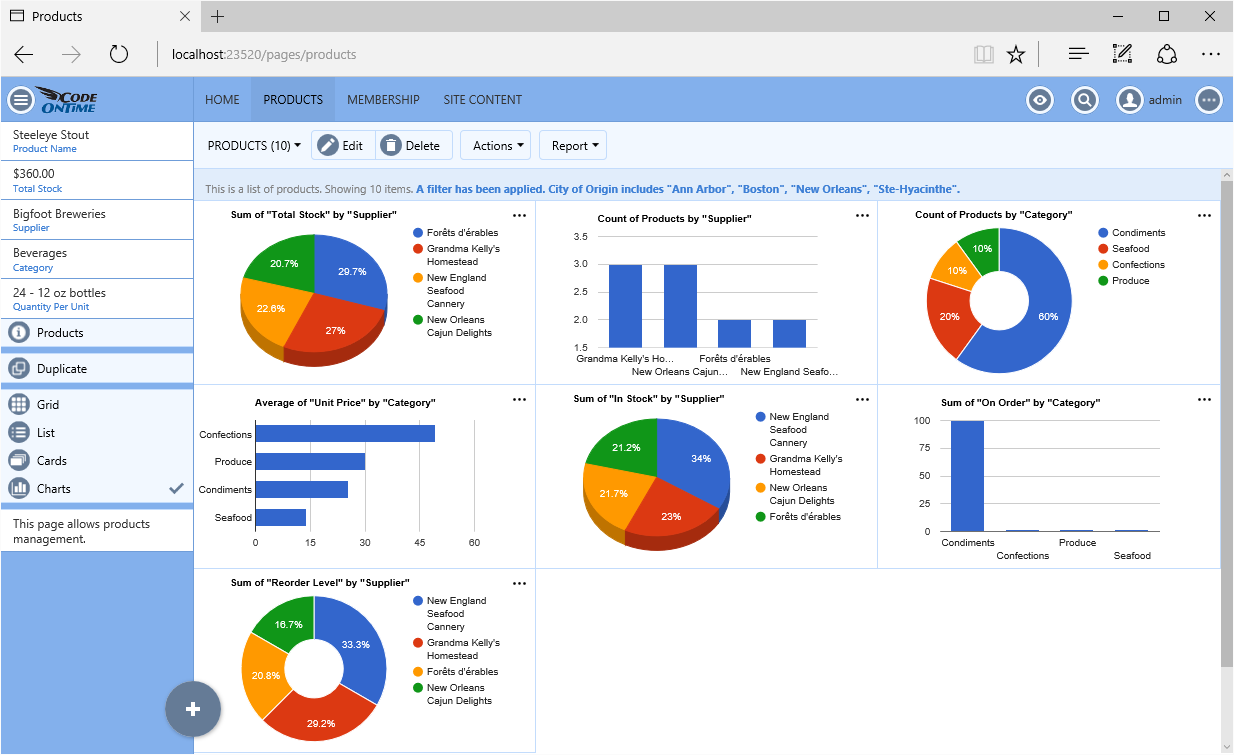
Standard features have also been added, including sorting, filtering, reporting, charting, geolocation, and scheduling.
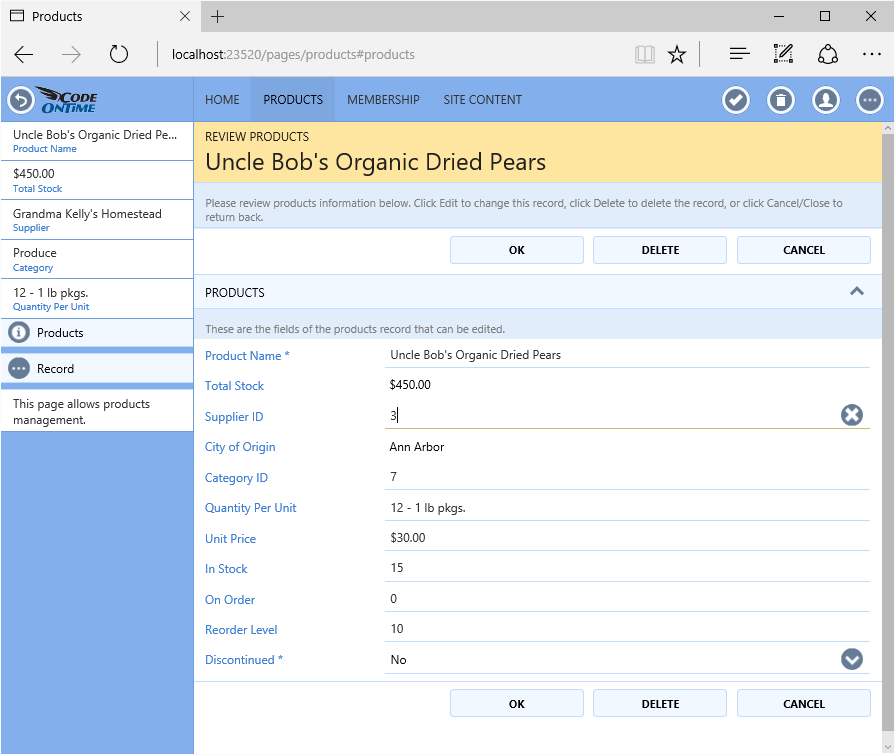
In the example below, notice that something is missing! The Category and Supplier foreign key lookups show the text value when the record is read-only, but the integer value is displayed when the user is editing the record. This field has not been configured as a lookup because there is no definition for what a “Supplier” or “Category” entity is yet.
A typical application would dictate that a custom lookup will need to be created, with a script for selecting suppliers and categories from the database. Using Code On Time app generator, simply define a data model for both Supplier and Category, and the field will automatically be configured to render a lookup that provides access to a grid of relevant records. Pages will also be added to allow editing of these lookup values as individual records.

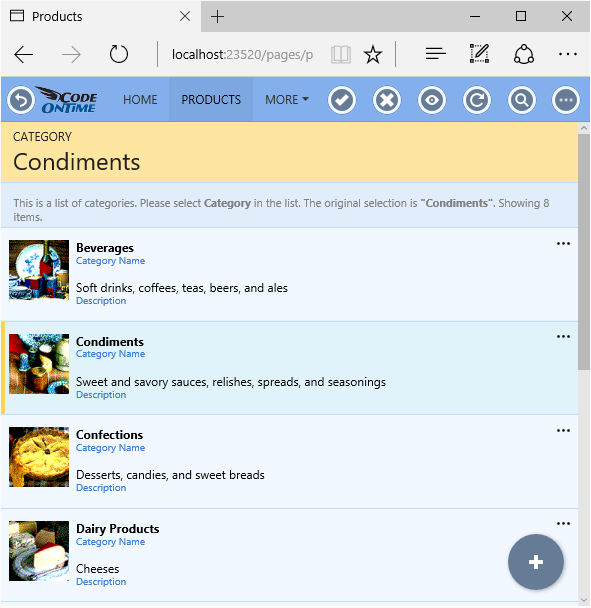
Clicking on the name of the Category or Supplier will activate the lookup, revealing the grid view for that entity. Selecting a category will use that category as the lookup value.
The generator also enables direct manipulation of the data controllers created from the models. Simply activate the Project Designer, and all pages, controllers, and user controls are individually customizable. Changes made to the controllers will be integrated with the data model.
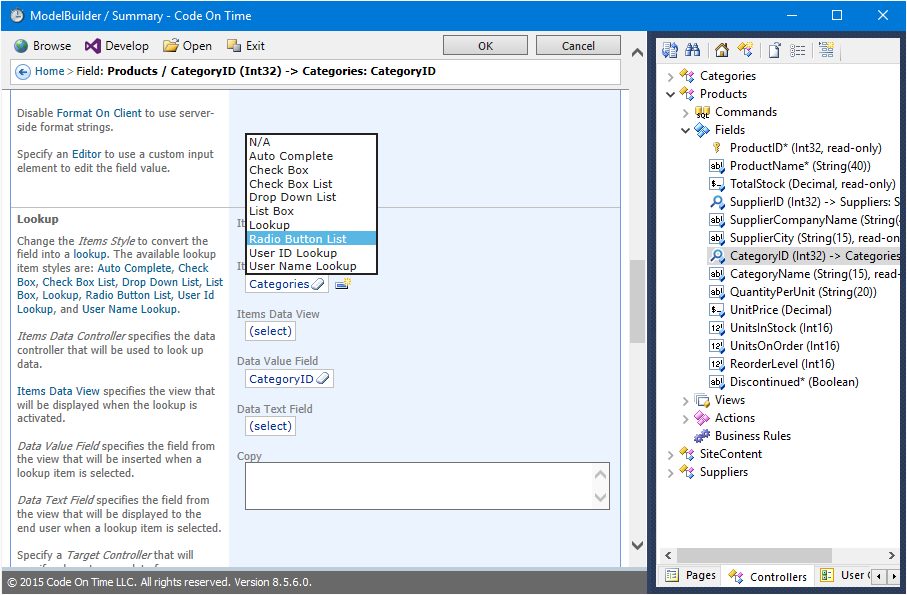
For example, suppose that the Categories lookup needs to be a radio button list. Using the Project Explorer on the right side of the screen, one can find the relevant field definition, and modify the rendering of that field directly.
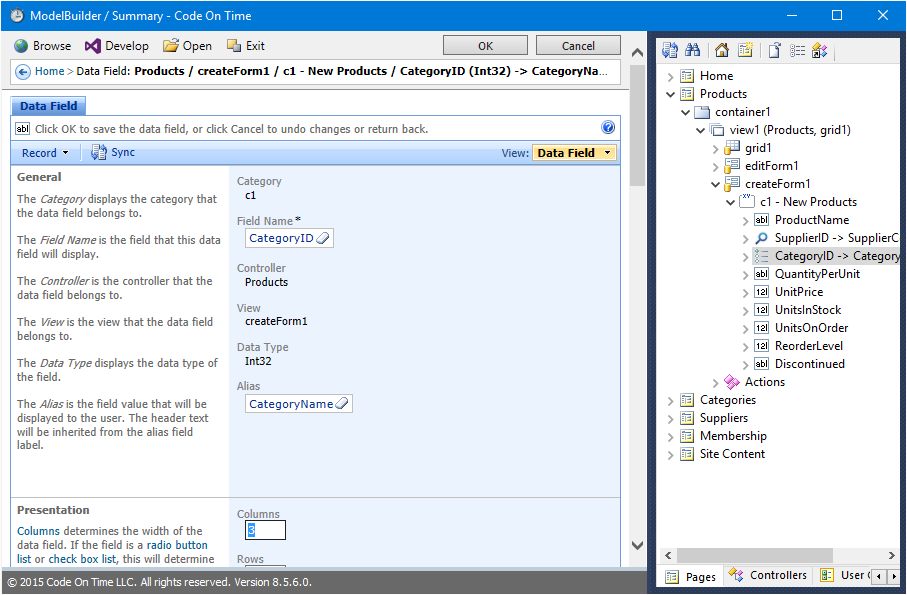
The specific binding of a field to a data view on the page can also be altered. The radio button list can be made to render in three columns in the create form on the Products page.
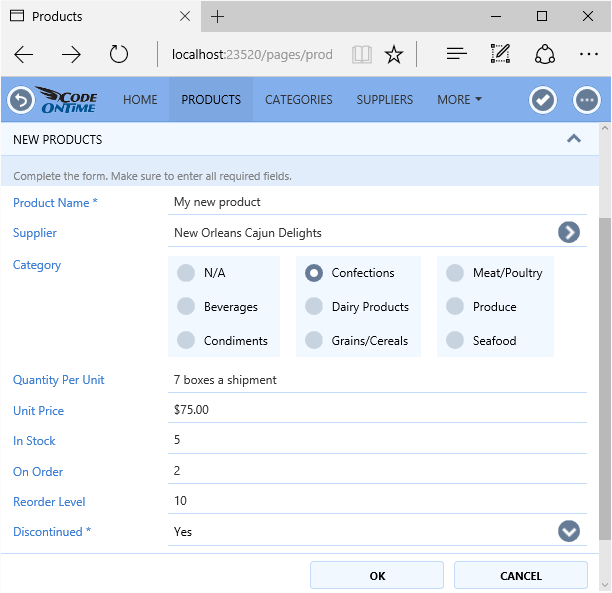
Generating the application will reveal that the Category lookup is now a radio button list, rendered in three columns.
If further, specific, customizations are required, the generated code base can be extended with additional behavior. Custom stylesheets enable the altering of application appearance. Custom controls can be added to further enhance the functionality of the application beyond the already impressive capabilities of the generated codebase.
The rapid development of premium applications is made easy with an intelligent framework that de-couples data schema from the presentation and behavior. Various tools allow customization at each stage of application generation.
In any business, having the right toolbox makes all the difference. Develop apps quickly and easily using the capabilities of Code On Time premium application generator today!